Page 114 of 420

ADJUSTING THE HEADLIGHTS WHEN
ABROAD
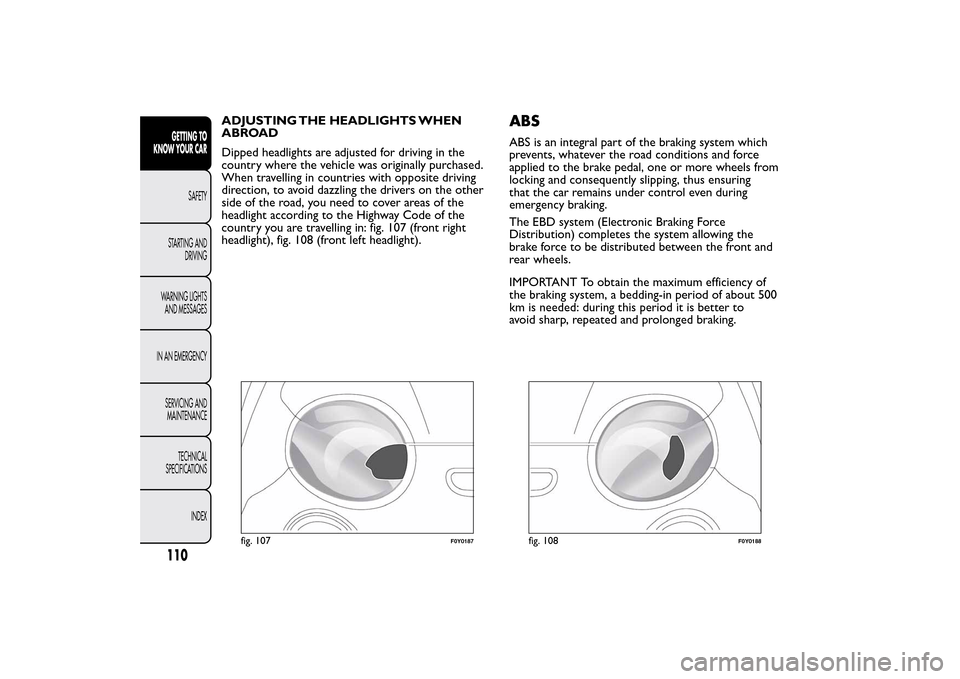
Dipped headlights are adjusted for driving in the
country where the vehicle was originally purchased.
When travelling in countries with opposite driving
direction, to avoid dazzling the drivers on the other
side of the road, you need to cover areas of the
headlight according to the Highway Code of the
country you are travelling in: fig. 107 (front right
headlight), fig. 108 (front left headlight).
ABSABS is an integral part of the braking system which
prevents, whatever the road conditions and force
applied to the brake pedal, one or more wheels from
locking and consequently slipping, thus ensuring
that the car remains under control even during
emergency braking.
The EBD system (Electronic Braking Force
Distribution) completes the system allowing the
brake force to be distributed between the front and
rear wheels.
IMPORTANT To obtain the maximum efficiency of
the braking system, a bedding-in period of about 500
km is needed: during this period it is better to
avoid sharp, repeated and prolonged braking.
fig. 107
F0Y0187
fig. 108
F0Y0188
110GETTING TO
KNOW YOUR CAR
SAFETY
STARTING AND
DRIVING
WARNING LIGHTS
AND MESSAGES
IN AN EMERGENCY
SERVICING AND
MAINTENANCE
TECHNICAL
SPECIFICATIONS
INDEX
Page 178 of 420

Electrical devices
Only use electrical devices for the amount of time
needed. The heated rear window, additional
headlights, windscreen/rear window wipers and
heater fan need a considerable amount of energy,
therefore increasing fuel consumption (by up to 25%
in the urban cycle).
Climate control system
The use of the climate control system leads to higher
fuel consumption. If the temperature outside
permits, try to use ventilation only.
Devices for aerodynamic control
The use of non-certified devices for aerodynamic
control may adversely affect air drag and fuel
consumption.
DRIVING STYLE
Starting
Do not warm up the engine at low or high revs when
the car is stationary; this causes the engine to warm
up more slowly, thereby increasing fuel consumption
and emissions.
It is advisable to set off immediately and slowly,
avoiding high revs: this allows the engine to warm up
more quickly.Unnecessary actions
Avoid revving up when at traffic lights or before
stopping the engine. This and also double declutching
is absolutely pointless on modern cars and also
increases consumption and pollution.
Gear selection
Use a higher gear as soon as traffic and road
conditions allow. Using a low gear for faster
acceleration will increase consumption.
In the same way improper use of a high gear
increases consumption, emissions and engine wear.
Maximum speed
Fuel consumption increases considerably with speed.
Keep speed as constant as possible, avoiding
unnecessary braking and acceleration, which have a
significant cost in terms of both fuel consumption
and emissions.
Acceleration
Sudden acceleration has a very negative effect on fuel
consumption and emissions: accelerate gradually.
174GETTING TO KNOW
YOUR CAR
SAFETYSTARTING AND
DRIVINGWARNING LIGHTS
AND MESSAGES
IN AN EMERGENCY
SERVICING AND
MAINTENANCE
TECHNICAL
SPECIFICATIONS
INDEX
Page 213 of 420

CHANGING A BULBGENERAL INSTRUCTIONS
❒Before changing a bulb check the contacts for
oxidation;
❒burnt bulbs must be replaced by others of the
same type and power;
❒after replacing a headlight bulb, always check the
correct alignment of the light beam;
❒when a light is not working, check that the
corresponding fuse is intact before changing a bulb.
For the location of fuses, refer to the paragraph
“If a fuse blows” in this section;
WARNING
Modifications or repairs to the electric
system that are not carried out properly
or do not take the system technical
specifications into account can cause
malfunctions leading to the risk of fire.
WARNING
Halogen bulbs contain pressurised gas,
in the case of breakage they may burst
causing glass fragments to be projected
outwards.
Halogen bulbs must be handled holding
the metal part only.Touching the
transparent part of the bulb with your
fingers may reduce the intensity of the emitted
light and even reduce the lifespan of the bulb. In
the event of accidental contact , wipe the bulb
with a cloth moistened with alcohol and let the
bulb dry.Where possible, it is advisable to have
bulbs changed at a Fiat Dealership.The
correct operation and direction of the
external lights are absolutely essential for the
safety of the car and of compliance with the law.
IMPORTANT When the weather is cold or damp
or after heavy rain or washing, the surface of
headlights or rear lights, may steam up and/or form
drops of condensation on the inside. This is a natural
phenomenon due to the difference in temperature
and humidity between the inside and the outside
of the glass which does not indicate a fault and does
not compromise the normal operation of lighting
devices. The mist disappears quickly when the lights
are turned on, starting from the centre of the
diffuser, extending progressively towards the edges.
209GETTING TO KNOW
YOUR CAR
SAFETY
STARTING AND
DRIVING
WARNING LIGHTS
AND MESSAGESIN AN
EMERGENCYSERVICING AND
MAINTENANCE
TECHNICAL
SPECIFICATIONS
INDEX
Page 215 of 420
LightsUse Type Power Ref. Figure
Dipped/main beam headlights H7 55W D
Front side lights/Day lights (DRL) W21/5W 21W/5W B
Rear side lights/Brake lights P21/5 W 21W/5W B
Front direction indicators WY21W 21 W B
Side direction indicators WY5W 5 W A
Rear direction indicators P21W 21 W B
3°Stop LED – –
Fog lights H11 55W E
Reverse W16W 16 W B
Rear fog lights W16W 16 W B
Number plate C5W 5 W C
Front roof light C5W 5 W C
Front roof lights (sun visors) C5W 5 W C
Luggage compartment roof light W5W 5 W A
Glove compartment light C5W 5 W C
Rear courtesy lights C5W 5 W C
211GETTING TO KNOW
YOUR CAR
SAFETY
STARTING AND
DRIVING
WARNING LIGHTS
AND MESSAGESIN AN
EMERGENCYSERVICING AND
MAINTENANCE
TECHNICAL
SPECIFICATIONS
INDEX
Page 216 of 420
REPLACING EXTERIOR BULBSFor the type of bulb and power rating, see “Changing
a bulb" paragraph.
FRONT UPPER LIGHT CLUSTER
This contains the bulbs for direction indicators and
dipped beams.
The bulbs are arranged as follows fig. 170:A
Direction indicators
BDipped beam headlightsDIRECTION INDICATORS
To change the bulb, proceed as follows:
❒remove cover A fig. 170;
❒turn bulb holder B fig. 171 clockwise, extract bulb
C and replace it;
❒refit the new bulb on the bulb holder, making sure
it is correctly locked;
❒refit the bulb holder in its housing and turn it
clockwise, until the locking click is heard;
❒then refit the cover A fig. 170.fig. 170
F0Y0021
fig. 171
F0Y0022
212GETTING TO KNOW
YOUR CAR
SAFETY
STARTING AND
DRIVING
WARNING LIGHTS
AND MESSAGES
IN AN
EMERGENCY
SERVICING AND
MAINTENANCE
TECHNICAL
SPECIFICATIONS
INDEX
Page 217 of 420
DIPPED BEAM HEADLIGHTS
To change the bulb, proceed as follows:
❒remove cover B fig. 170;
❒remove the connector + bulb holder C fig. 172
unit, releasing it outwards;
❒remove bulb D from connector E and replace it;
❒refit the new bulb on the connector, making sure it
is correctly locked;
❒refit the connector + bulb holder C unit in its
housing;
❒then refit the cover B fig. 170.FRONT LOWER LIGHT CLUSTER
This contains the bulbs for the main beams and side
lights/daytime running lights (DRL).
The bulbs are arranged as follows fig. 173:
C
Main beam headlights
D
Side lights/daytime running lights (DRL)
fig. 172
F0Y0023
fig. 173
F0Y0024
213GETTING TO KNOW
YOUR CAR
SAFETY
STARTING AND
DRIVING
WARNING LIGHTS
AND MESSAGESIN AN
EMERGENCYSERVICING AND
MAINTENANCE
TECHNICAL
SPECIFICATIONS
INDEX
Page 218 of 420
MAIN BEAM HEADLIGHTS
To change the bulb, proceed as follows:
❒steer the wheel completely inwards;
❒undo the screws A fig. 174 and remove the flap B;
❒remove cover C fig. 173;
❒remove the connector + bulb holder D fig. 175
unit, releasing it outwards;
❒remove the bulb E from connector F and replace
it;❒refit the new bulb on the connector, making sure it
is correctly locked;
❒refit the connector + bulb holder D unit in its
housing;
❒finally refit cover C fig. 173.
fig. 174
F0Y0145
fig. 175
F0Y0025
214GETTING TO KNOW
YOUR CAR
SAFETY
STARTING AND
DRIVING
WARNING LIGHTS
AND MESSAGES
IN AN
EMERGENCY
SERVICING AND
MAINTENANCE
TECHNICAL
SPECIFICATIONS
INDEX
Page 243 of 420

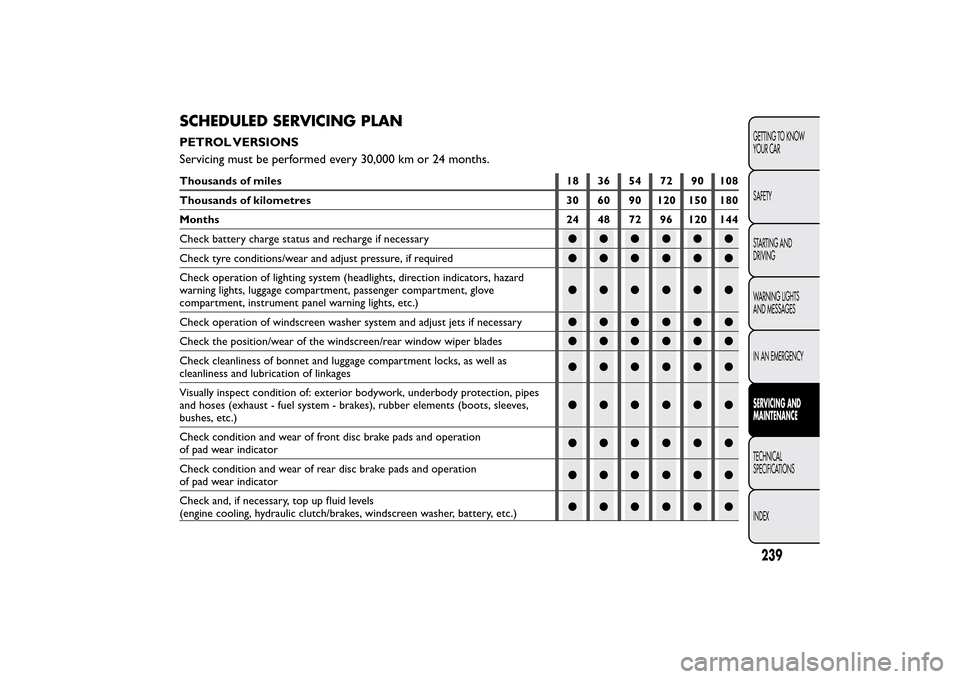
SCHEDULED SERVICING PLANPETROL VERSIONS
Servicing must be performed every 30,000 km or 24 months.Thousands of miles 18 36 54 72 90 108
Thousands of kilometres 30 60 90 120 150 180
Months 24 48 72 96 120 144
Check battery charge status and recharge if necessary●●●●●●
Check tyre conditions/wear and adjust pressure, if required●●●●●●
Check operation of lighting system (headlights, direction indicators, hazard
warning lights, luggage compartment, passenger compartment, glove
compartment, instrument panel warning lights, etc.)●●●●●●
Check operation of windscreen washer system and adjust jets if necessary●●●●●●
Check the position/wear of the windscreen/rear window wiper blades●●●●●●
Check cleanliness of bonnet and luggage compartment locks, as well as
cleanliness and lubrication of linkages●●●●●●
Visually inspect condition of: exterior bodywork, underbody protection, pipes
and hoses (exhaust - fuel system - brakes), rubber elements (boots, sleeves,
bushes, etc.)●●●●●●
Check condition and wear of front disc brake pads and operation
of pad wear indicator●●●●●●
Check condition and wear of rear disc brake pads and operation
of pad wear indicator●●●●●●
Check and, if necessary, top up fluid levels
(engine cooling, hydraulic clutch/brakes, windscreen washer, battery, etc.)●●●●●●
239GETTING TO KNOW
YOUR CAR
SAFETY
STARTING AND
DRIVING
WARNING LIGHTS
AND MESSAGES
IN AN EMERGENCYSERVICING AND
MAINTENANCETECHNICAL
SPECIFICATIONS
INDEX