Page 96 of 420
PASSENGER SIDE FRONT DOOR AND
REAR DOOR EMERGENCY LOCKING
DEVICE
The passenger side front door and the rear doors
have a device to lock them when there is no
electrical power supply.
In this case proceed as follows:
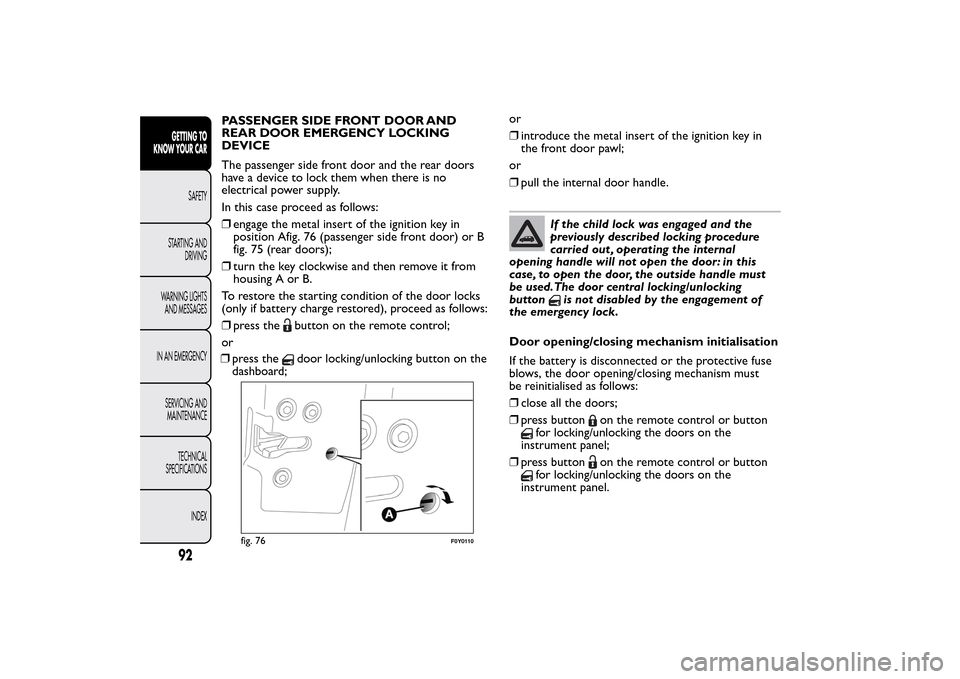
❒engage the metal insert of the ignition key in
position Afig. 76 (passenger side front door) or B
fig. 75 (rear doors);
❒turn the key clockwise and then remove it from
housing A or B.
To restore the starting condition of the door locks
(only if battery charge restored), proceed as follows:
❒press the
button on the remote control;
or
❒press thedoor locking/unlocking button on the
dashboard;or
❒introduce the metal insert of the ignition key in
the front door pawl;
or
❒pull the internal door handle.
If the child lock was engaged and the
previously described locking procedure
carried out , operating the internal
opening handle will not open the door: in this
case, to open the door, the outside handle must
be used.The door central locking/unlocking
button
is not disabled by the engagement of
the emergency lock.
Door opening/closing mechanism initialisation
If the battery is disconnected or the protective fuse
blows, the door opening/closing mechanism must
be reinitialised as follows:
❒close all the doors;
❒press button
on the remote control or button
for locking/unlocking the doors on the
instrument panel;
❒press button
on the remote control or button
for locking/unlocking the doors on the
instrument panel.
fig. 76
F0Y0110
92GETTING TO
KNOW YOUR CAR
SAFETY
STARTING AND
DRIVING
WARNING LIGHTS
AND MESSAGES
IN AN EMERGENCY
SERVICING AND
MAINTENANCE
TECHNICAL
SPECIFICATIONS
INDEX
Page 102 of 420
CLOSING
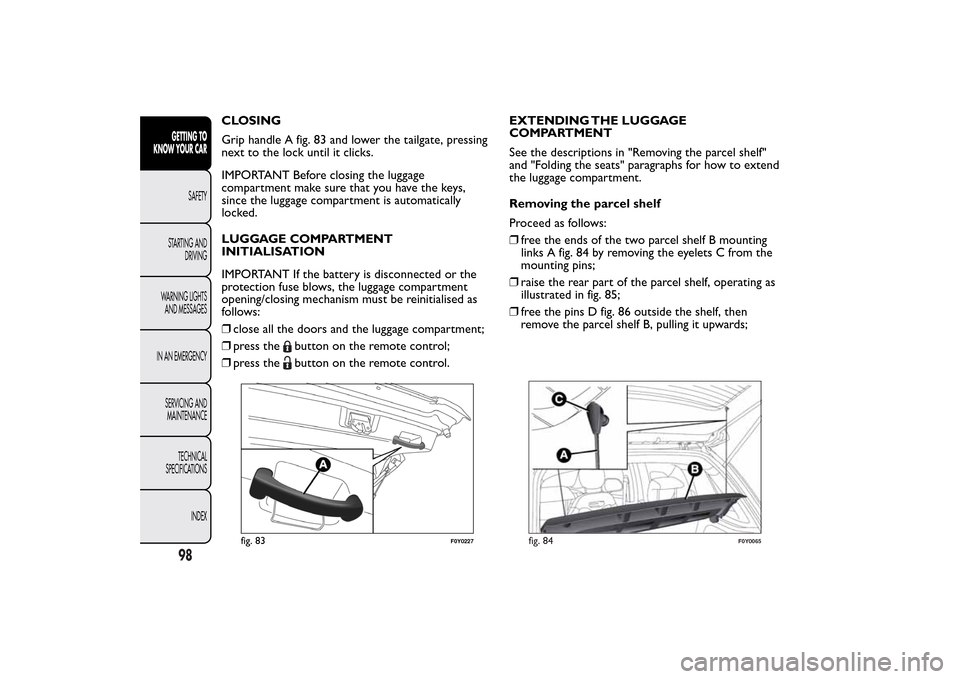
Grip handle A fig. 83 and lower the tailgate, pressing
next to the lock until it clicks.
IMPORTANT Before closing the luggage
compartment make sure that you have the keys,
since the luggage compartment is automatically
locked.
LUGGAGE COMPARTMENT
INITIALISATION
IMPORTANT If the battery is disconnected or the
protection fuse blows, the luggage compartment
opening/closing mechanism must be reinitialised as
follows:
❒close all the doors and the luggage compartment;
❒press the
button on the remote control;
❒press thebutton on the remote control.EXTENDING THE LUGGAGE
COMPARTMENT
See the descriptions in "Removing the parcel shelf"
and "Folding the seats" paragraphs for how to extend
the luggage compartment.
Removing the parcel shelf
Proceed as follows:
❒free the ends of the two parcel shelf B mounting
links A fig. 84 by removing the eyelets C from the
mounting pins;
❒raise the rear part of the parcel shelf, operating as
illustrated in fig. 85;
❒free the pins D fig. 86 outside the shelf, then
remove the parcel shelf B, pulling it upwards;
fig. 83
F0Y0227
fig. 84
F0Y0065
98GETTING TO
KNOW YOUR CAR
SAFETY
STARTING AND
DRIVING
WARNING LIGHTS
AND MESSAGES
IN AN EMERGENCY
SERVICING AND
MAINTENANCE
TECHNICAL
SPECIFICATIONS
INDEX
Page 133 of 420
When the CITY function is on, the steering wheel
effort is lighter, parking operations are easier:
therefore this function is particularly useful for
driving in city centres.
WARNING
It is absolutely forbidden to carr y out
any after-market operation involving
steering system or steering column
modifications (e.g.: installation of anti-theft
device) that could badly affect performance and
safety, invalidate warranty and also result in
non-compliance of the car with type approval
requirements.
IMPORTANT During parking manoeuvres requiring a
lot of steering, the steering may become harder;
this is normal and is due to the intervention of the
system to protect the electric steering motor from
overheating. No repair intervention is needed in this
case. When the car is used again, the power steering
will work normally again.
WARNING
Before performing any maintenance
operations, always turn off the engine
and remove the key from the ignition to lock
the steering column (especially when the car
wheels are not touching the ground). If this
is not possible (for example if the key needs to
be turned to MAR-ON or the engine must be
running), remove the main fuse that protects
the electric power steering.
129GETTING TO
KNOW YOUR CARSAFETY
STARTING AND
DRIVING
WARNING LIGHTS
AND MESSAGES
IN AN EMERGENCY
SERVICING AND
MAINTENANCE
TECHNICAL
SPECIFICATIONS
INDEX
Page 195 of 420
WARNING
Vehicle travel speed should always be
adapted to the traffic and weather
conditions, and must always comply with traffic
regulations.The engine can be stopped even if
the DPF warning light is on: however, repeated
interruptions of the regeneration process could
cause premature deterioration of the engine oil.
For this reason, it is always advisable to wait
for the warning light to go off before turning
the engine off, following the instructions
appearing above. Do not complete the DPF
regeneration process when the vehicle is
stopped.GENERIC FAILURE INDICATION
(amber)
(for versions/markets, where provided)
The warning light switches on in the following
circumstances. In these cases contact a Fiat
Dealership to have the fault fixed as soon as possible.
Speed limit exceeded
(for versions/markets, where provided)
The warning light switches on when the speed limit
set in the Setup menu is exceeded.
When the car exceeds this value, on some versions a
message and a symbol are shown on the display and
an acoustic signal is emitted.Fuel cut-off system intervention/fault
(for versions/markets, where provided)
The warning light switches on (together with a
message on the display) in the event of fuel cut-off
system intervention/fault.
Exterior lights failure
The warning light will come on when a fault to one
of the following lights is detected:
❒daytime running lights (DRLs) (for versions/
markets, where provided);
❒side lights;
❒direction indicators;
❒rear fog light;
❒reversing light;
❒number plate lights;
❒brake lights (for versions with multifunction display
only).
The failure relating to these lights could be: one or
more blown bulbs, a blown protection fuse or a
break in the electrical connection.
191GETTING TO KNOW
YOUR CAR
SAFETY
STARTING AND
DRIVINGWARNING LIGHTS
AND MESSAGESIN AN EMERGENCY
SERVICING AND
MAINTENANCE
TECHNICAL
SPECIFICATIONS
INDEX
Page 213 of 420
CHANGING A BULBGENERAL INSTRUCTIONS
❒Before changing a bulb check the contacts for
oxidation;
❒burnt bulbs must be replaced by others of the
same type and power;
❒after replacing a headlight bulb, always check the
correct alignment of the light beam;
❒when a light is not working, check that the
corresponding fuse is intact before changing a bulb.
For the location of fuses, refer to the paragraph
“If a fuse blows” in this section;
WARNING
Modifications or repairs to the electric
system that are not carried out properly
or do not take the system technical
specifications into account can cause
malfunctions leading to the risk of fire.
WARNING
Halogen bulbs contain pressurised gas,
in the case of breakage they may burst
causing glass fragments to be projected
outwards.
Halogen bulbs must be handled holding
the metal part only.Touching the
transparent part of the bulb with your
fingers may reduce the intensity of the emitted
light and even reduce the lifespan of the bulb. In
the event of accidental contact , wipe the bulb
with a cloth moistened with alcohol and let the
bulb dry.Where possible, it is advisable to have
bulbs changed at a Fiat Dealership.The
correct operation and direction of the
external lights are absolutely essential for the
safety of the car and of compliance with the law.
IMPORTANT When the weather is cold or damp
or after heavy rain or washing, the surface of
headlights or rear lights, may steam up and/or form
drops of condensation on the inside. This is a natural
phenomenon due to the difference in temperature
and humidity between the inside and the outside
of the glass which does not indicate a fault and does
not compromise the normal operation of lighting
devices. The mist disappears quickly when the lights
are turned on, starting from the centre of the
diffuser, extending progressively towards the edges.
209GETTING TO KNOW
YOUR CAR
SAFETY
STARTING AND
DRIVING
WARNING LIGHTS
AND MESSAGESIN AN
EMERGENCYSERVICING AND
MAINTENANCE
TECHNICAL
SPECIFICATIONS
INDEX
Page 229 of 420
REPLACING FUSESGENERAL INFORMATION
Fuses protect the electrical system: they intervene
(blow) in the event of a failure or improper
intervention on the system.
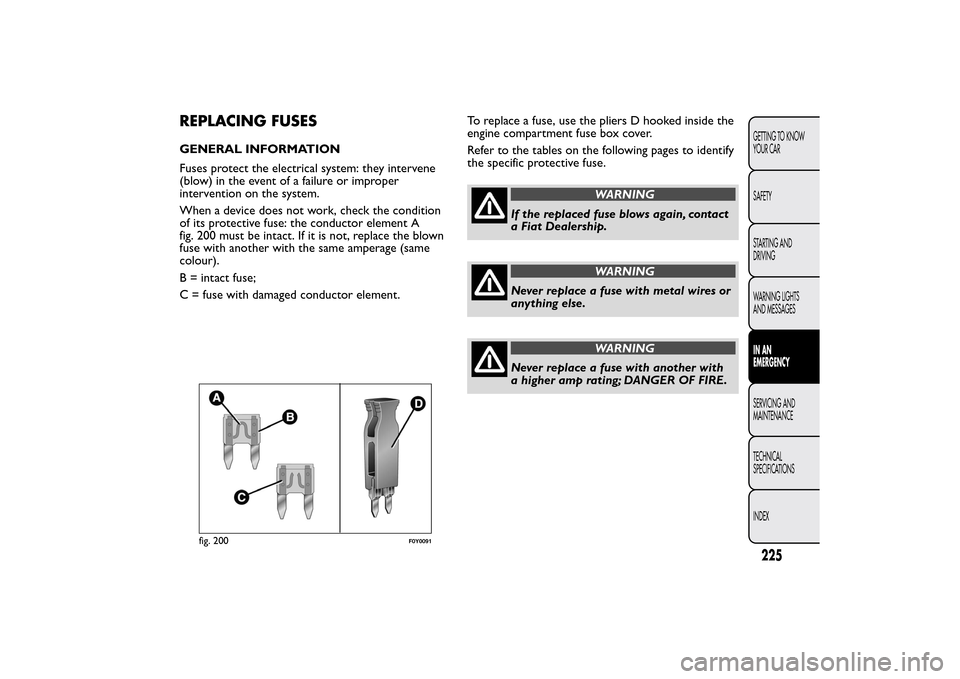
When a device does not work, check the condition
of its protective fuse: the conductor element A
fig. 200 must be intact. If it is not, replace the blown
fuse with another with the same amperage (same
colour).
B = intact fuse;
C = fuse with damaged conductor element.To replace a fuse, use the pliers D hooked inside the
engine compartment fuse box cover.
Refer to the tables on the following pages to identify
the specific protective fuse.
WARNING
If the replaced fuse blows again, contact
a Fiat Dealership.
WARNING
Never replace a fuse with metal wires or
anything else.
WARNING
Never replace a fuse with another with
a higher amp rating; DANGER OF FIRE.
fig. 200
F0Y0091
225GETTING TO KNOW
YOUR CAR
SAFETY
STARTING AND
DRIVING
WARNING LIGHTS
AND MESSAGESIN AN
EMERGENCYSERVICING AND
MAINTENANCE
TECHNICAL
SPECIFICATIONS
INDEX
Page 230 of 420
WARNING
If a general fuse (MEGA-FUSE,
MIDI-FUSE, MAXI-FUSE) blows contact
a Fiat Dealership.
WARNING
Before replacing a fuse, make sure that
the ignition key has been removed
and that all the other services are switched off
and/or disengaged.
WARNING
If a general protection fuse for safety
systems (airbag system, braking system),
power unit systems (engine system, transmission
system) or steering system is triggered, contact
a Fiat Dealership.
226GETTING TO KNOW
YOUR CAR
SAFETY
STARTING AND
DRIVING
WARNING LIGHTS
AND MESSAGES
IN AN
EMERGENCY
SERVICING AND
MAINTENANCE
TECHNICAL
SPECIFICATIONS
INDEX
Page 231 of 420
FUSE LOCATION
Engine compartment fuse box
This is located by the side of the battery fig. 202.
To access the fuses, proceed as follows:
❒undo the two screws A fig. 201;
❒remove cover B in the direction indicated by the
arrow.
IMPORTANT Before removing cover B press and
turn the two bayonet screws A slowly anticlockwise
(using the flat tip screwdriver provided) until
unlocking them. This is shown by the screw heads
lifting.
The number identifying the electrical component
corresponding to each fuse is shown on the cover.
After replacing the fuse, make sure you close cover B
on the fusebox.
If it is necessary to wash the engine
compartment , take care not to directly hit
the fuse box and the window wiper
motors with the water jet .
fig. 201
F0Y0071
fig. 202
F0Y0072
227GETTING TO KNOW
YOUR CAR
SAFETY
STARTING AND
DRIVING
WARNING LIGHTS
AND MESSAGESIN AN
EMERGENCYSERVICING AND
MAINTENANCE
TECHNICAL
SPECIFICATIONS
INDEX