Page 125 of 192

123
5
SAFETY
Airbags
FRONT AIRBAGS
The front airbags are fitted in the centre of
the steering wheel for the driver and in the
dashboard for the front passenger.
Deployment
They are deployed simultaneously, unless
the passenger's front airbag has been
deactivated, in the event of a serious front
impact.
The front airbag inflates between the front
occupant of the vehicle and the dashboard
to cushion their forward movement.
Deactivation of the passenger's airbag
Only the passenger's front airbag can be
deactivated. The airbag is deactivated from
the trip computer.
The airbag warning lamp in the
instrument panel is on while the
airbag is deactivated. To assure the safety of your child, you
must deactivate the passenger airbag
when you install a reaward facing child seat
on the front passenger seat. Otherwise, the
child would risk being killed or seriously
injured if the airbag were to inflate.
Refer to the "MENU" section of
chapter 3, then select OFF
on the
"Passenger airbag" menu.
Operating fault
If the two airbag warning lamps are on
continuously, do not install a rearward
facing child seat.
Have it checked by a CITROËN dealer or a
qualified workshop.
If this warning lamp comes
on in the instrument panel,
accompanied by an audible signal
and a message in the screen,
contact a CITROËN dealer or a qualified
workshop without delay to have the system
checked. The airbags may no longer be
deployed in the event of a serious impact.
Page 126 of 192

124
Airbags
For the airbags to be fully effective,
observe the following safety rules:
Sit in a normal upright position.
Wear a correctly adjusted seat belt.
Do not leave anything between the
occupants and the airbags (a child, pet,
object...). This could hamper the operation
of the airbags or injure the occupants.
After an accident or if the vehicle has been
stolen or broken into, have the airbag
systems checked.
All work on the airbag systems must be
carried out by a CITROËN dealer or a
qualified workshop.
Even if all of the precautions mentioned are
observed, a risk of injury or of slight burns
to the head, chest or arms when an airbag
is deployed cannot be ruled out. In fact,
the bag inflates almost instantly (within a
few milliseconds) then deflates within the
same time, discharging the hot gas through
openings provided for this purpose.
Front airbags
Do not drive holding the steering wheel
by its spokes or resting your hands on the
centre part of the wheel.
Passengers must not place their feet on the
dashboard.
Smoke as little as possible as deployment
of the airbags can cause burns or the risk of
injury from a cigarette or pipe.
Never remove or pierce the steering wheel
or hit it violently.
Lateral airbags
Only put approved covers on the seats,
compatible with the deployment of lateral
airbags. For information on the range of
seat covers suitable for your vehicle, you
can contact a CITROËN dealer. Refer to the
"Accessories" section.
Do not fix or attach anything to the seat
backs. This could cause injury to the chest
or arms when the lateral airbag inflates.
Do not sit with the upper part of the body
any nearer to the door than necessary.
Page 139 of 192
137
6
ACCESSORIES
Towing a trailer
TOWING A TRAILER, CARAVAN, ETC...
Driving advice
As the fan is electrically controlled, its
cooling capacity is not dependent on the
engine speed.
On the contrary, use a high gear to lower the
engine speed and reduce your speed. In all cases, pay attention to the coolant
temperature. A towed vehicle must free wheel: gearbox in
neutral.
Cooling:
towing a trailer on a slope
increases the coolant temperature.
Page 142 of 192

140
Equipment
Range of accessories for private vehicles
Another range is also available from
CITROËN dealers.
"Comfort":
insulated module, coat hanger fixed to a
head restraint, reading lamp, rear parking
sensors...
"Transport solutions":
boot liner, rear door net, set of transverse
and longitudinal roof bars, roof boxes...
"Style":
embellishers, secure wheel embellishers...
"Security and safety":
anti-intrusion alarm, window etching,
breathalyzer, first aid kit, high visibility vest,
warning triangle, child seats and booster
cushions, snow chains...
"Protection":
rubber mats, over-carpets, 3D mats, seat
covers compatible with lateral airbags, sets
of front and rear mudflaps...
"Multimedia":
audio systems, hands-free kit, speakers,
portable satellite navigation systems, speed
camera detectors, Wi-Fi on board...
By going to a CITROËN dealer, you can also
obtain cleaning and maintenance products
(interior and exterior) - including ecological
products from the "TECHNATURE" range -
products for topping up (screenwash...),
touch-up pens and paint aerosols for the
exact colour of your vehicle, recharges
(cartridge for the temporary puncture repair
kit...), ...
To avoid any risk of jamming of the pedals:
- ensure that the mat is positioned and
secured correctly,
- never fit one mat on top of another.
Page 146 of 192

144
Changing a wheel
CHANGING A WHEEL
Parking the vehicle
As far as possible, park the vehicle on level,
stable and non-slippery ground.
Apply the parking brake, switch off the
ignition and engage first gear (on a hill).
It is imperative that you ensure that the
occupants get out of the vehicle and wait in
a safe location.
If possible, place a chock under the
wheel diagonally opposite the wheel to be
changed.
Tools
The tools required are stored in a tool kit
located behind the driver's seat (Light van)
or behind the rear bench seat (Combi).
1.
Wheelbrace.
2.
Centring guide.
3.
Screwdriver.
4.
Jack with handle.
5.
Removable towing eye.
The jack and all of the tools are specific
to your vehicle. Do not use them for other
purposes.
Never go underneath the vehicle when it is
raised only by the jack; use an axle stand.
Taking out the spare wheel
The spare wheel retaining bolt is located on
the rear left part of the loading sill.
1.
Slacken the wheel retaining bolt using the
wheelbrace.
2.
Unscrew fully to unwind the winch cable.
3.
Take out the spare wheel using the
wheelbrace.
4.
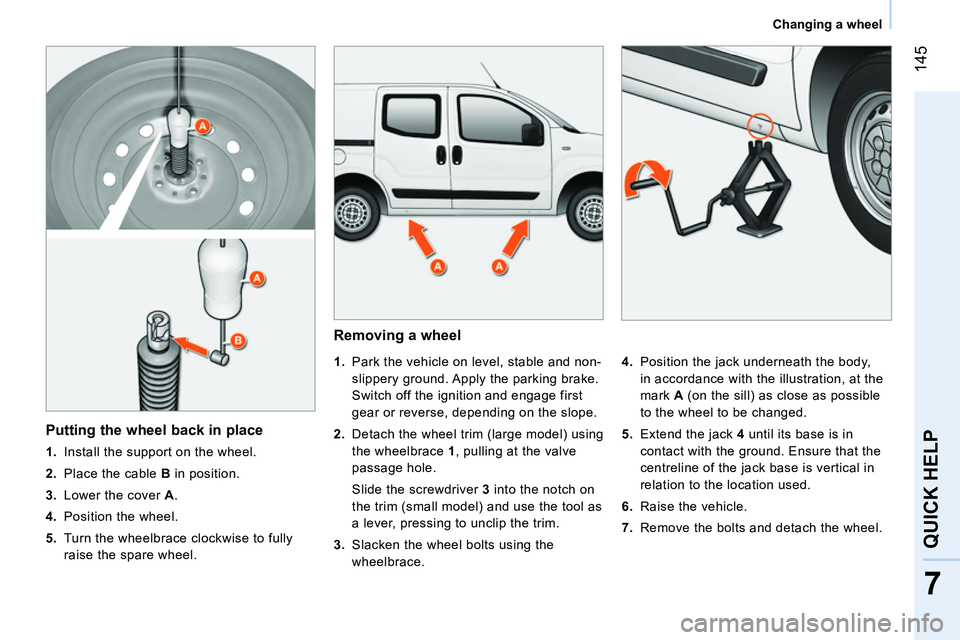
Raise the cover A
.
5.
Remove the cable B
from its housing.
6.
Release the spare wheel and place it
near the wheel to be changed.
Page 147 of 192

145
7
QUICK HELP
Changing a wheel
Removing a wheel
1.
Park the vehicle on level, stable and non-
slippery ground. Apply the parking brake.
Switch off the ignition and engage first
gear or reverse, depending on the slope.
2.
Detach the wheel trim (large model) using
the wheelbrace 1
, pulling at the valve
passage hole.
Slide the screwdriver 3
into the notch on
the trim (small model) and use the tool as
a lever, pressing to unclip the trim.
3.
Slacken the wheel bolts using the
wheelbrace.
4.
Position the jack underneath the body,
in accordance with the illustration, at the
mark A
(on the sill) as close as possible
to the wheel to be changed.
5.
Extend the jack 4
until its base is in
contact with the ground. Ensure that the
centreline of the jack base is vertical in
relation to the location used.
6.
Raise the vehicle.
7.
Remove the bolts and detach the wheel.
Putting the wheel back in place
1.
Install the support on the wheel.
2.
Place the cable B
in position.
3.
Lower the cover A
.
4.
Position the wheel.
5.
Turn the wheelbrace clockwise to fully
raise the spare wheel.
Page 148 of 192
146
Changing a wheel
Refitting a wheel
6.
Put the trim back in place, starting by
placing its notch facing the valve, and
press with the palm of your hand.
7.
Stow the tools and the wheel.
8.
Check the tyre pressure (see
"Identification markings") and have the
balance checked. Refer to the "Identification markings"
section of chapter 8 to locate the
tyre label.
Have the tightening of the bolts and the
pressure of the spare wheel checked by a
CITROËN dealer or a qualified workshop
without delay.
1.
Put the wheel in place using the centring
guide 2
to assist you.
2.
Screw in the 3 bolts by hand and remove
the centring guide. Position the 4th bolt.
3.
Pre-tighten using the wheelbrace 1
.
4.
Fold the jack 4
and detach it.
5.
Tighten the wheel bolts using the
wheelbrace. Also, have the original wheel repaired
and refitted by a CITROËN dealer
or a qualified workshop as soon as
possible.
Page 149 of 192

147
7
QUICK HELP
Changing a wheel
TEMPORARY PUNCTURE REPAIR KIT
This kit is located at the front of the
passenger compartment. It consists of:
- a repair cartridge A
, containing the
sealant, equipped with:
●
a fi lling pipe B
,
●
a sticker C
indicating "max. 80 km/h", which
the driver must affi x to the dashboard in a
visible position after repairing the tyre,
- a compressor D
equipped with a pressure
gauge and unions,
- adaptors for the inflation of various items,
- a pair of protective gloves,
- a quick guide to use of the temporary
puncture repair kit.
Repair procedure
- Apply the parking brake and place the
gear lever in neutral.
- Unscrew the valve cap of the tyre to be
repaired.
- Take out the filling pipe B
and screw the
ring E
onto the tyre valve.
- Check that the on/off switch F
on the
compressor is in position "0"
(off).
- Start the engine.
- Insert the connector G
in the nearest
12 V accessory socket in the vehicle.
- Place the compressor's on/off switch F
in
position "1"
(on).
- Inflate the tyre to a pressure of 3 bars.
To obtain a more accurate reading, you are
advised to check the pressure value on the
pressure gauge H
, with the compressor off. This temporary puncture repair kit is
available from CITROËN dealers.
It is provided for the repair of holes of
a maximum diameter of 4 mm, located
exclusively on the tread or side wall of the
tyre. Avoid removing any foreign bodies
which have penetrated into the tyre.