Page 189 of 260

9.25
06
JUMPY-ATLANTE-VP_EN_CHAP09B_RT6-2-7_ED01-2014
TRAFFIC INFORMATION
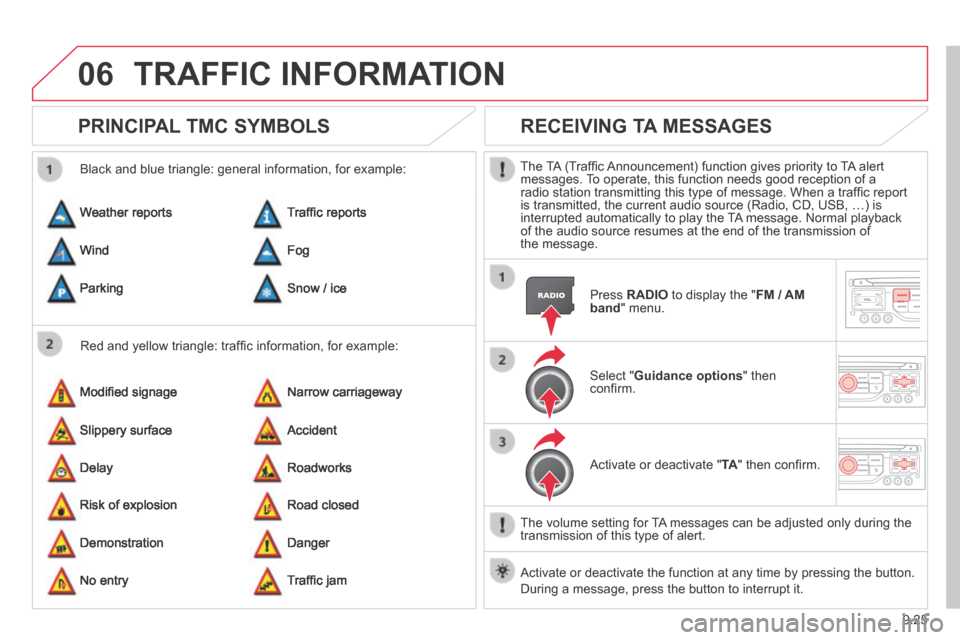
PRINCIPAL TMC SYMBOLS
Red and yellow triangle: traffi c information, for example:
Black and blue triangle: general information, for example:
Weather reports
Modifi ed signage
Risk of explosion
Traffi c reports
Narrow carriageway
Road closed
Wind
Slippery surface
Demonstration
Fog
Accident
Danger
Parking
Delay
No entry
Snow / ice
Roadworks
Traffi c jam
RECEIVING TA MESSAGES
The TA (Traffi c Announcement) function gives priority to TA alert messages. To operate, this function needs good reception of a radio station transmitting this type of message. When a traffi c report is transmitted, the current audio source (Radio, CD, USB, …) is interrupted automatically to play the TA message. Normal playback of the audio source resumes at the end of the transmission of the message.
Press RADIO to display the " FM / AM band " menu.
Select " Guidance options " then confi rm.
Activate or deactivate " TA " then confi rm.
The volume setting for TA messages can be adjusted only during the transmission of this type of alert.
Activate or deactivate the function at any time by pressing the button. \
During a message, press the button to interrupt it.
Page 193 of 260

9.29
07
JUMPY-ATLANTE-VP_EN_CHAP09B_RT6-2-7_ED01-2014
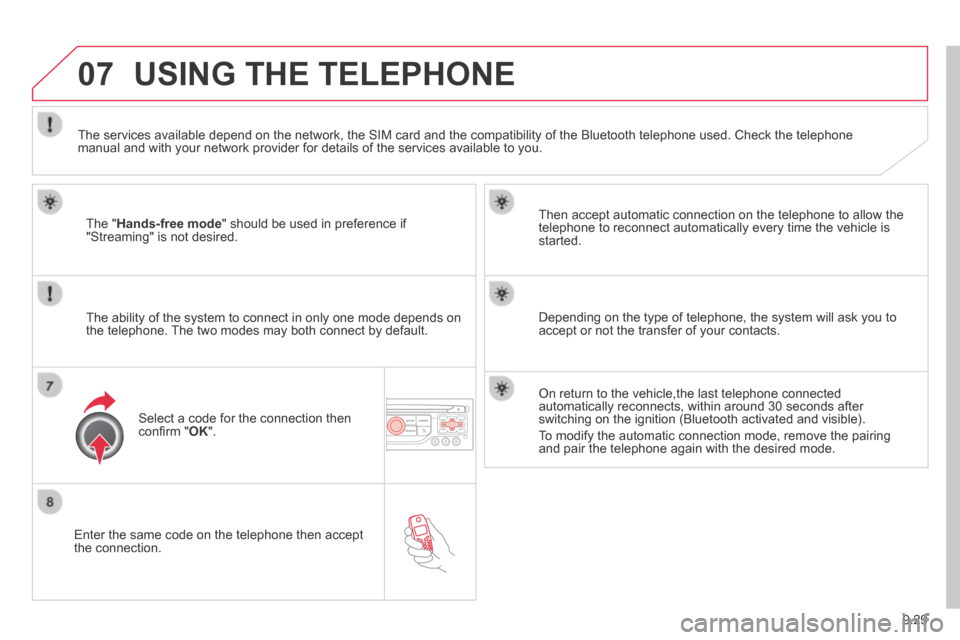
Enter the same code on the telephone then accept the connection.
Then accept automatic connection on the telephone to allow the telephone to reconnect automatically every time the vehicle is started.
The ability of the system to connect in only one mode depends on the telephone. The two modes may both connect by default.
USING THE TELEPHONE
The " Hands-free mode " should be used in preference if "Streaming" is not desired.
The services available depend on the network, the SIM card and the compa\
tibility of the Bluetooth telephone used. Check the telephone manual and with your network provider for details of the services availa\
ble to you.
Select a code for the connection then confi rm " OK ".
Depending on the type of telephone, the system will ask you to accept or not the transfer of your contacts.
On return to the vehicle,the last telephone connected automatically reconnects, within around 30 seconds after switching on the ignition (Bluetooth activated and visible).
To modify the automatic connection mode, remove the pairing and pair the telephone again with the desired mode.
Page 197 of 260
9.33
07
JUMPY-ATLANTE-VP_EN_CHAP09B_RT6-2-7_ED01-2014
USING THE TELEPHONE
CALLING A RECENTLY ENTERED NUMBER
Press TEL , select " Call list " and confi rm,
Select the desired number and confi rm.
To erase the calls log, press PHONE twice, select " Phone functions " and confi rm then select " Delete calls log " and confi rm.
ENDING A CALL
Press PHONE then select " OK " to end the call.
Or make a long press on TEL at the steering mounted controls.
Or make two short presses on TEL at the steering mounted controls.
Or press the MODE button, as many times as necessary, until the telephone screen is displayed.
Press PHONE to display the calls log.
or
Press " OK " to display the contextual menu then select " Hang up " and confi rm.
Page 199 of 260
9.35
07
JUMPY-ATLANTE-VP_EN_CHAP09B_RT6-2-7_ED01-2014
USING THE TELEPHONE
OPTIONS DURING A CALL *
During a call, press the MODE button several times to select display of the telephone screen, then press " OK " to open the contextual menu.
Select " Private mode " and confi rm to take the call on the handset.
Or select " Hands-free mode " and confi rm to take the call via the vehicle's speakers.
Select " Put call on hold " and confi rm to put the current call on hold.
Or select " Resume the call " and confi rm to resume the call on hold.
Select " DTMF ring tones " to use the numerical keypad, so as to navigate through the menu of an interactive vocal server.
Select " Hang up " to end the call.
* Depending on the compatibility of the phone and your service plan.
It is possible to hold a 3-way conference call by making 2 calls in succession*. Select " Conference mode call " in the contextual menu accessible using this button.
Or make a short press on this button.
Page 207 of 260

9.43
09
JUMPY-ATLANTE-VP_EN_CHAP09B_RT6-2-7_ED01-2014
MUSIC MEDIA PLAYERS
CD, MP3 CD / USB PLAYER
The audio equipment will only play audio fi les with ".wma, .aac, .fl ac, .ogg and .mp3" fi le extensions and with a bit rate of between 32 Kbps and 320 Kbps.
It also supports VBR (Variable Bit Rate) mode.
No other type of fi le (.mp4, .m3u…) can be played.
WMA fi les must be of the standard wma 9 type.
The sampling rates supported are 11, 22, 44 and 48 KHz.
It is advisable to restrict fi le names to 20 characters, without using of special characters (e.g.: " " ? ; ù) to avoid any playing and displ\
aying problems.
In order to be able to play a recorded CDR or CDRW, when recording it is preferable to select the ISO 9660 level 1, 2 or Joliet standard.
If the disc is recorded in another format it may not be played correctly\
.
It is recommended that the same recording standard is always used for an individual disc, with as low a speed as possible (4x maximum) for optimum sound quality.
In the particular case of a multi-session CD, the Joliet standard is recommended.
INFORMATION AND ADVICE
The system supports USB mass storage or iPod devices via the USB port (suitable cable not supplied).
If a partitioned USB memory key is connected to the system, only the fi rst partition is recognised.
Control of the peripheral device is with the audio system controls.
The number of tracks is limited to 2000 maximum, 999 tracks per folder.
If the current consumption at the USB port exceeds 500 mA, the system goes into protection mode and deactivates the port.
Other peripherals, not recognised on connection, must be connected to the auxiliary socket using a Jack cable (not supplied).
In order to be read, a USB memory stick must be formatted FAT 16 or 32.
The system does not support the operation of an Apple ® player and a ® player and a ®
USB memory stick connected at the same time.
It is recommended that offi cial Apple ® USB cables are used to ensure ® USB cables are used to ensure ®
correct operation.
Page 208 of 260

9.44
09
JUMPY-ATLANTE-VP_EN_CHAP09B_RT6-2-7_ED01-2014
MUSIC MEDIA PLAYERS
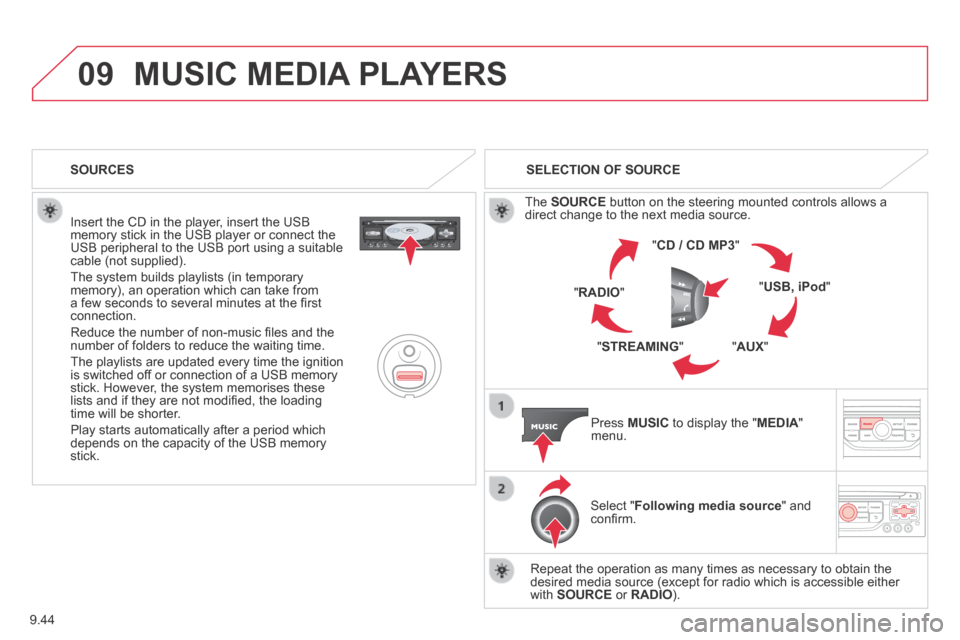
Insert the CD in the player, insert the USB memory stick in the USB player or connect the USB peripheral to the USB port using a suitable cable (not supplied).
The system builds playlists (in temporary memory), an operation which can take from a few seconds to several minutes at the fi rst connection.
Reduce the number of non-music fi les and the number of folders to reduce the waiting time.
The playlists are updated every time the ignition is switched off or connection of a USB memory stick. However, the system memorises these lists and if they are not modifi ed, the loading time will be shorter.
Play starts automatically after a period which depends on the capacity of the USB memory stick.
SELECTION OF SOURCE
The SOURCE button on the steering mounted controls allows a direct change to the next media source.
" CD / CD MP3 "
" USB, iPod "
" AUX " " STREAMING "
" RADIO "
Press MUSIC to display the " MEDIA " menu.
Select " Following media source " and confi rm.
Repeat the operation as many times as necessary to obtain the desired media source (except for radio which is accessible either with SOURCE or RADIO ).
SOURCES
Page 213 of 260
9.49
10
JUMPY-ATLANTE-VP_EN_CHAP09B_RT6-2-7_ED01-2014
CONFIGURATION
SETTING THE DATE AND TIME
Select the setting to adjust.
Confi rm by pressing OK , then adjust the setting and confi rm again to save the modifi cation.
Press SETUP to display the " Confi guration " menu.
Adjust the settings one by one.
Then select " OK " on the screen and confi rm to save the settings.
Select " Synchronize the minutes with GPS " so that setting the minutes is done automatically by satellite reception.
Select " Display confi guration " and confi rm.
Select " Set date and time " and confi rm.
Page 215 of 260

9.51
11
JUMPY-ATLANTE-VP_EN_CHAP09B_RT6-2-7_ED01-2014
TRIP COMPUTER
TRIP COMPUTER
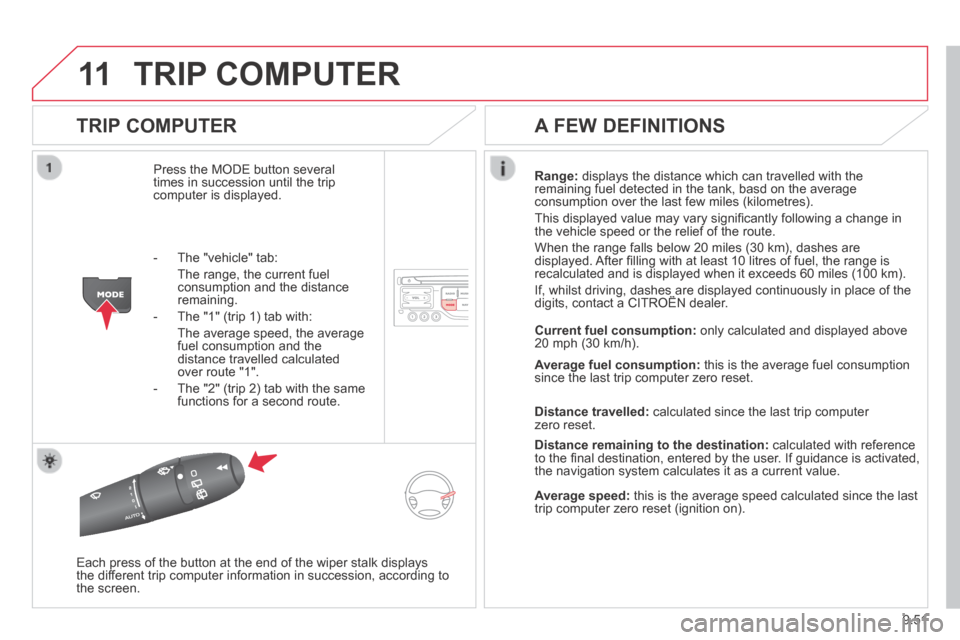
Press the MODE button several times in succession until the trip computer is displayed.
Range: displays the distance which can travelled with the remaining fuel detected in the tank, basd on the average consumption over the last few miles (kilometres).
This displayed value may vary signifi cantly following a change in the vehicle speed or the relief of the route.
When the range falls below 20 miles (30 km), dashes are displayed. After fi lling with at least 10 litres of fuel, the range is recalculated and is displayed when it exceeds 60 miles (100 km).
If, whilst driving, dashes are displayed continuously in place of the digits, contact a CITROËN dealer. If, whilst driving, dashes are displayed continuously in place of the digits, contact a CITROËN dealer. If, whilst driving, dashes are displayed continuously in place of the
Each press of the button at the end of the wiper stalk displays the different trip computer information in succession, according to the screen.
A FEW DEFINITIONS
- The "vehicle" tab:
The range, the current fuel consumption and the distance remaining.
- The "1" (trip 1) tab with:
The average speed, the average fuel consumption and the distance travelled calculated over route "1".
- The "2" (trip 2) tab with the same functions for a second route.
Current fuel consumption: only calculated and displayed above 20 mph (30 km/h).
Average fuel consumption: this is the average fuel consumption since the last trip computer zero reset.
Distance travelled: calculated since the last trip computer zero reset.
Distance remaining to the destination: calculated with reference to the fi nal destination, entered by the user. If guidance is activated, the navigation system calculates it as a current value.
Average speed: this is the average speed calculated since the last trip computer zero reset (ignition on).