Page 192 of 260

9.28
07
JUMPY-ATLANTE-VP_EN_CHAP09B_RT6-2-7_ED01-2014
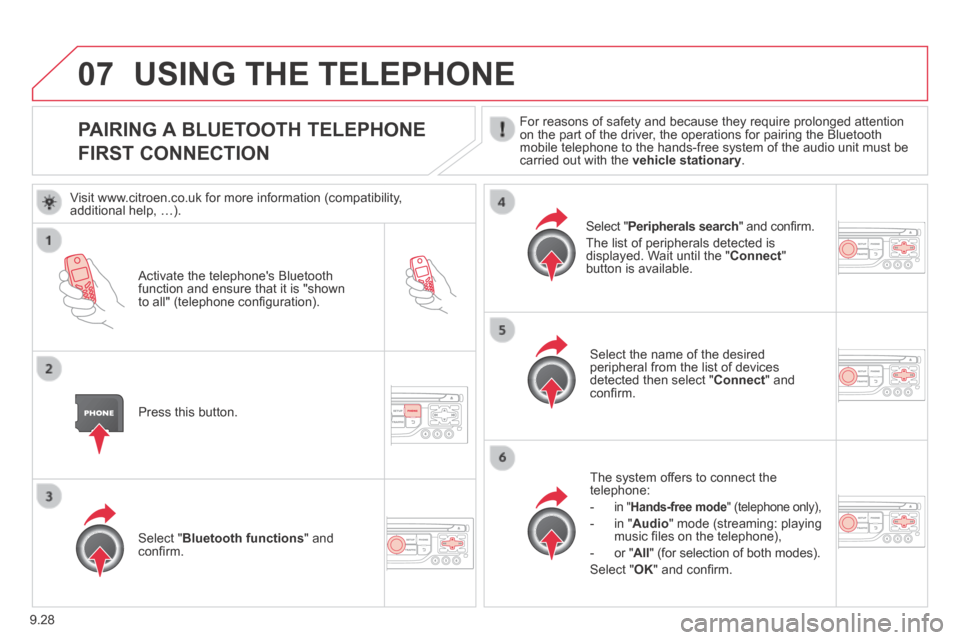
PAIRING A BLUETOOTH TELEPHONE
FIRST CONNECTION
For reasons of safety and because they require prolonged attention on the part of the driver, the operations for pairing the Bluetooth mobile telephone to the hands-free system of the audio unit must be carried out with the vehicle stationary .
Activate the telephone's Bluetooth function and ensure that it is "shown to all" (telephone confi guration).
Press this button.
Select the name of the desired peripheral from the list of devices detected then select " Connect " and confi rm.
The system offers to connect the telephone:
- in " Hands-free mode " (telephone only),
- in " Audio " mode (streaming: playing music fi les on the telephone),
- or " All " (for selection of both modes).
Select " OK " and confi rm.
Select " Bluetooth functions " and confi rm.
Select " Peripherals search " and confi rm.
The list of peripherals detected is displayed. Wait until the " Connect " button is available.
USING THE TELEPHONE
Visit www.citroen.co.uk for more information (compatibility, additional help, …).
Page 194 of 260

9.30
07
JUMPY-ATLANTE-VP_EN_CHAP09B_RT6-2-7_ED01-2014
USING THE TELEPHONE
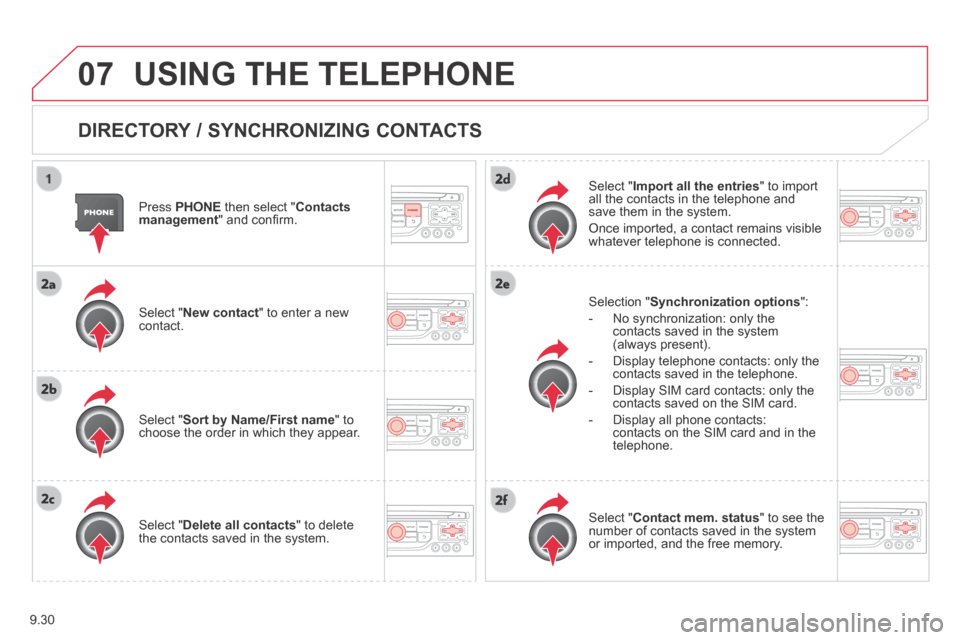
DIRECTORY / SYNCHRONIZING CONTACTS
Press PHONE then select " Contacts management " and confi rm.
Select " New contact " to enter a new contact.
Select " Sort by Name/First name " to choose the order in which they appear.
Select " Delete all contacts " to delete the contacts saved in the system.
Selection " Synchronization options ":
- No synchronization: only the contacts saved in the system (always present).
- Display telephone contacts: only the contacts saved in the telephone.
- Display SIM card contacts: only the contacts saved on the SIM card.
- Display all phone contacts: contacts on the SIM card and in the telephone.
Select " Import all the entries " to import all the contacts in the telephone and save them in the system.
Once imported, a contact remains visible whatever telephone is connected.
Select " Contact mem. status " to see the number of contacts saved in the system or imported, and the free memory.
Page 195 of 260
9.31
07
JUMPY-ATLANTE-VP_EN_CHAP09B_RT6-2-7_ED01-2014
MANAGING CONTACTS
Press PHONE then select " Directory of contacts " and confi rm.
Select the desired contact and confi rm.
Select " Import " to copy one contact to the system.
Select " Call " to start the call.
Select " Open " to view an external contact or modify a contact saved in the system.
Select OK
Select " Delete " to delete a contact saved in the system.
It is necessary to import an external contact to modify the record. It will be saved in the system. It is not possible to modify or delete contacts in the telephone or the SIM card via the Bluetooth connection.
USING THE TELEPHONE
or
press the back button to exit this menu.
Delete the addresses saved in the directory of contacts:
- Press on PHONE .
- Select "Directory of contacts".
- Select "Display contacts" and confi rm, then select the address.
- Select "Delete" and confi rm.
(This operation must be carried out contact by contact).
Page 197 of 260
9.33
07
JUMPY-ATLANTE-VP_EN_CHAP09B_RT6-2-7_ED01-2014
USING THE TELEPHONE
CALLING A RECENTLY ENTERED NUMBER
Press TEL , select " Call list " and confi rm,
Select the desired number and confi rm.
To erase the calls log, press PHONE twice, select " Phone functions " and confi rm then select " Delete calls log " and confi rm.
ENDING A CALL
Press PHONE then select " OK " to end the call.
Or make a long press on TEL at the steering mounted controls.
Or make two short presses on TEL at the steering mounted controls.
Or press the MODE button, as many times as necessary, until the telephone screen is displayed.
Press PHONE to display the calls log.
or
Press " OK " to display the contextual menu then select " Hang up " and confi rm.
Page 198 of 260
9.34
07
JUMPY-ATLANTE-VP_EN_CHAP09B_RT6-2-7_ED01-2014
USING THE TELEPHONE
RECEIVING A CALL
An incoming call is announced by a ring and a superimposed display on the screen.
"Yes " to accept the call is selected by default.
Press " OK " to accept the call.
Select " No " and confi rm to reject the call.
A short press on TEL accepts an incoming call.
A long press on TEL rejects an incoming call.
Page 199 of 260
9.35
07
JUMPY-ATLANTE-VP_EN_CHAP09B_RT6-2-7_ED01-2014
USING THE TELEPHONE
OPTIONS DURING A CALL *
During a call, press the MODE button several times to select display of the telephone screen, then press " OK " to open the contextual menu.
Select " Private mode " and confi rm to take the call on the handset.
Or select " Hands-free mode " and confi rm to take the call via the vehicle's speakers.
Select " Put call on hold " and confi rm to put the current call on hold.
Or select " Resume the call " and confi rm to resume the call on hold.
Select " DTMF ring tones " to use the numerical keypad, so as to navigate through the menu of an interactive vocal server.
Select " Hang up " to end the call.
* Depending on the compatibility of the phone and your service plan.
It is possible to hold a 3-way conference call by making 2 calls in succession*. Select " Conference mode call " in the contextual menu accessible using this button.
Or make a short press on this button.
Page 203 of 260
9.39
08
JUMPY-ATLANTE-VP_EN_CHAP09B_RT6-2-7_ED01-2014
RADIO
By alphabetical list
Press RADIO , select the station of your choice and confi rm.
By automatic frequency search
Press or for the automatic search for a lower or higher radio frequency.
Or turn the thumb wheel at the steering mounted controls.
By manual frequency search
Press or to adjust the radio frequency step by step.
SELECTING A STATION
The external environment (hill, building, tunnel, underground car park…\
) may interfere with the reception, including in RDS station tracking mode. This phenomenon is a normal result of the way in which radio waves are t\
ransmitted and does not in any way indicate a fault with the audio system.
The quality of reception is represented by the number of active waves in this symbol.
Press RADIO or OK to display the contextual menu.
CHANGING WAVEBAND
Select " Change waveband ".
Select " AM / FM " and confi rm.
Page 208 of 260

9.44
09
JUMPY-ATLANTE-VP_EN_CHAP09B_RT6-2-7_ED01-2014
MUSIC MEDIA PLAYERS
Insert the CD in the player, insert the USB memory stick in the USB player or connect the USB peripheral to the USB port using a suitable cable (not supplied).
The system builds playlists (in temporary memory), an operation which can take from a few seconds to several minutes at the fi rst connection.
Reduce the number of non-music fi les and the number of folders to reduce the waiting time.
The playlists are updated every time the ignition is switched off or connection of a USB memory stick. However, the system memorises these lists and if they are not modifi ed, the loading time will be shorter.
Play starts automatically after a period which depends on the capacity of the USB memory stick.
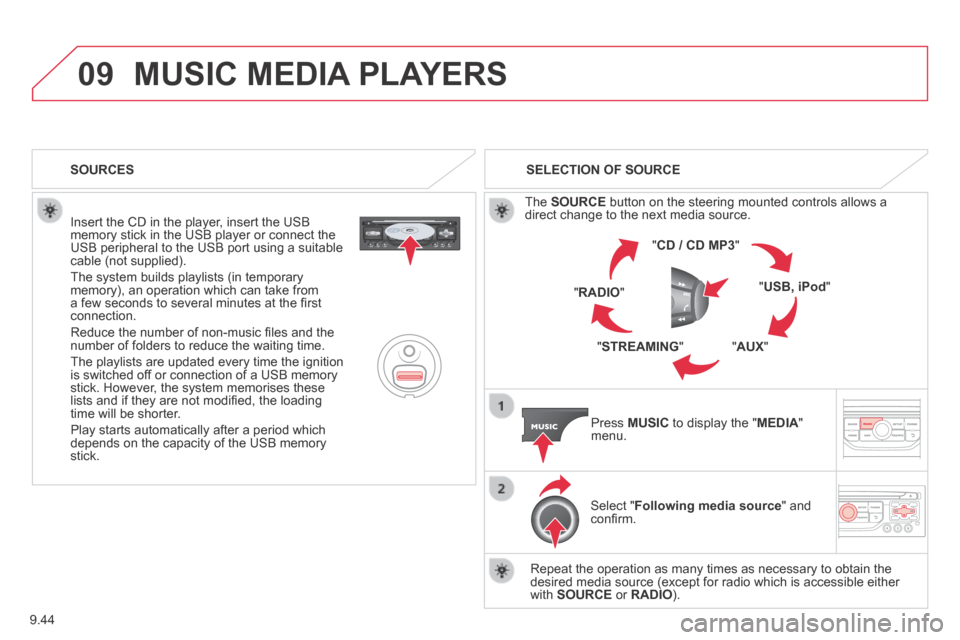
SELECTION OF SOURCE
The SOURCE button on the steering mounted controls allows a direct change to the next media source.
" CD / CD MP3 "
" USB, iPod "
" AUX " " STREAMING "
" RADIO "
Press MUSIC to display the " MEDIA " menu.
Select " Following media source " and confi rm.
Repeat the operation as many times as necessary to obtain the desired media source (except for radio which is accessible either with SOURCE or RADIO ).
SOURCES