2014 Citroen DS5 RHD brake
[x] Cancel search: brakePage 138 of 400

The cruise control system cannot, in any
circumstances, replace the need to respect speed
limits, nor can it replace the need for vigilance and
responsibility on the part of the driver.
You are advised to keep your feet near the pedals
at all times.
Cruise control
System which automatically maintains the
speed of the vehicle at the value programmed
by the driver, without any action on the
accelerator pedal.
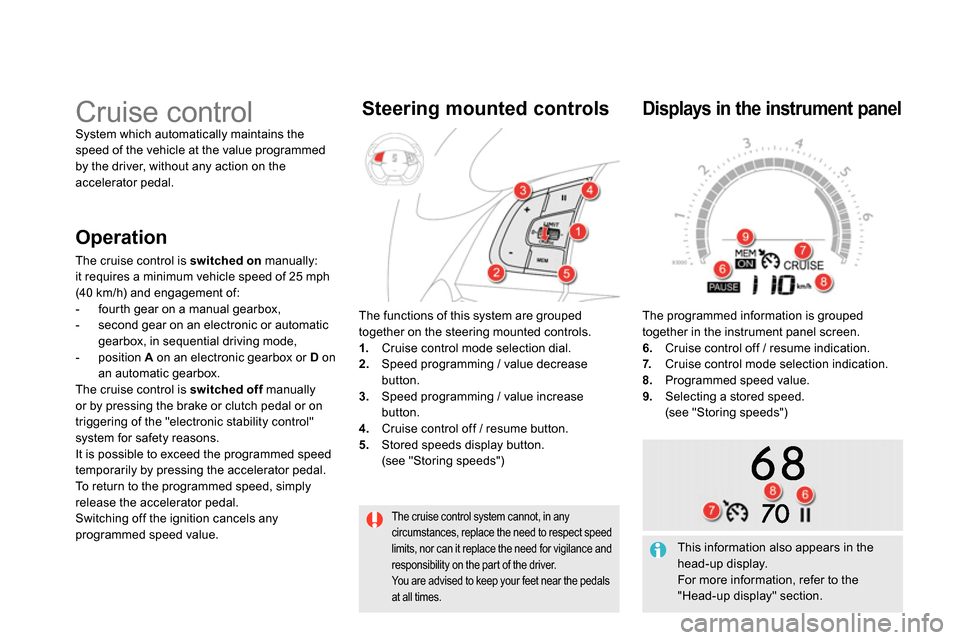
The functions of this system are grouped
together on the steering mounted controls.
1.
Cruise control mode selection dial.
2.
Speed programming / value decrease
button.
3.
Speed programming / value increase
button.
4.
Cruise control off / resume button.
5.
Stored speeds display button.
(see "Storing speeds")
Steering mounted controls
The programmed information is grouped
together in the instrument panel screen.
6.
Cruise control off / resume indication.
7.
Cruise control mode selection indication.
8.
Programmed speed value.
9.
Selecting a stored speed.
(see "Storing speeds")
Displays in the instrument panel
Operation
The cruise control is switched on
manually:
it requires a minimum vehicle speed of 25 mph
(40 km/h) and engagement of:
- fourth gear on a manual gearbox,
- second gear on an electronic or automatic
gearbox, in sequential driving mode,
- position A
on an electronic gearbox or D
on
an automatic gearbox.
The cruise control is switched off
manually
or by pressing the brake or clutch pedal or on
triggering of the "electronic stability control"
system for safety reasons.
It is possible to exceed the programmed speed
temporarily by pressing the accelerator pedal.
To return to the programmed speed, simply
release the accelerator pedal.
Switching off the ignition cancels any
programmed speed value.
This information also appears in the
head-up display.
For more information, refer to the
"Head-up display" section.
Page 184 of 400

Electronic Stability Programme incorporating
the following systems:
- the anti-lock braking system (ABS) and the
electronic brake force distribution (EBFD),
- the emergency braking assistance,
- the anti-slip regulation (ASR) or traction
control,
- the dynamic stability control (DSC).
Electronic stability programme (ESC)
Definitions
Anti-lock braking system (ABS)
and electronic brake force
distribution (EBFD)
This system improves the stability and
manoeuvrability of your vehicle when braking
and provides improved control in corners, in
particular on poor or slippery road sur faces.
The ABS prevents wheel lock in the event of
emergency braking.
The electronic brake force distribution system
manages the braking pressure wheel by wheel.
Emergency braking assistance
In an emergency, this system enables you to
reach the optimum braking pressure more
quickly and therefore reduce the stopping
distance.
It is triggered in relation to the speed at which
the brake pedal is pressed. This is felt by a
reduction in the resistance of the pedal and an
increase in the effectiveness of the braking.
Anti-slip regulation (ASR)
The ASR system (also known as Traction
Control) optimises traction in order to avoid
wheel slip by acting on the brakes of the driving
wheels and on the engine. It also improves
the directional stability of the vehicle on
acceleration.
Dynamic stability control (DSC)
If there is a difference between the path
followed by the vehicle and that required by
the driver, the DSC monitors each wheel and
automatically acts on the brake of one or more
wheels and on the engine to return the vehicle
to the required path, within the limits of the laws
of physics.
Page 185 of 400

183Safety
Intelligent traction control
system ("Snow motion")
Your vehicle has a system to help driving on
snow: intelligent traction control.
This system detects situations of difficult
sur face adhesion that could make it difficult to
move off or make progress on deep fresh snow
or compacted snow.
In these situations, the intelligent traction
control
limits the amount of wheel slip to
provide the best traction and trajectory control
for your vehicle.
In extremely severe conditions (deep snow,
mud, ...), when it proves impossible to move off,
it may be useful to temporarily deactivate the
ESP/ASR systems to allow the wheels to spin
freely and so allow movement of the vehicle.
Operation
Anti-lock braking system (ABS)
and electronic brake force
distribution (EBFD)
In emergency braking, press
ver y firmly without releasing the
pressure.
When changing wheels (tyres and rims),
make sure that these are approved for
your vehicle.
Normal operation of the ABS may make
itself felt by slight vibrations of the brake
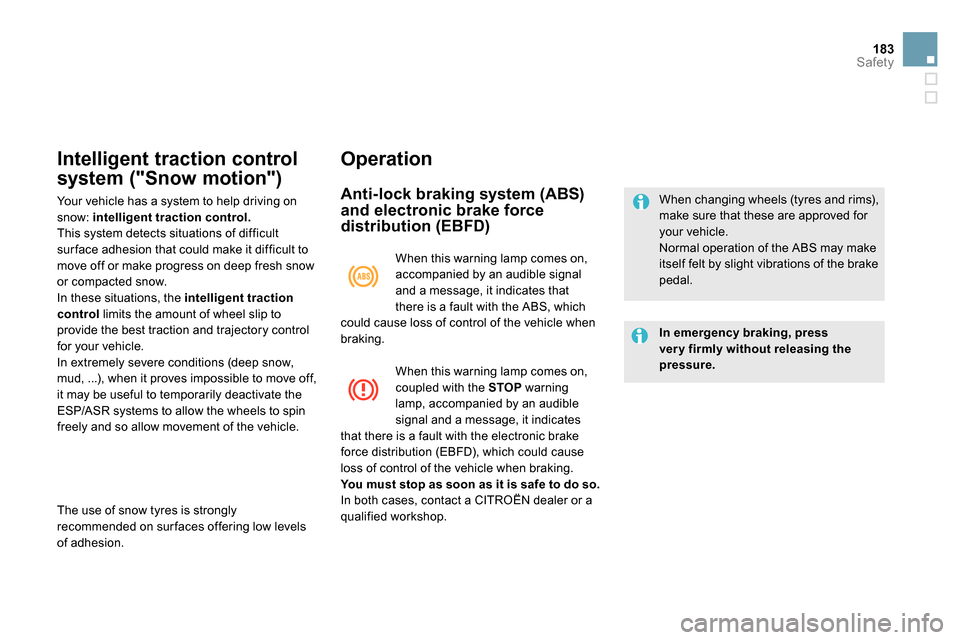
pedal. When this warning lamp comes on,
accompanied by an audible signal
and a message, it indicates that
there is a fault with the ABS, which
could cause loss of control of the vehicle when
braking.
When this warning lamp comes on,
coupled with the STOP
warning
lamp, accompanied by an audible
signal and a message, it indicates
that there is a fault with the electronic brake
force distribution (EBFD), which could cause
loss of control of the vehicle when braking.
You must stop as soon as it is safe to do so.
In both cases, contact a CITROËN dealer or a
qualified workshop.
The use of snow tyres is strongly
recommended on sur faces offering low levels
of adhesion.
Page 186 of 400

Dynamic stability control (DSC)
and anti-slip regulation (ASR)
Activation
These systems are activated automatically
each time the vehicle is started.
As soon as they detect a problem of grip or
trajectory, these systems act on the operation if
the engine and brakes.
This is indicated by flashing of this
warning lamp in the instrument panel.
Deactivation
Operating fault
Illumination of this warning lamp and
the lamp in the deactivation button,
accompanied by an audible signal
and a message, indicate a fault with
the system.
Reactivation
Press this button.
The indicator lamp in the button comes on.
The DSC and ASR systems no longer act on the
operation of the engine and on the brakes in the
event of a involuntary change of trajectory.
Press this button again.
Reactivate the systems as soon as the level of
grip permits.
Contact a CITROËN dealer or a qualified
workshop to have the system checked. In exceptional conditions (starting a vehicle
which is bogged down, stuck in snow, on soft
ground...), it may be advisable to deactivate
the DSC and ASR, so that the wheels can turn
freely and regain grip. The systems are reactivated automatically each
time the ignition is switched back on or from
30 mph (50 km/h).
Below 30 mph (50 km/h), you can reactivate
them manually:
Page 208 of 400

Removing a wheel
Parking the vehicle
Immobilise the vehicle where it does not
block traffic: the ground must be level,
stable and not slippery.
Apply the parking brake unless it has
been programmed to automatic mode,
switch off the ignition and engage first
gear * to block the wheels.
Check that the braking warning lamp
and the P
warning lamp in the parking
brake control lever come on.
The occupants must get out of the
vehicle and wait where they are safe.
Never go underneath a vehicle raised
using a jack; use an axle stand.
List of operations
Depending on equipment, remove the cover from from each of bolts using the tool 3
or remove
the hub cap using tool 4
.
Fit the security socket 5
on the wheelbrace 1
to slacken the security bolt (if fitted).
Slacken the other bolts (no more than a 1/4 turn) using the wheelbrace 1
only.
*
Position R
for an electronic gearbox; P
for an
automatic gearbox.
Page 212 of 400

Snow chains
In wintry conditions, snow chains improve traction as well as the behaviour of the vehicle when braking.
The snow chains must be fitted only
to the front wheels. They must never
be fitted to "space-saver" type spare
wheels.
Take account of the legislation in force
in your country on the use of snow
chains and the maximum running speed
authorised.
Advice on installation
If you have to fit the chains during a
journey, stop the vehicle on a flat sur face
on the side of the road.
Apply the parking brake and position any
wheel chocks to prevent movement of your
vehicle.
Fit the chains following the instructions
provided by the manufacturer.
Move off gently and drive for a few
moments, without exceeding 30 mph
(50 km/h).
Stop your vehicle and check that the snow
chains are correctly tightened.
Avoid driving on roads that have been
cleared of snow, to avoid damaging
your vehicle's tyres and the road
sur face. It is recommended that before
you leave, you practise fitting the snow
chains on a level and dry sur face. If
your vehicle is fitted with alloy wheels,
check that no part of the chain or its
fixings is in contact with the wheel rim.
Use only the chains designed to be fitted to the
type of wheel fitted to your vehicle:
Original tyre size Maximum link size.
215/60 R16
9 mm
225/50 R17
235/45 R18
cannot be fitted with
snow chains
235/40 R19
For more information on snow chains, contact a
CITROËN dealer or a qualified workshop.
Page 218 of 400

1. Sidelamps
(light emitting diodes - LEDs).
2. Direction indicators (PY21W amber).
3. Reversing lamps (P21W).
4. Brake lamps (P21W).
5. Foglamps (P21W).
Rear lamps
Direction indicators and brake
lamps (on the wings)
Open the boot then remove the access
cover.
Disconnect the lamp connector.
Remove the two lamp fixing nuts.
Carefully remove the lamp unit from
outside. The retaining clips unclip
automatically.
Turn the bulb holder a quarter of a turn and
change the bulb.
For reassembly, carry out these operations in
reverse order.
Changing the light emitting
diode-LED lamps
For replacement, contact a CITROËN
dealer or qualified workshop.
Page 220 of 400

Number plate lamps
Insert a thin screwdriver into the slot
in the lens.
Push it outwards to unclip it.
Remove the lens.
Pull the bulb out and change it.
Third brake lamp
(light emitting diodes - LEDs)
Contact a CITROËN dealer or qualified
workshop.