2014 Citroen C3 PICASSO engine
[x] Cancel search: enginePage 82 of 292

80
C3Picasso_en_Chap05_visibilite_ed01-2014
Courtesy lampsSelection and control of the various passenger compartment lamps.
1.
F
ront courtesy lamp
2.
M
ap reading lamps
3.
R
ear courtesy lamp
Front and rear courtesy lamps
Map reading lamps
F With the ignition on, press the corresponding switch.
In this position, the courtesy lamp
comes on gradually:
Permanently off.
Permanent lighting.
It switches off gradually:
-
w
hen the vehicle is locked,
-
w
hen the ignition is switched on,
-
3
0 seconds after the last door is closed.
-
w
hen the vehicle is unlocked,
-
w
hen the key is removed from the ignition,
-
w
hen a door is opened,
-
w
hen the remote control locking button is
pressed, in order to locate your vehicle.
Footwell lighting
These lamps come on at the same time as the
courtesy lamps.
In permanent lighting mode, different lighting times
are available:
- with the ignition off, approximately ten minutes,- in energy economy mode, approximately
thirty seconds,
- with the engine running, unlimited.
Visibility
Page 84 of 292

82
C3Picasso_en_Chap05_visibilite_ed01-2014
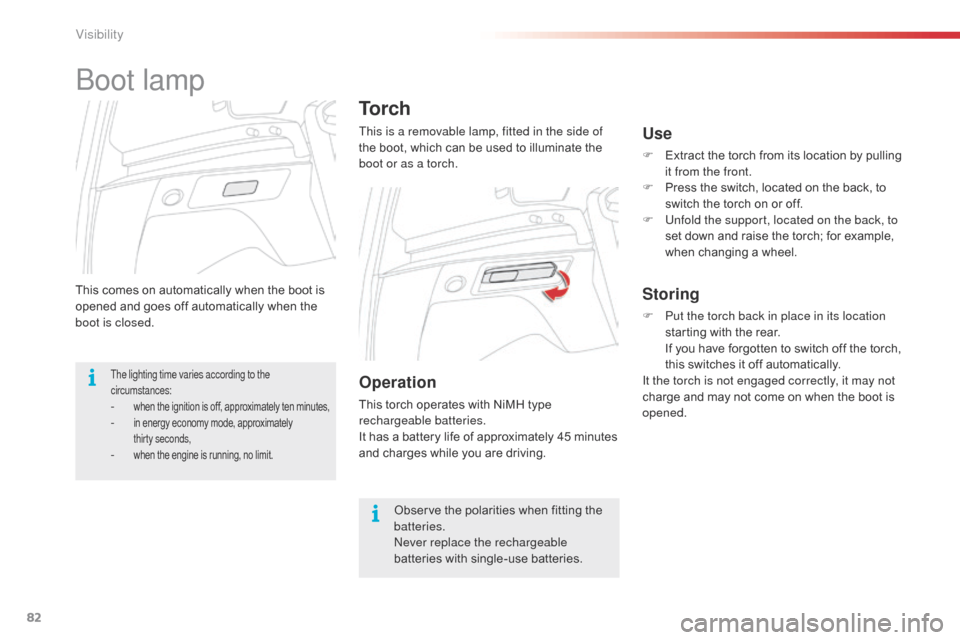
This comes on automatically when the boot is
opened and goes off automatically when the
boot is closed.
To r c h
This is a removable lamp, fitted in the side of
the boot, which can be used to illuminate the
boot or as a torch.
boot lamp
Use
F Extract the torch from its location by pulling it from the front.
F
P
ress the switch, located on the back, to
switch the torch on or off.
F
U
nfold the support, located on the back, to
set down and raise the torch; for example,
when changing a wheel.
Storing
F Put the torch back in place in its location starting with the rear.
I
f you have forgotten to switch off the torch,
this switches it off automatically.
It the torch is not engaged correctly, it may not
charge and may not come on when the boot is
opened.
Operation
This torch operates with NiMH type
rechargeable batteries.
It has a battery life of approximately 45 minutes
and charges while you are driving.
The lighting time varies according to the
circumstances:
- when the ignition is off, approximately ten minutes,- in energy economy mode, approximately
thirty seconds,
- when the engine is running, no limit.
Observe the polarities when fitting the
batteries.
ne
ver replace the rechargeable
batteries with single-use batteries.
Visibility
Page 116 of 292

114
C3Picasso_en_Chap08_securite_ed01-2014
Deactivation
In exceptional conditions (starting a vehicle
which is bogged down, stuck in snow, on soft
ground...), it may be advisable to deactivate the
DSC and ASR systems, so that the wheels can
move freely and regain grip.
F
P
ress the button, located in the centre of
the dashboard.
If this warning lamp comes on in the
instrument panel and the indicator
lamp on the button comes on, this
indicates that the
d
S
C and a
S
R
systems are deactivated.
Reactivation
These systems are reactivated automatically
each time the ignition is switched back on or
from 30 mph (50 km/h).
F
P
ress the button again to reactivate them
manually.
Operating fault
If this warning lamp comes on,
accompanied by an audible signal
and a message in the multifunction
screen, this indicates a malfunction
of these systems.
Trajectory control systems
The anti-slip regulation (also known as traction
control) optimises traction to prevent skidding of
the wheels, by acting on the brakes of the driving
wheels and on the engine.
The electronic stability control acts on the brake
of one or more wheels and on the engine to keep
the vehicle on the trajectory required by the driver,
within the limits of the laws of physics.
Anti-slip regulation (ASR)
and dynamic stability
control (DSC)
This is indicated by flashing of this
warning lamp in the instrument panel.
Activation
These systems are activated automatically
each time the vehicle is started.
They come into operation in the event of a grip
or trajectory problem. The
d
S
C/
aS
R systems offer
exceptional safety in normal driving, but
this should not encourage the driver to
take extra risks or drive at high speed.
The correct operation of these
systems depends on observation of
the manufacturer's recommendations
regarding wheels (tyres and rims),
braking components, electronic
components and assembly and repair
procedures.
af
ter an impact, have these systems
checked by a CITR
oËn
dealer or a
qualified workshop.
Have it checked by a CITR
oËn
dealer or a
qualified workshop.
Safety
Page 119 of 292

117
C3Picasso_en_Chap08_securite_ed01-2014
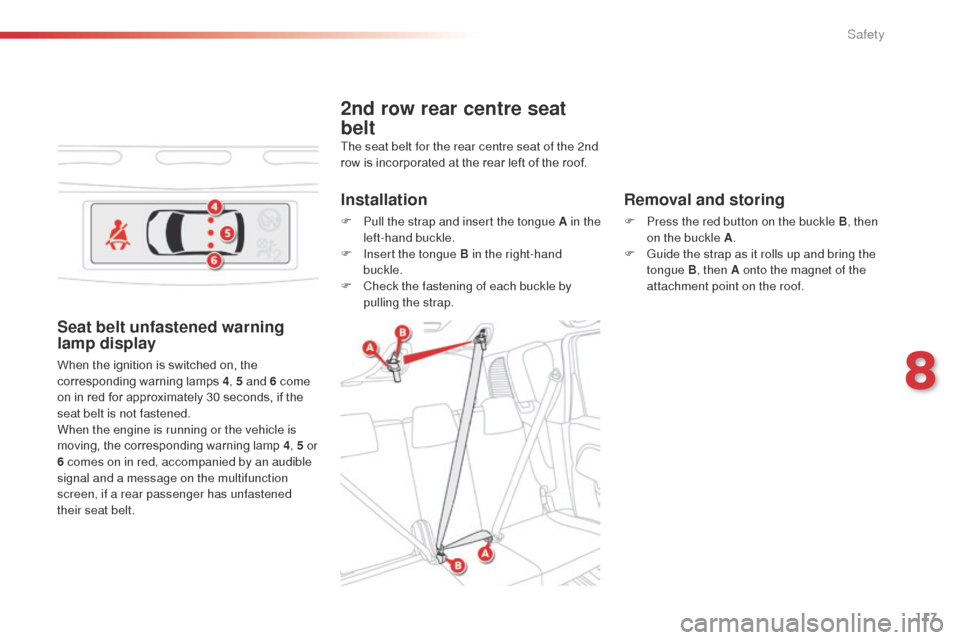
2nd row rear centre seat
belt
Removal and storing
F Press the red button on the buckle B, then on the buckle A .
F
G
uide the strap as it rolls up and bring the
tongue B , then A
onto the magnet of the
attachment point on the roof.
Installation
F Pull the strap and insert the tongue A in the left-hand buckle.
F
I
nsert the tongue B in the right-hand
buckle.
F
C
heck the fastening of each buckle by
pulling the strap.
The seat belt for the rear centre seat of the 2nd
row is incorporated at the rear left of the roof.
Seat belt unfastened warning
lamp display
When the ignition is switched on, the
corresponding warning lamps
4, 5 and 6 come
on in red for approximately 30 seconds, if the
seat belt is not fastened.
When the engine is running or the vehicle is
moving, the corresponding warning lamp 4, 5 or
6 comes on in red, accompanied by an audible
signal and a message on the multifunction
screen, if a rear passenger has unfastened
their seat belt.
8
Safety
Page 125 of 292

123
C3Picasso_en_Chap09_conduite_ed01-2014
Parking brake
Applying
F Pull the parking brake lever fully up to immobilise your vehicle.
When the vehicle is being driven, if this warning lamp
and the STOP warning lamp come on, accompanied
by an audible signal and a message in the
multifunction screen, this indicates that the parking
brake is still on or has not been properly released.
Releasing
F Pull the parking brake lever gently, press the release button then lower the lever
fully.
6-speed manual
gearbox
Engaging 5th or 6th gear
F Move the lever fully to the right to engage 5th or 6th g e a r.
Engaging reverse gear
F Raise the ring under the knob and move the gear lever to the left then for wards.
When parking on a slope, direct your
wheels against the pavement, apply the
parking brake and engage a gear. Only engage reverse gear when the
vehicle is stationary with the engine at idle.
as a s
afety precaution and to facilitate
starting of the engine:
-
a
lways select neutral,
-
p
ress the clutch pedal.
Failure to follow this advice may cause
permanent damage to the gearbox
(engagement of 3
rd or 4th gear by
m i st a ke).
9
driving
Page 127 of 292

125
C3Picasso_en_Chap09_conduite_ed01-2014
Display in the instrument panel
Gear lever positions
N. neutral
R. R everse
1, 2, 3, 4, 5, 6.
G
ears in manual mode.
AUTO.
T
his comes on when the automated
mode is selected. It switches off on
changing to manual mode.
Moving off
F Select position N .
F P ress the brake pedal down fully.
F
S
tart the engine.N appears in the instrument panel
screen.
F
Sel
ect automated mode (position A ) or
manual mode (position M ) or reverse
(position R ).
F
R
elease the parking brake.
F
P
rogressively take your foot off the brake
pedal.
F
A
ccelerate away.
AUTO and 1, 1 or R appear in the instrument
panel screen.
Automated mode
F Select position A .
AUTO and the gear engaged appear
in the instrument panel screen.
The gearbox operates in auto-active mode,
without any action on the part of the driver. It
continuously selects the most suitable gear for:
-
o
ptimisation of fuel consumption,
-
t
he style of driving,
-
t
he profile of the road.
-
t
he vehicle load.
For optimum acceleration, for example
when overtaking another vehicle, press the
accelerator pedal firmly past the point of
resistance.
You must press the brake pedal when
starting the engine.
ne
ver select neutral N when driving.
N
flashes in the instrument panel,
accompanied by an audible signal and a
message in the multifunction screen, if the
gear lever is not in position N on starting.
a
message is displayed in the screen, if
the brake pedal is not pressed on starting
the engine.
You can change mode at any time by
moving the gear lever from A to M or
the other way round.
9
driving
Page 128 of 292

126
C3Picasso_en_Chap09_conduite_ed01-2014
F Select position M. To engage reverse gear R
, the vehicle must be
immobilised with your foot on the brake pedal.
F
Sel
ect position R.
At very low speed, if reverse gear is requested,
this will only be acted on when the vehicle is
immobilised.
at h
igh speed, if reverse gear is requested,
the
N indicator flashes and the gearbox goes
into neutral. To engage a gear again, put the
gear lever in position A or M .Temporary control of gear
changing
You can temporarily take over control of
gear changing using the "+" and "-" steering
mounted paddles: if the engine speed allows,
the request to change gear is acted on.
This function allows you to anticipate certain
situations such as overtaking a vehicle or the
approach to a corner.
After a few moments without any action on
the control paddles, the gearbox resumes
automatic control of the gears. The gears engaged appear in
succession in the instrument panel
screen.
The gear change requests are only acted on if
the engine speed permits.
It is not necessary to release the accelerator
during gear changes.
When braking or slowing down, the gearbox
changes down automatically to allow the
vehicle to accelerate in the correct gear.
On sharp acceleration, the gearbox will not
change up unless the driver acts on the gear
lever or the steering mounted paddles.
ne
ver select neutral N while the vehicle
is moving. You can change mode at any time, be
moving the gear lever from M to A or
the other way round. Engagement of reverse gear is
accompanied by an audible signal.
Manual mode
Reverse
driving
Page 129 of 292

127
C3Picasso_en_Chap09_conduite_ed01-2014
Stopping the vehicleOperating fault
With the ignition on, the flashing of AUTO ,
accompanied by an audible signal and a
message in the screen, indicates a malfunction
of the gearbox.
Have it checked by a CITR
oËn
dealer or a
qualified workshop.
In all cases when parking, you must
apply the parking brake to immobilise
the vehicle.
When immobilising the vehicle, with
the engine running, you must place the
gear lever in neutral N .
Before carrying out any work in the
engine compartment, ensure that the
gear lever is in neutral N and that the
parking brake is applied.
Before switching off the engine, you can:
-
m
ove to position N to engage neutral,
or
-
l
eave the gear engaged; in this case, it will
not be possible to move the vehicle. If the ambient temperature is
below
-23°C, the engine should be left
running at idle for four minutes, in order
to ensure the correct operation and
durability of the engine and gearbox.
When traversing a flooded road or a
ford, drive at walking pace.
9
driving