Page 8 of 284
6
C3_en_Chap00b_vue-ensemble_ed01-2014
Instruments and controls1. Cruise control / speed limiter controls.
2. Headlamp height adjustment.
3.
S
teering wheel adjustment control.
4.
L
ighting and direction indicator control stalk.
5.
I
nstrument panel.
6.
d
r
iver's airbag.
Horn.
7.
G
ear lever.
8.
1
2 V accessory socket
U
S
b
port / auxiliary socket.
9.
H
eated seat control.
10.
b
o
nnet release lever.
11.
d
o
or mirror controls.
E
lectric window controls.
R
ear doors and electric windows
deactivation switch.
12 .
Fusebox.
13.
S
top & Start deactivation switch.
E
lectronic stability deactivation switch
(
dS
C/
a
SR)
U
nder-inflation detection reinitialisation
switch (depending on version).
14 .
F
ront door window demisting/defrosting
vent.
15.
S
peaker (tweeter).
16.
W
indscreen demisting/defrosting vent.
over view
Page 9 of 284
7
C3_en_Chap00b_vue-ensemble_ed01-2014
Instruments and controls1. Steering lock and ignition.
2. Audio equipment steering wheel controls.
3.
W
iper / screenwash / trip computer control
stalk.
4.
M
icrophone.
5.
S
cented air freshener.
6.
C
entral locking switch.
7.
M
ultifunction screen.
8.
H
azard warning lamps switch.
9.
C
entral adjustable air vents.
10.
S
unshine sensor
H
i-Fi audio system central speaker.
11.
P
assenger's airbag.
12 .
S
ide adjustable air vent.
13.
G
love box / Passenger's airbag
deactivation /
a
u
dio/video sockets.
14 .
P
arking brake.
15.
C
entral armrest with storage.
16.
U
pper and lower storage.
17.
a
u
dio system or eMyWay.
18.
H
eating / air conditioning controls.
.
over view
Page 35 of 284

33
C3_en_Chap02_Ecrans-multifonction_ed01-2014
Monochrome screen C
This displays the following information:
- time,
-
date,
-
a
mbient temperature (this flashes if there is
a risk of ice),
-
s
tatus of doors and boot,
-
a
udio sources (radio, C
d, U
S
b
port /
auxiliary socket etc.),
-
t
rip computer (refer to the "Instruments and
controls" section).
Warning messages (E.g. "Emissions control
system faulty") or information messages
(E.g.:
a
u
tomatic headlamps active") may
appear temporarily. These can be cleared by
pressing the "Back" button.
Controls
From your audio system control panel, you can:
F p ress the "MENU" button to gain access to
the main menu ,
F
p
ress the " 5" or " 6" buttons to scroll
through the items in the screen,
F
p
ress the "MODE" button to change the
permanent application (trip computer,
audio source...),
F
p
ress the " 7" or " 8" buttons to change a
setting value,
F
p
ress the "OK" button to confirm,
or
F
p
ress the "Back" button to abandon the
operation in progress.
Main menu
F Press the "MENU" button to gain access
to the main menu :
-
a
udio functions,
-
t
he trip computer,
-
personalisation-configuration,
-
t
elephone (hands-free kit).
F
P
ress the " 5" or " 6" buttons to select the
menu required, then confirm by pressing
the "OK" button.
"Audio functions"
menu
With the Audio system switched on, once this
menu has been selected you can activate
or deactivate the functions linked with use
of the radio (R
dS
, REG, RadioText), the C
d
(introscan, shuffle, C
d
repeat) or the MP3
player (US
b
port / auxiliary socket).
For more information on the "
au
dio functions"
application, refer to the "
au
dio system" section.
Displays in the screen
2
Multifunction screens
Page 63 of 284

61
C3_en_Chap04_ouvertures_ed01-2014
Emergency control
Locking the driver's door
F Insert the key in the lock, then turn it to
the right.
Unlocking the driver's door
F Insert the key in the lock, then turn it to the left.
Locking the front and rear
passenger doors
F Remove the black cap, located on the edge of the door, using the key.
F
I
nsert the key in the socket, then turn it to
the stop.
F
R
emove the key and refit the cap.
Unlocking the front and rear
passenger doors
F Pull the interior door opening control.
In the event of failure of the central
locking system, the battery must be
disconnected to lock the boot and
so ensure that the vehicle is locked
completely.
Check that the rear doors child lock is
not on.
System allowing the doors to be locked and
unlocked manually in the event of a fault with
the central locking system or a battery failure.
Activation
F Press button A for more than two seconds.a
confirmation message appears on the
multifunction screen, accompanied by an
audible signal.
Deactivation
F Press button A again for more than two seconds.
a
confirmation message appears on the
multifunction screen, accompanied by an
audible signal.
Driving with the doors locked may make
access more difficult for the emergency
services in an emergency.
4
access
Page 78 of 284
76
C3_en_Chap06_amenagement_ed01-2014
Interior fittings
1. Sun visor
2. I
lluminated glove box
(
see details on following page)
3.
Doo
r pocket s
4.
U
pper storage compartment
5.
L
ower storage compartment with
non-slip mat
6.
U
SB por t / Auxiliar y socket
(
see details on following page)
or
C
oin holder
7.
1
2 V accessory socket
(
see details on following page)
8.
C
entre armrest with storage
(
see details on the following page)
or
C
up / bottle holder
Fittings
Page 80 of 284
78
C3_en_Chap06_amenagement_ed01-2014
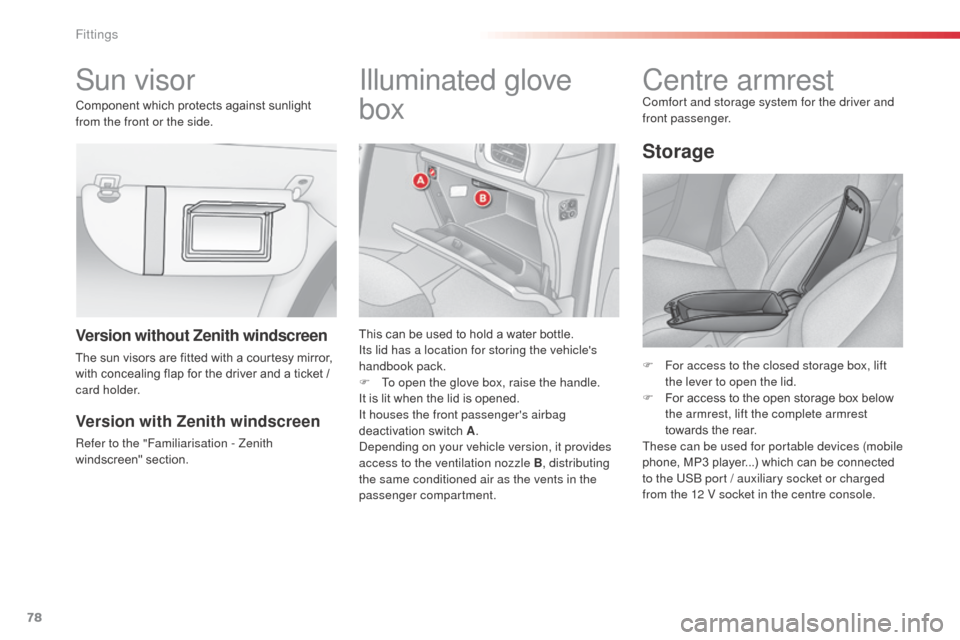
Sun visor Illuminated glove
box
This can be used to hold a water bottle.
Its lid has a location for storing the vehicle's
handbook pack.
F
T
o open the glove box, raise the handle.
It is lit when the lid is opened.
It houses the front passenger's airbag
deactivation switch A.
de
pending on your vehicle version, it provides
access to the ventilation nozzle B, distributing
the same conditioned air as the vents in the
passenger compartment.
Centre armrestComfort and storage system for the driver and
front passenger.
F
F
or access to the closed storage box, lift
the lever to open the lid.
F
F
or access to the open storage box below
the armrest, lift the complete armrest
towards the rear.
These can be used for portable devices (mobile
phone, MP3 player...) which can be connected
to the US
b
port / auxiliary socket or charged
from the 12 V socket in the centre console.
Version with Zenith windscreen
Refer to the "Familiarisation - Zenith
windscreen" section.
Version without Zenith windscreen
The sun visors are fitted with a courtesy mirror,
with concealing flap for the driver and a ticket /
card holder. Component which protects against sunlight
from the front or the side.
Storage
Fittings
Page 81 of 284

79
C3_en_Chap06_amenagement_ed01-2014
USb Player
The USb port is located in the "AUX " box on
the centre console.
It permits the connection of a portable device,
such as a digital audio player of the iPod
®
generation 5 and later type or USb
memory
stick type.
It reads the audio file formats (mp3, ogg,
wma, wav...) which are transmitted to your
audio equipment and played via the vehicle's
speakers.
You can manage these files using the steering
mounted controls or the audio equipment
control panel and display them on the
multifunction screen.
For more information on the use of this
equipment, refer to the "
au
dio system" section.
12 V accessory
socket
F To connect a 12 V accessory (max power: 120 W), lift the cover and connect a
suitable adaptor.
auxiliary socket
The auxiliary socket is located in the " AUX" box
on the centre console.
It permits the connection of a portable device,
such as a digital audio player of the iPod
® type,
to listen to your music files using the vehicle's
speakers.
For more information on the use of this
equipment, refer to the "
au
dio system" or
"eMyWay" section. The management of the files is done
using your portable device.
When it is in use, the portable device
charges automatically.
6
Fittings
Page 145 of 284

143
C3_en_Chap11_Info-pratiques_ed01-2014
F Check that the compressor switch is at the "O " position).
F
U
ncoil fully the electric cable, stowed under
the compressor.
F
C
onnect compressor's plug to the vehicle's
12 V socket.
F
S
witch on the ignition. F
S tart the compressor by placing the switch
at the " I" position and leave it running until
the tyre pressure reaches 2.0 bar.
T
he sealant product is injected into the tyre
under pressure; do not disconnect the pipe
from the valve during this operation (risk of
splashing and stains). If after around 5 to 7 minutes the
pressure is not attained, this indicates
that the tyre is not repairable; contact
a CITR
oËn
dealer or a qualified
workshop for assistance.
Take care, the sealant product
is harmful (e.g. ethylene-glycol,
colophony...) if swallowed and causes
irritation to the eyes.
ke
ep this product out of the reach of
children.
The use-by date is marked on the
cartridge.
af
ter use, do not discard the
cartridge by the roadside, take it to
a CITR
oËn
dealer or an authorised
waste disposal site.
Don't forget to obtain a new sealant
cartridge, available from a CITR
oËn
dealer or a qualified workshop.
11
Practical information


