Page 33 of 132

This setting provides less reaction time than the “Far” setting, which allows for a more dynamic
driving experience.
More dynamic or aggressive drivers that want to avoid frequent warnings may prefer this setting.
Off
Changing the FCW status to “Off ” prevents the system from warning you of a potential frontal
collision.
NOTE:
• If FCW is set to “Off ”, “FCW OFF” will be displayed in the EVIC.
• Refer to the Owner's Manual on the DVD for further details.
WARNING!
•Leaving the Electronic or Adaptive Speed Control system on when not in use is dangerous.
You could accidentally set the system or cause it to go faster than you want. You could lose
control and have a collision. Always leave the Electronic or Adaptive Speed Control system
off when you are not using it.
•Electronic Speed Control can be dangerous where the system cannot maintain a constant
speed. Your vehicle could go too fast for the conditions, and you could lose control. A collision
could be the result. Do not use Electronic Speed Control in heavy traffic or on roads that are
winding, icy, snow-covered or slippery.
•Adaptive Cruise Control (ACC) is a convenience system. It is not a substitute for active driving
involvement. Pay attention to road, traffic, and weather conditions, vehicle speed, distance to
the vehicle ahead, and brake operation to ensure safe operation of the vehicle under all road
conditions. Your attention is always required while driving to maintain safe control of your
vehicle. Failure to follow these warnings can result in a collision or serious personal injury.
The ACC system:
• Does not react to pedestrians, oncoming vehicles, and stationary objects (i.e., a stoppedvehicle in a traffic jam or a disabled vehicle).
• Cannot take street, traffic, and weather conditions into account, and may be limited upon adverse sight distance conditions.
• Does not predict the lane curvature or the movement of preceding vehicles and will not compensate for such changes.
• Does not always fully recognize complex driving conditions, which can result in wrong or missing distance warnings.
• Can only apply a maximum of 25% of the vehicle’s braking capability, and may not bring
the vehicle to a complete stop.
You should switch off the ACC system:
• When driving in fog, heavy rain, heavy snow, sleet, heavy traffic, and complex driving situations (i.e., in highway construction zones).
• When entering a turn lane or highway off ramp; when driving on roads that are winding, icy, snow-covered, slippery, or have steep uphill or downhill slopes; and when towing a trailer.
• When circumstances do not allow safe driving at a constant speed.
• Failure to follow these warnings can result in a collision.
•
Forward Collision Warning (FCW) is not intended to avoid a collision on its own. The driver
has the responsibility to avoid a collision by controlling the vehicle via braking and steering.
Failure to follow this warning could lead to serious injury or death.
OPERATING YOUR VEHICLE
31
Page 34 of 132

ELECTRONIC SHIFTER — 3.6L ENGINE
Your new vehicle is equipped with a fuel efficient 8 speed transmission. The electronic shift lever
in this vehicle does not slide like a conventional shifter. Instead, the shift lever is spring loaded and
moves forward and rearward, always returning to the center position after each gear is selected.
The transmission gear range (PRND) is displayed both on the shift lever and in the Electronic
Vehicle Information Center (EVIC).
Shifting From PARK To DRIVE
• Firmly press the brake pedal, press the lock button on the shift lever, then pull and hold theshift lever fully rearward until “D” is highlighted in the EVIC.
• To shift back into PARK from DRIVE, bring the vehicle to a complete stop, firmly press the brake pedal, press the lock button on the shift lever, then push and hold the shift lever fully
forward until “P” is highlighted in the EVIC.
Shifting From REVERSE To NEUTRAL
• Pull the shift lever rearward to the first detent and release. “N” will be highlighted in the EVIC.
• To shift back into REVERSE from NEUTRAL, firmly press the brake pedal, press the lock button on the shift lever, then push the shift lever forward to the first detent and release. “R” will
be highlighted in the EVIC.
Shifting From NEUTRAL To DRIVE
• Firmly press the brake pedal, press the lock button on the shift lever, then pull the shift lever rearward and release. “D” will be highlighted in the EVIC.
• To shift back into NEUTRAL from DRIVE, firmly press the brake pedal, press the lock button on the shift lever, then push the shift lever forward to the first detent and release. “N” will be
highlighted in the EVIC.
OPERATING YOUR VEHICLE
32
Page 35 of 132

Shifting From REVERSE To DRIVE
• Bring the vehicle to a complete stop, firmly press the brake pedal, then pull the shift lever fullyrearward and release when “D” is highlighted in the EVIC.
• To shift back into REVERSE from DRIVE, bring the vehicle to a complete stop, firmly press the brake pedal, press the lock button on the shift lever, then push the shift lever forward to the
second detent and release when “R” is highlighted in the EVIC.
Shifting From DRIVE To SPORT/LOW — Equipped With SPORT Mode
• To shift from DRIVE to SPORT, pull the shift lever rearward until “S” is highlighted in the EVIC.
• To shift back into DRIVE from SPORT, pull the shift lever rearward until “D” is highlighted in the EVIC.
Shifting From DRIVE To SPORT/LOW — Vehicles Equipped With LOW Mode
• To shift from DRIVE to LOW, pull the shift lever rearward until “L” is highlighted in the EVIC.
• To shift back into DRIVE from LOW, pull the shift lever rearward until “D” is highlighted in the EVIC.
TRANSMISSION MODES/AUTOSTICK®
Sport Mode (If Equipped)
• Sport mode is driver selectable and provides more aggressive shifting, for spirited driving.
• Shifting into SPORT mode can be done anytime the vehicle is in the “D” Drive position.Simply tap the shift lever rearward and release when “S” is highlighted in the EVIC. Tapping
the shift lever rearward a second time will return the vehicle to the “D” Drive position.
NOTE:
When the vehicle is in SPORT mode, a “SPORT” message and green flag icon will be illuminated
in the instrument cluster.
Low Mode (If Equipped)
• LOW range should be used for engine braking when descending very steep grades. In this range, the transmission will downshift for increased engine braking. To switch between DRIVE
and LOW modes, tap the shift lever rearward.
• Shifting into LOW can be done anytime the vehicle is in the “D” DRIVE position.
OPERATING YOUR VEHICLE
33
Page 36 of 132

AUTOSTICK® — If Equipped
NOTE:
AutoStick® is only available on vehicles with SPORT mode.
•
When the transmission is in DRIVE, it will
operate automatically, shifting between the
eight available gears. While in SPORT mode,
the transmission will only shift between seven
of the eight available gears.
• To engage AutoStick®, simply tap one of the steering wheel-mounted shift paddles (+/-).
• In AutoStick® mode, the transmission will only shift up or down when (+/-) is manually
selected by the driver, except as described
below. It will remain in the selected gear until
another upshift or downshift is chosen.
• When AutoStick® is active, the current transmission gear is displayed in the EVIC.
• If AutoStick® is engaged while in DRIVE mode, lack of accelerator pedal activity will cause the transmission to revert to automatic operation. The transmission will also upshift automatically
once redline, (where the tachometer needle points to the red portion of the gauge) is reached.
If the accelerator is pressed to the floor, the transmission will downshift when possible (based
on current vehicle speed and gear).
• When AutoStick® is used in SPORT mode, the transmission will only shift up or down when commanded by the driver, except as noted below.
• In either DRIVE or SPORT mode, the transmission will automatically downshift as the vehicle slows to a stop (to prevent engine lugging) and will display the current gear. Tapping the (+)
paddle (at a stop) will allow starting in second gear. After a stop, the driver should manually
upshift (+) the transmission as the vehicle accelerates.
NOTE:
To disengage AutoStick® mode, press and hold the (+) shift paddle until “D” or “S” is once again
displayed in the EVIC. You can shift in or out of the AutoStick® mode at any time without taking
your foot off the accelerator pedal.
OPERATING YOUR VEHICLE
34
Page 37 of 132
CLIMATE CONTROLS
Uconnect® 8.4 Automatic Climate Controls
Climate Control Knobs
• For your convenience the climate controls can also be operated by using the soft-keys locatedon the touchscreen or the climate control knobs below the Uconnect® touchscreen.
OPERATING YOUR VEHICLE
35
Page 38 of 132

Automatic Operation
• Press the AUTO button.
• Select the desired temperature by pressing the Temperature Control buttons.
• The system will maintain the set temperature automatically.
Air Conditioning (A/C)
• If the air conditioning button is pressed while in the AUTO mode, the system will enter manualmode with the air conditioning on.
Air Recirculation
• Use recirculation for maximum A/C operation.
• For window defogging, turn the recirculation button off.
• If the recirculation button is pressed while in the AUTO mode, the indicator light may flashthree times to indicate the cabin air is being controlled automatically.
Heated Mirrors
• The mirrors are heated to melt frost or ice. This feature is activated whenever you turn on therear window defroster.
BLIND SPOT MONITORING
The Blind Spot Monitoring (BSM) system uses two radar-based sensors, located inside the rear
bumper fascia, to detect Highway licensable vehicles (automobiles, trucks, motorcycles etc.) that
enter the blind spot zones from the rear/front/side of the vehicle.
The Blind Spot Monitoring (BSM) system warning light, located in the outside mirrors, will
illuminate if a vehicle moves into a blind spot zone.
The BSM system can also be configured to sound an audible (chime) alert and mute the radio to
notify you of objects that have entered the detection zones.
Refer to your Owner's Manual on the DVD for further details.
OPERATING YOUR VEHICLE
36
Page 39 of 132

POWER SUNROOF
The power sunroof switch is located on the overhead console.
Opening Sunroof
Express Open
•
Press the switch rearward and release it within
one-half second. The sunroof will fully open
and stop automatically.
Manual Open
• Press and hold the switch rearward to open the sunroof. Any release of the switch will
stop the movement, and the sunroof will
remain in a partially open position until the
switch is pressed again.
Venting Sunroof
• Press and release the button and the sunroofwill open to the vent position.
This is called “Express Vent” and will occur
regardless of sunroof position. During Express
Vent operation, any movement of the switch
will stop the sunroof.
Closing Sunroof
Express Closing
• Press the switch forward and release it within one-half second. The sunroof will fully close automatically from any position.
Manual Closing
• Press and hold the switch forward to close the sunroof. Any release of the switch will stop the movement, and the sunroof will remain in a partially closed position until the switch is pressed
again.
Power Sunroof Switch
1 — Opening Sunroof
2 — Venting Sunroof
3 — Closing Sunroof
OPERATING YOUR VEHICLE
37
Page 40 of 132

COMMANDVIEW® SUNROOF WITH POWER SHADE
The CommandView® sunroof with power shade switch is located on the overhead console.
NOTE:
The CommandView® sunroof switches func-
tion exactly the same as the power sunroof.
Refer to “Opening Sunroof, Venting Sunroof
and Closing Sunroof ” in “Power Sunroof ”.
Opening Power Shade
Express
• Press the shade switch rearward and releaseit within one-half second and the shade will
automatically open to the halfway position
and stop automatically.
• Press the switch a second time from the halfway position and the shade will auto-
matically open to the full open position and
stop automatically.
Manual
• To open the shade, press and hold the switch rearward. The shade will open and stop auto-
matically at the half-open position.
• Press and hold the shade switch rearward again and the shade will open automatically to the full-open position.
NOTE:
Any release of the switch will stop the movement and the shade will remain in a partially opened
condition until the switch is pushed and held rearward again.
Closing Power Shade
Express
• Press the switch forward and release it within one-half second and the shade will close automatically from any position.
Manual
• To close the shade, press and hold the switch in the forward position.
NOTE:
Any release of the switch will stop the movement and the shade will remain in a partially closed
condition until the switch is pushed and held forward again.
1 — Opening Sunroof
2 — Venting Sunroof
3 — Closing Sunroof
4 — Opening Shade
5 — Closing Shade
OPERATING YOUR VEHICLE
38
 1
1 2
2 3
3 4
4 5
5 6
6 7
7 8
8 9
9 10
10 11
11 12
12 13
13 14
14 15
15 16
16 17
17 18
18 19
19 20
20 21
21 22
22 23
23 24
24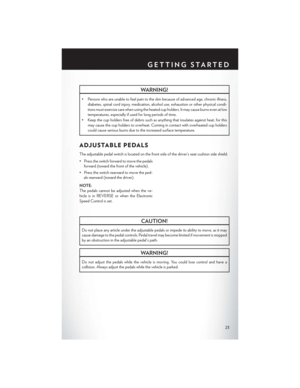 25
25 26
26 27
27 28
28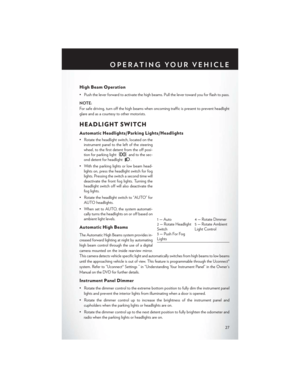 29
29 30
30 31
31 32
32 33
33 34
34 35
35 36
36 37
37 38
38 39
39 40
40 41
41 42
42 43
43 44
44 45
45 46
46 47
47 48
48 49
49 50
50 51
51 52
52 53
53 54
54 55
55 56
56 57
57 58
58 59
59 60
60 61
61 62
62 63
63 64
64 65
65 66
66 67
67 68
68 69
69 70
70 71
71 72
72 73
73 74
74 75
75 76
76 77
77 78
78 79
79 80
80 81
81 82
82 83
83 84
84 85
85 86
86 87
87 88
88 89
89 90
90 91
91 92
92 93
93 94
94 95
95 96
96 97
97 98
98 99
99 100
100 101
101 102
102 103
103 104
104 105
105 106
106 107
107 108
108 109
109 110
110 111
111 112
112 113
113 114
114 115
115 116
116 117
117 118
118 119
119 120
120 121
121 122
122 123
123 124
124 125
125 126
126 127
127 128
128 129
129 130
130 131
131