Page 57 of 132

Select The Mobile Phone's Priority Level
• When the pairing process has successfully completed, the system will prompt you to choosewhether or not this is your favorite phone. Selecting Yes will make this phone the highest
priority. This phone will take precedence over other paired phones within range. Only one
phone can be paired at a time.
• You are now ready to make hands-free calls. Press the Uconnect® Phone button on your steering wheel to begin.
Phone Menu Screen
Making A Phone Call
• Press the Uconnect® Phone button.
• After the BEEP, say “dial” then the number (or “call” then the name as listed in your phone; see Phonebook).
NOTE:
You can also initiate a call by using the touchscreen on the Phone main screen.
Receiving A Call — Accept (And End)
• When an incoming call rings/is announced on Uconnect®, press the Phone button.
• To end a call, press the Phone button
.
Mute (Or Unmute) Microphone During Call
• During a call, touch the “mute” soft-key on the Phone main screen to mute and unmute the call.
ELECTRONICS
55
Page 58 of 132

Transfer Ongoing Call Between Handset And Vehicle
• During an on-going call, touch the “Transfer” soft-key on the Phone main screen to transfer anon-going call between handset and vehicle.
Common Phone Commands (Examples)
• “Call John Smith”
• “Call John Smith mobile”
• “Dial 1 248 555 1212”
• “Call Emergency”
• “Call Towing Assistance”
• “Redial”
Phonebook
• Uconnect® radios will automatically download your phonebook from your paired phone, if thisfeature is supported by your phone. Entries are updated each time that the phone is
connected. If your phone book entries do not appear, check the settings on your phone. Some
phones require you to enable this feature manually.
• Your phonebook can be browsed on your radio screen, but editing can only be done on your phone. To browse, touch the “Phone” soft-key, then the “Phonebook” soft-key.
• Favorite phonebook entries can be saved as Favorites for quicker access. Favorites are shown at the top of your main phone screen.
Voice Command Tips (8.4A And 8.4AN Only)
• Using complete names (i.e; Call John Doe vs. Call John) will result in greater system accuracy.
•
You can “chain” commands together for faster results. Say “Call John Doe, mobile”, for example.
• If you are listening to available voice command options, you do not have to listen to the entirelist. When you hear the command that you need, press the
button on the steering
wheel, wait for the beep and say your command.
Changing The Volume
• Start a dialogue by pressing the Phone button, then say a command for example -
"Help."
• Use the radio ON/OFF VOLUME rotary knob to adjust the volume to a comfortable level while the Uconnect® system is speaking. Please note the volume setting for Uconnect® is
different than the audio system.
NOTE:
To access help, press the Uconnect® Phone
button on the steering wheel and say "help."
Touch the display or push either
orbutton and say "cancel" to cancel the help
session.
ELECTRONICS
56
Page 59 of 132

Voice Text Reply
• Uconnect® Phone can read or send new text messages on your mobile phone.
• Your mobile phone must support Voice Text Reply over Bluetooth® to use this feature. If theUconnect® Phone determines your mobile phone is not compatible with Voice Text Reply
messaging over Bluetooth®, the “Messaging” button will be greyed out and the feature will not
be available for use.
NOTE:
•
For mobile phone compatibility and pairing instructions, please visit www.UconnectPhone.com
• Uconnect® Phone Voice Text Reply is only available when the vehicle is not moving.
WARNING!
• Any voice commanded system should be used only in safe driving conditions following applicable laws regarding phone use. Your attention should be focused on safely operating
the vehicle. Failure to do so may result in a collision causing you and others to be severely
injured or killed.
• In an emergency, to use Uconnect® Phone, your mobile phone must be:
• turned on,
• paired to Uconnect® Phone,
• and have network coverage.
Uconnect® VOICE COMMAND (8.4 & 8.4N ONLY)
• If the Uconnect® Voice Commandbutton exists on your steering wheel, then you
have the Voice Command feature.
• The Voice Command feature lets you keep your hands on the steering wheel, and your eyes on the road.
• When you press the Voice Command button
located on the radio faceplate or
steering wheel, you will hear a beep. The beep is your signal to give a command. If you do not
know what commands to say, you can say "help" and the system will provide options to you. If
you ever wish to interrupt the system while it lists options, press the Voice Command button
, listen for the BEEP, and say your command.
• You can “chain” commands together for faster results. Say “Play the artist Scott Joplin”, for example.
ELECTRONICS
57
Page 60 of 132
.
• Use the radio ON/OFF VOLUME rotary knob to adjust the volume to a comfo")
Changing The Volume
• Start a dialogue by pressing the Voice Command button, then say a command
(for example, “help”).
• Use the radio ON/OFF VOLUME rotary knob to adjust the volume to a comfortable level while the Voice Command system is speaking. The volume setting for Voice Command is
different than the audio system.
• Refer to the “Understand The Features Of Your Vehicle” section of your vehicle's Owner's Manual on the DVD for further details.
Common Voice Commands (Examples)
Switch Modes “FM”
“Satellite” “AM”
“Change Source to iPod”
“Change Source to SD Card”
Radio (FM, AM) “95.5”
“95.5 FM”
“Go to preset 5”
Player “Play Album 'Greatest Hits”
“Play Artist 'Scott Joplin” “Play Genre 'Rock”
“Play Song 'Maple Leaf Rag”
SiriusXM Satellite Radio “39”
“Foxxhole”
SiriusXM Travel Link “Show fuel prices”
“Show movie listings”
“Show current weather”
“Show extended weather”
“Show Travel Link favorites”
“Show NFL headlines”
“Show NBA rankings”
“Show NFL schedules”
“Show NBA scores”
Navigation “Navigate to (Address)”
“Navigate to (Point of Interest)”
NOTE:
For the shortened SiriusXM Satellite Radio mode commands to be recognized you must be in
that mode. For example, if you are in SiriusXM Satellite Radio mode you can say “39,” but if you
are not in SiriusXM mode, you would need to say “Tune to Satellite Channel 39.”
ELECTRONICS
58
Page 61 of 132

Common Navigation Voice Commands
• To access the navigation voice commands, press the Uconnect® Voice Command
button while in any mode and say “Navigation.”
• Once in the Navigation feature, you can simply Say What You Seeon the touchscreen to give
a navigation voice command.
• Locating an address can be given as a one shot entry. For example, after saying “Find
Address” and the system is ready, you can say the entire address in one command, “1234 1st
Street, Any Town, Michigan.” If you are searching for a particular address or Point Of Interest,
the available voice commands depend on what is displayed on the touchscreen.
• When the Voice Command system is ready to be given a command, the green indicator is visible in the right corner of the touchscreen.
• The following chart lists the navigation voice commands that may be available.
Navigation Voice Commands:
“Where To?” (Main Menu command) “View Map” (Main Menu command)
“Repeat guidance” “Cancel Route” “Detour” (During a Route Guidance)“Where Am I?”“Find Address” “Go Home”
“Find Place by Category” “Find Place by Name”
“Find Recently Found” “Find Favorite”“Find City”
“Find Nearest Restaurant” “Find Nearest Fuel” “Find Nearest Transit”
“Find Nearest Lodging”
“Find Nearest Shopping” “Find Nearest Bank”
“Find Nearest Parking”
“Find Nearest Entertainment” “Find Nearest Recreation”
“Find Nearest Attractions” “Find Nearest Hospitals”
“Find Nearest Community”
“Find Nearest Auto Services” “Find Nearest Airport”
“Find Nearest Police Stations” “Find Nearest Fire Stations”
“Find Nearest Auto Dealers”
WARNING!
Any voice commanded system should be used only in safe driving conditions following
applicable laws regarding phone use. Your attention should be focused on safely operating the
vehicle. Failure to do so may result in a collision causing you and others to be severely injured
or killed.
ELECTRONICS
59
Page 62 of 132

• The EVIC features a driver interactive dis-play that is located in the instrument cluster.
Pressing the controls on the left side of the
steering wheel")
ELECTRONIC VEHICLE INFORMATION
CENTER (EVIC)
• The EVIC features a driver interactive dis-play that is located in the instrument cluster.
Pressing the controls on the left side of the
steering wheel allows the driver to select
vehicle information and Personal Settings.
For additional information, refer to “Pro-
grammable Features” located in this guide.
• Press and release the UP
button to
scroll upward through the main menus (Fuel
Economy, Vehicle Info, Tire PSI, Cruise,
Messages, Trip Info, Vehicle Speed and Turn
Menu Off ) and sub menus.
• Press and release the DOWN
button to scroll downward through the main menus and
sub menus.
• Press and release the SELECT
button for access to main menus, sub menus or to select
a personal setting in the setup menu. Press and hold the SELECT button for two seconds to
reset features.
• Press the BACK button to scroll back to a previous menu or sub menu.
Compass Calibration
• This compass is self-calibrating, which eliminates the need to set the compass manually. When the vehicle is new, the compass may appear erratic and the EVIC will display “CAL” until the
compass is calibrated.
• You may also calibrate the compass by completing one or more 360 degree turns (in an area free from large metal or metallic objects) until the “CAL” message displayed in the EVIC turns
off. The compass will now function normally.
ECO
• The ECO message will appear in your EVIC display whenever you are driving in a fuelefficient manner.
• This feature allows you to monitor when you are driving in a fuel efficient manner, and it can be used to modify driving habits in order to increase fuel economy.
ELECTRONICS
60
Page 63 of 132

• The EVIC can be used to view or change the following settings. Press the UPor DOWN
button until System Setup displays, then press")
PROGRAMMABLE FEATURES
Electronic Vehicle Information Center (EVIC)
• The EVIC can be used to view or change the following settings. Press the UPor DOWN
button until System Setup displays, then press the SELECTbutton. Scroll through
the settings using the UP or DOWN buttons. Press the SELECT
button to change the
setting. Press the BACK button to scroll back to a previous menu or sub menu.
• Fuel Economy •Vehicle Info (Customer Information Features)
• Vehicle Speed• Messages
• Trip Info • Turn Menu Off
• Units
Uconnect® 8.4 Customer Programmable Features
•The Uconnect® 8.4 system allows you to access Customer Programmable feature settings such as
Display, Clock, Safety/Assistance, Lights, Doors & Locks, Heated Seats, Engine Off Operation,
Compass Settings, Audio, Phone/ Bluetooth and SiriusXM Setup through soft-keys.
• Touch the More soft-key to on the bottom of the screen, then touch the Settings soft-key to
access the Settings screen. When making a selection, scroll up or down until the preferred
setting is highlighted, then press and release the preferred setting until a check-mark appears
next to the setting, showing that setting has been selected. The following feature settings are
available:
• Display • Clock
• Safety / Assistance • Doors & Locks
• Auto-On Comfort & Remote Start • Engine Off Options
• Compass • Audio
• Phone / Bluetooth • SiriusXM Setup
• Lights
ELECTRONICS
61
Page 64 of 132

• HomeLink® replaces up to three hand-held transmitters that operate devices such as garagedoor openers, motorized gates, lighting or home security systems")
UNIVERSAL GARAGE DOOR OPENER
(HomeLink®)
• HomeLink® replaces up to three hand-held transmitters that operate devices such as garagedoor openers, motorized gates, lighting or home security systems. The HomeLink® unit is
powered by your vehicles 12 Volt battery.
• The HomeLink® buttons that are located in the overhead console or sunvisor designate the three different HomeLink® channels.
• The HomeLink® indicator is located above the center button.
Before You Begin Programming
HomeLink®
• Ensure that your vehicle is parked outside of the garage before you begin programming.
• For efficient programming and accurate transmission of the radio-frequency signal,
it is recommended that a new battery be
placed in the hand-held transmitter of the
device that is being programmed to the
HomeLink® system.
• Erase all channels before you begin pro- gramming. To erase the channels, place the
ignition switch into the ON/RUN position,
then press and hold the two outside
HomeLink® buttons (I and III) for up to 20 seconds or until the red indicator flashes.
NOTE:
Erasing all channels should only be performed when programming HomeLink® for the first time.
Do not erase channels when programming additional buttons.
• If you have any problems, or require assistance, please call toll-free 1-800-355-3515 or, on the Internet at www.HomeLink.com for information or assistance.
Programming A Rolling Code
NOTE:
For programming Garage Door Openers that were manufactured after 1995. These Garage
Door Openers can be identified by the “LEARN” or “TRAIN” button located where the hanging
antenna is attached to the Garage Door Opener. It is NOT the button that is normally used to
open and close the door. The name and color of the button may vary by manufacturer.
1. Place the ignition switch into the ON/RUN position.
2. Place the hand-held transmitter 1 to 3 in (3 to 8 cm) away from the HomeLink® button you wish
to program while keeping the HomeLink® indicator light in view.
3. Simultaneously press and hold both the HomeLink® button you want to program and the hand-held transmitter button.
ELECTRONICS
62
 1
1 2
2 3
3 4
4 5
5 6
6 7
7 8
8 9
9 10
10 11
11 12
12 13
13 14
14 15
15 16
16 17
17 18
18 19
19 20
20 21
21 22
22 23
23 24
24 25
25 26
26 27
27 28
28 29
29 30
30 31
31 32
32 33
33 34
34 35
35 36
36 37
37 38
38 39
39 40
40 41
41 42
42 43
43 44
44 45
45 46
46 47
47 48
48 49
49 50
50 51
51 52
52 53
53 54
54 55
55 56
56 57
57 58
58 59
59 60
60 61
61 62
62 63
63 64
64 65
65 66
66 67
67 68
68 69
69 70
70 71
71 72
72 73
73 74
74 75
75 76
76 77
77 78
78 79
79 80
80 81
81 82
82 83
83 84
84 85
85 86
86 87
87 88
88 89
89 90
90 91
91 92
92 93
93 94
94 95
95 96
96 97
97 98
98 99
99 100
100 101
101 102
102 103
103 104
104 105
105 106
106 107
107 108
108 109
109 110
110 111
111 112
112 113
113 114
114 115
115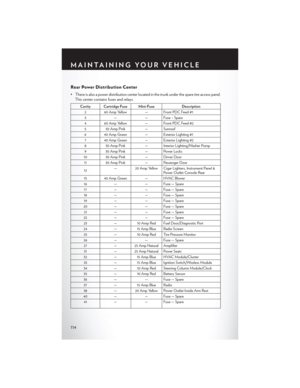 116
116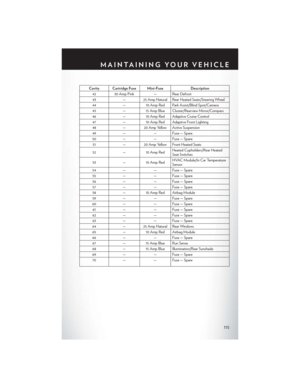 117
117 118
118 119
119 120
120 121
121 122
122 123
123 124
124 125
125 126
126 127
127 128
128 129
129 130
130 131
131