2014 CHEVROLET SILVERADO 1500 length
[x] Cancel search: lengthPage 98 of 542
Black plate (38,1)Chevrolet Silverado Owner Manual (GMNA-Localizing-U.S./Canada/Mexico-
5853506) - 2014 - CRC 3rd Edition - 8/28/13
3-38 Seats and Restraints
.Can proper safety belt fit be
maintained for the length of the
trip? If yes, continue. If no,
return to the booster seat.
Q: What is the proper way to wear safety belts?
A: An older child should wear a
lap-shoulder belt and get the
additional restraint a shoulder
belt can provide. The shoulder
belt should not cross the face or
neck. The lap belt should fit
snugly below the hips, just
touching the top of the thighs.
This applies belt force to the
child's pelvic bones in a crash.
It should never be worn over the
abdomen, which could cause
severe or even fatal internal
injuries in a crash.
Also see “Rear Safety Belt Comfort
Guides” underLap-Shoulder Belt on
page 3-14.
According to accident statistics,
children are safer when properly
restrained in a rear seating position. In a crash, children who are not
buckled up can strike other people
who are buckled up, or can be
thrown out of the vehicle. Older
children need to use safety belts
properly.
{Warning
Never allow more than one child
to wear the same safety belt. The
safety belt cannot properly spread
the impact forces. In a crash, they
can be crushed together and
seriously injured. A safety belt
must be used by only one person
at a time.
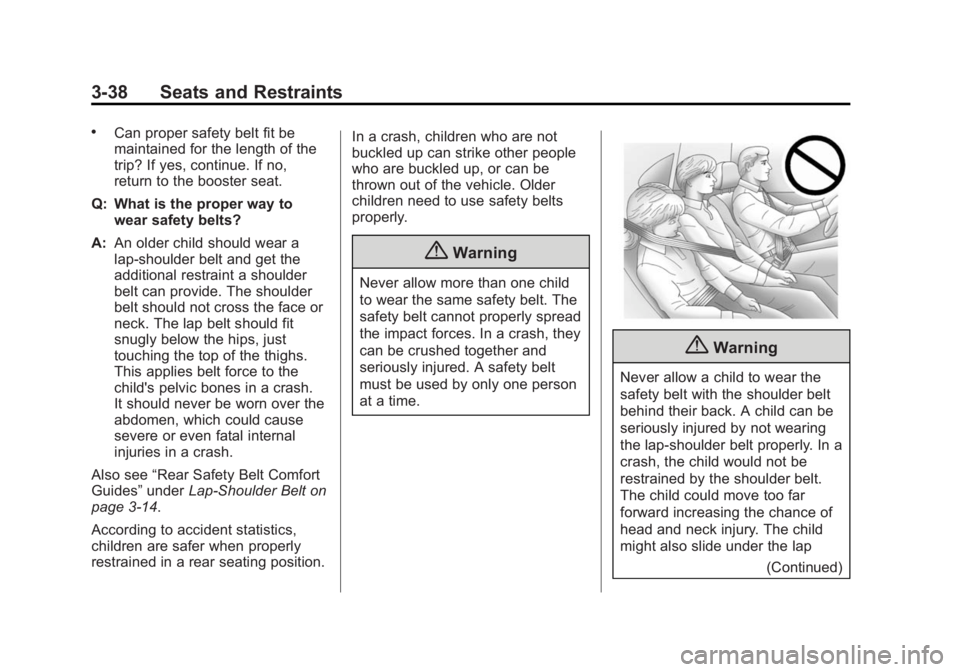
{Warning
Never allow a child to wear the
safety belt with the shoulder belt
behind their back. A child can be
seriously injured by not wearing
the lap-shoulder belt properly. In a
crash, the child would not be
restrained by the shoulder belt.
The child could move too far
forward increasing the chance of
head and neck injury. The child
might also slide under the lap
(Continued)
Page 186 of 542
Black plate (50,1)Chevrolet Silverado Owner Manual (GMNA-Localizing-U.S./Canada/Mexico-
5853506) - 2014 - CRC 3rd Edition - 8/28/13
5-50 Instruments and Controls
Select All Doors or Driver
Door Only.
Passive Door Lock
This feature can be turned on or off,
or can be used to select feedback
when using the button on the driver
door to lock the vehicle. See
Remote Keyless Entry (RKE)
System Operation on page 2-3.
Select Off, On with Horn
Chirp, or On.
Remote Left in Vehicle Alert
This feature sounds an alert when
the RKE transmitter is left in the
vehicle.
Select Off or On.
Bluetooth
Select and the following may
display:
.Pair New Device
.Device Management
.Ringtones
.Voice Mail NumbersPair New Device
Select to pair a new device. See
“Pairing”
in“Infotainment Controls”
under Bluetooth (Infotainment
Controls - Base Radio) on
page 7-33 orBluetooth (Voice
Recognition - Base Radio) on
page 7-37 orBluetooth (Overview)
on page 7-31 orBluetooth
(Infotainment Controls - Base
Connected Radio) on page 7-42 or
Bluetooth (Voice Recognition - Base
Connected Radio) on page 7-46 or
“Pairing” in“Infotainment Controls”
under Bluetooth in the infotainment
manual.
Device Management
Select to connect to a different
phone source, disconnect a phone,
or delete a phone.
Ringtones
Press to change the ring tone for
the specific phone. The phone does
not need to be connected to change
the ring tones. Voice Mail Numbers
This feature displays the voice mail
number for all connected phones.
To change the voice mail number,
select EDIT or press the EDIT
button. Type a new number, then
select SAVE or press the SAVE
button.
Voice
Select and the following may
display:
.Prompt Length
.Audio Feedback Speed
Prompt Length
This feature adjusts the voice
prompt length.
Select Short or Long.
Audio Feedback Speed
This feature adjusts the audio
feedback speed.
Select Slow, Medium, or Fast.
Page 233 of 542
Black plate (31,1)Chevrolet Silverado Owner Manual (GMNA-Localizing-U.S./Canada/Mexico-
5853506) - 2014 - CRC 3rd Edition - 8/28/13
Infotainment System 7-31
Voice Recognition for the
Phone
“Call
call to an entered contact. The
command may include location if
the contact has location numbers
stored.
“Call
“At Work,” “On Mobile,” or“On
Other”: Initiate a call to an entered
contact and location at home, at
work, on mobile device, or on
another phone.
“Call
call to a standard phone number
seven or 10 digits in length, and
also 911, 411, or 611.
“Pair Phone”: Begins the
Bluetooth pairing process. Follow
instructions on the radio display. “Switch Phone”:
Select a different
phone for outgoing calls.
“Voice Keypad”: Begins a dialog
to enter special numbers like
international numbers. The numbers
can be entered in groups of digits
with each group of digits being
repeated back by the system. If the
group of digits is not correct, the
command “Delete”will remove the
last group of digits and allow them
to be re-entered. Once the entire
number has been entered, the
command “Call”will start dialing the
number.
“Voice Mail”: Initiate a call to voice
mail numbers.
Voice Recognition for OnStar
(If Equipped)
“OnStar”: Begin Onstar Voice
Recognition.
Phone
Bluetooth (Overview)
Instructions for using the cell phone
may differ between infotainment
systems. The base radio and base
radio with connectivity instructions
are included in this manual. See the
infotainment manual for instructions
on the uplevel radios.
Bluetooth-capable systems can
interact with many cell phones,
allowing:
.Placement and receipt of calls in
a hands-free mode.
.Sharing of the cell phone’s
address book or contact list with
the vehicle.
To minimize driver distraction,
before driving, and with the vehicle
parked:
.Become familiar with the
features of the cell phone.
Organize the phone book and
contact lists clearly and delete
Page 296 of 542
Black plate (30,1)Chevrolet Silverado Owner Manual (GMNA-Localizing-U.S./Canada/Mexico-
5853506) - 2014 - CRC 3rd Edition - 8/28/13
9-30 Driving and Operating
{Warning
Plugging the cord into an
ungrounded outlet could cause an
electrical shock. Also, the wrong
kind of extension cord could
overheat and cause a fire. You
could be seriously injured. Plug
the cord into a properly grounded
three-prong 110-volt AC outlet.
If the cord will not reach, use a
heavy-duty three-prong extension
cord rated for at least 15 amps.
4. Before starting the engine, be sure to unplug and store the
cord as it was before to keep it
away from moving engine parts.
If you do not, it could be
damaged.
The length of time the heater should
remain plugged in depends on
several factors. Ask a dealer in the
area where you will be parking the
vehicle for the best advice on this.
Shifting Into Park
{Warning
It can be dangerous to get out of
the vehicle if the shift lever is not
fully in P (Park) with the parking
brake firmly set. The vehicle can
roll. If you have left the engine
running, the vehicle can move
suddenly. You or others could be
injured. To be sure the vehicle will
not move, even when you are on
fairly level ground, use the steps
that follow. With four-wheel drive,
if the transfer case is in
N (Neutral), the vehicle will be
free to roll, even if the shift lever
is in P (Park). Be sure the transfer
case is in a drive gear. If towing a
trailer, see Driving Characteristics
and Towing Tips on page 9-75. 1. Hold the brake pedal down, then
set the parking brake.
See Parking Brake on
page 9-54.
2. Move the shift lever into the P (Park) position by pulling the
shift lever toward you and
moving it up as far as it will go.
3. Be sure the transfer case (if equipped) is in a drive
gear —not in N (Neutral).
4. Turn the ignition key to LOCK/OFF.
5. Remove the key and take it with you. If you can leave the vehicle
with the ignition key in your
hand, the vehicle is in P (Park).
Page 408 of 542
Black plate (38,1)Chevrolet Silverado Owner Manual (GMNA-Localizing-U.S./Canada/Mexico-
5853506) - 2014 - CRC 3rd Edition - 8/29/13
10-38 Vehicle Care
.To check the P (Park)
mechanism's holding ability:
With the engine running, shift to
P (Park). Then release the
parking brake followed by the
regular brake.
Contact your dealer if service is
required.
Wiper Blade Replacement
Windshield wiper blades should be
inspected for wear or cracking. See
Maintenance Schedule on
page 11-3.
Replacement blades come in
different types and are removed in
different ways. For proper
windshield wiper blade length and
type, see Maintenance
Replacement Parts on page 11-15.
{Caution
Allowing the wiper arm to touch
the windshield when no wiper
blade is installed could damage
the windshield. Any damage that
occurs would not be covered by
your warranty. Do not allow the
wiper arm to touch the windshield.
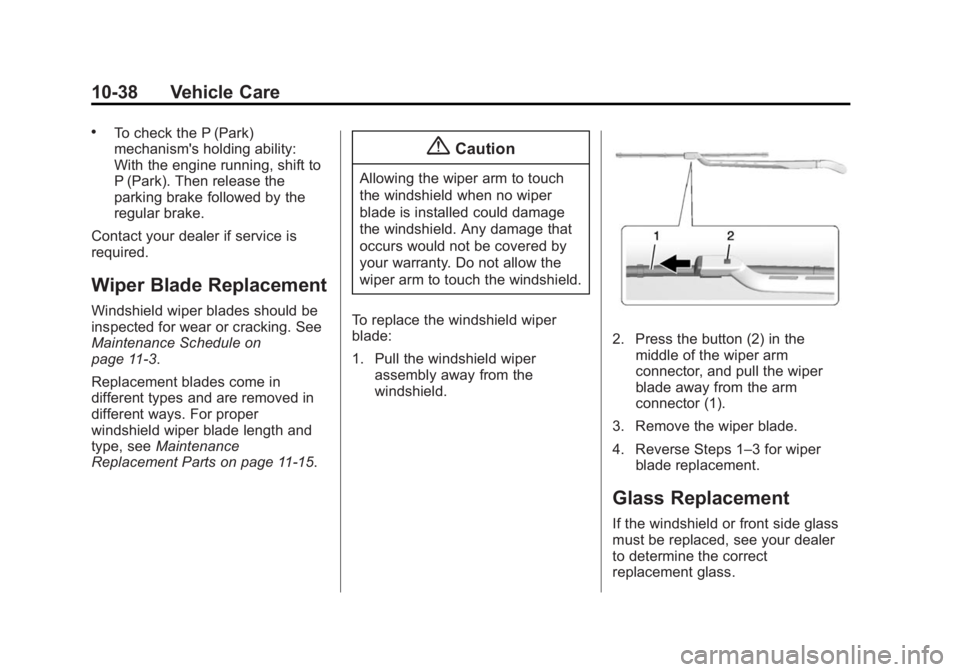
To replace the windshield wiper
blade:
1. Pull the windshield wiper assembly away from the
windshield.
2. Press the button (2) in themiddle of the wiper arm
connector, and pull the wiper
blade away from the arm
connector (1).
3. Remove the wiper blade.
4. Reverse Steps 1–3 for wiper blade replacement.
Glass Replacement
If the windshield or front side glass
must be replaced, see your dealer
to determine the correct
replacement glass.