2014 CHEVROLET SILVERADO 1500 clutch
[x] Cancel search: clutchPage 293 of 542
Black plate (27,1)Chevrolet Silverado Owner Manual (GMNA-Localizing-U.S./Canada/Mexico-
5853506) - 2014 - CRC 3rd Edition - 8/28/13
Driving and Operating 9-27
{Caution
Do not try to shift to P (Park) if the
vehicle is moving. If you do, you
could damage the transmission.
Shift to P (Park) only when the
vehicle is stopped.
Manual Transmission
The shift lever should be in Neutral
and the parking brake engaged.
Hold the clutch pedal down to the
floor and start the engine. The
vehicle will not start if the clutch
pedal is not all the way down.
Starting Procedure
1. With your foot off the acceleratorpedal, turn the ignition key to
START. When the engine starts,
let go of the key. The idle speed
will go down as the engine gets
warm. Do not race the engine
immediately after starting it.
Operate the engine and
transmission gently to allow the
oil to warm up and lubricate all
moving parts.
The vehicle has a
Computer-Controlled Cranking
System. This feature assists in
starting the engine and protects
components. If the ignition key is
turned to the START position,
and then released when the
engine begins cranking, the
engine will continue cranking for
a few seconds or until the
vehicle starts. If the engine does
not start and the key is held in
START for many seconds,
cranking will be stopped after
15 seconds to prevent cranking
motor damage. To prevent gear damage, this system also
prevents cranking if the engine
is already running. Engine
cranking can be stopped by
turning the ignition switch to the
ACC/ACCESSORY or LOCK/
OFF position.
When the low fuel warning light
is on and the FUEL LEVEL LOW
message is displayed in the
Driver Information Center (DIC),
the Computer-Controlled
Cranking System is disabled to
prevent possible vehicle
component damage. When this
happens, hold the ignition switch
in the START position to
continue engine cranking.
{Caution
Cranking the engine for long
periods of time, by returning the
ignition to the START position
immediately after cranking has
ended, can overheat and damage
(Continued)
Page 298 of 542
Black plate (32,1)Chevrolet Silverado Owner Manual (GMNA-Localizing-U.S./Canada/Mexico-
5853506) - 2014 - CRC 3rd Edition - 8/28/13
9-32 Driving and Operating
The shift lock release is always
functional except in the case of an
uncharged or low voltage (less than
9 volt) battery.
If the vehicle has an uncharged
battery or a battery with low voltage,
try charging or jump starting the
battery. SeeJump Starting on
page 10-89.
To shift out of P (Park):
1. Apply the brake pedal.
2. Move the shift lever to the desired position.
If you still are unable to shift out of
P (Park):
1. Ease the pressure on the shift lever.
2. While holding down the brake pedal, press the shift lever all
the way into P (Park).
3. Move the shift lever to the desired position.
If you are still having a problem
shifting, then have the vehicle
serviced soon.Parking (Manual
Transmission)
If the vehicle has a manual
transmission, before you get out of
the vehicle, move the shift lever into
R (Reverse), and firmly apply the
parking brake. Once the shift lever
has been placed into R (Reverse)
with the clutch pedal pressed in,
turn the ignition key to LOCK/OFF,
remove the key and release the
clutch.
If you are parking on a hill, or if the
vehicle is pulling a trailer, see
Driving Characteristics and Towing
Tips on page 9-75.
Parking over Things
That Burn
{Warning
Things that can burn could touch
hot exhaust parts under the
vehicle and ignite. Do not park
over papers, leaves, dry grass,
or other things that can burn.
Active Fuel Management®
Vehicles with a V8 or V6 gasoline
engine may have Active Fuel
Management. This system allows
the engine to operate on either all of
its cylinders, or in V4 mode,
depending on the driving conditions.
When less power is required, such
as cruising at a constant vehicle
speed, the system will operate in
the V4 mode, allowing the vehicle to
achieve better fuel economy. When
greater power demands are
required, such as accelerating from
Page 305 of 542
Black plate (39,1)Chevrolet Silverado Owner Manual (GMNA-Localizing-U.S./Canada/Mexico-
5853506) - 2014 - CRC 3rd Edition - 8/28/13
Driving and Operating 9-39
SeeTow/Haul Mode Light on
page 5-25 andHill and Mountain
Roads on page 9-12.
Also see “Tow/Haul Mode” under
Towing Equipment on page 9-89.
Tow/Haul Mode Grade Braking
Tow/Haul Mode Grade Braking is
only enabled while the Tow/Haul
Mode is selected and the vehicle is
not in the Range Selection Mode.
See “Tow/Haul Mode” listed
previously and Manual Mode on
page 9-37. Tow/Haul Mode Grade
Braking assists in maintaining
desired vehicle speeds when driving
on downhill grades by using the
engine and transmission to slow the
vehicle.
On vehicles with a gasoline engine,
to disable or enable Tow/Haul
Grade Braking within the current
ignition key cycle, press and hold
the Tow/Haul button for
five seconds. When the button is
released, the requested mode change is made. A DIC message is
displayed. See
Transmission
Messages on page 5-41.
On vehicles with a diesel engine,
Tow/Haul Mode Grade Braking can
be enabled or disabled by pressing
the Tow/Haul Mode button. Use the
exhaust brake and Tow/Haul Mode
for maximum grade braking.
See Towing Equipment on
page 9-89.
For other forms of grade braking,
see Automatic Transmission on
page 9-34 andCruise Control on
page 9-59.
Manual Transmission
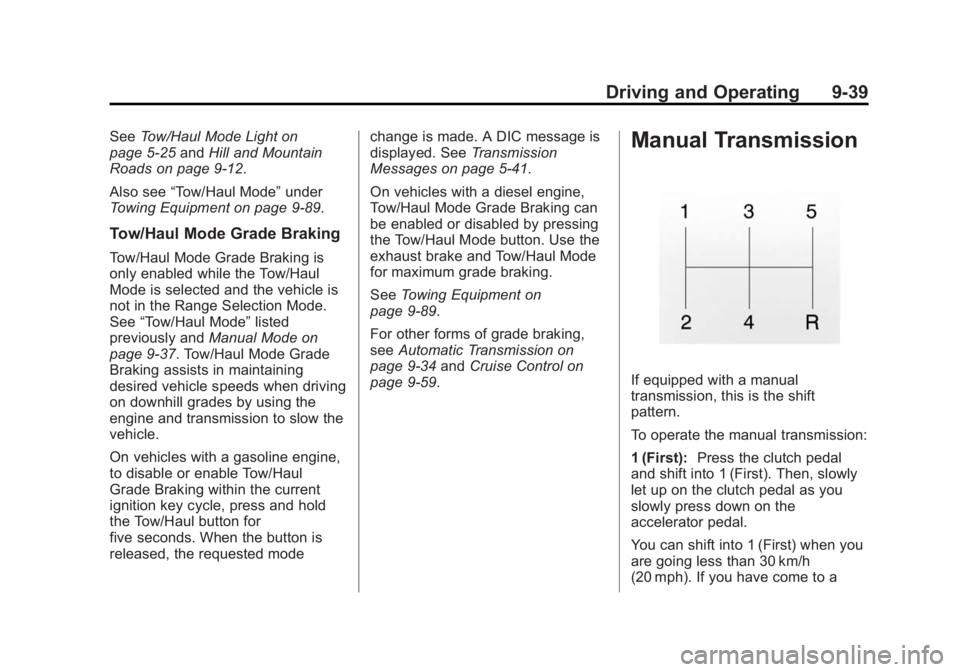
If equipped with a manual
transmission, this is the shift
pattern.
To operate the manual transmission:
1 (First): Press the clutch pedal
and shift into 1 (First). Then, slowly
let up on the clutch pedal as you
slowly press down on the
accelerator pedal.
You can shift into 1 (First) when you
are going less than 30 km/h
(20 mph). If you have come to a
Page 306 of 542
Black plate (40,1)Chevrolet Silverado Owner Manual (GMNA-Localizing-U.S./Canada/Mexico-
5853506) - 2014 - CRC 3rd Edition - 8/28/13
9-40 Driving and Operating
complete stop and it is hard to shift
into 1 (First), put the shift lever in
Neutral and let up on the clutch.
Then press the clutch pedal back
down and shift into 1 (First).
2 (Second):Press the clutch pedal
as you let up on the accelerator
pedal and shift into 2 (Second).
Then, slowly let up on the clutch
pedal as you press the accelerator
pedal.
3 (Third), 4 (Fourth), and 5 (Fifth):
Shift into 3 (Third), 4 (Fourth), and
5 (Fifth) the same way you do for
2 (Second). Slowly let up on the
clutch pedal as you press the
accelerator pedal.
To stop, let up on the accelerator
pedal and press the brake pedal.
Just before the vehicle stops, press
the clutch pedal and the brake
pedal, and shift to Neutral.
Neutral: Use this position when
you start or idle the engine. R (Reverse):
To back up, press the
clutch pedal. After the vehicle stops,
shift into R (Reverse). Slowly let up
on the clutch pedal as you press the
accelerator pedal. If it is hard to
shift, let the shift lever return to
Neutral and release the clutch
pedal. Then press the clutch again
and shift into R (Reverse). Do not
attempt to shift into 5 (Fifth) prior to
shifting into R (Reverse). The
transmission has a lock out feature,
which prevents a 5 (Fifth) gear to
R (Reverse) gear shift.
{Caution
Shifting to R (Reverse) while the
vehicle is moving forward could
damage the transmission. The
repairs would not be covered by
the vehicle warranty. Shift to
R (Reverse) only after the vehicle
is stopped.
Use R (Reverse), along with the
parking brake, for parking the
vehicle.
Shift Speeds
{Warning
If you skip a gear when
downshifting, you could lose
control of the vehicle. You could
injure yourself or others. Do not
shift down more than one gear at
a time when downshifting.
Page 371 of 542
Black plate (1,1)Chevrolet Silverado Owner Manual (GMNA-Localizing-U.S./Canada/Mexico-
5853506) - 2014 - CRC 3rd Edition - 8/29/13
Vehicle Care 10-1
Vehicle Care
General Information
General Information . . . . . . . . . . 10-2
California Proposition65 Warning . . . . . . . . . . . . . . . . . 10-2
California Perchlorate Materials Requirements . . . . 10-3
Accessories and Modifications . . . . . . . . . . . . . . . 10-3
Vehicle Checks
Doing Your OwnService Work . . . . . . . . . . . . . . . 10-3
Hood . . . . . . . . . . . . . . . . . . . . . . . . 10-4
Engine Compartment Overview . . . . . . . . . . . . . . . . . . . 10-5
Engine Oil . . . . . . . . . . . . . . . . . . 10-10
Engine Oil Life System . . . . . 10-13
Automatic Transmission Fluid . . . . . . . . . . . . . . . . . . . . . . 10-14
Manual Transmission Fluid . . . . . . . . . . . . . . . . . . . . . . 10-17
Hydraulic Clutch . . . . . . . . . . . . 10-17
Engine Air Cleaner/Filter . . . . 10-18
Cooling System . . . . . . . . . . . . 10-19
Engine Coolant . . . . . . . . . . . . . 10-20
Engine Overheating . . . . . . . . 10-23 Overheated Engine
Protection Operating Mode
(6.0L V8 Engine Only) . . . . . 10-25
Engine Fan . . . . . . . . . . . . . . . . . 10-26
Power Steering Fluid (1500 Series) . . . . . . . . . . . . . . . . . . . . 10-26
Power Steering Fluid (2500/ 3500 Series) . . . . . . . . . . . . . . 10-26
Washer Fluid . . . . . . . . . . . . . . . 10-27
Brakes . . . . . . . . . . . . . . . . . . . . . 10-28
Brake Fluid . . . . . . . . . . . . . . . . . 10-29
Battery . . . . . . . . . . . . . . . . . . . . . 10-31
Four-Wheel Drive . . . . . . . . . . . 10-31
Front Axle . . . . . . . . . . . . . . . . . . 10-33
Rear Axle . . . . . . . . . . . . . . . . . . 10-34
Noise Control System . . . . . . 10-35
Starter Switch Check . . . . . . . 10-36
Automatic Transmission Shift Lock Control Function
Check . . . . . . . . . . . . . . . . . . . . . 10-37
Ignition Transmission Lock Check . . . . . . . . . . . . . . . . . . . . . 10-37
Park Brake and P (Park) Mechanism Check . . . . . . . . 10-37
Wiper Blade Replacement . . . . . . . . . . . . . . 10-38
Glass Replacement . . . . . . . . 10-38
Headlamp Aiming
Headlamp Aiming . . . . . . . . . . 10-39
Bulb Replacement
Bulb Replacement . . . . . . . . . . 10-39
Halogen Bulbs . . . . . . . . . . . . . . 10-39
Headlamps, Front Turn Signal, Sidemarker, and
Parking Lamps . . . . . . . . . . . . 10-39
Fog Lamps . . . . . . . . . . . . . . . . . 10-40
Taillamps (Chassis Cab Models) . . . . . . . . . . . . . . . . . . . 10-40
Taillamps, Turn Signal, Stoplamps, and Back-Up
Lamps . . . . . . . . . . . . . . . . . . . . 10-41
Center High-Mounted Stoplamp (CHMSL) and
Cargo Lamp . . . . . . . . . . . . . . 10-41
License Plate Lamp . . . . . . . . 10-42
Replacement Bulbs . . . . . . . . . 10-42
Electrical System
Electrical System Overload . . . . . . . . . . . . . . . . . . 10-43
Fuses . . . . . . . . . . . . . . . . . . . . . . 10-43
Page 376 of 542
Black plate (6,1)Chevrolet Silverado Owner Manual (GMNA-Localizing-U.S./Canada/Mexico-
5853506) - 2014 - CRC 3rd Edition - 8/29/13
10-6 Vehicle Care
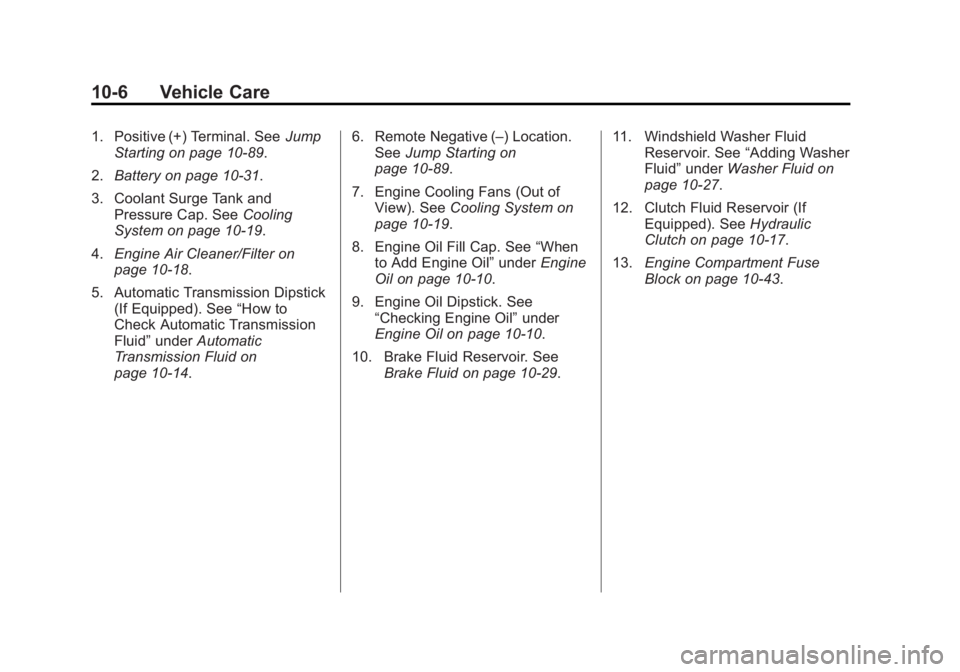
1. Positive (+) Terminal. SeeJump
Starting on page 10-89.
2. Battery on page 10-31.
3. Coolant Surge Tank and Pressure Cap. See Cooling
System on page 10-19.
4. Engine Air Cleaner/Filter on
page 10-18.
5. Automatic Transmission Dipstick (If Equipped). See “How to
Check Automatic Transmission
Fluid” under Automatic
Transmission Fluid on
page 10-14. 6. Remote Negative (–) Location.
See Jump Starting on
page 10-89.
7. Engine Cooling Fans (Out of View). See Cooling System on
page 10-19.
8. Engine Oil Fill Cap. See “When
to Add Engine Oil” underEngine
Oil on page 10-10.
9. Engine Oil Dipstick. See “Checking Engine Oil” under
Engine Oil on page 10-10.
10. Brake Fluid Reservoir. See Brake Fluid on page 10-29. 11. Windshield Washer Fluid
Reservoir. See “Adding Washer
Fluid” under Washer Fluid on
page 10-27.
12. Clutch Fluid Reservoir (If Equipped). See Hydraulic
Clutch on page 10-17.
13. Engine Compartment Fuse
Block on page 10-43.
Page 387 of 542
Black plate (17,1)Chevrolet Silverado Owner Manual (GMNA-Localizing-U.S./Canada/Mexico-
5853506) - 2014 - CRC 3rd Edition - 8/29/13
Vehicle Care 10-17
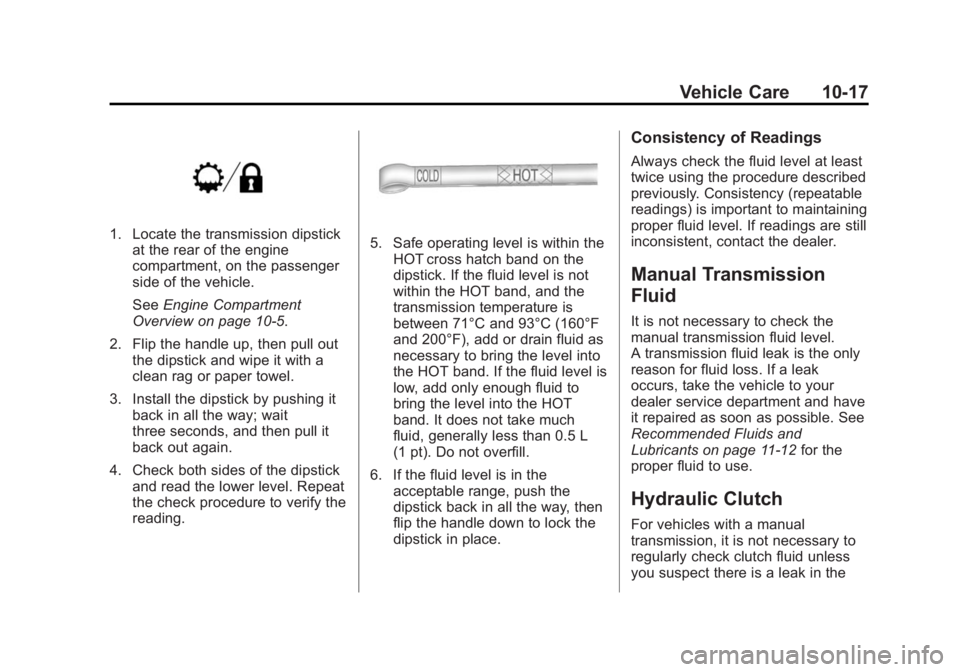
1. Locate the transmission dipstickat the rear of the engine
compartment, on the passenger
side of the vehicle.
See Engine Compartment
Overview on page 10-5.
2. Flip the handle up, then pull out the dipstick and wipe it with a
clean rag or paper towel.
3. Install the dipstick by pushing it back in all the way; wait
three seconds, and then pull it
back out again.
4. Check both sides of the dipstick and read the lower level. Repeat
the check procedure to verify the
reading.5. Safe operating level is within theHOT cross hatch band on the
dipstick. If the fluid level is not
within the HOT band, and the
transmission temperature is
between 71°C and 93°C (160°F
and 200°F), add or drain fluid as
necessary to bring the level into
the HOT band. If the fluid level is
low, add only enough fluid to
bring the level into the HOT
band. It does not take much
fluid, generally less than 0.5 L
(1 pt). Do not overfill.
6. If the fluid level is in the acceptable range, push the
dipstick back in all the way, then
flip the handle down to lock the
dipstick in place.
Consistency of Readings
Always check the fluid level at least
twice using the procedure described
previously. Consistency (repeatable
readings) is important to maintaining
proper fluid level. If readings are still
inconsistent, contact the dealer.
Manual Transmission
Fluid
It is not necessary to check the
manual transmission fluid level.
A transmission fluid leak is the only
reason for fluid loss. If a leak
occurs, take the vehicle to your
dealer service department and have
it repaired as soon as possible. See
Recommended Fluids and
Lubricants on page 11-12 for the
proper fluid to use.
Hydraulic Clutch
For vehicles with a manual
transmission, it is not necessary to
regularly check clutch fluid unless
you suspect there is a leak in the
Page 388 of 542
Black plate (18,1)Chevrolet Silverado Owner Manual (GMNA-Localizing-U.S./Canada/Mexico-
5853506) - 2014 - CRC 3rd Edition - 8/29/13
10-18 Vehicle Care
system. Adding fluid will not correct
a leak. A fluid loss in this system
could indicate a problem. Have the
system inspected and repaired.
When to Check and What
to Use
The hydraulic clutch fluid reservoir
is filled with DOT 3 brake fluid as
indicated on the reservoir cap. See
Engine Compartment Overview on
page 10-5for reservoir location.
How to Check and Add Fluid
Visually check the clutch fluid
reservoir to make sure the fluid level
is at the MIN (minimum) line on the
side of the reservoir. The hydraulic
clutch fluid system should be closed
and sealed.
Do not remove the cap to check the
fluid level or to top-off the fluid level.
Remove the cap only when
necessary to add the proper fluid
until the level reaches the MIN line.
Engine Air Cleaner/Filter
If the vehicle has a diesel engine,
see“Pickup Models” under“Engine
Air Cleaner/Filter” in the Duramax
diesel supplement for the correct
inspection and replacement
procedures.
See Engine Compartment Overview
on page 10-5 for the location of the
engine air cleaner/filter.
When to Inspect the Engine Air
Cleaner/Filter
Inspect the air cleaner/filter at the
scheduled maintenance intervals
and replace it at the first oil change
after each 80 000 km (50,000 mi)
interval. See Maintenance Schedule
on page 11-3. If driving in dusty/dirty
conditions, inspect the filter at each
engine oil change.
How to Inspect the Engine Air
Cleaner/Filter
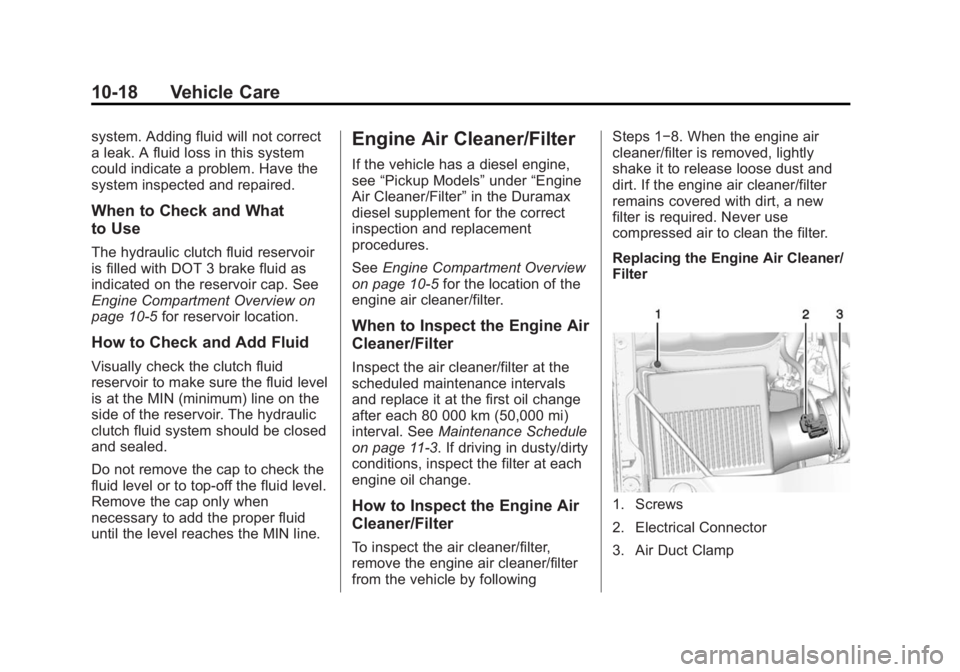
To inspect the air cleaner/filter,
remove the engine air cleaner/filter
from the vehicle by following Steps 1−8. When the engine air
cleaner/filter is removed, lightly
shake it to release loose dust and
dirt. If the engine air cleaner/filter
remains covered with dirt, a new
filter is required. Never use
compressed air to clean the filter.
Replacing the Engine Air Cleaner/
Filter
1. Screws
2. Electrical Connector
3. Air Duct Clamp