2014 CHEVROLET ORLANDO ECO mode
[x] Cancel search: ECO modePage 35 of 98

Black plate (35,1)Chevrolet Orlando Infotainment System (GMNA-Localizing-Canada-
6081467) - 2014 - CRC - 6/13/13
Infotainment System 35
Pictures
Pictures can only be viewed using
USB devices. If pictures are on an
SD card, transfer to a USB device
or use a USB-SD adapter.
A maximum 5Mb uncompressed
photo size is supported, however to
achieve this, use a 4 Megapixel or
lower resolution camera setting.
Only jpeg, bmp, gif, and png files
are supported.
1. Press the Pictures screen buttonon the Home Page.
2. The system does a search to find the picture folders.
A“Please wait” message
displays until the search is
finished.
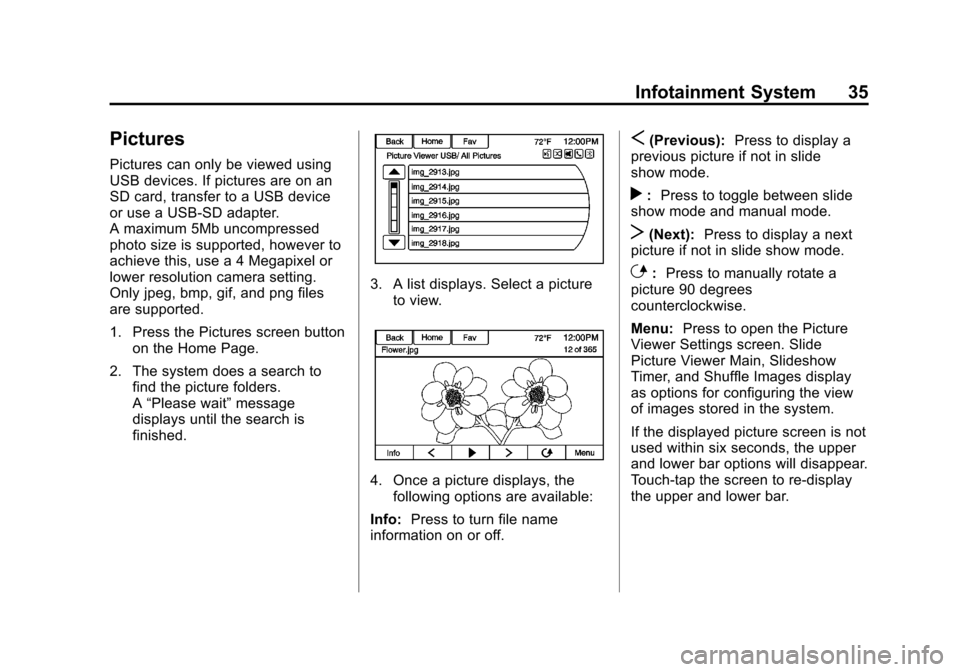
3. A list displays. Select a picture to view.
4. Once a picture displays, thefollowing options are available:
Info: Press to turn file name
information on or off.
S(Previous): Press to display a
previous picture if not in slide
show mode.
r: Press to toggle between slide
show mode and manual mode.
T(Next): Press to display a next
picture if not in slide show mode.
E: Press to manually rotate a
picture 90 degrees
counterclockwise.
Menu: Press to open the Picture
Viewer Settings screen. Slide
Picture Viewer Main, Slideshow
Timer, and Shuffle Images display
as options for configuring the view
of images stored in the system.
If the displayed picture screen is not
used within six seconds, the upper
and lower bar options will disappear.
Touch-tap the screen to re-display
the upper and lower bar.
Page 43 of 98

Black plate (43,1)Chevrolet Orlando Infotainment System (GMNA-Localizing-Canada-
6081467) - 2014 - CRC - 6/13/13
Infotainment System 43
Albums:
1. Press to view the albums onthe iPod.
2. Select an album name to view a list of all songs on the album or
select All Songs to view all
songs on the iPod.
3. Select the song from the list to begin playback.
Genres:
1. Press to view the genres on the iPod.
2. Select a genre name to view a list of artists of that genre.
3. Select an artist to view albums or All Albums to view all albums
of that genre.
4. Select Artist to view albums.
5. Select Album to view songs.
6. Select the song from the list to begin playback. Songs:
1. Press to view a list of all songs
on the iPod.
2. Select the song from the list to begin playback.
Podcasts:
1. Press to view the podcasts on the iPod.
2. Select a podcast name to begin playback.
Composers:
1. Press to view the composers on the iPod.
2. Select the composer to view a list of songs by that composer.
3. Select a song from the list to begin playback. Audiobooks:
1. Press to view the audiobooks on
the iPod.
2. Select the audiobook from the list to begin playback.
Playing from an iPhone
or iPad®
This feature supports the following
iPhone or iPad models:
.iPhone®(2G, 3G, 3GS, 4, 4S,
and 5)
.iPad®(1G, 2G)
Follow the same instructions as
stated earlier for using an iPod. To
use voice recognition to play music,
say “Play USB,” “Play Artist,” “Play
Album,” “Play Song,” or“Play
Genre.” SeeVoice Recognition on
page 72.
Page 76 of 98

Black plate (76,1)Chevrolet Orlando Infotainment System (GMNA-Localizing-Canada-
6081467) - 2014 - CRC - 6/13/13
76 Infotainment System
Settings Commands
Verbose (set) on (mode), Verbose
(set) off (mode):Instructs the
system to turn voice prompts on or
off. When off, this feature turns off
voice prompts.
Language (language): Instructs
the system to set the language.
List Devices: Instructs the system
to give a list of devices to use.
Other Commands
Goodbye: Instructs the system to
end a phone call or voice
recognition.
Cancel: Instructs the system to
cancel an action.
Go Back, Back, Previous:
Instructs the system to go back to a
prior menu.
Main Menu: Instructs the system to
go to the main menu. Yes, Yep, Yup, Ya, Sure, Right,
Correct, OK, Positive, You Got it,
Probably, You Bet:
These can be
used to say “Yes.”
No, Nope, Na, No way, Wrong,
Incorrect, Negative, Not really, No
I said, No I Did Not, No I Do Not:
These can be used to say “No.”
Next Page, Page Down: Instructs
the system to scroll forward one
page in a list.
Previous Page, Page Up: Instructs
the system to scroll back one page
in a list.
Navigation Commands (If
Equipped)
To activate the navigation voice
recognition:
1. Press
b/gon the steering
wheel. The audio system mutes.
A voice prompt says, “Please
say a command.” Wait until the
tone is heard before speaking. If there is no tone, make sure
the volume is turned up.
While voice recognition is active,
the system displays a symbol in
the top right of the screen.
2. Clearly speak the command “Navigation.”
3. Clearly speak one of the commands in this section.
The following commands only apply
once the Navigation command is
given.
Change Country: Changes the
country origin to input a destination
from that region. The system will
accept United States, Canada,
or Mexico.
Address or Destination: Allows
an address to be stated as a
one-shot method. The system will
recognize the address if stated
all at once or say a city center.
An example is to say, “200
Renaissance Street, Detroit,
Michigan” or“Detroit, Michigan.”
Page 81 of 98

Black plate (81,1)Chevrolet Orlando Infotainment System (GMNA-Localizing-Canada-
6081467) - 2014 - CRC - 6/13/13
Infotainment System 81
Pairing a Phone/Device
1. Press the CONFIG buttonor
5/>.
2. Select Phone Settings.
3. Select Pair Device (Phone). The radio displays “Please start
Bluetooth search on your phone.
Confirm or enter number:.” If the
device supports a four-digit
Personal Identification Number
(PIN), it will display. The PIN is
used in Step 5.
4. Start the pairing process on the cell phone to be paired to the
vehicle. See the cell phone
manufacturer's user guide.
5. Locate and select the device named after the vehicle make
and model in the list on the cell
phone. Follow the instructions
on the cell phone to enter the
PIN provided in Step 4, or to
confirm the six-digit code
matches. The system recognizes
the new connected phone after
the pairing process is complete. 6. If the phone prompts to accept
connection or allow phone book
download, select always accept
and allow. The phone book
may not be available if not
accepted. Some phones will
put connection request or
phonebook request in a pull
down task bar at the top of the
screen. Drag down the task bar
and look for connection/
phonebook request and accept.
7. Repeat to pair additional phones.
Listing All Paired and Connected
Phones/Devices
1. Press the CONFIG button.
2. Select Phone Settings.
3. Select Device List.
Deleting a Paired Phone/Device
1. Press the CONFIG button.
2. Select Phone Settings.
3. Select Device List. 4. Select the phone to delete and
follow the screen prompts.
Connecting to a Different Phone
To connect to a different phone, the
new phone must be in the vehicle
and available to be connected to the
Bluetooth system before the
process is started.
1. Press the CONFIG button.
2. Select Phone Settings.
3. Select Device List.
4. Select the new phone to connect to and follow the screen
prompts.
Pairing with Voice Recognition
A Bluetooth-enabled cell phone
must be paired and then connected
to the vehicle before it can be used.
See the cell phone manufacturer's
user guide for Bluetooth functions
before pairing the cell phone. If a
Bluetooth phone is not connected,
calls will be made using OnStar
Hands-Free Calling, if equipped.
See “OnStar” in the owner manual.