2014 CADILLAC SRX mirror
[x] Cancel search: mirrorPage 2 of 20

2
Adjustable Pedals Switch♦
Exterior Lamps Control
Cruise Control/Phone/Heated Steering Wheel♦ Buttons
Instrument Cluster/Driver Information Center
Hazard Warning Flashers Button
Engine Start/Stop Button
Audio Steering Wheel Controls/ 5-Way Controller
Heated/ Ventilated Seat Buttons♦
Turn Signal Lever
Power Mirrors Control
Review this guide for an overview of some important features in your Cadillac SRX. Some optional equipment (denoted by ♦) described in this guide may not be included in your vehicle. More detailed information can be found in your Owner Manual.
Instrument Panel
CUE Touch Screen
Electric Parking Brake Switch
Shift Lever/ Driver Shift Control
StabiliTrak/ Traction Control Button
Lane Departure♦/ Parking Assist♦/ ECO Mode Buttons
Windshield Wipers/Rear Wiper Lever
Audio System ControlsClimate Controls
Tilt/Telescope Steering Wheel Lever
Page 12 of 20

12
Driver Awareness♦ and Driver Assist♦ Features
Side Blind Zone Alert – When a vehicle is detected in a side blind spot area, a warning symbol displays on the side mirror.
To turn off the system, see the Collision/Detection Systems menu under Vehicle Settings. The system turns on automati-cally every time the vehicle is started.
Rear Cross Traffic Alert – Warns of approaching traffic by dis-playing a ! visual alert on the touch screen from the Rear Vision Camera, and the left or right side of the driver’s seat pulses.*
Driver Awareness Package
Safety Alert Seat – Subtle seat cushion vibration pulses, left or right, or simultaneously, alert the driver of potential hazards.
Lane Departure Warning – When crossing a detected lane
marking without using a turn signal, a visual alert on the
instrument panel flashes and the left or right side of the driver’s seat pulses.*
Press the Lane Departure Warning button on the center console to turn the system on or off.
*Audible notification may be selected instead of Safety Alert Seat
vibration notification. See Vehicle Personalization on page 11.
Forward Collision Alert – When approaching a vehicle directly ahead too quickly, a visual alert on the windshield flashes and the driver’s seat pulses.*
Press the Collision Alert button on the left side of the steering wheel to set the alert timing (see the Collision/ Detection Systems menu if equipped with Adaptive Cruise Control).
Driver Assist Package (includes Driver Awareness Package)
Automatic Collision Preparation – Prepares the brakes or applies the brakes if an emergency collision appears imminent or the driver does not react to previous alerts.
Front and Rear Automatic Braking – Applies the brakes in potential collision situations to help reduce damage or help avoid collisions at lower speeds.
Press the Parking Assist button on the center console to turn Automatic Braking on or off.
Adaptive Cruise Control – If a vehicle is detected ahead, the vehicle accelerates or brakes moderately to maintain the selected following gap. If driver action is required, the system pulses the driver’s seat.*
Press the Follow Distance Gap button on the left side of the steering wheel to set a following gap.
See Driving and Operating in your Owner Manual.
The driver awareness and assist systems are based on a “control and a\
lert” strategy that helps identify potential collision situations and intervenes when a collision threat appears more imminent, employing visual, audible and tactile (vibration) alerts, depending on the feature.
Page 15 of 20

Press the power door Unlock/ Lock button on the
driver’s door to unlock or lock all doors.
Pull the inside door handle to unlock a door; pull the handle again to open the door.
Press the Safety Locks button on the driver’s door to
prevent the rear doors from opening from the inside and to
disable the rear power windows. The button indicator will
illuminate when activated.
See Keys, Doors and Windows in your Owner Manual.
15
Power Door Locks/Safety Locks
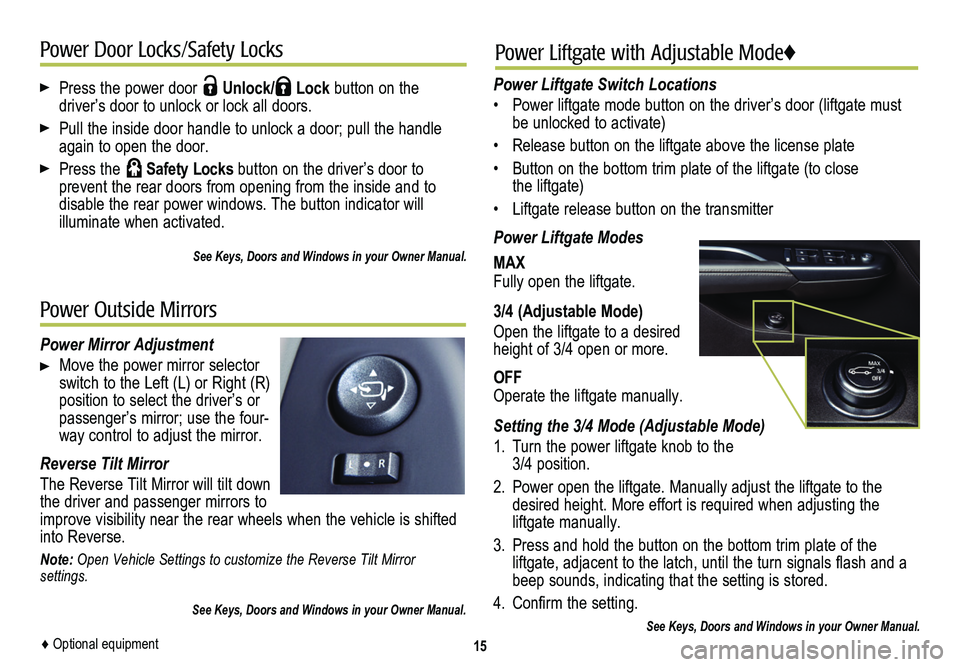
Power Mirror Adjustment
Move the power mirror selector switch to the Left (L) or Right (R) position to select the driver’s or passenger’s mirror; use the four-way control to adjust the mirror.
Reverse Tilt Mirror
The Reverse Tilt Mirror will tilt down the driver and passenger mirrors to improve visibility near the rear wheels when the vehicle is shifted into Reverse.
Note: Open Vehicle Settings to customize the Reverse Tilt Mirror settings.
See Keys, Doors and Windows in your Owner Manual.
Power Outside Mirrors
Power Liftgate with Adjustable Mode♦
Power Liftgate Switch Locations
• Power liftgate mode button on the driver’s door (liftgate must be unlocked to activate)
• Release button on the liftgate above the license plate
• Button on the bottom trim plate of the liftgate (to close the liftgate)
• Liftgate release button on the transmitter
Power Liftgate Modes
MAXFully open the liftgate.
3/4 (Adjustable Mode)
Open the liftgate to a desired height of 3/4 open or more.
OFFOperate the liftgate manually.
Setting the 3/4 Mode (Adjustable Mode)
1. Turn the power liftgate knob to the 3/4 position.
2. Power open the liftgate. Manually adjust the liftgate to the desired height. More effort is required when adjusting the liftgate manually.
3. Press and hold the button on the bottom trim plate of the liftgate, adjacent to the latch, until the turn signals flash and a beep sounds, indicating that the setting is stored.
4. Confirm the setting.
See Keys, Doors and Windows in your Owner Manual.♦ Optional equipment
Page 18 of 20

The Cargo Management System features front and rear storage
compartments under the partitioned cargo floor cover.
Press the rear part of the handle, and then lift up the handle to unlatch the cover.
Storage Compartment
A prop rod locks into place when the front cover is opened. To close the cover, press the red button on the middle of the prop rod (A).
Use the hooks on the cover to secure small bags.
U-Rail System
Align the Unlock symbol (B) with the button arrow (C) and press the button to install/remove the fence.
Align the Lock symbol (D) with the
button arrow (C) and press the button to lock the fence in place.
To move the fence on the track, remove one side from an adapter; then press the buttons to move the adapters to the desired locations.
To store the fence, place it in the clips under the storage compartment cover.
See Storage in your Owner Manual.18
Memory Seats♦Cargo Management System♦
Set Memory Positions
1. Adjust the driver’s seat, power outside mirrors and adjustable pedals♦ to the desired positions.
2. Press and hold the MEM button and button 1 on the driver’s seat until a beep sounds.
3. Repeat the steps using button 2 for a second driver.
Recall Positions
Press and hold button 1 or 2 until the stored position is reached. Releasing the button before the stored position is reached cancels the recall.
See Seats and Restraints in your Owner Manual.
Sunroof♦
Open/Close the Sunshade
Fully press the rear or front of the sunshade switch to express-open or express-close the sunshade.
Open/Close the Sunroof
Press the rear of the sunroof switch to the first detent to open the sunroof to the vent position.
Fully press the rear of the switch to express-open the sunroof to the comfort position.
Fully press the front of the switch to express-close the sunroof.
See Keys, Doors and Windows in your Owner Manual.
A
B
D
C