2014 CADILLAC SRX window
[x] Cancel search: windowPage 6 of 20
6
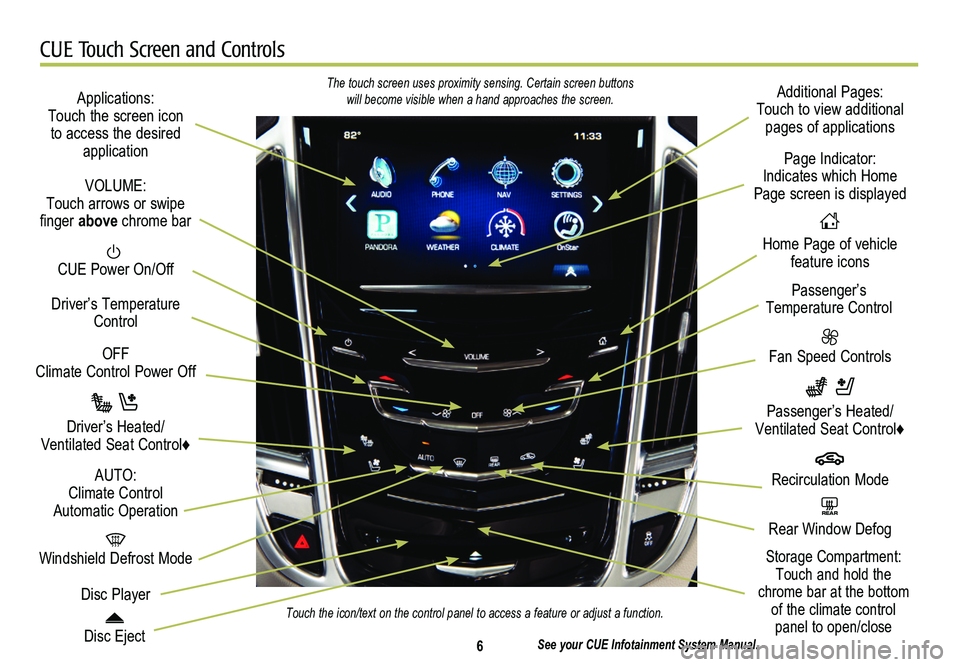
CUE Touch Screen and Controls
Applications: Touch the screen icon to access the desired application
See your CUE Infotainment System Manual.
CUE Power On/Off
Windshield Defrost Mode
Disc Eject
OFF Climate Control Power Off
Disc Player
Driver’s Temperature Control
Additional Pages: Touch to view additional pages of applications
Fan Speed Controls
Page Indicator: Indicates which Home Page screen is displayed
Passenger’s Temperature Control
Passenger’s Heated/ Ventilated Seat Control♦
Driver’s Heated/Ventilated Seat Control♦
The touch screen uses proximity sensing. Certain screen buttons will become visible when a hand approaches the screen.
Touch the icon/text on the control panel to access a feature or adjust a\
function.
VOLUME: Touch arrows or swipe finger above chrome bar
AUTO: Climate Control Automatic OperationREAR Rear Window Defog
Recirculation Mode
Home Page of vehicle feature icons
Storage Compartment: Touch and hold the chrome bar at the bottom of the climate control panel to open/close
Page 8 of 20
8
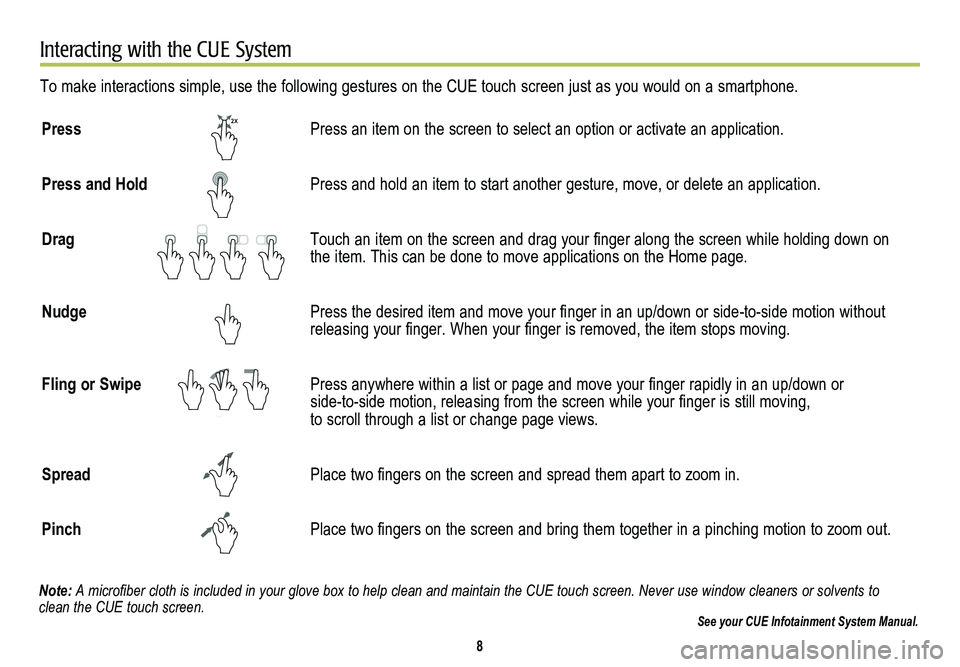
Interacting with the CUE System
To make interactions simple, use the following gestures on the CUE touch screen just as you would on a smartphone.
Press Press an item on the screen to select an option or activate an applicati\
on.
Press and Hold Press and hold an item to start another gesture, move, or delete an appl\
ication.
Drag Touch an item on the screen and drag your finger along the screen while holding down on the item. This can be done to move applications on the Home page.
Nudge Press the desired item and move your finger in an up/down or side-to-side motion without releasing your finger. When your finger is removed, the item stops moving.
Fling or Swipe Press anywhere within a list or page and move your finger rapidly in an up/down or side-to-side motion, releasing from the screen while your finger is still moving, to scroll through a list or change page views.
Spread Place two fingers on the screen and spread them apart to zoom in.
Pinch Place two fingers on the screen and bring them together in a pinching motion to zoom out.
See your CUE Infotainment System Manual.
2X
2X
2X2X
2X
2X
2X
Note: A microfiber cloth is included in your glove box to help clean and maintain the CUE touch screen. Never use window cleaners or solvents to clean the CUE touch screen.
Page 13 of 20
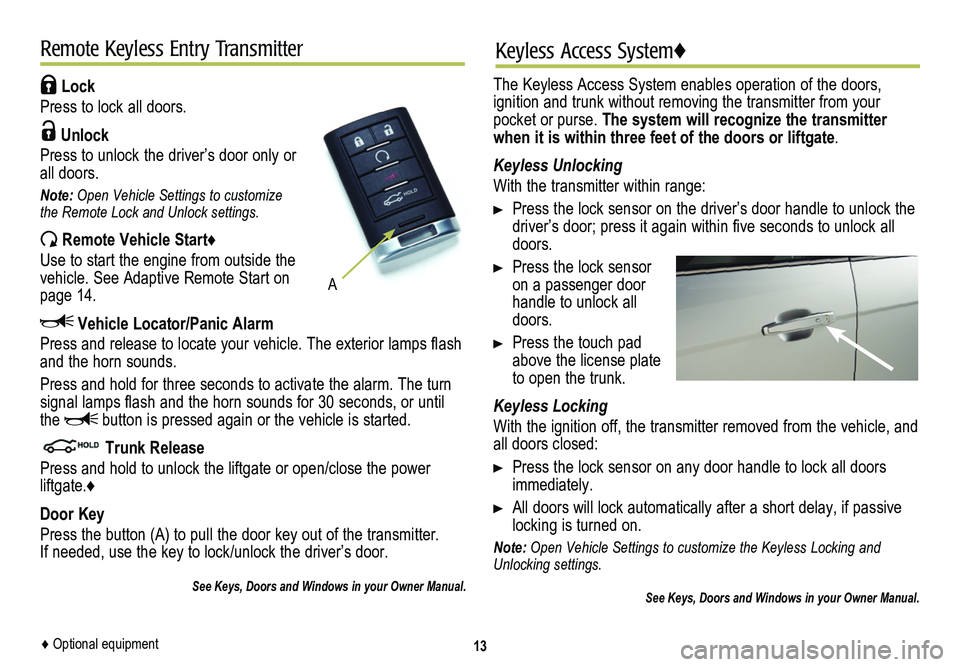
Lock
Press to lock all doors.
Unlock
Press to unlock the driver’s door only or all doors.
Note: Open Vehicle Settings to customize the Remote Lock and Unlock settings.
Remote Vehicle Start♦
Use to start the engine from outside the vehicle. See Adaptive Remote Start on page 14.
Vehicle Locator/Panic Alarm
Press and release to locate your vehicle. The exterior lamps flash and the horn sounds.
Press and hold for three seconds to activate the alarm. The turn signal lamps flash and the horn sounds for 30 seconds, or until the button is pressed again or the vehicle is started.
Trunk Release
Press and hold to unlock the liftgate or open/close the power liftgate.♦
Door Key
Press the button (A) to pull the door key out of the transmitter. If needed, use the key to lock/unlock the driver’s door.
See Keys, Doors and Windows in your Owner Manual.
13
Remote Keyless Entry Transmitter
A
Keyless Access System♦
The Keyless Access System enables operation of the doors,
ignition and trunk without removing the transmitter from your pocket or purse. The system will recognize the transmitter when it is within three feet of the doors or liftgate.
Keyless Unlocking
With the transmitter within range:
Press the lock sensor on the driver’s door handle to unlock the driver’s door; press it again within five seconds to unlock all doors.
Press the lock sensor on a passenger door handle to unlock all doors.
Press the touch pad above the license plate to open the trunk.
Keyless Locking
With the ignition off, the transmitter removed from the vehicle, and all doors closed:
Press the lock sensor on any door handle to lock all doors immediately.
All doors will lock automatically after a short delay, if passive locking is turned on.
Note: Open Vehicle Settings to customize the Keyless Locking and Unlocking settings.
See Keys, Doors and Windows in your Owner Manual.
♦ Optional equipment
Page 14 of 20
14
Keyless StartAdaptive Remote Start♦
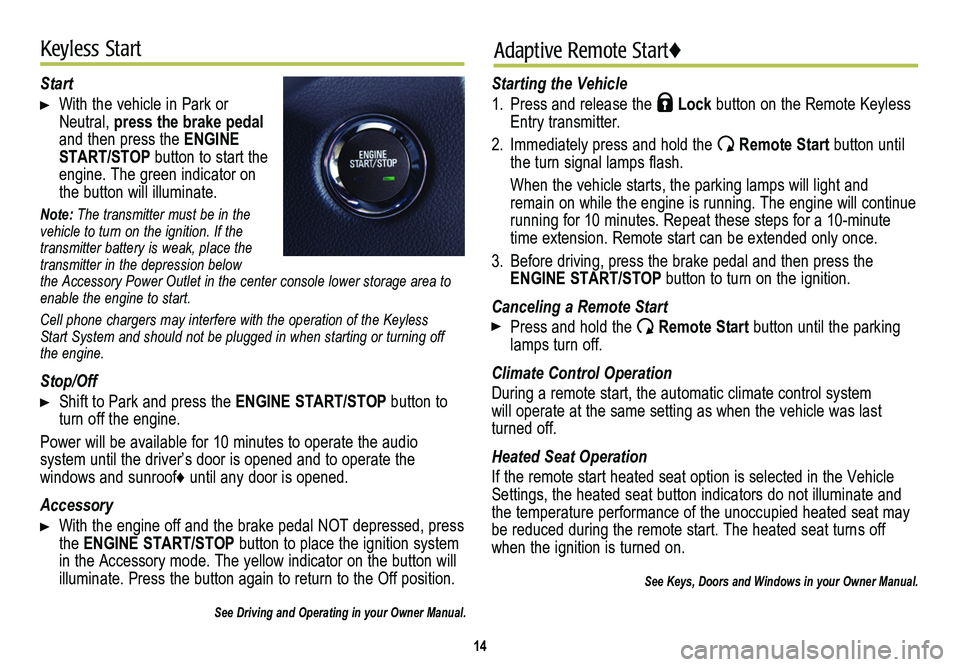
Start
With the vehicle in Park or Neutral, press the brake pedal and then press the ENGINE START/STOP button to start the engine. The green indicator on the button will illuminate.
Note: The transmitter must be in the vehicle to turn on the ignition. If the transmitter battery is weak, place the transmitter in the depression below the Accessory Power Outlet in the center console lower storage area to enable the engine to start.
Cell phone chargers may interfere with the operation of the Keyless Start System and should not be plugged in when starting or turning off the engine.
Stop/Off
Shift to Park and press the ENGINE START/STOP button to turn off the engine.
Power will be available for 10 minutes to operate the audio
system until the driver’s door is opened and to operate the
windows and sunroof♦ until any door is opened.
Accessory
With the engine off and the brake pedal NOT depressed, press the ENGINE START/STOP button to place the ignition system in the Accessory mode. The yellow indicator on the button will illuminate. Press the button again to return to the Off position.
See Driving and Operating in your Owner Manual.
Starting the Vehicle
1. Press and release the Lock button on the Remote Keyless Entry transmitter.
2. Immediately press and hold the Remote Start button until the turn signal lamps flash.
When the vehicle starts, the parking lamps will light and remain on while the engine is running. The engine will continue
running for 10 minutes. Repeat these steps for a 10-minute time extension. Remote start can be extended only once.
3. Before driving, press the brake pedal and then press the ENGINE START/STOP button to turn on the ignition.
Canceling a Remote Start
Press and hold the Remote Start button until the parking lamps turn off.
Climate Control Operation
During a remote start, the automatic climate control system will operate at the same setting as when the vehicle was last turned off.
Heated Seat Operation
If the remote start heated seat option is selected in the Vehicle Settings, the heated seat button indicators do not illuminate and the temperature performance of the unoccupied heated seat may be reduced during the remote start. The heated seat turns off when the ignition is turned on.
See Keys, Doors and Windows in your Owner Manual.
Page 15 of 20
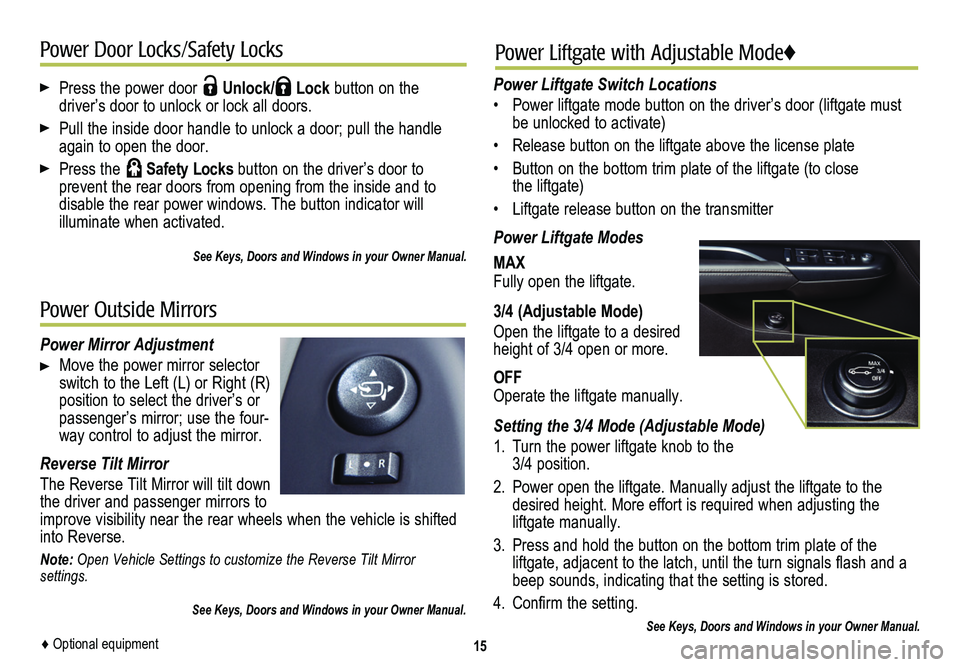
Press the power door Unlock/ Lock button on the
driver’s door to unlock or lock all doors.
Pull the inside door handle to unlock a door; pull the handle again to open the door.
Press the Safety Locks button on the driver’s door to
prevent the rear doors from opening from the inside and to
disable the rear power windows. The button indicator will
illuminate when activated.
See Keys, Doors and Windows in your Owner Manual.
15
Power Door Locks/Safety Locks
Power Mirror Adjustment
Move the power mirror selector switch to the Left (L) or Right (R) position to select the driver’s or passenger’s mirror; use the four-way control to adjust the mirror.
Reverse Tilt Mirror
The Reverse Tilt Mirror will tilt down the driver and passenger mirrors to improve visibility near the rear wheels when the vehicle is shifted into Reverse.
Note: Open Vehicle Settings to customize the Reverse Tilt Mirror settings.
See Keys, Doors and Windows in your Owner Manual.
Power Outside Mirrors
Power Liftgate with Adjustable Mode♦
Power Liftgate Switch Locations
• Power liftgate mode button on the driver’s door (liftgate must be unlocked to activate)
• Release button on the liftgate above the license plate
• Button on the bottom trim plate of the liftgate (to close the liftgate)
• Liftgate release button on the transmitter
Power Liftgate Modes
MAXFully open the liftgate.
3/4 (Adjustable Mode)
Open the liftgate to a desired height of 3/4 open or more.
OFFOperate the liftgate manually.
Setting the 3/4 Mode (Adjustable Mode)
1. Turn the power liftgate knob to the 3/4 position.
2. Power open the liftgate. Manually adjust the liftgate to the desired height. More effort is required when adjusting the liftgate manually.
3. Press and hold the button on the bottom trim plate of the liftgate, adjacent to the latch, until the turn signals flash and a beep sounds, indicating that the setting is stored.
4. Confirm the setting.
See Keys, Doors and Windows in your Owner Manual.♦ Optional equipment
Page 16 of 20
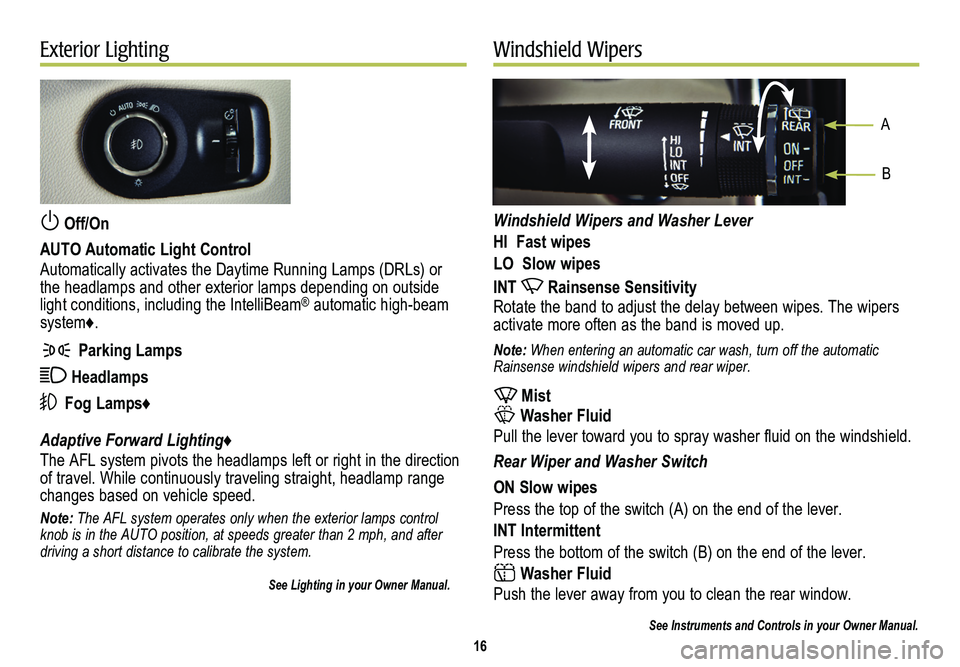
Off/On
AUTO Automatic Light Control
Automatically activates the Daytime Running Lamps (DRLs) or the headlamps and other exterior lamps depending on outside light conditions, including the IntelliBeam® automatic high-beam system♦.
Parking Lamps
Headlamps
Fog Lamps♦
Adaptive Forward Lighting♦
The AFL system pivots the headlamps left or right in the direction of travel. While continuously traveling straight, headlamp range changes based on vehicle speed.
Note: The AFL system operates only when the exterior lamps control knob is in the AUTO position, at speeds greater than 2 mph, and after driving a short distance to calibrate the system.
See Lighting in your Owner Manual.
Windshield Wipers and Washer Lever
HI Fast wipes
LO Slow wipes
INT Rainsense Sensitivity
Rotate the band to adjust the delay between wipes. The wipers activate more often as the band is moved up.
Note: When entering an automatic car wash, turn off the automatic Rainsense windshield wipers and rear wiper.
Mist
Washer Fluid
Pull the lever toward you to spray washer fluid on the windshield.
Rear Wiper and Washer Switch
ON Slow wipes
Press the top of the switch (A) on the end of the lever.
INT Intermittent
Press the bottom of the switch (B) on the end of the lever.
Washer Fluid
Push the lever away from you to clean the rear window.
See Instruments and Controls in your Owner Manual.
16
Exterior LightingWindshield Wipers
A
B
Page 18 of 20

The Cargo Management System features front and rear storage
compartments under the partitioned cargo floor cover.
Press the rear part of the handle, and then lift up the handle to unlatch the cover.
Storage Compartment
A prop rod locks into place when the front cover is opened. To close the cover, press the red button on the middle of the prop rod (A).
Use the hooks on the cover to secure small bags.
U-Rail System
Align the Unlock symbol (B) with the button arrow (C) and press the button to install/remove the fence.
Align the Lock symbol (D) with the
button arrow (C) and press the button to lock the fence in place.
To move the fence on the track, remove one side from an adapter; then press the buttons to move the adapters to the desired locations.
To store the fence, place it in the clips under the storage compartment cover.
See Storage in your Owner Manual.18
Memory Seats♦Cargo Management System♦
Set Memory Positions
1. Adjust the driver’s seat, power outside mirrors and adjustable pedals♦ to the desired positions.
2. Press and hold the MEM button and button 1 on the driver’s seat until a beep sounds.
3. Repeat the steps using button 2 for a second driver.
Recall Positions
Press and hold button 1 or 2 until the stored position is reached. Releasing the button before the stored position is reached cancels the recall.
See Seats and Restraints in your Owner Manual.
Sunroof♦
Open/Close the Sunshade
Fully press the rear or front of the sunshade switch to express-open or express-close the sunshade.
Open/Close the Sunroof
Press the rear of the sunroof switch to the first detent to open the sunroof to the vent position.
Fully press the rear of the switch to express-open the sunroof to the comfort position.
Fully press the front of the switch to express-close the sunroof.
See Keys, Doors and Windows in your Owner Manual.
A
B
D
C