Page 9 of 20

9
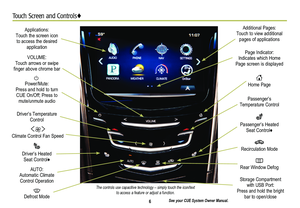
CUE System Features♦
See your CUE System Owner Manual.
Portable Audio Devices
Two USB ports, an SD media card slot, and an auxiliary audio input jack are located in the center console storage compartment.
Connect an iPod®, iPhone®, MP3 player, a USB flash drive or a USB mass storage device to a USB port or insert an SD media card into the card slot. CUE will read the connected device and build a list of voice commands. Search for music on-screen or by voice commands.
PANDORA® Internet Radio
Listen to personalized radio stations based on favorite artists or genres. Requires an Internet-connected device with Pandora software.
1. Download the Pandora app to your smartphone. Restart the smartphone and sign in to Pandora.
2. Create a station on your phone to listen to a customized song list in the vehicle.
3. Connect your smartphone/device to the system by Bluetooth or, for Apple devices, by a USB cable.
4. Touch the Pandora icon on the touch screen to access Pandora. A slight delay may occur when loading a song or changing a station.
Setting the Time
1. Touch Settings on the home page.
2. Touch Time and Date.
3. Touch Set Time.
4. Touch + or – to adjust the hours, minutes, and AM or PM.
5. Touch < BACK to exit the menu.
Storing Favorite Stations
Radio stations from all bands (AM, FM or XM) can be stored, in any order, on up to six pages of favorites.
1. Tune in the desired radio station.
2. Touch FAV to display the desired favorites page.
3. Touch and hold one of the favorite screen buttons until a beep is heard, indicating it is stored.
4. Repeat the steps to store another favorite station.
CD Player♦
The CD player is located in the glove box.
Touch Media until CD is displayed to play a disc.
Refer to your Owner Manual for important safety information about using \
the infotainment system while driving.
CUE uses a Bluetooth or USB connection to link a smartphone, cell phone, USB flash drive or portable audio player/iPod® to the touch screen infotainment display. It offers a variety of entertainment options, including streaming audio from the Internet through a smart-phone, and features enhanced hands-free voice control, music information and the ability to play music files from a USB flash drive or an SD media card. For assistance, call 1-855-4-CUE-NOW (1-855-428-3669) or visit www.cadillac.com/cue.
Page 10 of 20
Bluetooth® System (included with CUE♦)
Control the music source and make phone calls hands-free using the enhanced voice recognition system.
1. Pr")
10
Natural Voice Recognition (included with CUE♦)Bluetooth® System (included with CUE♦)
Control the music source and make phone calls hands-free using the enhanced voice recognition system.
1. Press the Push to Talk button on the steering wheel.
2. The radio will say “Please say a command,” followed by a beep.
3. After the beep, say what you want it to do.
• Hands-free calling:
Example command: “Call Amanda” or “Dial 555-1212”
• Connected music device search:
Example command: “Play artist [name]”
Example command: “Play song ‘Dance the Night Away’”
• Radio control:
Example command: “Tune FM 104.3” or “Tune XM Classic Vinyl”
Example command: “Tune Pandora” (Pandora app required)
• Help:
– Say “Help” for voice recognition assistance.
– To start speaking immediately without waiting for the beep, press thePush to Talk button twice.
See your CUE System Owner Manual.
Before using a Bluetooth-enabled device in the vehicle, it must be paired with the in-vehicle Bluetooth system. Not all devices will support all functions. For more information, visit www.gmtotalconnect.com.
Pair a Phone using Voice Recognition
1. Press the Push to Talk button.
2. After the beep, say “Pair.” The system will search for your phone. A code appears on the display.
3. Start the pairing process on the phone. Locate Cadillac CUE on the phone.
4. Enter the four-digit code that appears on the touch screen or confirm a six-digit code on the phone.
5. If your phone prompts you to accept the connection or phone book download, click “yes” and always allow.
Device List
Up to 10 devices may be paired with the in-vehicle Bluetooth
system. To switch devices using voice recognition:
1. Press the Push to Talk button.
2. Say “Device list” or “Select device.”
3. Select from the list of paired phones/devices.
Note: Vehicles equipped with the base audio system (not CUE) include Bluetooth phone functionality with basic voice prompt recognition. Up to five phones can be paired with the system.
See your CUE System Owner Manual.
Page 11 of 20
11
Vehicle Personalization (included with CUE♦)Navigation (included with CUE♦)
Some vehicle features can be customized using the controls on the audio system. The Vehicle Settings menu may include Climate and Air Quality; Collision/Detection Systems; Comfort and Convenience; Lighting; Power Door Locks; and Remote Locking, Unlocking and Starting.
1. Touch Settings on the home page.
2. Touch Vehicle Settings.
3. Touch the desired menu item.
4. Touch the desired feature and setting.
5. Touch < BACK to exit each menu.
See Instruments and Controls in your Owner Manual.
Enter a destination using the Single Line Destination feature. Approximate your desired destination and CUE’s auto-fill function will enter the necessary information.
1. Touch Navigation on the home page.
2. Touch Destination.
3. Type the address, intersection or road.
4. Touch Go.
5. Select the desired name from the generated list.
6. Touch Go.
See your CUE System Owner Manual.
Page 12 of 20

12
Remote Keyless Entry TransmitterKeyless Access System♦
Lock
Press to lock all doors.
Unlock
Press to unlock the driver’s door only or all doors.
Note: Use the touch screen to open Vehicle Settings >Remote Locking, Unlocking, Starting to change the Remote Lock and Unlock settings.
Remote Vehicle Start♦
Use to start the engine from outside the vehicle. See Adaptive Remote Start on page 13.
Vehicle Locator/Panic Alarm
Press and release to locate your vehicle. The exterior lamps flash and the horn sounds.
Press and hold for three seconds to activate the alarm. The turn signal lamps flash and the horn sounds for 30 seconds, or until the button is pressed again or the vehicle is started.
Trunk Release
Press and hold until the trunk begins to move to open the trunk.
Door Key
Press the button (A) to pull the door key out of the transmitter. Use the key to lock/unlock the driver’s door and glove box.
See Keys, Doors and Windows in your Owner Manual.
The Keyless Access System enables operation of the doors,
ignition and trunk without removing the transmitter from your pocket or purse. The system will recognize the transmitter when it is within three feet of the doors or trunk.
Keyless Unlocking
With the transmitter within range:
Press the lock sensor on the driver’s door handle to unlock the driver’s door; press it again within five seconds to unlock all doors.
Press the lock sensor on a passenger door handle to unlock all doors.
Press the touch pad above the license plate to open the trunk.
Keyless Locking
With the ignition off, the transmitter removed from the vehicle, and all doors closed:
Press the lock sensor on any door handle to lock all doors immediately.
All doors will lock automatically after a short delay, if passive locking is turned on.
Note: Use the touch screen to open Vehicle Settings >Remote Locking, Unlocking, Starting to change the Keyless Locking and Unlocking settings.
See Keys, Doors and Windows in your Owner Manual.
A
Page 13 of 20

13
Pushbutton StartAdaptive Remote Start♦
Start
With the vehicle in Park or Neutral, press the brake pedal and then press the ENGINE START/STOP button to start the engine. The green indicator on the button will illuminate. ENGINE START/STOP will
illuminate on the button when the headlamps are on.
Note: The transmitter must be in the vehicle to turn on the ignition. If the \
transmitter battery is weak, place the transmitter in the depression below the Accessory Power Outlet in the center console lower storage area to enable the engine to start.
Cell phone chargers may interfere with the operation of the Pushbutton Start System and should not be plugged in when starting or turning off the engine.
Stop/Off
Shift to Park and press the ENGINE START/STOP button to turn off the engine.
Power is available to operate the audio system for 10 minutes or until the driver’s door is opened.
Accessory
With the engine off and the brake pedal NOT depressed, press the ENGINE START/STOP button to place the vehicle in Accessory mode. The yellow indicator on the button will illuminate.
See Driving and Operating in your Owner Manual.
Starting the Vehicle
1. Press and release the Lock button on the Remote Keyless Entry transmitter.
2. Immediately press and hold the Remote Start button until the turn signal lamps flash.
When the vehicle starts, the parking lamps will light and remain on while the engine is running. The engine will continue
running for 10 minutes. Repeat these steps for a 10-minute time extension. Remote start can be extended only once.
3. Before driving, simultaneously press the brake pedal and the ENGINE START/STOP button to activate vehicle systems.
Canceling a Remote Start
Press and hold the Remote Start button until the parking lamps turn off.
Climate Control Operation
During a remote start, the automatic climate control system will operate at the same setting as when the vehicle was last turned off.
Heated Seat Operation
If the remote start heated seat option is selected in the Vehicle Settings, the heated seat button indicators do not illuminate and the temperature performance of the unoccupied heated seat may be reduced during the remote start. The heated seat turns off when the ignition is turned on.
See Keys, Doors and Windows in your Owner Manual.
Page 14 of 20

Press the power door Unlock/ Lock button on either front door to unlock or lock all doors.
Pull the inside door handle to unlock a door; pull the handle again to open the door.
Press the Safety Locks button on the driver’s door to
prevent the rear doors from opening from the inside and to
disable the rear power windows. The button indicator will
illuminate when activated.
See Keys, Doors and Windows in your Owner Manual.
14
Power Door Locks/Safety Locks
Power Mirror Adjustment
Move the power mirror selector switch to the Left (L) or Right (R) position to select the driver’s or passenger’s mirror; use the four-way control to adjust the mirror.
Reverse Tilt Mirror
The Reverse Tilt Mirror will tilt down the driver and passenger mirrors to improve visibility near the rear wheels when the vehicle is shifted into Reverse.
Note: Use the touch screen to open Settings > Vehicle > Comfort and Convenience to change the Reverse Tilt Mirror settings.
See Keys, Doors and Windows in your Owner Manual.
Power Outside Mirrors
Valet Mode
To lock/unlock various features of the vehicle, select Valet Mode under Vehicle Settings and enter a passcode. It can be used when it’s desired that only an authorized user has access to personalized features.
See your CUE System Owner Manual.
To open the trunk from inside the
vehicle, press theTrunk Release button on the driver's door.
To open the trunk from outside the vehicle, press the touch pad above the license plate. The vehicle must be unlocked or the Remote Keyless Entry transmitter must be within range of the trunk (if equipped with the Keyless Access System).
See Keys, Doors and Windows in your Owner Manual.
Trunk Release
Page 15 of 20

15
Enhanced Safety Strategy Features♦
See Driving and Operating in your Owner Manual.
Driver Awareness Package
Lane Departure Warning – When crossing a detected lane mark-ing without using a turn signal, a visual alert on the instrument panel flashes and the left or right side of the driver’s seat pulses.*
Press the Lane Departure Warning button on the left side of the instrument panel to turn the system on or off. The button is illuminated when the system is on.
Forward Collision Alert – When approaching a vehicle directly ahead too quickly, a visual alert on the windshield flashes and the driver’s seat pulses.*
Press the Collision Alert button on the left side of the steering wheel to set the alert timing (see the Collision/Detec-tion Systems menu if equipped with Adaptive Cruise Control).
Safety Alert Seat – Subtle seat cushion vibration pulses, left or right, or simultaneously, alert the driver of potential hazards.
Rainsense™ Automatic Windshield Wipers – A sensor detects the amount of water on the windshield and controls the frequency of the wipers. See Windshield Wipers on page 16.
Rear Thorax Airbags – Seat-mounted side impact airbags for the rear seat outboard passengers.
IntelliBeam® – Automatically turns the high-beam headlamps on or off depending on traffic conditions.
Driver Assist Package (includes Driver Awareness Package)
Automatic Collision Preparation – Prepares the brakes or applies the brakes if an emergency collision appears immediate or the driver does not react to previous alerts.
Front and Rear Automatic Braking – Applies the brakes in potential collision situations to help reduce damage or help avoid collisions at lower speeds.
Press the Parking Assist button on the left side of the instrument panel to turn Automatic Braking on or off.
Adaptive Cruise Control – If a vehicle is detected ahead, the vehicle accelerates or brakes moderately to maintain the selected following gap. If driver action is required, the system pulses the driver’s seat.*
Press the Follow Distance Gap button on the left side of the steering wheel to set a following gap.
Side Blind Zone Alert – When a vehicle is detected in a side blind spot area, a warning symbol displays on the side mirror.
To turn off the system, see the Collision/Detection Systems menu under Vehicle Settings. The system turns on automati-cally every time the vehicle is started.
Rear Cross Traffic Alert – Warns of approaching traffic by dis-playing a visual alert on the touch screen from the Rear Vision Camera, and the left or right side of the driver’s seat pulses.*
Press the Parking Assist button on the left side of the instrument panel to turn system on or off. The button is
illuminated when the system is on.
Head-Up Display – Projects vehicle operating information on the windshield, reducing the need to look away from the road.
*Audible notification may be selected instead of Safety Alert Seat vibration notification. See Vehicle Personalization on page 11.
The driver awareness and assist systems are based on a “control and a\
lert” strategy that helps identify potential collision situations and intervenes when a collision threat appears more imminent, employing visual, audible and tactile (vibration) alerts, depending on the feature.
Page 16 of 20
 or")
16
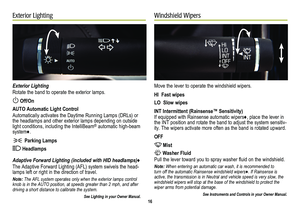
Exterior LightingWindshield Wipers
Exterior Lighting
Rotate the band to operate the exterior lamps.
Off/On
AUTO Automatic Light Control
Automatically activates the Daytime Running Lamps (DRLs) or the headlamps and other exterior lamps depending on outside light conditions, including the IntelliBeam® automatic high-beam system♦.
Parking Lamps
Headlamps
Adaptive Forward Lighting (included with HID headlamps)♦
The Adaptive Forward Lighting (AFL) system swivels the head-lamps left or right in the direction of travel.
Note: The AFL system operates only when the exterior lamps control knob is in the AUTO position, at speeds greater than 2 mph, and after driving a short distance to calibrate the system.
See Lighting in your Owner Manual.
Move the lever to operate the windshield wipers.
HI Fast wipes
LO Slow wipes
INT Intermittent (Rainsense™ Sensitivity)If equipped with Rainsense automatic wipers♦, place the lever in the INT position and rotate the band to adjust the system sensitiv-ity. The wipers activate more often as the band is rotated upward.
OFF
Mist
Washer Fluid
Pull the lever toward you to spray washer fluid on the windshield.
Note: When entering an automatic car wash, it is recommended to turn off the automatic Rainsense windshield wipers♦. If Rainsense is active, the transmission is in Neutral and vehicle speed is very slow, the
windshield wipers will stop at the base of the windshield to protect the\
wiper arms from potential damage.
See Instruments and Controls in your Owner Manual.


Navigation (included with CUE♦)
Some vehicle features can be customized using the controls on the audio system. The Vehicle Settings menu may include")