2014 BMW 650I XDRIVE CONVERTIBLE wheel
[x] Cancel search: wheelPage 202 of 243
Snow chain detection
The concept When using snow chains, settings should bemade via the iDrive for the snow chains being
applied.
The snow chain detection system supports
you by automatically showing the detected
state on the Control Display.
When snow chains are in use, the rear axle
steering of the Integral Active Steering is deac‐
tivated automatically.
At speeds above the maximum permitted
speed with snow chains of 30 mph/50 km/h,
the rear axle steering is activated again auto‐
matically.
Activating the status1."Settings"2."Tire chains"3."Tire chains installed"
Automatic detection If functioning properly:
▷Snow chains are mounted. The setting is
not activated
.
After you drive a short distance, a Check
Control message is shown and the state is
activated automatically.
Confirm the automatic activation.
▷Snow chains are not mounted. The setting
is activated
.
At speeds above 30 mph/50 km/h, a Check
Control message is displayed. Deactivate
the status manually.
If not functioning properly:
▷Snow chains are mounted. The setting is
not activated
.
A Check Control message is not displayed.
The automatic detection system is mal‐
functioning. Activate the status manually.
Activating/deactivating rear axle
steering
If the status indicating that snow chains are in
use is activated, the rear axle steering is deac‐
tivated automatically.
At speeds above 30 mph/50 km/h, the rear axle
steering is activated again, even though snow
chains are in use.Seite 202MobilityWheels and tires202
Online Edition for Part no. 01 40 2 910 721 - VI/13
Page 213 of 243

These lights feature LED technology.
Contact your service center in the event of a
malfunction.
Lamps in the trunk lidAccess to the lamps
If necessary, remove the fasteners using the
screwdriver from the onboard vehicle tool kit
and fold away the cover.
Inside brake lamp
Follow the general instructions on Lamps and
bulbs, refer to page 210.
24-watt bulb, HP24W
1.Squeeze the bulb holder and pull it out.2.Pull off the connector.3.Replace the bulb.4.Mount the bulb holder and the cover of the
trunk lid in reverse order.
Reversing lamp
Follow the general instructions on Lamps and
bulbs, refer to page 210.
16-watt bulb, W16W1.Unscrew the bulb holder counterclockwise.2.Pull out the bulb and replace it.3.Mount the bulb holder and the cover of the
trunk lid in reverse order.
Changing wheels
Hints
The vehicle equipment does not include a
spare tire.
When using run-flat tires or tire sealants, a tire
does not need to be changed immediately in
the event of pressure loss due to a flat tire.
The tools for changing wheels are available as
accessories from your service center.
Jacking points for the vehicle jack
The jacking points for the vehicle jack are lo‐
cated at the positions shown.
Seite 213Replacing componentsMobility213
Online Edition for Part no. 01 40 2 910 721 - VI/13
Page 214 of 243
Vehicle batteryMaintenance
The battery is maintenance-free, i.e., the elec‐ trolyte will last for the life of the battery.
Your service center will be glad to advise you
on questions regarding the battery.
Battery replacement Use approved vehicle batteries only
Only use vehicle batteries that have been
approved for your vehicle by the manufacturer; otherwise, the vehicle could be damaged and
systems or functions may not be fully availa‐
ble.◀
After a battery replacement, have the battery registered on the vehicle by your service cen‐
ter to ensure that all comfort functions are fully
available and that any Check Control mes‐
sages of these comfort functions are no longer
displayed.
Charging the battery
Note Do not plug chargers into the socket
Do not connect battery chargers to the
factory-installed sockets in the vehicle as this
may damage the battery.◀
General information
Make sure that the battery is always suffi‐
ciently charged to guarantee that the battery
remains usable for its full service life.
The battery may need to be charged in the fol‐
lowing cases:▷When making frequent short-distance
drives.▷If the vehicle is not used for prolonged pe‐
riods, longer than a month.Starting aid terminals
In the vehicle, only charge the battery via the
starting aid terminals, refer to page 218, in the
engine compartment with the engine off.
Power failure After a temporary power loss, some equipment
needs to be reinitialized.
Individual settings need to be reprogrammed:▷Seat, mirror, and steering wheel memory:
store the positions again.▷Time: update.▷Date: update.▷Radio station: saving new, see user's
manual for Navigation, Entertainment and
Communication.▷Navigation system: wait for the operability
of the navigation.
Disposing of old batteries
Have old batteries disposed of by your
service center or bring them to a recy‐
cling center.
Maintain the battery in an upright position for
transport and storage. Secure the battery so
that it does not tip over during transport.
Fuses Notes Replacing fuses
Never attempt to repair a blown fuse and
do not replace a defective fuse with a substi‐
tute of another color or amperage rating; this could lead to a circuit overload, ultimately re‐
sulting in a fire in the vehicle.◀
Plastic tweezers and information on the fuse
types and locations are stored in the fuse box
in the cargo area.
Seite 214MobilityReplacing components214
Online Edition for Part no. 01 40 2 910 721 - VI/13
Page 221 of 243
CareVehicle equipmentAll standard, country-specific and optional
equipment that is offered in the model series is
described in this chapter. Therefore, equip‐
ment is also described that is not available in a
vehicle, e. g., because of the selected optional
equipment or country variant. This also applies
for safety-related functions and systems.
Car washes Hints Steam jets or high-pressure washers
When using steam jets or high-pressure
washers, hold them a sufficient distance away and use a maximum temperature of
140 ℉/60 ℃.
Holding them too close or using excessively
high pressures or temperatures can cause
damage or preliminary damage that may then lead to long-term damage.
Follow the user's manual for the high-pressure
washer.◀
Cleaning sensors/cameras with high-
pressure washers
When using high-pressure washers, do not
spray the exterior sensors and cameras, e.g., Park Distance Control, for extended periods of
time and only from a distance of at least
12 in/30 cm.◀
Regularly remove foreign items such as leaves
in the area below the windshield when the
hood is raised.
Wash your vehicle frequently, particularly in
winter.
Intense soiling and road salt can damage the
vehicle.Automatic car washes
Hints Do not use high pressure washing sys‐
tems
With washing systems operating at high pres‐
sures and nozzle positions close to the win‐
dows, drops of water can penetrate.◀
Note the following:▷Give preference to cloth car washes or
those that use soft brushes in order to
avoid paint damage.▷Make sure that the wheels and tires are not
damaged by the transport mechanisms.▷Fold in the exterior mirrors; otherwise, they
may be damaged, depending on the width
of the vehicle.▷Deactivate the rain sensor, refer to
page 71, to avoid unintentional wiper acti‐
vation.▷Do not treat the convertible top with wax.
Ensure that a cycle without wax or a spe‐
cial cycle for convertibles is available.▷In some cases, an unintentional alarm can
be triggered by the interior motion sensor
of the alarm system. Follow the instruc‐
tions on avoiding an unintentional alarm,
refer to page 41.
Guide rails in car washes
Avoid car washes with guide rails higher
than 4 in/10 cm; otherwise, the vehicle body
could be damaged.◀
Before driving into a car wash In order to ensure that the vehicle can roll in a
car wash, take the following steps:
Automatic transmission:
1.Drive into the car wash.Seite 221CareMobility221
Online Edition for Part no. 01 40 2 910 721 - VI/13
Page 224 of 243
Caring for special components
Light-alloy wheels When cleaning the vehicle, use only neutral
wheel cleaners having a pH value from 5 to 9.
Do not use abrasive cleaning agents or steam
jets above 140 ℉/60 ℃. Follow the manufac‐
turer's instructions.
Aggressive, acidic or alkaline cleaning agents
can destroy the protective layer of adjacent
components, such as the brake disk.
Chrome surfaces Carefully clean components such as the radia‐
tor grille or door handles with an ample supply of water, possibly with shampoo added, partic‐
ularly when they have been exposed to road
salt.
Rubber components Aside from water, treat only with rubber
cleansers.
When cleaning rubber seals, do not use any
silicon-containing car care products in order to
avoid damage or reduced noise damping.
Fine wood parts Clean fine wood facing and fine wood compo‐
nents only with a moist rag. Then dry with a
soft cloth.
Plastic components
These include:▷Imitation leather surfaces.▷Headliner.▷Lamp lenses.▷Instrument cluster cover.▷Matte black spray-coated components.▷Painted parts in the interior.
Clean with a microfiber cloth.
Lightly dampen the cloth with water.
Do not soak the headliner.
Do not use cleansers that contain alcohol
or solvents
Do not use cleansers that contain alcohol or
solvents, such as lacquer thinners, heavy-duty
grease removers, fuel, or such; this could lead
to surface damage.◀
Safety belts
Dirty belt straps impede the reeling action and
thus have a negative impact on safety.
Chemical cleaning
Do not clean chemically; this can destroy
the webbing.◀
Use only a mild soapy solution, with the safety
belts clipped into their buckles.
Do not allow the reels to retract the safety
belts until they are dry.
Carpets and floor mats No objects in the area around the pedals
Keep floor mats, carpets, and any other
objects out of the area of motion of the pedals;
otherwise, the function of the pedals could be
impeded while driving
Do not place additional floor mats over existing
mats or other objects.
Only use floor mats that have been approved
for the vehicle and can be properly fixed in
place.
Ensure that the floor mats are securely fas‐
tened again after they were removed for clean‐
ing, for example.◀
Floor mats can be removed from the passen‐
ger compartment for cleaning.
If the floor carpets are very dirty, clean with a
microfiber cloth and water or a textile cleaner.
To prevent matting of the carpet, rub back and
forth in the direction of travel only.Seite 224MobilityCare224
Online Edition for Part no. 01 40 2 910 721 - VI/13
Page 229 of 243
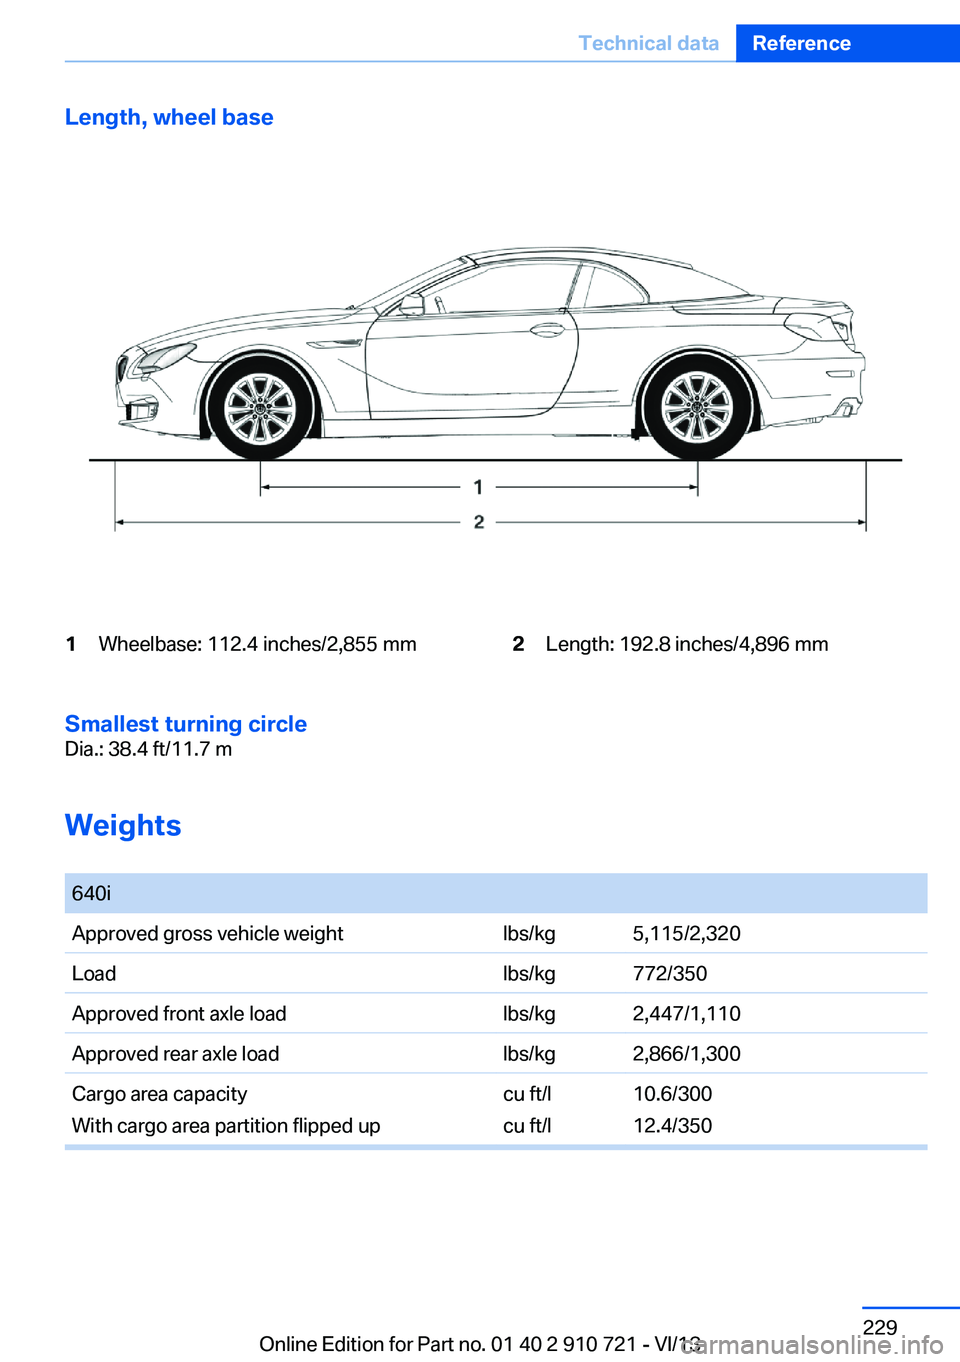
Length, wheel base1Wheelbase: 112.4 inches/2,855 mm2Length: 192.8 inches/4,896 mm
Smallest turning circle
Dia.: 38.4 ft/11.7 m
Weights
640iApproved gross vehicle weightlbs/kg5,115/2,320Loadlbs/kg772/350Approved front axle loadlbs/kg2,447/1,110Approved rear axle loadlbs/kg2,866/1,300Cargo area capacity
With cargo area partition flipped upcu ft/l
cu ft/l10.6/300
12.4/350Seite 229Technical dataReference229
Online Edition for Part no. 01 40 2 910 721 - VI/13
Page 232 of 243
Everything from A to Z
IndexA ABS, Antilock Brake Sys‐ tem 122
ACC, Active Cruise Control with Stop & Go 130
Activated-charcoal filter 160
Active Blind Spot Detec‐ tion 117
Active Cruise Control with Stop & Go, ACC 130
Active Protection 119
Active roll stabilization, see Dynamic Drive 125
Active seat, front 53
Active seat ventilation, front 53
Active Steering, integral 125
Adaptive brake assistant 122
Adaptive brake lights, refer to Brake force display 119
Adaptive drive 125
Adaptive light control 92
Additives, oil 206
Adjusting, steering wheel 59
Adjustments, seats/head re‐ straints 51
After washing vehicle 222
Airbags 96
Airbags, indicator/warning light 97
Air circulation, refer to Recir‐ culated-air mode 159
Air distribution, manual 158
Air drying, refer to Cooling function 159
Air flow, automatic climate control 158
Air pressure, tires 191
Air vents, refer to Ventila‐ tion 160 Alarm system 40
Alarm, unintentional 41
All around the center con‐ sole 14
All around the interior rear‐ view mirror 15
All around the steering wheel 12
All-season tires, refer to Win‐ ter tires 200
All-wheel-drive 124
Alternating-code hand-held transmitter 165
Alternative oil types 206
Ambient light 94
Antifreeze, washer fluid 72
Antilock Brake System, ABS 122
Anti-slip control, refer to DSC 122
Approved engine oils 206
Armrest, refer to Front center armrest 170
Arrival time 88
Ashtray 166
Assistance, Roadside Assis‐ tance 217
Assistance when driving off 122
Attentiveness assistant 119
AUTO H button, refer to Au‐ tomatic Hold 68
AUTO intensity 158
Automatic car wash 221
Automatic Cruise Control with Stop & Go 130
Automatic Curb Monitor 58
Automatic deactivation, front passenger airbags 98
Automatic headlamp con‐ trol 92 Automatic Hold 68
Automatic locking 39
Automatic recirculated-air control 159
Automatic Soft Closing, doors 36
Automatic transmission with Steptronic 72
AUTO program, automatic cli‐ mate control 158
AUTO program, intensity 158
Auto Start/Stop function 65
Average fuel consumption 88
Average speed 88
Axle loads, weights 229
B Backrest curvature, refer to Lumbar support 52
Backrest, seats 51
Backrest, width 52
Backup camera 144
Band-aids, refer to First aid kit 217
Bar for tow-starting/ towing 219
Battery replacement, remote control for parked-car heat‐
ing/ventilation 162
Battery replacement, vehicle battery 214
Battery replacement, vehicle remote control 30
Battery, vehicle 214
Belts, safety belts 54
Beverage holder, cu‐ pholder 171
BMW Assist, see user's manual for Navigation, En‐Seite 232ReferenceEverything from A to Z232
Online Edition for Part no. 01 40 2 910 721 - VI/13
Page 233 of 243
tertainment and Communi‐
cation
BMW Homepage 6
BMW Internet page 6
BMW maintenance sys‐ tem 208
Bonus range, ECO PRO 181
Bottle holder, refer to Cu‐ pholder 171
Brake assistant 122
Brake assistant, adaptive 122
Brake discs, breaking in 174
Brake force display 119
Brake lamps, brake force dis‐ play 119
Brake lamps, bulb replace‐ ment 212
Brake lights, adaptive 119
Brake pads, breaking in 174
Braking, hints 175
Breakdown assis‐ tance 216, 217
Breaking in 174
Brightness of Control Dis‐ play 90
Bulb replacement, front 210
Bulb replacement, rear 212
Button, RES 133
Button, Start/Stop 63
Bypassing, refer to Jump- starting 218
C
California Proposition 65 Warning 7
Calling up mirror adjust‐ ment 39
Calling up seat adjust‐ ment 39
Calling up steering wheel ad‐ justment 39
Camera, backup camera 144
Camera, care 225
Camera, Side View 149
Camera, Top View 147 Can holder, refer to Cu‐
pholder 171
Car battery 214
Car care products 222
Care, displays 225
Care, vehicle 222
Cargo 177
Cargo area lid 37
Cargo area partition 45
Cargo area, storage compart‐ ments 171
Cargo, securing 178
Cargo straps, securing cargo 178
Car key, refer to Remote con‐ trol 30
Carpet, care 224
Car wash 221
Catalytic converter, refer to Hot exhaust system 174
CBS Condition Based Serv‐ ice 208
CD/Multimedia, see user's manual for Navigation, En‐
tertainment and Communi‐
cation
Center console 14
Center-Lock, see button for central locking 33
Central locking system 33
Central screen, refer to Con‐ trol Display 16
Changes, technical, refer to Safety 7
Changing parts 210
Changing wheels 213
Changing wheels/tires 199
Check Control 80
Checking the oil level elec‐ tronically 205
Children, seating position 60
Children, transporting safely 60
Child restraint fixing sys‐ tem 60 Child restraint fixing system
LATCH 61
Child restraint fixing systems, mounting 60
Child seat, mounting 60
Child seats 60
Chrome parts, care 224
Cigarette lighter 166
Cleaning, displays 225
Climate control 157
Climate control wind‐ shield 175
Clock 83
Closing/opening from in‐ side 36
Closing/opening via door lock 35
Closing/opening with remote control 34
Coasting 183
Coasting with engine decou‐ pled, coasting 183
Coasting with idling en‐ gine 183
Collision warning with braking function 106
Collision warning with City Braking function 108
Combination switch, refer to Turn signals 69
Combination switch, refer to Wiper system 70
COMFORT+ program, Driving Dynamics Control 128
Comfort Access 38
COMFORT program, Driving Dynamics Control 128
Computer 87
Condensation on win‐ dows 159
Condensation under the vehi‐ cle 176
Condition Based Service CBS 208
Configure driving mode 128
Confirmation signal 39 Seite 233Everything from A to ZReference233
Online Edition for Part no. 01 40 2 910 721 - VI/13