2014 AUDI RS7 SPORTBACK wheel bolts
[x] Cancel search: wheel boltsPage 246 of 292
24 4 T ire s and wheel s
Snow chains
Snow chains may be fitted on ly to the front
wheels, and only to certain tire sizes. Ask your
authorized Audi dealer on whic h tire sizes
snow chains can be used.
I f you are going to use snow chains , then you
must install them on the front wheels at
l east.
The snow chains must have low-profile links
and must not be thicker than 0.4 inch (10 ,5 mm), including the lock .
Remove wheel center covers and tr im discs
before putting snow cha ins on your vehicle
c:;, Q) _ For safety reasons cover caps must the n
be fitted over the whee l bolts. These are ava il
ab le from authorized Audi dea lers.
A WARNING
Using the wrong snow chains for yo ur vehi
cle or installing them incorrectly can in
crease the risk of loss of control leading to
ser ious personal inj ury.
- Snow chains are ava ilable in different
sizes. Always make sure to follow the in
struct ions provided by the snow chain
manufacturer .
- When driving w ith snow chains never
dr ive faster than the speed permitted for
your specific snow cha ins.
- Always observe local regulat ions .
([) Note
-Remove snow cha ins before driving on
roads not covered with snow to avoid
damaging t ires and wear ing the snow
chains down unnecessar ily.
- Snow chains, wh ich come into d irect con
tact with the wheel rim, can scratch or
damage it . Therefore, make sure that the
snow chains are suitab ly covered . Check
the position of the snow chains after
driving a few yards and correct if neces
sa ry. Follow the i nstructions from the
snow cha in manufacture r when doing so.
- If the Adaptive Air Suspension* should
malfunction, do no t mo unt or use snow chains because the vehicle will be ex
treme ly low. If you do drive with snow
chains on while the vehicle is at this lev
el, the snow cha ins might severely dam
age the whee lhouse and other parts of
the vehicle .
(D Tips
Where snow chains are mandatory on cer
tain roads, th is normally a lso applies to
vehicles with all-wheel drive.
Wheel bolts
Wheel bol ts mus t alway s be tightened to the
correc t torque.
The design of wheel bolts is matched to the
factory installed rims . If different r ims are fit
ted, the correct wheel bol ts with the righ t
length and correct ly shaped bolt heads must
be used . T his ensures that wheels are fitted
securely and that the b rake system functions
co rrect ly.
In certa in circumstances, you may not use
wheel bolts from a different veh icle -even if it
is the same model
c:;, page 275 .
A WARNING
Imp rope rly t ightened or ma inta ined wheel
bo lts can become loose c ausing loss of
control, a col lision and serio us pe rsonal i n
jury .
- Always keep the wheel bo lts and the
threads in the wheel hubs clean so the
wheel bo lts can turn easily and be prop
erly tightened.
- Never g rease or oil the wheel bolts and
the threads in t he wheel hubs . They can
become loose while driv ing if greased or
oiled, even if t ightened to the specified
torque.
- On ly use wheel bolts that belong to the
rim being installed .
- Never use different wheels bolts on yo ur
veh icle.
- Always maintain the correct t ightening
torque for the whee l bolts to reduce the
Page 247 of 292
risk of a wheel loss . If the tightening tor
que of the wheel bolts is too low, they
can loosen and come out when the vehi
cle is moving. If the tightening torque is
too high, the whee l bolts and threads
can be damaged and the wheel can be
c ome loose.
(D Note
The spec ified torque for the wheel bo lts is
90 ft lb (120 Nm) w ith a tolerance of ± 7,4
ft lb(± 10 Nm) . Torque wheel bo lts d iago
na lly . After chang ing a wheel, the torque
m ust be che cked as soon as possib le w it h a
t orque wrenc h -preferab ly by an a utho r
ized Audi dealer or qualified workshop.
Low aspect ratio tires
Your Audi is factory-equipp ed with low aspect
ratio t ires. These t ires have been thorough ly
tested and been selected spec ifically for your
model for the ir superb performance, road feel
and handling unde r a va riety of driving condi
tions. Ask your a uthorized Aud i dea le r fo r
mo re deta ils.
T he low aspect ratio of these tires is indicated
by a nume ral of
55 or less in the tire's size
des ignation . T he numeral represents the rat io
of the ti re's sidewall height in relat io n t o its
tread wid th expressed in per cen tage . C o nven
tional t ires have a height/width ra tio of 60 or
mo re.
Th e performan ce of low -aspe ct-ratio tir es is
parti cularl y se nsitive to improper inflation
pressure . It is therefore impor tant that low
a s pect ratio tire s are inflated to the specified
pressure and that the inflation pre ssure is
regularly checked and maintained. Ti re pres
sures should be checked at least once a
month and always before a long trip
c::> page 234, Checking tire pressure .
What you can do to avoid tire and rim
damage
Low aspect ratio tires can be damaged more
eas ily by impact with potho les, curbs, gu llies
Tire s an d wheel s 245
or r idges on the road, partic ularly if the tire is
u nderinflated.
In orde r to minimize t he occ urren ce of impact
dam age to the tires o f your vehi cle, we recom
mend that you observe the following p reca u
tions:
- Always ma int ain re commended inflation
pressu res . Check your tire pressu re eve ry
2,000 miles ( 3,000 km) and add air if neces
sary.
- Dr ive ca re fu lly on roads with potholes, deep
gullies o r ridges. The impact from driving
through or over such obstacles can damage
your tires. Impact with a curb may also cause damage to your tires .
- After any impact, immed iate ly inspect your
tires or have them inspected by the nearest
au thor ized Audi dealer. Replace a damaged
tire as soon as possible .
- Inspect your tires every 2,000 m iles (3,000
km) for damage and wear. Damage is no t al
ways easy to see . Damage can lead to loss of
air a nd under inflat ion, which could eventu
ally cause tire failure .
If you believe that a
t ire may have been damaged, rep lace the
t ire as soon as possib le.
- These tires may wear more quickly tha n oth
ers.
- Please also remember that, while these tires
de live r respon sive handling, they may ride
less comfo rtably and m ake more noise tha n
other choi ces .
Reduced performance in winter /cold
season conditions
A ll ti res are designed for cer ta in p urposes.
T he low aspect ratio, ult ra h igh performance
tires originally installed on your vehicle are i n
tended for maxim um dry and wet road per
f ormance and handling. They are not suitable
for cold , snowy or icy weather condi tions. If
you drive under those circumstances, you
shou ld equ ip your vehicle w it h all -season or
winter tires, which offer bette r traction under
those conditions. We suggest you use the rec
ommended snow o r all-season t ires specified
f o r yo ur vehicle , or t hei r equivalent . .,..
•
•
Page 252 of 292
250 What do I do now?
What do I do now?
Emergency warning
triangle
App lies to vehicles: with emerge ncy warning triangle
The warning triangle is located on the inside
of the trunk lid .
-
"' M ~ 0 6
~ ~
Fig. 203 Trunk lid: Warning triang le
.,. To open the cover, turn the locking mecha
nism and pull the cover downward .
" m
.,. Remove the warning triang le from its hold
er .
The rear lid is only designed to hold the warn
ing triangle offered by the original accessories
program. If you would like to retrofit your ve
hicle with a warning triangle, p lease contact
your authorized Audi dealer.
Vehicle tool kit
Vehicle tool kit and jack
The vehicle tool kit is located in the luggage
compartment under the cargo floor cover.
Fig. 204 Trunk lid: V ehicl e too l kit
.,. Fold the floor to the seatback with the help
of the handle . .,.
Turn the handwheel counter-clockwise and
remove the cover to reach the veh icle tool
kit.
T he onboard tool kit includes :
- Tire repair kit (Tire Mobility System)
- Hooks to remove the wheel covers*
- Plastic hook to remove wheel bolt covers*
- Wheel bolt wrench
- Alignment pin for changing wheels
- Screwd river with reversible bla de
-Towing eye
-J ack
Before storing the jack, make sure it is wound
back down as far as it will go .
A WARNING
Improper use of the vehicle jack can cause
serious personal injuries.
- Never use the screw driver hex head to
tighten wheel bolts, since the bolts can
not attain the necessary tighten ing tor
que if you use the hex head, potentially
causing an accident .
- The factory-supplied jack is intended on
ly for your vehicle model. Under no cir
cumstances should it be used to lift
heavy veh icles or other loads; you risk in
juring yourself.
- Never start the engine when the vehicle
is raised, which could cause an acc ident.
- Support the vehicle securely with appro
priate stands if work is to be performed
underneath the vehicle; otherwise, there
is a potential risk for injury.
- Never use the jack supplied with your
Audi on another vehicle, particularly on a
heav ier one. The jack is only suitable for
use on the veh icle it came with.
@ Tips
- Some of the onboard items listed above
are provided on certain models only or
are optional extras .
- Before you can raise your vehicle using
the jack, you must activate the jacking
mode¢
page 256 .
Page 256 of 292
254 What do I do now?
After a tire repa ir, have the sealant bottle
rep laced at a dealership. This restores full
functionality to the Tire Mob ility System.
Changing a wheel
Before changing a wheel
Observe the following precautions for your
own and your passenger's safety when chang
ing a wheel .
• After you experience a tire fa ilure, pull the
car well away from moving traffic and try to
reach
level g ro und before you stop¢ /.1..
• All passengers sho uld le ave the car a nd
move to a sa fe loca tion (fo r instance, beh ind
t h e guardrai l) ¢
/.1. .
• Engage the pa rking b rake to prevent your
vehicle from ro lling unintentionally ¢
/.1..
• Move selector leve r to position P ¢ &_ .
• Take the jack out of the luggage compart
ment
¢ page 250.
A WARNING
You or your passe ngers cou ld be injured
w hile c hanging a whee l if you do not fol
low t hese safety p re cau tions:
-If you have a flat t ire, move a safe dis
tan ce off the road. Tur n off the e ng in e,
tu rn the e mergen cy fla shers o n and use
other wa rning dev ices to alert o ther mo
torists.
- M ake su re th at passengers wai t in a safe
place away from the ve hicl e an d well
away from the road and traff ic.
- T o help p revent the veh icle from mov ing
s u dden ly and possibly slipping off the
jack, a lways fully set the parking bra ke
and bloc k the whee l diagona lly opp osite
the whee l being cha nged. When one
front whee l is lifted off the gro und, plac
ing the A utomat ic Transmiss io n in P
(Pa rk) will
not pre vent the vehicle from
moving. -
Before you change a wheel, be s ure t he
ground is level and firm. If necessary,
use a sturdy board under the jack.
- Always store the vehicle tool kit, the jack
and the rep laced tire in t he luggage com
partment
¢page 129.
(D Note
If you are changing the whee l on a steep
i ncl ine, use a roc k or similar object to
block the opposite whee l to prevent the
vehicle from moving.
(D Tips
- Before changing the wheel, you must ac
tivate the jacking mode, so that t he au
tomatic cont rols for the Adaptive Air
Suspension* do not ma ke it mo re d iff i
cult to lift the veh icle w it h the jack
¢page 256.
- Obey all laws.
Changing a wheel
When you change a wheel , follow these
quence described below step-by-step and in
exactly that order .
l. Activate the vehicle jack mode*
¢ page 256.
2. Remove the wheel bolt caps* . For more
details see also ¢
page 255, Wheels with
wheel bolt caps.
3. Loosen the wheel bolt s ¢page 255.
4. Loc ate the p roper moun ting point fo r the
j ack an d align the jack be low that poin t
¢page 256.
5. Raise the car with the jack¢ page 256.
6. Remove the wheel with the flat tire and
then insta ll the other whee[¢
page 258.
7. Tighte n all whee l bolts lightly .
8.
Lower the vehicle wi th the jack .
9 . Use the wheel bolt w rench and
firmly
t ig ht en al l w heel bo lt s¢ page 255.
10. Re place the wheel bolt caps* .
Page 257 of 292
11. Deactivate the vehicle jack mode* in the
MMI:
! CARI function button> (C ar)* sys
tem s
control button > Servicing & chec ks
> Air susp. : jack mo de> Off .
The vehicle jack mode* switches off automati
cally at speeds above 6 mph (10 km/h).
A WARNING
Always read and follow all WARNINGS and
information
c:> .&. in Raising the vehicle on
page 257
and c::> page 259.
After changing a wheel
A wheel change is not complete without the
doing the following .
.. Always store the vehicle tool kit, the jack*
and the replaced tire in the luggage com
partment
c::> page 129.
.. As soon as possible, have the tighten ing
torqu es
on all wheel bolts checked with a
torque wrench . The correct tightening tor
que is 90 ft lb (120 Nm) .
.. Have the flat tire
re pl ace d as soon as poss i
ble.
@ Tips
- If you notice that th e whee l bolts are
corroded and difficult to turn wh ile
changing a t ire, they should be replaced
before you check the tighten ing torque .
- Drive at reduced speed unt il you have the
tightening torq ues checked .
- After changing a wheel, the tire pressure
i n a ll four tires must be checked/cor rect
ed and the tire pressure mon itoring indi
cator must be stored in the MM I
c::>page248 .
What do I do now ? 255
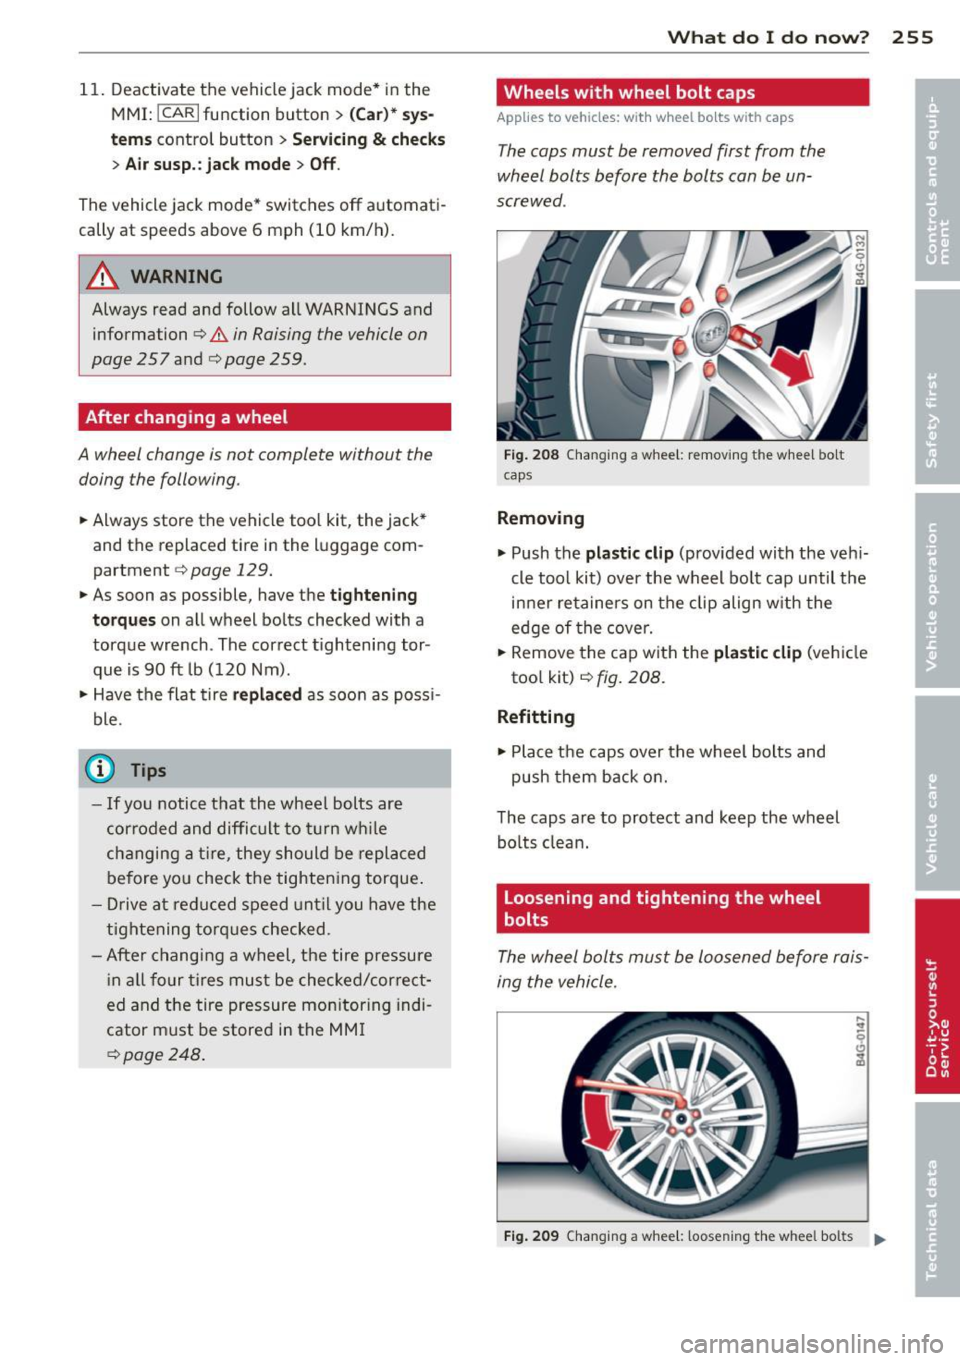
Wheels with wheel bolt caps
Applies to vehicles: with wheel bolts with caps
The caps must be removed first from the
wheel bolts before the bolts can be un
screwed .
Fig. 208 C hanging a whee l: removi ng the wheel bo lt
caps
Removing
.. Push the pla stic clip (provided with the veh i
cle too l kit) over the wheel bo lt cap until the
inner retainers on the clip align w ith the
edge of the cove r.
.,. Remove the cap with the
plas tic clip (ve hicle
too l kit)
c::> fig. 208 .
Refitting
.,. Place the caps over the whee l bolts and
push them back on.
The caps are to protect and keep the wheel bolts clean.
Loosening and tightening the wheel
bolts
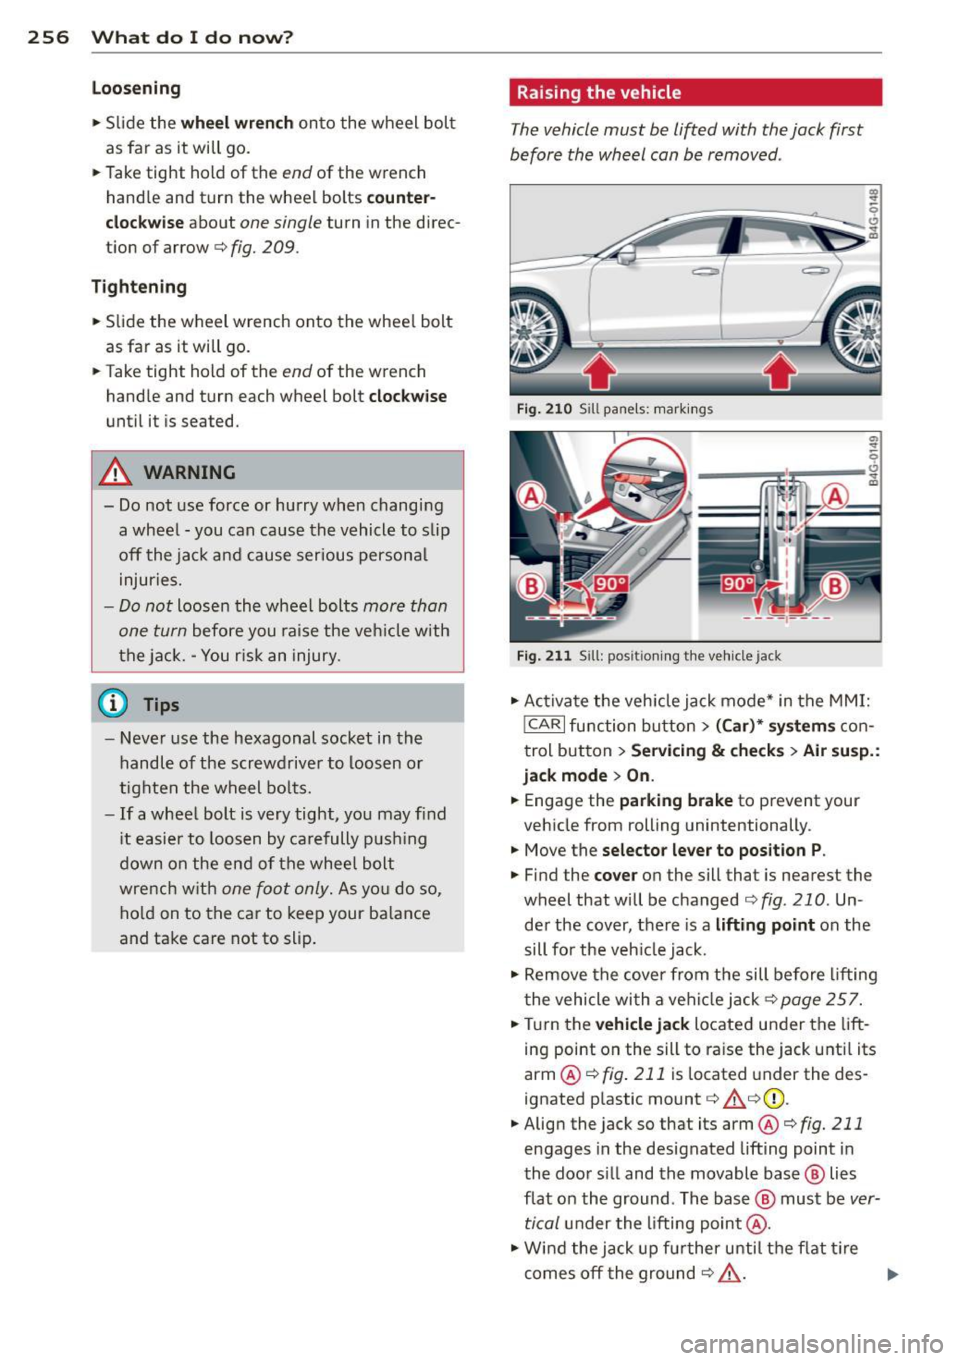
The wheel bolts must be loosened before rais
ing the vehicle.
Fig. 209 Changing a wheel: loosening t he wheel bolts ..
Page 258 of 292
256 What do I do now?
Loosening
.,. Slide the wheel wrench onto the wheel bolt
as far as it will go.
.,. Take tight hold of the
end of the wrench
handle and turn the wheel bolts
counter
clockwise
about one single turn in the direc
t ion of arrow
c:;, fig. 209.
Tightening
.,. Slide the wheel wrench onto the wheel bolt
as far as it will go .
.,. Take tight hold of the
end of the wrench
hand le and turn each wheel bolt
clockwise
until it is seated.
_& WARNING
- Do not use force or hurry when changing
a wheel -you can cause the vehicle to slip
off the jack and cause serious personal injuries.
- Do not loosen the wheel bolts more than
one turn
before you raise the vehicle with
the jack. -You risk an injury.
@ Tips
- Never use the hexagonal socket in the
handle of the screwdriver to loosen or
tighten the wheel bolts.
- If a wheel bolt is very tight, you may find
it easier to loosen by carefully pushing
down on the end of the wheel bolt
wrench with
one foot only. As you do so,
hold on to the car to keep your balance
and take care not to slip.
Ra ising the vehicle
The vehicle must be lifted with the jack first
before the wheel can be removed .
Fig. 210 Sill pane ls : markings
; q
--~~~~~-~
Fig. 211 Sill: posit ioning the Ve hicle jack
.,. Activate the vehicle jack mode* in the MMI:
!CARI function button> (Car)* systems con
trol button>
Servicing & checks> Air susp.:
jack mode
> On.
.,. Engage the parking brake to prevent your
vehicle from rolling unintentionally.
.,. Move the
selector lever to position P .
.,. Find the cover on the sill that is nearest the
wheel that will be changed
c:;, fig. 210 . Un
der the cover, there is a
lifting point on the
sill for the vehicle jack .
.,. Remove the cover from the sill before lifting
the vehicle with a vehicle jack
c:;, page 257 .
.,. Turn the vehicle jack located under the lift
ing point on the sill to raise the jack until its
arm @
c:;, fig. 211 is located under the des
ignated plastic mount
c:;, &c:;,(I) ,
.,. Align the jack so that its arm @ c:;, fig. 211
engages in the designated lifting point in
the door s ill and the movable base @ lies
flat on the ground . The base @ must be
ver
tical
under the lifting point @ .
.,. Wind the jack up further until the flat tire
comes off the ground
c:;, & . ..,.
Page 260 of 292
2 58 What do I do now ?
Taking the wheel off/installing a wheel
Follow these instructions step-by-step for
changing the wheel.
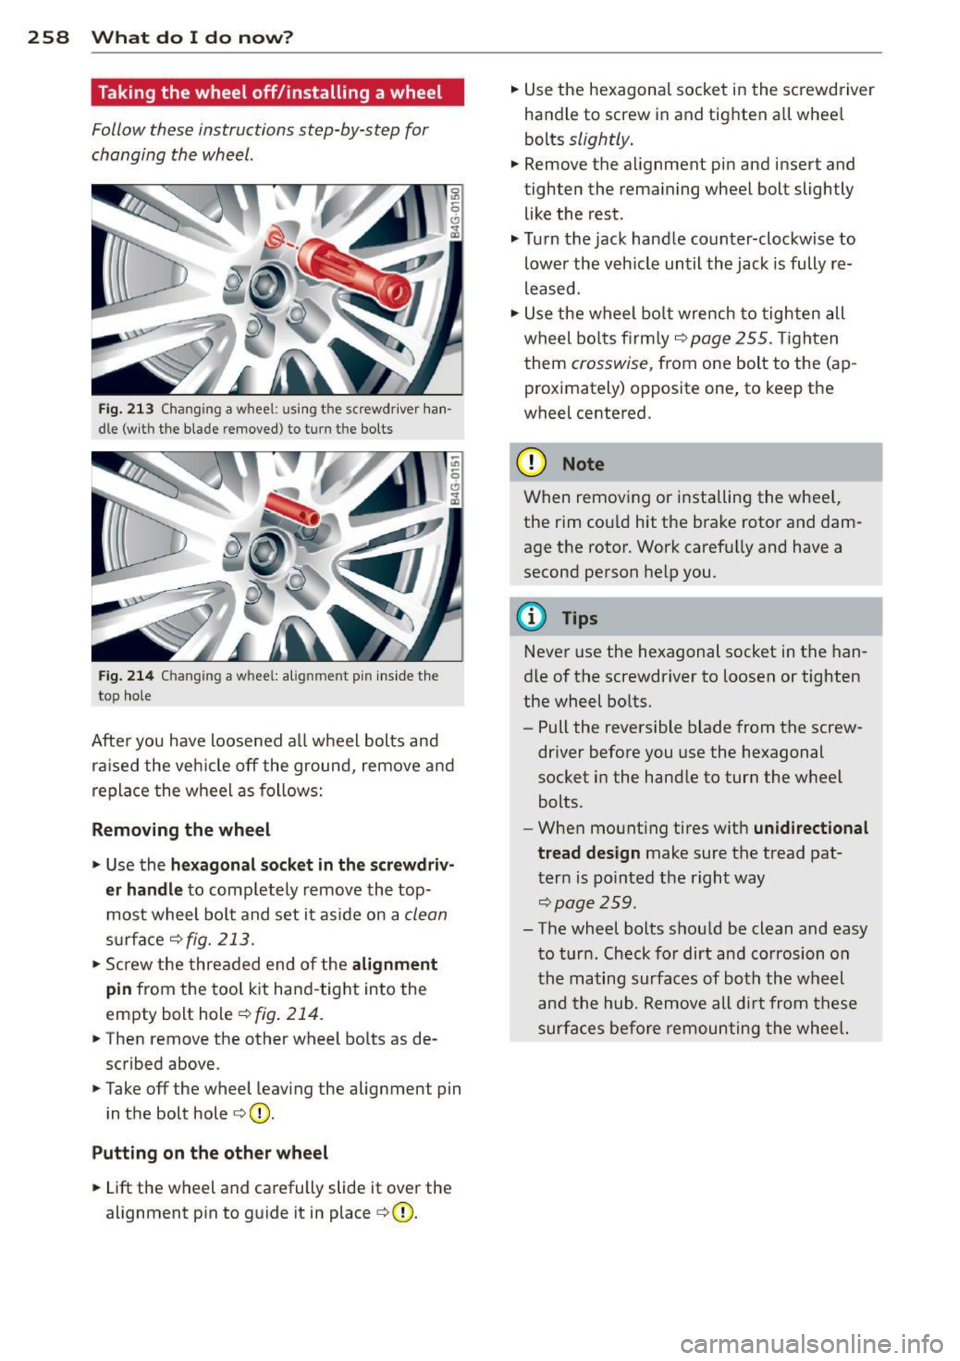
Fig. 213 Changing a whee l: u sing the screwdriver han
dle (w ith the blade removed } to turn t he bolts
Fig . 214 C hanging a w hee l: al ignm en t pi n inside the
top hole
Afte r you have loosened a ll wheel bolts and
raised the vehicle off the ground, remove and
replace the wheel as follows:
Removing the wheel
.. Use the hexagonal socket in the screwdriv
er handle
to comp letely remove the top
most wheel bolt and set it aside on a
clean
surface c:> fig. 213 .
.. Screw the threaded end of the alignment
pin
from the tool kit hand -tight into the
empty bolt hole
c:> fig. 214.
.. The n remove the other wheel bo lts as de
scribed above .
.. Take off the wheel leaving the alignment pin
in the bolt hole
c:> (D .
Putting on the other wheel
.. Lift the wheel and carefully slide it over the
alignment pin to guide it in place
c:>(D.
.. Use the hexagonal socket in the screwdriver
handle to screw in and tighten all whee l
bolts
slightly.
.. Remove the alignment pin and insert and
tighten the remaining wheel bolt slightly like the rest .
.. Turn the jack handle counter-clockwise to
lower the vehicle until the jack is fully re
leased .
.. Use the wheel bolt wrench to tighten all
wheel bolts fir m ly
c:> page 255 . Tighten
them
crosswise, from one bolt to the (ap
proximately) opposite one, to keep the
wheel centered.
(D Note
When remov ing or installing the wheel,
the rim cou ld hit the brake rotor and dam
age the rotor. Work carefu lly and have a
second person help you.
(D Tips
Never use the hexagonal socket in the han
d le of the screwdriver to loosen or tighten
the wheel bolts.
- Pull the reversible blade from the screw
driver before you use the hexagonal
socket in the handle to turn the wheel
bolts.
- When mounting tires w ith
unidirectional
tread design
make sure the tread pat
tern is pointed the right way
c:>page25 9.
-The wheel bolts should be clean and easy
to turn . Check for dirt and corrosion on
the mating surfaces of both the wheel
and the hub. Remove all dirt from these
surfaces before remounting the wheel.
Page 261 of 292

Tires with unidirectional tread design
Tires with unidirectional tread design must be
mounted with their tread pattern pointed in the right direction .
Using a replacement tire with a tre ad
patte rn intend ed for us e in a specific
directi on
When us ing a replacement t ire with a tread
pattern intended for use in a specific direc
tion, please note the fo llowing :
- T he direction of rotation is marked by an ar
row on the side of the tire .
-If the replacement tire has to be installed in
t h e incorrect d irection, use the rep lacement
t ire only temporarily since the t ire will not
be able to achieve i ts optimum performance
characteristics with regard to aquap laning,
noise and wear .
- We recommend that you pay particular at
tention to this fact during wet weather and
that you adjust your speed to match road conditions .
- Replace the flat tire with a new one and
have it installed on you r veh icle as soon as
poss ible to restore the handling advantages
of a unid irect ional tire.
Notes on wheel changing
P lease read the information ¢ page 239, New
tires and replacing tires and wheels
i f you are
go ing to use a replacement tire w hich is dif
fe rent from the tires on your vehicle.
After you change a ti re :
- Chec k the tir e p ress ure on the rep lacement
t ire immed ia tel y aft er in stall ation.
- Ha ve the wheel bolt tight ening torque
checked w ith a to rqu e wrench as soon as
possible by your auth oriz ed Aud i dealer o r
a qu alifi ed s erv ice station .
- With steel and allo y wheel rims , the wheel
bol ts are correctl y tightened at a to rque of
9 0 ft lb (1 20 Nm ).
- If y ou no tice th at the whee l bolts are cor
roded and d ifficult to tu rn whil e cha nging
What do I do now? 259
a tire , th ey s hould be repl aced before you
c heck the tightening torq ue.
- Repl ac e th e flat ti re with a new on e and
ha ve it in sta lled on you r veh icle as s oon a s
po ssible. Remount the whee l cove r.
Until then , dri ve with extr a care and at r e
du ced sp ee ds.
A WARNING
-=
- If you are going to equip your vehicle
with tires or rims which differ from those
which were factory installed, then be sure to read the information ¢
page 239,
New tires and replacing tires and
wheels .
-Always make sure the damaged wheel or
even a flat tire and the jack and tool kit
are properly secured in the luggage com
partment and are not loose in the pas
senger compartment .
- In an accident or sudden maneuver they
co uld fly forwa rd , injuring anyone in the
veh icle.
- Always sto re damaged wheel, jack and
too ls securely in the luggage compa rt
men t. Othe rwise , in an accident or s ud
den maneuver they co uld f ly forward ,
causing injury to passengers in the vehi
cle.
([) Note
Do not use commercially avai lab le tire
sea lants . O therwise, the e lectr ica l compo
nents of the tire pressure monitoring sys
tem will no longer work properly and the
sensor for the tire pressure mon itor ing
system will have to be rep laced by quali
fied workshop. •
•