2014 AUDI RS7 SPORTBACK transmission
[x] Cancel search: transmissionPage 268 of 292
266 Emergency situations
-When connecting jumper cables, make
sure that they cannot get caught in any
moving parts in the engine compart
ment .
- Before you check anything in the engine
compartment, always read and heed all
WARNINGS
<=) page 213.
(D Note
Improper hook-up of jumper cables can ru
in the generator.
- Always connect POSITIVE( +) to POSI
TIVE(+), and NEGATIVE(-) to NEGATIVE
( - ) ground post of the battery manager
control unit .
- Check that all screw plugs on the battery
cells are screwed in firmly . If not, tighten
plugs prior to connecting clamp on nega
tive battery terminal.
- Please note that the procedure for con
necting a jumper cable as described
above applies specifically to the case of
your vehicle being jump started. When
you are giving a jump start to another ve
hicle, do
not connect the negat ive( -) ca
ble to the negative( -) terminal on the
discharged battery ©
Q fig. 220. In
stead, securely connect the negative( -)
cable to either a solid metal component
that is firmly bolted to the engine block
or to the engine block itself. If the bat
tery that is being charged does not vent
to the outside, escaping battery gas
could ignite and explode!
Emergency towing
with commercial tow
truck
General hints
Your Audi requires special handling for tow
tng .
The following information is to be used by
commercia l tow truck operators who know
how to operate their equipment safely.
-Never tow your Audi. Towing will cause
damage to the engine and transmission .
- Never wrap the safety chains or winch ca
bles around the brake lines.
- To prevent unne cessary damage, your Audi
must be transported with a flat bed truck.
- To load the vehicle on to the flat bed, use
the towing loop found in the vehicle tools
and attach to the front or rear anchorage
r=) page 266 and ¢ page 267.
.&_ WARNING
=
A vehicle being towed is not safe for pas-
sengers. Never allow anyone to ride in a
vehicle be ing towed, for any reason.
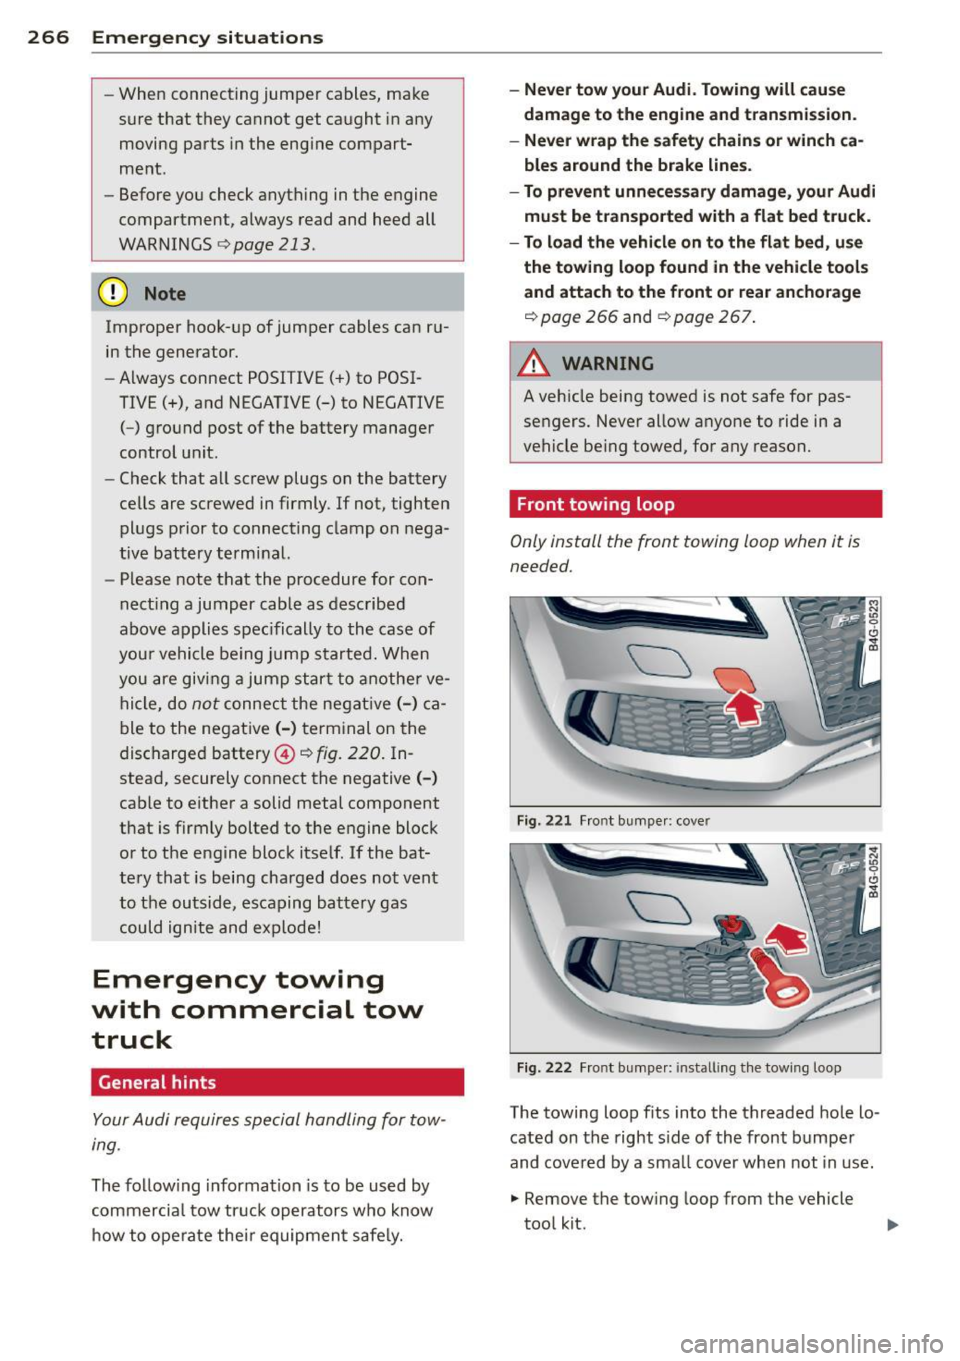
Front towing loop
Only install the front towing loop when it is
needed.
Fig. 221 Front bumpe r: cove r
Fig. 222 Front bumper: installing the towing loop
-
The towing loop fits into the threaded hole lo
cated on the right side of the front bumper
and covered by a smal l cover when not in use.
.,. Remove the towing loop from the vehicle
tool kit.
Page 271 of 292
heavy components such as the engi ne
b lock or transmiss ion are removed.
- W hen removing heavy components like
these, ancho r vehicle to hoist o r add cor
respond ing weig hts to ma inta in the cen
ter of g ravity . Otherwise, the vehicle
m ight tilt o r sli p off the hoist, causi ng
ser ious p erso na l in ju ry.
([) Note
-Be awa re of the fo llowing points befo re
li fting t he vehicle:
- The vehicle should never be lifted or
jacked up from underneath the engine oil pan, the transmission housing, the
front or rear axle or the body side
members. This could lead to serious
damage.
- To avoid damage to the underbody or
chassis frame , a rubber pad must be
i nserted between the floor jack and
the lift points.
- Before driving over a workshop hoist,
check that the veh icle weight does not
exceed the permissible lifting capacity
of the hoist.
- Before driving over a workshop hoist,
ensure that there is sufficient clear
ance between the hoist and low parts
of the vehicle.
Emergency situations 269
•
•
Page 272 of 292

2 70 Technical data
Technical data
Vehicle identification
Fig . 228 Vehicle Ident ification Number (VlN) plate: lo·
cat ion on driver 's s ide dash panel
XXXXX XX · X -XXXX XXX xx
r,"\__l f~ -11!111 · NII. ~ V!Hlll -llllll . NO.
IYP IT'fl'E
XXXXXXXX XX X XXXXXXXX
XXX XXX
XX XXXXXXX XX X X XX
XXX
KW XXX
®i ~~:f :l~~ XXXX XXX XXX
@+ ~~r= XXXX I XXXX XXX I XX M ,. AIIISl./ lflllllS
EOA 7D5 4 UB 6XM SSG 5RW
2E H JDZ llB l AS lBA
3FC 5MU 7Xl
FO A
9G3 OG7 O
YH OJF
TL6 J
KA BEH
UlA X9B QZ 7
l XW
8Q3 9Q8 82 4 020
7T6 CV 7 7KO 4X3 2K2
3L4 4 KC 3YO 4I3 502
lS A 7GB Q1A 4GQ
XX X XX X XX X XXXX
Fig. 229 Th e vehicle identificat ion label -inside the
l uggag e compa rtmen t
Vehicle Identification Number (VlN)
The Vehicle Identification Number is located
in different p laces:
- under the w indshield on the driver's side
~fig . 228.
-in the MMI: Select: Function button ICARI >
(Car)* systems> VIN number .
-on the veh icle identification label.
Vehicle identification label
The vehicle identification label is located in
the luggage compartment in the spare wheel
well. T
he label ~
fig. 229 shows the following vehi
cle data:
(D Vehicle Ident ificat ion Number (VIN )
@ . Vehicle type, engine output, transmission
® Engine and transmission code
@ Paint number and interior
® Optional equipment numbers
Th e information of the vehicle identification
lab el can also be found in your Warranty
&
Maintenance booklet.
Safety compliance sticker
The safety compliance sticker is your assur
ance that your new veh icle complies with all
applicable Federal Motor Vehicle Safety
Standards which were in effect at the time the
vehicle was manufactured. You can find this
sticker on the door jamb on the driver's side.
It shows the month and year of production
and the vehicle ident ificat ion number of your
vehicle (perfo rat ion) as well as the Gross Vehi
cl e Weight Rating (GVWR) and the Gross Axle
Weight Rating (GAWR) .
High voltage warning label
The high voltage warning label is located in
the engine compartment next to the engine
hood re lease . The spark ign ition sys tem com·
plies with the Canadian standard IC ES-002.
Weights
Gross Vehicle Weight Rating
The Gross Vehicle Weight Rating (GVWR), and
the Gross Axle Weight Rat ing (GAWR) for
front and rear are listed on a sticker on the
doo r jamb on the driver' s side .
The Gross Vehicle Weight Rating includes the
weight of the bas ic vehicle plus fu ll fuel tank,
oil and coolant, plus maximum load, which in
cl udes passenger weight (150 lbs/68 kg per
designated seating position) and luggage
weight ~&. - .,.
Page 276 of 292
274 Con sum er Inf ormation
steadi ly reduced the scope of maintenance
and repairs which can be carried out by vehicle
owners.
Als o, sa fe ty a nd en vir onm ent al con
cerns place very strict limits on the nature of
repairs and adjustments to engine and trans
miss ion parts which an owner can perform .
Maintenance, adjustments and repa irs usua lly
require special tools, testing devices and oth
er equipment available to specially trained
workshop personnel in order to assure proper pe rformance, reliab ility and safety of the vehi
cle and its many systems.
Improper maintenance, adjustments and re
pa irs can impair the operation and reliab ility
of your vehicle and even void your vehicle war
ranty. Therefore, proof of servic ing in accord
ance w ith the ma intenance schedule may be a
condition for upholding a poss ible warranty
claim made within the warranty period.
Above all, operational safety can be adversely
affected, c reating unnecessary risks for you
and your passengers.
If in doubt about any se rv icing, have it done
by your author ized Audi dealer or any other
p roperly equipped and qualified workshop.
We strong ly urge you to give yo ur autho rized
Audi dealer the opportunity to perfo rm all
schedu led maintenance and necessary repairs.
Your dea ler has the facilities, original parts
and trained specialists to keep your vehicle
running properly.
Performing limit ed m aint enance yours elf
The following pages describe a limited num
ber of proced ures which can be performed on
your vehicle with ordinary too ls, shou ld the
need arise and trained personnel be unavaila
ble. Before performing any of these proce
dures, always thoroughly read all of the app li
cable text and carefully follow the instruc
tions given . Always rigorously obse rve the
WARNINGS p rovided.
Before you ch eck anything in th e eng ine
co mpartm ent , alway s re ad and h eed all
WA RNINGS
c::> .&. and c::> .&. in Working in the
engine compartment on page 213.
_& WARNING
- Serious personal injury may occur as a re
sult of improperly performed mainte
nance, adjustments or repa irs.
- Always be extremely careful when work
ing on the vehicle. Always follow com
monly accepted safety pract ices and gen
eral common sense. Never r is k personal
injury.
- Do not attempt any of the maintenance,
checks or repairs descr ibed on the fol
lowing pages if you are not fu lly fam iliar
with these or other procedures with re
spect to the vehicle, or are uncertain how
to proceed .
- Do not do any work without the proper
too ls and equipment. Have the necessa ry
work done by your authorized A udi deal
er or another proper ly equipped and
qualified workshop.
- The engine compartment of any motor
veh icle is a potentially hazardous area.
Never reach into the area around or
touch the radiator fan. It is temperature controlled and can sw itch on suddenly -
even when the engine is off. The radiator
fan switches on automatical ly when the
coo lant re aches a certain temperature
and will continue to run until the coo lant
temperature drops .
- Always sw itch off the ignition before any
one gets under the vehicle.
- Always support your veh icle with safety
stands if it is necessary to work under
neath the vehicle. The jack s upplied with
the vehicle is not adequate for this pur
pose and cou ld co llapse causing serious
personal injury.
- If you must work underneath the vehicle
with the wheels on the ground, a lways
make sure the vehicle is on level ground,
that the wheels are a lways securely
b locked and that the engine cannot be
started .
- Always make sure the transmission se
lector lever (automatic transmission) is
Page 280 of 292

278 Index
Setup . . . . . . . . . . . . . . . . . . . . . . . . . . . . 72
synchronizing ............. ... .... .. 71
Automatic Shift Lock (ASL) .......... . 105
Automatic transmission . . . . . . . . . . . . . . 104
Automatic Shift Lock (ASL) . .. .. .. .. . 105
Driving .... .. ........ .... ... .. .. . 106
Emergency mode ........... .. .. ... 108
E mergency release ........ .. .. .. .. . 109
Kick -down ............... .... .... . 108
Manual shift program ......... .. .. . 108
Selector lever ............. ... .... . 104
Automatic wipers . .. ........ ... .. .. .. 48
Auto Safety Hotline . . . . . . . . . . . . . . . . . 131
Average consumption ....... .. .. .. .. . . 24
Average speed . . . . . . . . . . . . . . . . . . . . . . . 24
Avoid damaging the vehicle ........ .. . 199
B
Bag hooks . . . . . . . . . . . . . . . . . . . . . . . . . . 67
Battery ... .. .. .. ............ ... .. . 223
Charging ... .. .. .. .......... ... .. . 226
I mportant warnings ...... .. .. .. .. . 224
Jump starting .. ........ .. .. .. .. .. . 264
L ocat ion ..... ........... ........ . 224
l ow ... .... ................ ..... . 195
Rep lacing the battery ...... ... .. .. . 227
State of charge ............ ... .. .. . 195
Winter operation ......... .... .... . 223
Working on the battery .... .. .. .. .. . 224
Before driving . . . . . . . . . . . . . . . . . . . . . . 123
Blended gasoline .... ...... .. .. .. .. . 208
Blower (automatic climate control) . . . . . . 71
Boost display . . . . . . . . . . . . . . . . . . . . . . . . 28
Booster seats ... .... ...... .. .. .. .. . 177
Boost pressure indicator .......... .. .. 28
Brake fluid Changing the brake fl uid ... .... .. .. . 223
Check ing the brake fluid level . .. .. .. . 222
What is the correct brake fluid leve l? .. 222
What should I do if the brake fluid warn-
ing light comes on? ........ .... ... . 222
Brake system Anti-lock braking system ..... .. ...... 19
Brake assist system ........ ... .. .. . 189
Brake booster ............. ... .... . 193
Brake fluid ............... ... .... . 222 Brake fluid specifications for refill and re
placement
. . . . . . . . . . . . . . . . . . . . . . . 223
Brake light defective . . . . . . . . . . . . . . . . 21
Brake pads ...... ............. .... 198
Electromechanical parking brake . .... . 77
Fluid reservoir . .. ................ . 222
How does moisture or road salt affect the
brakes? ....... .. .. ........ ... ... . 193
Warning/ind icator lights ...... .. .. .. . 14
Worn b rake pads symbo l ........ .. .. . 20
braking guard
Settings . . . . . . . . . . . . . . . . . . . . . . . . . . 88
Braking guard ..... ............. ... .. 81
Messages . .. .. .. .. ........... .... . 88
Break-in per iod .... ............. .... 198
Brake pads .... .. ................ . 198
Tires .... ..... .. .. .............. . 198
Bu lbs .. .. .. .. .. .. .. .. ...... ... .. .. 263
C
California Proposition 65 Warn ing .... . 214
Battery specific .. ..... ......... ... 225
Capacities .. .... .. ................. 271
Engine oil ....... ............. .... 215
Carbon parts Cleaning . . . . . . . . . . . . . . . . . . . . 205, 206
Car carrier Transporting your vehicle ....... .. .. 268
Care ... .. .. .. .. .. ............. .. .. 203
Cargo area . ..... .. ............. ... . 129
Cargo net . . . . . . . . . . . . . . . . . . . . . . . . . . . 66
Catalytic converter .............. .. .. 199
Center armrest Cockpit . . . . . . . . . . . . . . . . . . . . . . . . . . . 56
Central locking .. .. .......... ...... .. 34
Emergency locking ... ....... ...... .. 38
Certification ..................... .. 276
Changi ng a wheel .. ... .......... .. .. 254
Changing engine oil .......... ...... . 219
Checking Engine coolant level ............ .... 220
Tire pressure ... .. ... .......... .. .. 234
Page 286 of 292
284 Index
Opening Hood .. .... ................ ..... . 213
Power windows .................... 41
Rear lid . . . . . . . . . . . . . . . . . . . . . . . . . . . 38
Sliding/tilting sunroof ..... .. .. .... .. 42
Operate your vehicle economica lly and
minimize po llution .......... ... .... . 200
Other equipment (effic iency program) ... 25
Outlet .. .. .. ............. .. .. .. ... . 59
p
Paint damage
205
Paint No . .. .... ........... .. .. .... . 270
Parking . .. .... ........... .... .... .. 78
Automatic transmission ....... .. ... 106
Valet park ing .. ... ... .... .. .. .. .. .. 42
Parking brake ............. .. .. .. ... . 77
also refer to Electromechanical parking
br ake .. .. ................. .. .. .. .. 77
Parking system Adjusting the disp lay/warning tone . .. 120
C leaning sensors/came ra lenses . .... . 204
Cleaning the rear view camera .. .. .. .
Malfunc tion ......... ...... .. .. .. .
Parking system plus ........ ... .. .. . 112
120
111
Peripheral cameras ........ ... .. ... 115
Rear view camera ............. .. ... 11 2
o/sorefertoPark ingsystems . .. 111 ,112
Pa rking systems .. ......... .. .. .. .. . 110
Parts replacement .......... ... .... . 275
Pass-through with sk i sack ... .. .. .. .. . . 67
PASS ENG ER A IR BAG OF F light . . . . . . . . 155
Passenger protection ....... .. .. .. .. . 187
Passive safety system . . . . . . . . . . . . . . . . 123
Pedals .... .. ............... .. .... . 128
Physical principles of a frontal coll is ion 134
Plas tic parts
Cleaning . ...... .. ..... .... .. .. .. . 205
Polishing .... ................ ..... . 205
Pollen filter
refer to Pollutant filter . . . . . . . . . . . . . . 69
Pollutan t filter ............ .. .. .. .. .. 69
Power locking system . . . . . . . . . . . . . . . . . 34
Locking/unlocking the vehicle from in-
side ... .... ................ ..... .. 37
Selective unlock feature ... .. .. .... .. 35 Settings .
..... .. ............. ..... 35
Unlocking and locking vehicle ..... ... . 35
Power seat ad justment
Front seats . . . . . . . . . . . . . . . . . . . . . . . . 54
Power steer ing
refer to Electro -mechanical power as -
sist ......... ... .. ............... 194
Power windows .. ........ ....... .... . 41
malfunction . .. .. .... ... .. .. .. .. .. . 41
Pregnant women Special considerations when wearing a
safety belt .... .. ................ . 138
pre sense . .. .. .. . .. ... ..... ... ... .. 187
Preventative passenger pro tec tion . .. .. 187
Programming the Homelink universal re -
mote control . ..... ................. 121
Proper occupant seating positions . .. .. 124
Proper safe ty belt position .. .... .. .... 13 7
Proper seating position Front passenger .. ............. .... 125
Occupants ..... .. ................. 124
Rear passengers . . . . . . . . . . . . . . . . . . . 126
Protecting
Q
quattro
refer to All-wheel drive
Question What happens to unbelted occupants?
Why safety belts? ................ .
R
205
195
1 34
133
Radia tor fan .. .. .. ...... ..... .. .... 222
Radio clock . . . . . . . . . . . . . . . . . . . . . . . . . 26
Rain/light sensor Headlights .. .. .. ....... ..... ..... . 44
Inte rmittent (w indshield w ipers) . .... . 48
Sensor defective . . . . . . . . . . . . . . . . . . . . 22
Range (fuel level) . . . . . . . . . . . . . . . . . . . . 24
Reading lights ..... ............. ..... 47
Rear fog lights .. .. ... .. .. .. .. .. .. .. . 44
Rear lid
Automatic operation . . . . . . . . . . . . . . . . 38
Emergency release .................. 40
Page 289 of 292
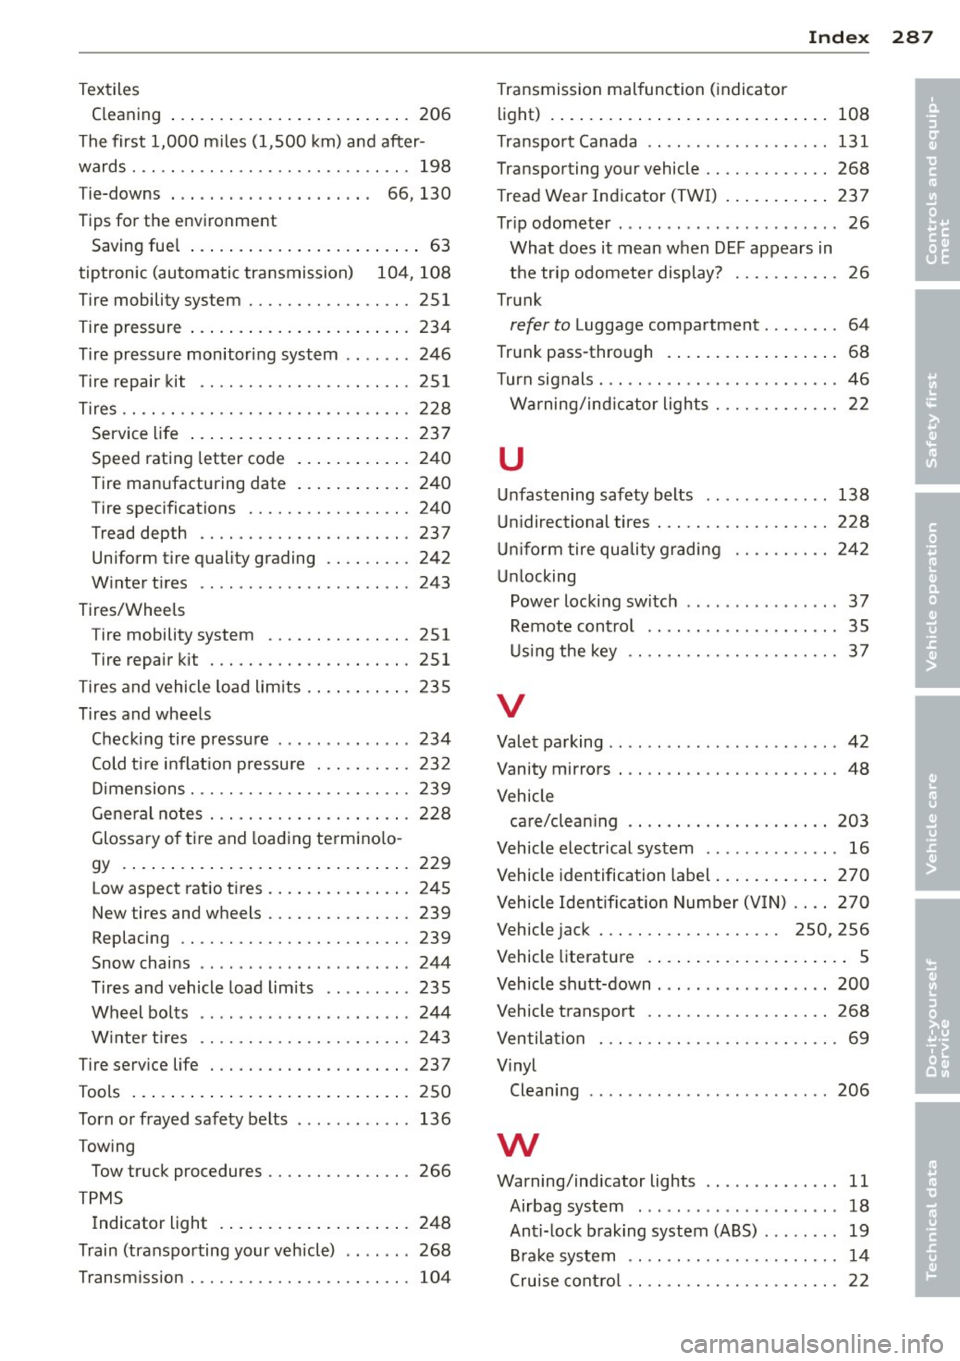
Textiles Cleaning ... ..... ..... ... .. .. .. ... 206
The first 1,000 miles (1 ,500 km) and after-
wards . .. .. .. .... ........... .. .. ... 198
T ie-downs . . . . . . . . . . . . . . . . . . . . . 66, 130
Tips for the env ironment
Saving fue l . . . . . . . . . . . . . . . . . . . . . . . . 63
tiptronic (au tomatic tra ns m ission) 10 4, 108
Tire mobility system ........ .. .. .. .. . 251
Tire pressure ..... .. .... ... .. .. .. ... 234
T ire pressure monitor ing system .. . ... . 246
T ire repair kit ............. .... .. ... 251
T ires .. .. .. .. .... ............. .. .. . 228
Service life ... .... .... ... .. .. .. ... 23 7
Speed rating letter code ... .. .. .. .. . 240
Tire manufacturing date ... .. .. .. .. . 240
T ire specifications ........ .. .. .. .. . 240
Tread depth .. ........... .. .. .. ... 237
Uniform t ire quality grading .. .. .. .. . 242
W inter t ires ................ ... ... 243
Tires/Whee ls
T ire mobility system
251
Tire repair kit ............ .... .. ... 251
Tires and vehicle load limits . ... .. .. .. . 235
Tires and whee ls
Checking tire p ressure ........ .. .... 234
Cold ti re inflat io n pressu re . .. .. .. .. . 23 2
Di mensions . .. ........... .. .. .. ... 239
General notes ............ .... .. ... 228
Glossary of t ire and load ing termino lo-
gy . ..... .. ... .. .. ..... ... .. .. ... 229
Low aspect ratio t ires ...... .. .. .. .. . 245
New tires and wheels ...... .. .. .. .. . 239
Replacing .. .. ........... .. .. .. ... 239
Snow chains .............. ... ... .. 244
T ires and vehicle load limits .. .. ... .. 235
Wheel bo lts . . . . . . . . . . . . . . . . . . . . . . 244
W inte r tir es ............. .... .. .. . 243
Tire serv ice life ............ .... .. .. . 237
Tools ..... .. .. .... .. .... ... .. .. ... 250
Torn or frayed safety belts ... .. .. .. .. . 136
T owing
Tow truck procedures ...... .. .. .. .. . 266
TPMS Indicator light . ....... ... .. .. .. ... 248
Train (transpo rting your veh icle) .. ... .. 268
Transm ission . ............. .... .. ... 104
Inde x 287
Transmission mal function (indicator
light) . ... .. .. .. .... . ... ...... ... .. 108
T ra nspo rt Canada .. ................. 131
Transporting your vehicle ......... .... 268
T read Wea r Ind icator ( TW I) .... ... .. .. 237
Tr ip odometer . .. .. .. ... ....... ...... 26
What does it m ean when DEF appears in
t h e tr ip odomete r display? ...... .. .. . 26
Trunk
refer to Luggage compartment ........ 64
T runk pass-through . .. .. ..... ... .. .. . 68
T urn signals . .. .. .. .... ........... .. . 46
Warning/ind icat or lights ........ .... . 22
u
Un fastening safety belts ............. 138
U nidirectional tires . .... ............. 228
Unif orm tire quality g radi ng
U nlocking 2
42
Power locki ng switc h ... .. .. ... ... .. . 37
Remote cont ro l .... ... .. ..... ..... . 35
U si ng the key .. .. .. . .............. . 37
V
Valet pa rking .. .. .. .. . .. .... .... .. .. . 42
Vanity mirrors . .. .. .. ............... . 48
Vehicle care/clean ing . ... .. .. ... ..... ... .. 20 3
Vehicle electr ical system ............ .. 16
Vehicle identification label ..... ... .. .. 270
Vehicle Ident ifi cat ion Numbe r (V IN) .. .. 270
Vehicle jack . . . . . . . . . . . . . . . . . . . 250, 256
Vehicle literature .... . .. .. ..... ... .. .. 5
Vehicle shutt-down ........ ......... . 200
Vehicle transport .. ................. 268
Ven tila tion . . . . . . . . . . . . . . . . . . . . . . . . . 69
V inyl
Cleaning .. .. .. .. .. . .. .... .... .. .. 206
w
Warning/ind icator lights . . . . . . . . . . . . . . 11
Airbag system . ......... ........... 18
Ant i- lock b raking system (ABS) .. ... .. . 19
B ra ke system . . . . . . . . . . . . . . . . . . . . . . 14
Cruise cont ro l . . . . . . . . . . . . . . . . . . . . . . 22
•
•