2014 AUDI RS7 SPORTBACK warning
[x] Cancel search: warningPage 227 of 292
-Always wear eye protection. Do not let
battery acid or any lead particles get on
your skin or clothing. Shield your eyes .
Explosive gases can cause blindness or
other injury.
- Battery acid contains sulfuric acid . Sulfu
ric acid can cause blindness and severe
burns.
- Always wear gloves and eye protection.
Do not tilt the battery because acid
could leak out of the ventilation open
ings.
- If you get battery acid in your eyes or
on your skin, immediately rinse with
cold water for several minutes and get
medical attention .
- If you should ingest any battery acid,
seek medical attention immediately.
- Do not expose the battery to an open
flame, electric sparks or an open light.
- Do not smoke.
- Do not interchange the positive and neg -
ative cables .
= When working on the battery, be sure
not to short-circuit the terminals with
tools or other metal objects. This would cause the battery to heat up very quickly,
which could lead to damage or explosion and personal injury.
- When a battery is charged, it produces
hydrogen gas which is explosive and
could cause personal injury .
- Always keep the battery well out of the
reach of children.
- Before work is done on the electrical sys
tem, disconnect the negative ground ca ble .
- Before performing any work on the elec
trical system, switch off the engine and
ignition as well as any electrical equip
ment. The negative cable on the battery
must be disconnected . If you are just go
ing to replace a light bulb, then it is
enough to switch off the lights.
- Before disconnecting the battery, switch
off the anti-theft alarm system! Other
wise you will set off the alarm.
Checking and filling 225
-When disconnecting the battery, first
disconnect the negative cable and then
the positive cable.
- Before reconnecting the battery, make
sure all electrical consumers are switch
ed off. Reconnect the positive cable first
and then the negative cable . Never inter
change the cables -this could start a fire!
- Never charge a frozen or a thawed-out
battery . It could explode! If a battery has
frozen , then it must be replaced . A dis
charged battery can freeze over at 32 °F
(0 °C) .
-Make sure the vent hose is always attach
ed to the opening on the side of the bat
tery .
- Never use batteries which are damaged.
There is the danger of an explosion! Al
ways replace a damaged battery.
&_ WARNING
California Proposition 65 Warning:
- Battery posts, terminals and related ac
cessories contain lead and lead com
pounds, chemicals known to the State of
California to cause cancer and reproduc
tive problems. Wash hands after han dling.
(D Note
- Do not disconnect the vehicle battery
when the ignition is on or when the en gine is running, otherwise, you will dam
age electronic components in the e lectri
cal system.
- If your vehicle is going to stand for a
long period of time without being driven,
protect the battery from "freezing", oth
erwise it will be damaged and will then
have to be replaced.
- When opening the doors, the windows
lower approximately 10 mm automati
cally . This function is not available when
the battery is disconnected, which
means there is a risk that the door sea l
or the window could be damaged.
•
•
Page 228 of 292
226 Checking and filling
Battery charging
Starting the engine requires a well charged
battery.
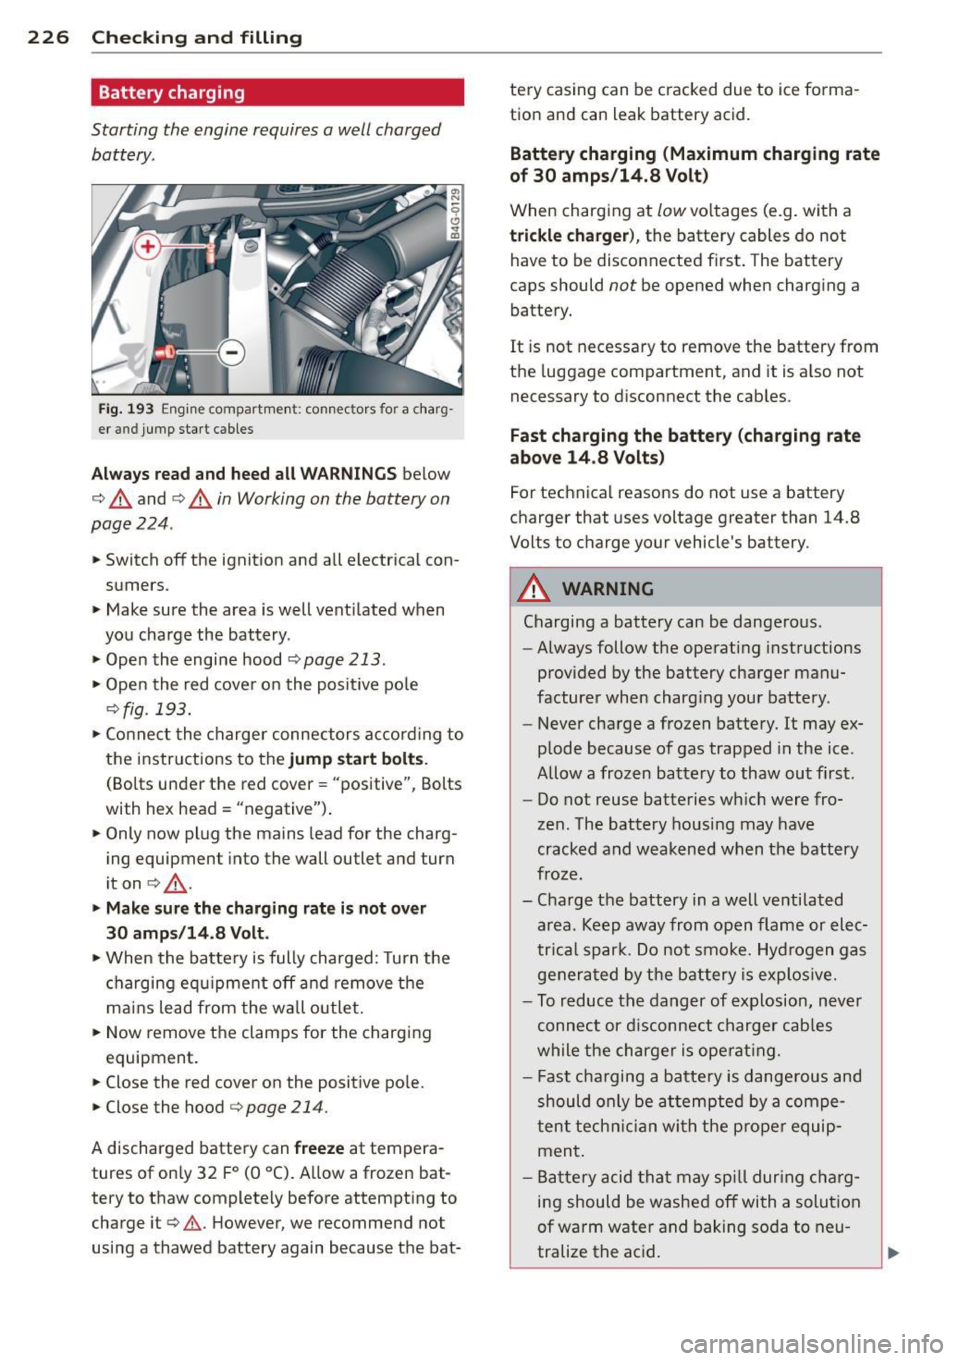
Fig . 193 Engine compartme nt: connecto rs for a charg
er and jump start cables
Always read and heed all WARNINGS below
c:> A and c:> A in Working on the battery on
page 224 .
.,. Switch off the ignition and all electrical con
sumers.
> Make sure the area is well vent ilated when
you charge the battery .
> Open the engine hood c:> page 213 .
> Open the red cover on the posit ive pole
c:>fig. 193.
> Connect the charger connectors according to
the instructions to the
jump start bolts.
(Bolts under the red cover = "positive", Bolts
with hex head= "negative") .
> Only now plug the mains lead for the charg
ing equipment into the wall outlet and turn
iton
c:> &_ .
.,. Make sure the charging rate is not over
30 amps/14.8 Volt.
> When the batte ry is fully charged: Turn the
charging equipment off and remove the
ma ins lead from the wall outlet.
> Now remove the clamps for the charging
equipment.
.. Close the red cover on the positive pole.
> Close the hood c:> page 214.
A discharged battery can freeze at tempera
tures of on ly 32 F
0 (0 °C). Allow a frozen bat
tery to thaw completely before attempting to charge it
c:> .&. However, we recommend not
using a thawed battery again because the bat- tery casing can
be cracked due to ice forma
tion and can leak battery acid.
Battery charging (Maximum charging rate
of 30 amps/14.8 Volt)
When charging at low voltages (e.g. with a
trickle charger), the battery cables do not
have to be disconnected f irst. The battery
caps should
not be opened when charging a
battery.
It i s not necessary to remove the battery from
the luggage compartment, and it is also not
necessary to disconnect the cables.
Fast charging the battery (charging rate
above 14 .8 Volts)
For technical reasons do not use a battery
charger that uses voltage greater than 14.8
Volts to charge your vehicle's battery .
A WARNING
Charging a battery can be dangerous.
- Always follow the operating instructions
provided by the battery charger manu
facturer when charg ing your battery.
- Never charge a frozen battery. It may ex
plode because of gas trapped in the ice .
Allow a frozen battery to thaw out first.
- Do not reuse batteries wh ich were fro
zen. The battery housing may have
cracked and weakened when the battery
froze.
- Charge the battery in a well ventilated area. Keep away from open flame or elec
tr ica l spar k. Do not smoke. Hydrogen gas
generated by the battery is explos ive.
- To reduce the danger of explosion, never
connect or disconnect charger cables
while the charger is operating .
- Fast charging a battery is dangerous and
should only be attempted by a compe
tent technician with the proper equip
ment .
- Battery acid that may spill dur ing charg
ing should be washed off with a solution
of warm water and baking soda to neu
tralize the acid.
Page 229 of 292
CD Note
Never use a fast charger as a booster to
start the engine. This will seriously dam
age sensitive electronic components, such
as control units, relays, radio, etc., as well
as the battery charger .
Battery replacement
The new battery must have the same specifi
cations and dimensions as the original equip
ment battery .
Intelligent energy management in your vehi
cle is respons ible for distributing the electri
cal energy throughout your vehicle
c::> page 195. The intelligent energy manage
ment system w ill keep the engine battery
charged bette r than vehicles w ithout t his sys
tem. To make sure the additional electr ica l en
ergy is available once again after you have
changed the battery, we recommend that you
install batteries of the same type and manu
facture only (the same as those installed at
the time your vehicle was delivered). Specifi
cations are listed on the battery hous ing. Your
author ized dealer must code the battery in
the energy management system to enable you
to use the energy management functions cor
rectly after replac ing the battery.
The new battery must have the same capacity,
voltage (12-volts), amperage, const ruct ion
and p lug sealing.
When installing the battery, make sure the ig
n ition and all electr ical consumers are sw itch
ed off .
CD Note
Make sure the ventilation hose on the s ide
of the battery is connected, otherwise
fumes or battery ac id can leak out.
@ For the sake of the environment
Because of the problem of proper d isposal
of a battery, we recommend your author
ized Aud i dealer change the battery for
you . Batteries contain su lfuric ac id and
Checkin g and fillin g 22 7
lead and must always be disposed o f prop
erly in compliance with a ll environmental
regulations. Disposing of vehicle batter ies
i mproperly is very dangerous to the envi
ronment .
Windshield/headlight*
washer container
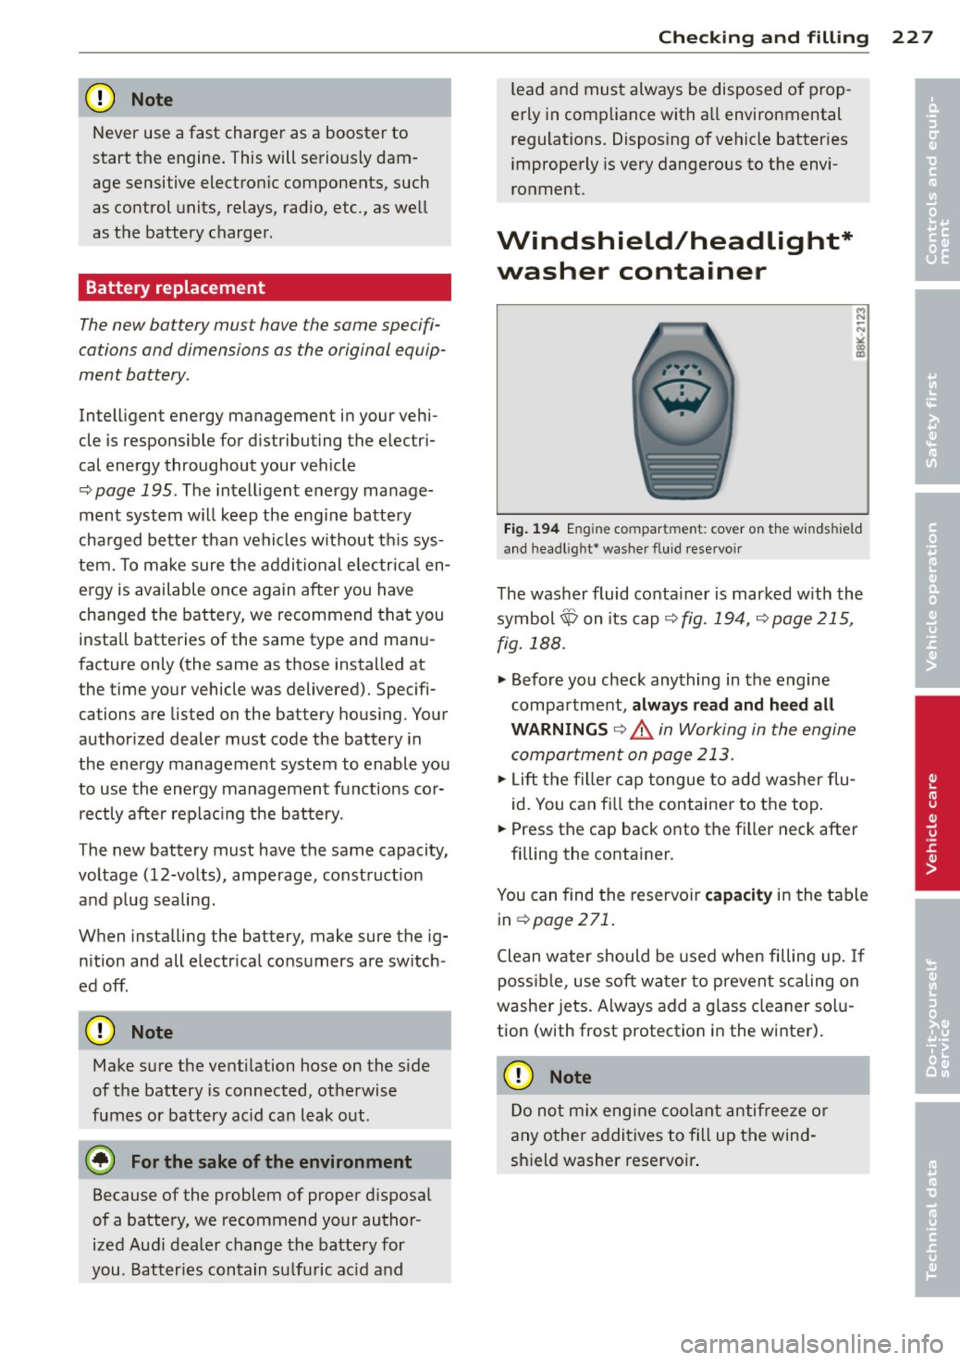
Fig. 194 Engine compart ment: cover on th e windshield
and headl ig ht* washer fluid reservo ir
The washer fluid conta iner is marked w ith the
symbol~ on its cap
c::> fig. 194, c::>page 215,
fig. 188.
.,. Before you check anything in the engine
compartment, always read and heed all
WARNINGS c::> &. in Working in the engine
compartment on page 213.
.. Lift the filler cap tongue to add washer flu
id. You can f ill the container to the top .
.. Press the cap back onto the fi ller neck after
filling the container.
You can find the reservoir
capacity in the table
in
c::> page 271.
Clean water should be used when filling up. If
possible, use soft water to prevent scaling on
washer jets. Always add a g lass cleaner solu
tion (with frost protection in the winter).
([) Note
Do not mix engine coolant antifreeze or
any other additives to fill up the wind
shield washer reservoir .
•
•
Page 230 of 292
228 Tire s and wheel s
Tires and wheels
Tires
General notes
Tires may be the least appreciated and most
abused parts of a motor vehicle .
Tires may be the least appreciated and most
abused parts of a motor vehicle . Tires are,
however, one of the most important parts of a
vehicle, particularly considering the compara
tive ly small patch of rubber on each tire that
assures that all -impo rtant contact between
you, your vehicle and the road.
Maintaining the correct tire pressure, mak ing
sure that your vehicle and its tires do not have
to carry mo re weight than they can safe ly han
d le, avoiding damage from road hazards and
reg ularly inspecting t ires for damage includ
ing cuts, slashes irregu la r wear and ove rall
condition are the most important things that
you can do to he lp avoid sudden tire failure in
cluding tread separation and blowouts.
A voidin g damage
I f you have to drive over a curb or similar ob
stacle, drive very s low ly and as close as possi
b le at a right angle to the curb.
A lways keep chem ica ls includ ing grease, o il,
gasoline and b rake fluid off the ti res.
Inspect the t ires regularly for damage (cuts,
cracks or b listers, etc.). Remove any fo reign
bod ies embedded in the treads.
St oring tires
Mark tires when you remove them to indicate
the direction of rotation . Th is ensures you to
be ab le to mount them correctly when you re
install t hem.
When removed, the wheels or t ires should be
stored in a cool, dry and preferably dark place .
Store tires in a vertical pos ition if they are not
mounted on rims, in a horizontal pos it ion if
they are mounted on rims. New tire
s
New t ires have to be broken in¢&,. .
T he tread depth of new t ires may vary, accord
ing to the type a nd make of t ire and the tread
pa tte rn .
Hidden damage
Damage to tires and r ims is often not readily
vis ible . If you notice unusual v ibrat ion or the
vehicle p ulls to one side, th is may ind icate
that one of the t ires has been damaged . Th e
t ir es m ust be checked immed iate ly by an au
tho rized Aud i dea le r or q uali fied wor kshop.
Unidirectional t ires
A un idirectional tire can be identified by ar
rows on the sidewa ll, that po int in the direc
t ion the t ire is designed to rotate. You must
fol low the specified d irection of rotation . This
is necessary so that these tires can develop
their optimum characteristics regarding grip, road no ise, wear and hydrop laning resistance.
For more information
¢page 259.
A WARNING
-New tires or tires that are old, worn or
damaged cannot provide maximum con
trol and braking ability .
-
-New tires tend to be slippery and must
be broken in . To reduce the risk of losing
control, a co llision and ser ious personal
in jur ies, d rive w ith special ca re fo r the
fi rst 350 m iles (560 km).
- Driving with worn or damaged tires can
lead to loss of control, sudden tire fail
ure, including a blowou t and sudden de
fl ation, c rashes and seriou s personal in
juries . Have wo rn or damaged t ires re
p laced immediate ly .
- T ires age even if they are not being used
and can fai l sudden ly, especially at high
speeds. Tires that are more than 6 years
old can only be used in an emergency
and then w ith specia l care and at low
speed.
Page 235 of 292
Tires an d wheel s 233
you have stored. The system does not recog
nize the load condition of your vehicle.
The effectiveness of the ti re pressu re monitor
ing sys tem w ill be impaired if you store no r
mal load pressures but then operate the vehi
cle at its maximum load¢,& .
See the illustration ¢
fig. 195 for the location
of the label on dr iver's side B-pillar (color of
the actual labe l and exact location on the ve
hicle wi ll vary slig htly) .
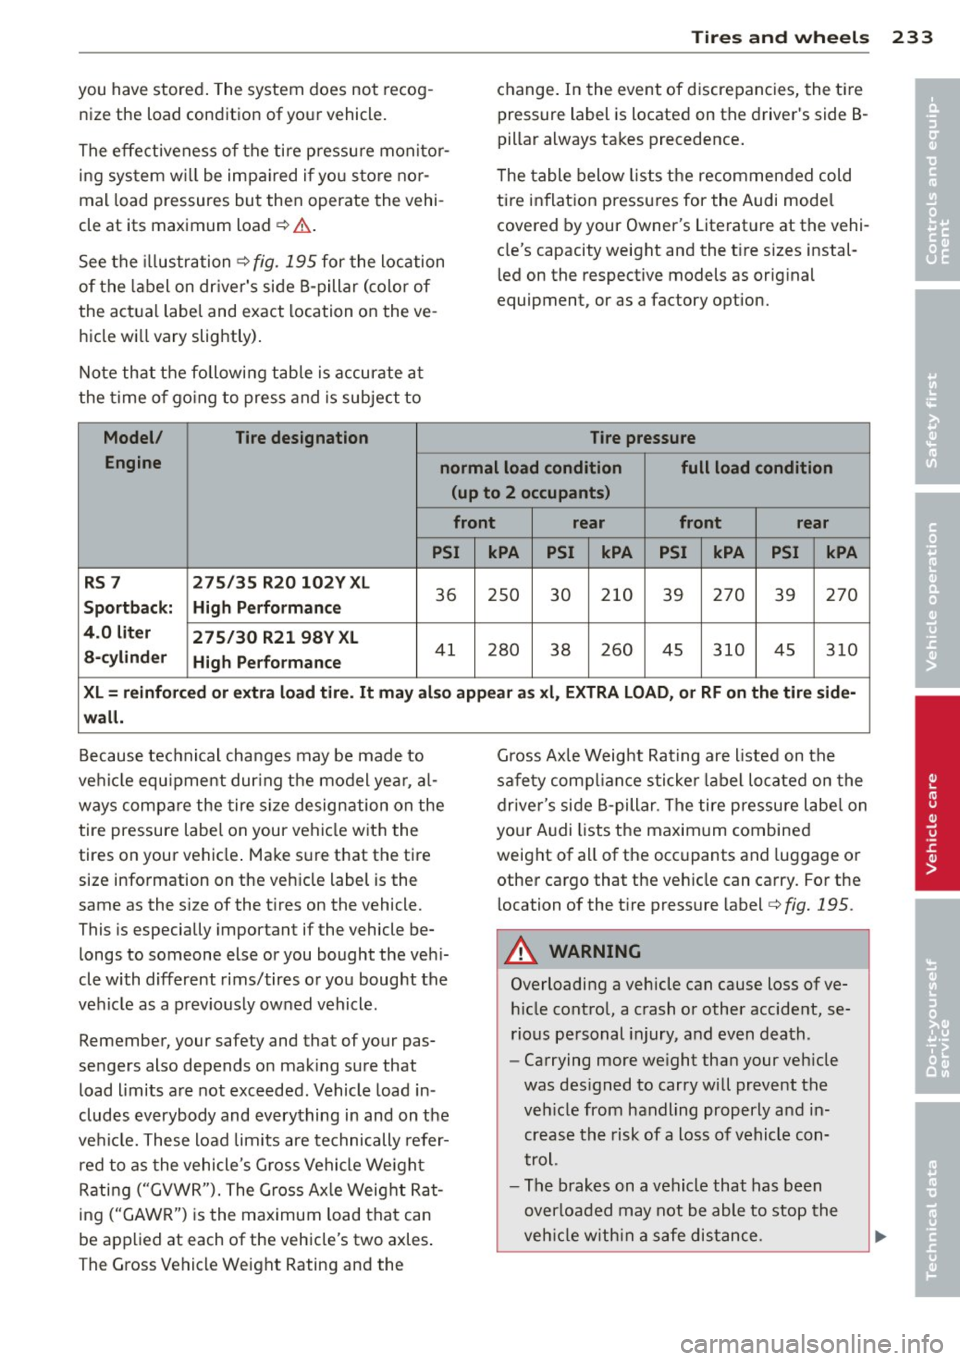
Note that the fo llowing tab le is accurate at
the t ime o f go ing to press and is subject to
Model/ Tire de
signation
c h ange. In the event of discrepancies, the ti re
pressure label is located on the driver's side B
pillar always takes precedence .
T he table below lists the recommended cold
ti re inflat ion pressures for the Audi mode l
covered by your Owner's Literat ure at the vehi
cle's capacity weight and the t ire sizes instal
l ed on the respective models as orig inal
equipment, or as a factory option.
Tire pressure
Engine normal load condition full load condition
(up to 2 occupants )
front r ear front rear
PSI kPA PSI kPA PSI kPA PSI kPA
RS 7 275/35 R20 102V XL
36 2S0 30 210 39 270 39 270 Sportback: High P erformanc e
4.0 lit er
275 /30 R21 98V XL
a -cy linder
High Performance
41 280 38 260 45 310 4S 3 10
X L = r einfor ced or extra load tir e. It ma y al so appear a s xl , EXTRA LOAD, or RF on th e tire side -
w all.
Because tec hnical changes may be made to
ve hicl e equ ipment dur ing the model yea r, a l
ways compare the tire s ize designation on the
tire pressure label on your vehicle with the
tires on your vehicle . Make s ure that the tire
size information on the vehicle label is the
same as the s ize of the t ires on the vehicle.
This is especially important if the vehicle be
longs to someone else or you bought the veh i
cle with different rims/tires or you bought the
veh icle as a previously owned vehicle.
Remember, your safety and that of your pas
sengers also depends on mak ing sure that
load limits are not exceeded . Vehicle load in
cludes everybody and everything in and on the
ve hicl e. These load limits are technically refer
r ed to as the vehicle's G ross Vehicle We ight
Rating ("GVWR"). The Gross Ax le Weight Rat
ing ("GAWR") is the maximum load that can
be applied at each of the vehicle's two axles .
The Gross Vehicle We ight Rating and the G
ross Ax le Weig ht Rating are listed on the
sa fety comp liance sticke r label lo cated on the
driver's side B-pillar . The tire pressu re labe l on
your A udi lists the maximum combined
weight of all of the occ upants and luggage o r
other cargo that the veh icle can carry. For the
location of the t ire pressure label ¢
fig. 195.
A WARNING
-Overloading a vehicle can cause loss of ve-
h icle contro l, a crash or other accide nt, se
rious personal injury, and even death.
- Carrying more we ight than your veh icle
was des igned to carry will prevent the
veh icle from handling properly a nd in
crease the risk of a loss of vehicle con
trol.
- The brakes on a vehicle that has been
overloaded may not be able to stop the
veh icle w ith in a safe distance.
•
•
Page 236 of 292
234 Tire s and wheel s
-Tires on a vehicle that has been overload
ed can fail suddenly causing loss of con
trol and a crash.
- Always make sure that the tota l load be
ing transported does not make the vehi
cle heavier than the veh icle's Gross Vehi
cle Weight Rating.
A WARNING
- Incorrect tire pressures and/or underin flation can lead to a serious or fatal acci
dent .
- Incorrect tire pressures and/or underin
flation cause increased tire wear and can affect the handling of the vehicle.
- Incorrect tire pressures and/or underin
flation can also lead to sudden tire fa il
ure, including a blowout and sudden de
flation, causing loss of vehicle control.
Checking tire pressure
-
The correct tire pressure for the tires original
ly installed on your vehicle is listed on the tire
pressure label located on driver's side 8-pil
lar.
The recommended t ire pressures are on the
tire pressure label and in the tab le
~ page 232, Cold tire inflation pressure . This
means that the pressure must be checked and
adjusted when the tire has not been driven for
more than a couple of mi les (kilometers) at
low speeds during the previous three hours.
Air in the tires expands when the tire heats up
as a result of internal fr iction as it flexes in
use . The tire pressure is higher when the tire
has warmed up than when it is "cold."
It is the inflat ion pressure in a "cold" tire that
counts. Therefore , you should never let air out
of a warm t ire to match "Cold tire inflation
pressure" recommendations
~ page 232. The
tires would then be under inflated and cou ld
fail suddenly.
The tire p ressure label on your Audi l ists the
recommended cold t ire inflat ion pressures at
maximum capacity for the new, original equipment tires that were on your vehicle at
the time it was manufactured. For the loca
t ion of the labe l
~pag e 232, fig. 195.
Most tires lose air naturally over t ime . They
can a lso lose some air if you drive over a pot
ho le or hit a curb while parking. It is usually
not possible to see whether the rad ial tires
used today are underinflated just by looking
at them.
Therefore , be sure to check tire pressures at
l east once a month and always before going
on a long trip. Make sure to take the number
of people and the amount of luggage into ac
count when adjusting tire pressure for a trip -
even one that you would not consider to be
"long ." See ~
page 235, Tires and vehicle
load limits
for more important info rmation .
Always use an accurate tire pressure gauge
whe n checking and adjusting inflat ion p res
sures . Check al l of the tires . If the pressure in
any ti re is too high when the tire is "cold," let
air o ut of the tire slowly with the edge of the
t ire gauge and keep checking the pressure un
ti l you reach the pressure that is correct for
the load (passengers and luggage) and kind of
driving you plan to do.
If the pressure in any ti re is too low, note the
difference between the pressure in the co ld
tire and the pressure you need and add the air
that you need to reach the correct pressure for
the vehicle load (passengers and luggage) for
the tires on your vehicle as listed on the on
your vehicle and in this manual and the kind
of driving you plan to do.
Ne ver ex cee d th e ma ximu m in fl ation pr es
sure l isted on th e tir e side wall for any re a
son .
Remember that the vehicle manufacturer, not
the tire manufacturer, determines the correct
t ire pressure for the tires on your vehicle.
It is important to check the tire pressure when
the tires are co ld.
- Read the required tire pressure from the t ire
pressure labe l. The tire pressure label is lo -
cated on the driver's side B-pillar .
liJJ>
Page 237 of 292
-Turn the valv e stem cap counter-clockwise
to remove it from the tire valve.
- Place the air pressure gauge on the valve.
- The tire pressures should only be checked
and adjus ted when the tires are cold . The
s li ght ly raised p ressures of warm tires must
not be reduced .
- Adjust the tire pressure to the load you are
carrying .
- Re insta ll the va lve stem cap on the valve.
When should I che ck the tire pres sur e?
The correct tire pressure is espec ially impor
tant at high speeds. The pressure should
therefo re be checked at least once a month
and a lways before start ing a journey.
When should I adjust the tire p re ssure s?
Adjust the tire pressure to the load you are
carry ing . After changing a wheel
o r replacing
wheels you have to adjust the tire pressures
on all wheels. In addition , you must then
store the new ti re pressu res in the t ire pres
sure monitoring system
r::!.> page 246 .
A WARNING
Incorrect tire pressures and/or underinf la
tion can lead sudden tire failure, loss of contro l, collision, serious persona l injury
or even death.
- When the warning symbo l
[ti] appears in
the instrument cl uster, stop and inspect
the tires.
- Incorrect tire pressure and/or underinfla
t ion can cause increased tire wear and
can affect the handling of the veh icle and
stopp ing ability .
- Incorrect tire pressures and/or underin
flation can also lead to sudden tire fa il
ure, including a blowout and sudden de
flation, causing loss of vehicle control.
- The driver is responsible for the correct
tir e pressures fo r all t ires on the vehicle .
T he applicable pressu re va lues are locat
ed on a stic ker on the drive r's side B-pil
lar .
- Only when a ll t ires on the vehicle are fi l
led to t he cor rect pressure, the ti re p res-
Tire s an d wheel s 235
sure monitor ing system can work cor
rectly.
- The use of incorrect tire pressure va lues
can lead to acc idents or other damage.
Therefore it is essential that the driver
observe the spec ified t ire pressure values
for the tires and the correct pressures for
the function of the t i re p ress ure monito r
ing system .
- Always inf late t ires to the recommended
a nd correct t ire p ress ure before dr iv ing
off.
- Driving with unde rinflated tires bend
mo re, lett ing t hem get too hot resulti ng
in tread separation, s udden tire failure
and loss of cont ro l.
- Excess ive speed and/overloadi ng can
cause heat b uild- up, sudden tire failure
a nd loss of cont rol.
- If the tire pressure is too low or too high,
the t ires will wear prema turely and the
veh icle w ill not handle well.
- If the tire is not fla t and you do not have
to ch ange a wheel immedia tely, drive a t
red uced speed to the nearest service sta
tion to check the t ire p ress ure and add
air as requi red.
(D Note
Dr iving w it h out valve stem c aps can c ause
damage to the tire valves . To prevent this,
a lways make sure that factory insta lled
va lve stem caps on all whee ls are sec urely
mounted on the valve .
@ For the sake of the env ironment
Un derinflated tires wi ll also increase the
fuel consumption .
Tires and vehicle load limits
There are limits to the amount of load or
weight that any vehicle and any tire can carry.
A vehicle that is overloaded will not handle
well and is mo re d iff icult to stop. Overloading
can not o nly lead to loss of vehicle control,
but can also damage important parts of the
vehicle and c an le ad to sudden tire fa ilu re, .,..
•
•
Page 238 of 292
236 Tire s and whee ls
including a blowout and sudden deflation that
can cause the vehicle to crash.
Your safety and that of your passenge rs a lso
depends on making s ure that load limits are
not exceeded. Vehicle load includes everybody
and everything in and on the vehicle. These
load limits are techn ically referred to as the
vehicle's
Gr oss Veh icl e W eight R ating
("GVWR").
The "GVWR" includes the weight of the basic
ve hicle, all factory installed accessories, a full
tank of fuel, oil, coolant and other fluids plus
maximum load. The maximum load includes
the number of passengers that the vehicle is
i ntended to carry ("seating capacity") with a n
assumed weight of 150 lbs (68 kg) for each
passenger at a des ignated seat ing pos ition
and the tota l we ight of any luggage in the ve
h icle.
The
Gro ss Axle Weight Rating ("GAWR") is
the maximum load that can be app lied at each
of the vehicle's two axles .
The G ross Vehicle Weight Rating and the
Gross Axle Weight Rating are listed on the
safety compliance st icker labe l located on the
driver 's side B-p illar. Your A udi has 4 seating
positions, 2 in the front and 2 in the rear for
total seating capacity of 4. Each seating posi
tion has a safety belt
9 page 133, Safety
belts.
The fact that there is an upper limit to your
vehicle's Gross Vehicle Weight Rating means
that the tota l weight of whatever is being car
ried in the vehicle is limited. The more passen
gers in the veh icle or passengers who are
heav ier than the standard weights assumed
mean that less weight can be carried as lug
gage.
The tire pressure label on your Audi also lists
the maximum combined weight of all of the
occupants and luggage or other cargo that
the veh icle can carry . For the location of the
l abe l
9page 232, fig. 195.
A WARNING
Overloading a vehicle can cause loss of ve
h icle contro l, a crash or other accident, se
rious personal injury, and even death.
- Carrying more we ight than your veh icle
was des igned to carry will prevent the
veh icle from handling properly and in
crease the risk of the loss of vehicle con
trol.
- The brakes on a vehicle that has been
overloaded may not be able to stop the
veh icle w ith in a safe distance.
- Tires on a vehicle that has been overload
ed can fail suddenly, including a blowout
and sudden deflation, causing loss of
control and a crash.
- Always make sure that the total lo ad be
ing transpor ted does not make the veh i
cle heavier than the vehicle's Gross Vehi
cle Weight Rating.
Determining correct load limit
U se the exa mple belo w to ca l
c ula te the t otal weight of the
p ass engers a nd lu ggage or oth
e r thin gs that yo u plan to tran s
p o rt so t hat yo u can make sur e
th at yo ur vehi cle w ill n ot be
ove rloa ded.
Steps for Determining
Correct Load Limit
1. Lo cate th e statement "THE
COMBINED WEIGH T OF Q C-
CU PANT S A ND CARGO
SHOULD NE VER E XCEED XXX
KG OR XXX LBS" on your ve
hicle 's placard (tire inflation
11>