2014 AUDI RS7 SPORTBACK start stop button
[x] Cancel search: start stop buttonPage 108 of 292

106 Automatic Transmission
lever is left in N (Neutral) for more than ap
proximately 2 second, without the brake ped
a l being pressed .
Release button
The release button on the selector lever pre
vents the lever from being accidentally shifted
into certain positions. Depending on the direc
tion of the shift, the se lector lever locks at d if
ferent positions. The positions are highlighted in the illustration
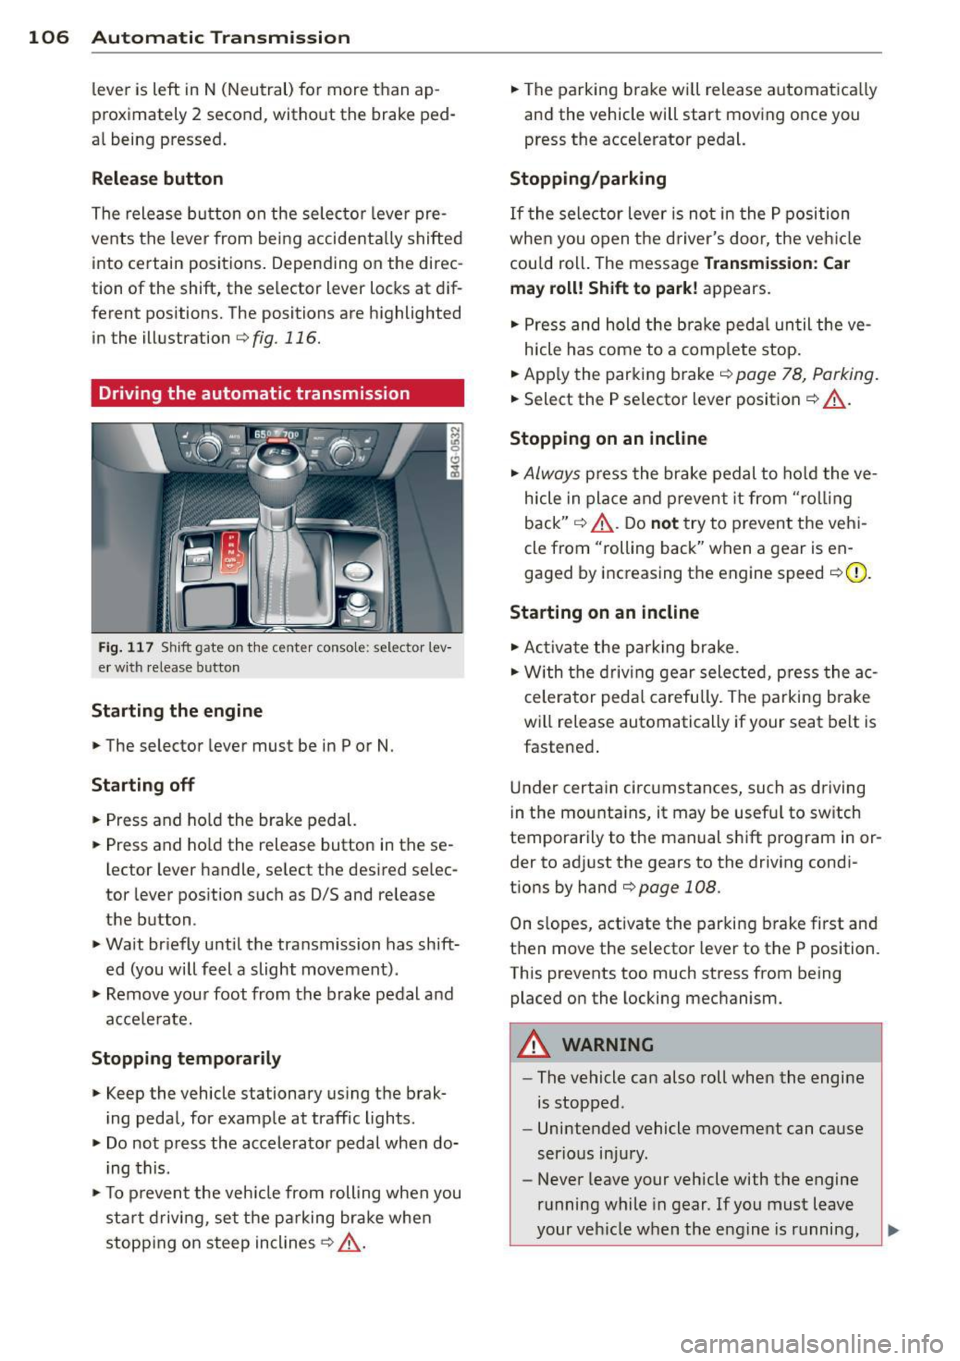
c:;, fig. 116.
Driving the automatic transmission
Fig. 117 Sh ift gate on the center conso le: selector lev
er w ith release button
Starting the engine
,.. The selector lever must be in P or N.
Starting off
,.. Press and ho ld the brake pedal.
,.. Press and ho ld the release button in these
lector lever handle, se lect the desired se lec
tor lever position such as 0/5 and release
the button .
,.. Wait briefly until the transmission has shift
ed (you will feel a slight movement) .
,.. Remove your foot from the brake pedal and
acce le rate.
Stopping temporarily
,.. Keep the vehicle stationary us ing the brak
ing peda l, for example at traffic lights.
,.. Do not press the accelerator pedal when do
ing this .
,.. To prevent the veh icle from rolling when you
sta rt driving, set the parking brake whe n
stopping on steep inclines
c:;, _& .
,.. The parking brake will release automatica lly
and the vehicle will start moving once you
press the acce lerator pedal.
Stopping/parking
If the sele ctor lever is not in the P position
whe n you open t he driver's door, the veh icle
could roll. The message
Transmission: Car
may roll! Shift to park!
appears.
,.. Press and hold the brake pedal until the ve-
hicle has come to a complete stop.
,.. App ly the parking brake
c::> page 78, Parking.
,.. Select the P selector lever position c:;, _& .
Stopping on an incline
,.. Always press the brake pedal to hold the ve
hicle in place and prevent it from "rol ling
back"
c:;, _& . Do not try to prevent the vehi
cle from "rolling back" when a gear is en
gaged by increasing the engine speed
c::>(D .
Starting on an incline
,.. Activate the parking brake.
,.. With the driving gear selected, press the ac
celerator pedal carefully. The parking brake
will release automatically if your seat belt is
fastened .
Under certain circumstances, such as driving
in the mounta ins, it may be usefu l to sw itch
temporarily to the manual shift program in or
der to adj ust the gears to the driving condi
t ions by hand
c::>page 108 .
On slopes, activate the parking brake first and
then move the selector lever to the P position.
This prevents too much stress from being placed on the locking mechanism.
A WARNING
-
- The vehicle can also roll when the engine
is stopped .
- Unintended vehicle movement can cause
serious injury.
- Never leave your vehicle with the engine
running while in gear . If you must leave
your vehicle when the engine is running,
Page 121 of 292

Parallel parking
Applies to vehicles: with parking system plus and rear
mode
This view may be used when parallel parking
along the side of a street.
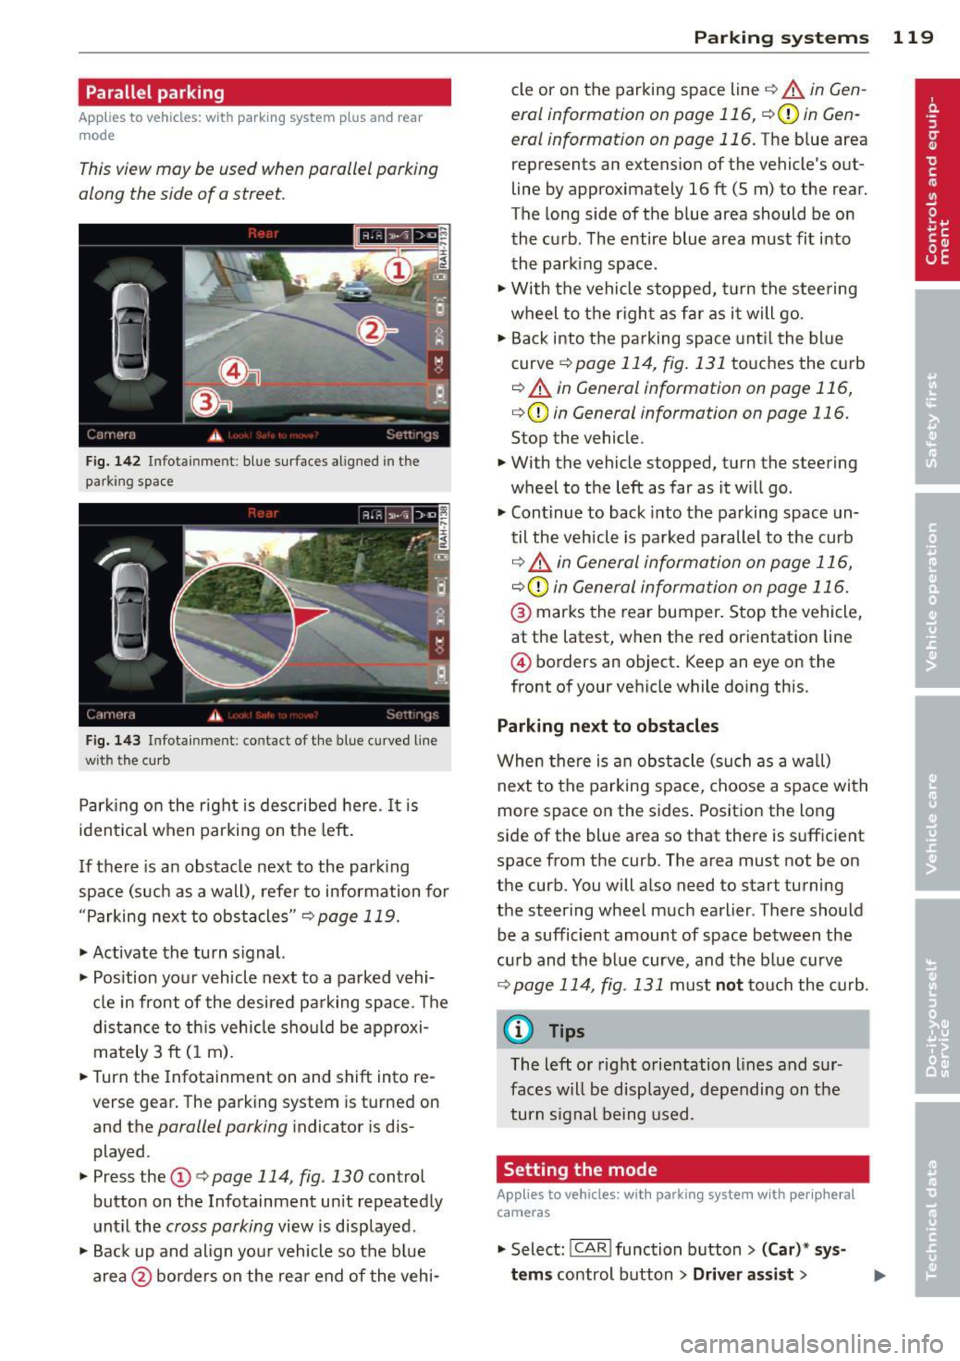
Fig. 1 42 Infotainment: blue su rfaces aligned in the
parking space
F ig. 1 43 Infota inmen t: contact of the blue curved line
wi th th e curb
Park ing on the right is described he re. It is
ident ical when parking on the left .
I f there is an obstacle next to the park ing
space (such as a wall), refer to information for
"Parking next to obstacles"
c::> page 119.
~ Activate the turn s ignal.
~ Position your vehicle next to a parked vehi
cle in front of the desired parking space . T he
distance to th is vehicle should be approxi
mately 3 ft (1 m).
~ Turn the Infotainment on and shift into re
verse gear. The parking system is turned on
and the
parallel parking indicator is dis
played .
~ Press the@¢ page 114 , fig. 130 control
button on the Infotainment un it repeatedly
unt il the
cross parking view is displayed.
~ Backup and align yo ur vehicle so the blue
area @ borders on the rear end of the vehi-
Parking systems 119
cle or on the parking space line c::> A in Gen
eral information on page 116, c::>(I)in Gen
eral information on page 116.
The blue area
represents an extension of the vehicle 's out
line by approximately 16 ft (5 m) to the rear.
The long side of the blue area should be on
the curb . The entire blue area must fit into
th e parking space .
~ With the vehicle stopped, turn the stee ring
wheel to t he righ t as fa r as it will go.
~ Back into the parking space unt il the blue
curve
c::> page 114, fig. 131 to uches the curb
c::> A in General information on page 116,
c::>(D in General information on page 116.
Stop the vehicle.
~ With the vehicle stopped, turn the steering
wheel to the left as far as it w ill go.
~ Continue to back into the parking space un
til the vehicle is parked parallel to the curb
c::> ..&. in General information on page 116,
c::> (Din General information on page 116.
@ marks the rear bumper. Stop the vehicle,
at the latest, when the red orientation line
@ borders an object . Keep an eye on the
front of your vehicle while do ing this .
Parking next to obstacles
When there is an obstacle (such as a w all)
next to the parking space, choose a space with
more space on the sides . Positio n the long
side of the blue area so that there is sufficient
space from the curb. The area must not be on
the curb. You will also need to start turning
the steering wheel much earlier . T here should
be a sufficient amount of space between the
c ur b and the bl ue curve, and the b lue curve
c::> page 114, fig . 131 m ust no t touch the curb.
@ Tips
The left o r right orientation lines and sur
faces w ill be disp layed, depending on the
turn s ignal being used .
Setting the mode
Applies to vehicles: with parking system with peripheral
cameras
~ Select: ! CAR ! function button> (Car) * sy s
tems
control button > Driver assist >
Page 123 of 292

Homelink
Universal remote
control
General information
Applies to vehicles: with Home link unive rsal remote con
tro l
The Homelink universal remote control can
be programmed with hand-held transmitters
from existing equipment
With Home link, you can control devices such
as the garage door, security systems, house
lights, etc. comfortably from the inside of you
vehicle.
Homelink makes it possible for you to replace
three different remote controls from devices
in your home with one universal remote . This
feature works for most garage door and exte rior door motor signals. Programmi ng the in
d iv idual remote control for your remote con
trol takes place near the center of the radiator
grille. There is a control module attached at
this location .
A one-t ime programming of the sensor must
be performed before you are able to use sys
tems with Homelink.
A WARNING , .,.
- Never use the Homelink transmitter
with any garage door opener that does
have not the safety stop and reverse fea
ture as required by federal safety stand
ards . Th is includes any garage door open
er model manufactured before April 1, 1982.
- A garage door opener which cannot de
tect an object, signaling the door to stop
and reverse does not meet current feder
al safety standards . Us ing a garage door
opener without these features increases
risk of serious injury or death.
- For safety reasons
never release the
parking brake or start the engine while
anyone is standing in front of the vehicle .
- A garage door or an estate gate may sometimes be set in motion when the
H ome link 121
Homelink remote control is being pro
grammed. If the device is repeatedly ac
tivated, this can overstrain motor and
damage its electrical components -an
overheated motor is a fire hazard!
- To avoid possible injuries or property
damage, please always make absolutely
certa in that no persons or objects are lo
cated in the range of motion of any
equipment being ope rated.
(D Tips
- If you would like additional information
on the Home link Universal Transce iver
I
Homel ink compatib le products, or to
purchase other accessories such as the
Homelink Lighting Package, please con
tact Homelink at 1-800-355 -3515 or on
the Internet at www. homelink.com.
- For Declaration of Comp liance to United
States FCC and Ind ustry Canada reg ula
tions~
page 2 76.
- For security reasons, we recommend that
you clear the programmed buttons be
fore selling the vehicle .
Operation
Applies to vehicles: with Homelink
Fig. 144 Headliner : cont rols
Req uirement: The bu ttons must be program
med
~ page 122.
.,. To open the garage door, press the program
med button . The LED @ will light up or
flash.
... To close the garage door , press the button
again .
II>
Page 288 of 292

28 6 Index
Seat heating/venti lation (automatic cli-
mate control) . . . . . . . . . . . . . . . . . . . . . . . 71
Seating position Dr iver . .. .. ............. .. .. .. .. . 124
Fr ont passenger .......... .. .. .... . 125
How to adjust the front seats . . . . . . . . 125
Incorrect seat position ... .. .. .. .... . 127
Occupants . ... . .. ..... ... .. .. .... . 124
Rear passengers . . . . . . . . . . . . . . . . . . . 126
Seat memo ry ........... .. .. .. .. .. .. 57
Seats Comfort seat side view . . . . . . . . . . . . . . 58
Seat symmetry . . . . . . . . . . . . . . . . . . . . . 58
Seats (number) . ........... .. .. .... . 133
Selective unlock feature ... .. .. .. .. .. . . 35
Selector lever ... .... .... .. .. .. .. .. . 104
Selector lever eme rgency release ..... . 109
Service and disposal Safety belt pretens ioner ... .. .. .... . 140
Service interval d isplay ....... ... .. .... 27
Shift buttons .... . ...... ... .. .. .... . 108
Shifting indicator . . . . . . . . . . . . . . . . . . . . 28
Ship (transporting your ve hicle) . .. ..... 268
Shutting down vehicle . ... .. .. ... ... . 200
Side airbags Descr ipt ion . ... . ...... ... .. .. .. .. . 162
H ow they work ......... .. .. .. .. .. . 163
side assist . . . . . . . . . . . . . . . . . . . . . . . . . . 93
Adjusting the brightness ....... .. .... 95
Sensor range .. .... ...... .. .. .. .. .. 93
Side assist Activating and deactivating . .. .. .. .. . . 95
C leaning the sensors ...... .. .. .. .. . 204
Side curtain airbags ..... ... .. .. .... . 165
Description .... .. ..... ... .. .. .... . 165
How they work ........... .. .. .... . 166
Safety instructions ........ .. .. .. .. . 166
Side marker ligh ts ......... .... .... .. 44
Ski sack ... .. ................ ... ... . 67
also refer to Trunk pass-through .. .. .. 68
Sliding/tilting sunroof Emergency closing ........ .. .. .... .. 43
Opening and clos ing .. .. .. .... .. .. . . 42
Snow chains .... . ...... ... .. .. .... . 244
Socket .. .. .. ................ ... ... . 60 Sources of information abo
ut child re-
straints and their use .... ..... ... .. .. 186
Speedometer . . . . . . . . . . . . . . . . . . . . . . . 26
Speed rating letter code .......... .... 240
Speed warning system . .. ..... ... .. .. . 79
Sport d ifferential .. ..... ........... .. 96
Indicator light ... ..... ........... .. 22
Star button . . . . . . . . . . . . . . . . . . . . . . . . . 24
START ENG INE S TO P bu tton ...... .... . 74
Starting from rest . . . . . . . . . . . . . . . . . . . . 78
Starting the engine . .... ..... ... .. .. . 74
Stee ring
El ectr ically adjustable stee ring wheel . . 73
Manua lly adjustable steering wheel ... . 73
also refer to Electro -mecha nica l powe r
ass ist . ... .... .. .. ... ..... ... .. .. 194
Stee ring wheel
E asy entry fea ture ... .......... .. .. . 7 4
Indicator light . . . . . . . . . . . . . . . . 17,194
Stee ring w heel heating . ..... .... . .. . 72
Stee ring wheel column
Adjusting electri cally . . . . . . . . . . . . . . . . 73
Adjus ting ma nually ............ .. .. . 73
Steering wheel with tiptronic .......... 108
Steps for determin ing correct load limit . 236
Stopping the eng ine .. .. ...... ... .. .. . 75
Storage . . . . . . . . . . . . . . . . . . . . . . . . 60, 64
Sunroof . ... .. .. .. .. ... ..... ... .. .. . 42
Sun shade ...... .. .. ... ....... .... .. 48
Sun visors . ..... .. .. ... ..... ... .. .. . 48
Symbols
refer to War ning/ indica to r li ghts . .. .. . 11
T
Tacho meter . . . . . . . . . . . . . . . . . . . . . 11, 23
Tail lights Cleaning .. .. ... ... ... ..... ... .. .. 204
T echnical data ..... .. ... ..... ... .. .. 270
T echnical modifications .............. 275
Temperature display ............. .... . 23
T empera ture indica tor
Engine oil . . . . . . . . . . . . . . . . . . . . . . . . . 28
T ether anchors . ... ... .. .. ... ..... .. 185
Tether strap .. .. .. ............. .. .. 185