2014 AUDI RS7 SPORTBACK hood open
[x] Cancel search: hood openPage 167 of 292
larger, unclosed openings in the door
panel.
- Never d rive w ith int erio r door tr im pan
els removed.
- Never d rive when parts have been re
moved from t he ins ide door panel and
the openings they leave have not been
properly closed.
- Never d rive w hen loudspeakers in the
doors have been removed unless the
spea ker holes have been properly
closed.
- Always make cer tai n t hat openings are
covered or filled if additional speake rs
or other equi pment is installed in the
inside door panels.
- A lways have work on t he doors done by
a n authorized Audi dealer or qualified
wo rkshop .
Side curtain airbags
Description of side curtain airbags
The side curtain airbag system can provide
supplemental protection to properly restrain
ed occupants.
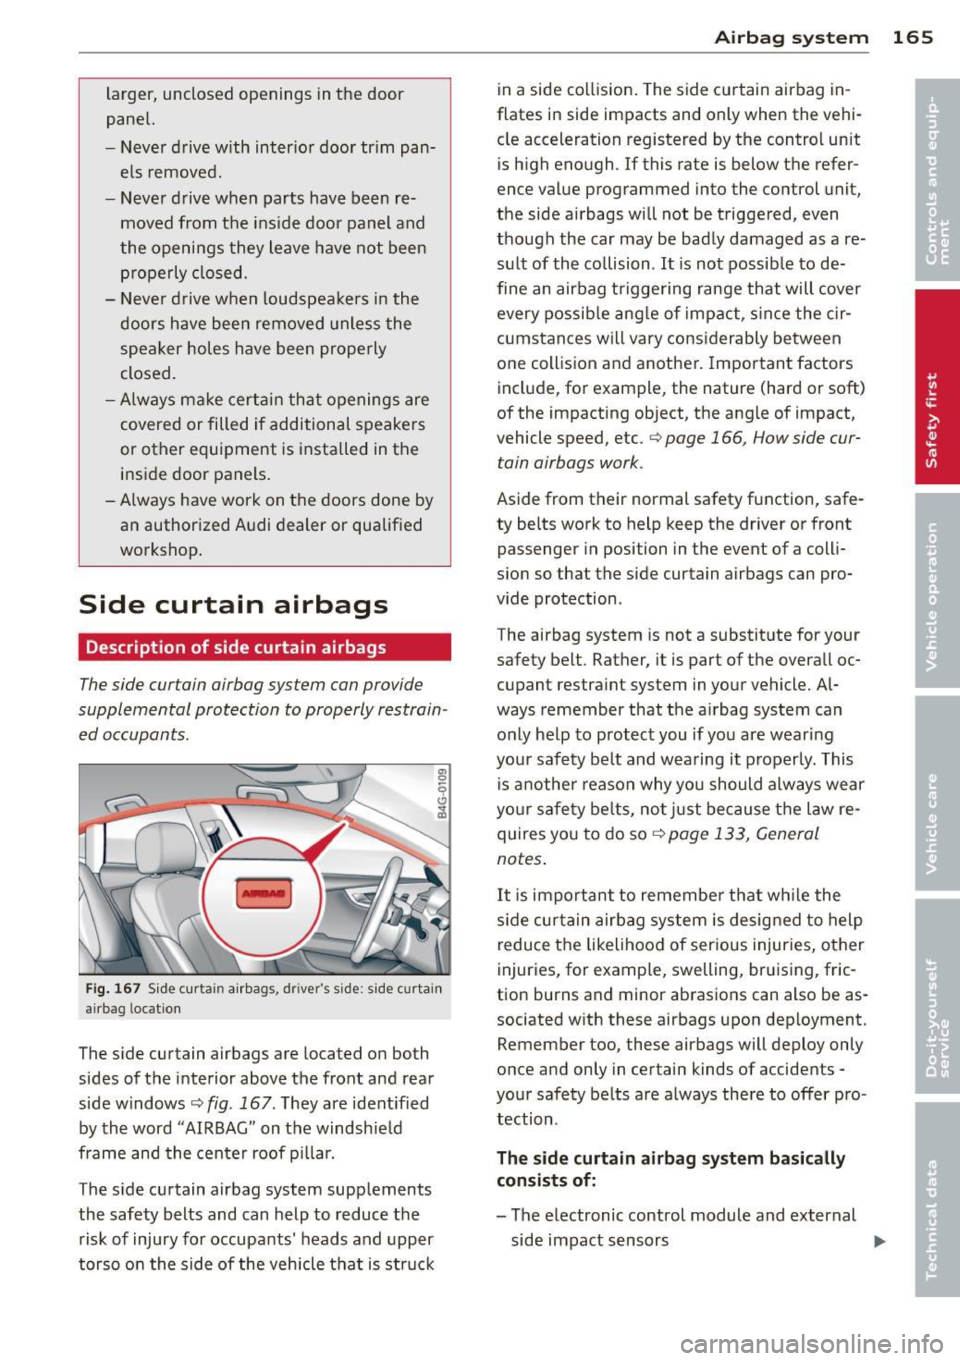
Fi g. 167 Side curtai n airbags, dri ver 's s ide: side cu rtai n
ai rbag locat ion
The side curtain airbags are located on both
sides of the interior above the front and rear
side windows ¢
fig. 167 . They are identified
by the word "AIRBAG" on the windshie ld
frame and the center roof pillar.
The s ide curtain airbag system supplements
the safety belts and can help to reduce the
risk of injury for occupa nts' heads and upper
torso on the side of the veh icle tha t is struc k
Airba g system 165
in a side collision. The side cu rtain airbag in
flates in side impacts and only when the vehi
cle acceleration registered by the control un it
is h igh eno ugh. If this rate is below the refer
ence value programmed into the control unit,
the side airbags will not be triggered, even
though the car may be badly damaged as a re
sult of the co llision . It is not possib le to de
fine an airbag triggering range that will cover every possib le ang le of impa ct, sin ce the cir
c u mstances will vary cons iderably be tween
one collision and anothe r. Important factors
incl ude , for example, the nature (hard or soft)
of the impacting object, the ang le of impact,
vehicle speed, etc. ¢
page 166, How side cur
tain airbags work.
Aside from their normal safety function, safe
ty belts work to help keep the driver or front passenger in position in the event of a colli
s ion so that the side curtain airbags can pro
vide protection .
The airbag system is not a substit ute for your
safety belt. Rather, it is part of the overall oc
cupant restraint system in your vehicle. Al
ways remember that the a irbag system can
o nly help to protect you if you are wear ing
you r safety be lt and wearing it properly. This
i s a nothe r reason why you should a lways wear
your sa fe ty be lts, no t ju st because the law re
quires you to do so ¢
page 133, General
notes .
It is important to remember that wh ile the
s ide cu rtain air bag system is desig ned to help
reduce the likelihood of serious injuries, other
injur ies, for examp le, swelling, bruising, fric
tion burns and minor abrasions can also be as
sociated w ith these airbags upon dep loyment.
Remember too, these airbags will deploy only
once and only in certain kinds of accidents -
your safety belts a re always there to offer pro
tection .
The side curtain airbag sy stem basic ally
consists of :
- The electronic control module and external
side impact sensors
ll>-
Page 189 of 292
Audi pre sense Preventative passenger
protection
App lies to veh icles: with Audi p re se nse
Audi pre sense can initiate steps to help pro
tect vehicle occupants in certain situations.
The funct ions descr ibed depend on equipment
installed in your vehicle:
Audi pre sense basic*
The following functions can be triggered in
certain driving situations:
- Tightening of the safety belts (for example,
during heavy braking) : the front safety belts
have reversible belt pretensioners. If a colli
sion does not occur, the safety belts loosen
slightly and are ready to be tightened again.
- Closing the windows and the sunroof* : the
windows and the sunroof* close leaving a
small open gap .
Audi pre sense basic functions can be trig
gered at speeds above 20 mph (30 km/h).
Vehicles with Audi drive select*: the deploy
ment time is adapted in Dynamic mode.
Audi pre sense front (vehicles with
adaptive cruise control*)
Audi pre sense front includes the functions in
Audi pre sense basic. In addition, within the limits of the system, the likelihood of a colli
sion with the vehicle immediately ahead is al
so calculated . If the system senses an immi
nent collision the following functions can be
tr iggered:
- Braking guard
¢ page 87
-Tightening the safety belts
- Closing the windows and the sunroof* ( leav-
ing a small open gap)
Audi pre sense rear (vehicles with Audi
side assist*)
Audi pre sense rear includes the functions in
Audi pre sense basic. In addition, the likeli
hood of a rear-end col lision with the vehicle
coming from behind is also calculated. If the
Audi pre sense 187
risk of a collision is detected, the following
functions can be triggered:
- Tightening the safety belts
- Closing the windows and the sunroof* (leav-
ing a small open gap)
Audi pre sense plus*
Audi pre sense plus includes the functions in
Audi pre sense front and Aud i pre sense rear .
Error message
Audi pre sense: not available
Preventative passenger protection is not avail
able. See your authorized Audi dealer immedi
ate ly to have the malfunction corrected.
A WARNING
-=
Audi pre sense cannot overcome the laws
of physics. It cannot prevent a collision. Do
not let the increased safety provided
tempt you to take risks . This will increase
the risk of a coll is ion and serious personal
injuries .
- The sensors cannot always detect all ob jects. This increases the risk of a colli
s10n .
- Aud i pre sense does not detect people or
an imals or objects that are crossing the
veh icle's path
¢page 81.
-The radar sensor's v is ion can be reduced
by heavy rain, ice, snow, heavy road spray
and reflections from guard rails, tunnel
entrances, etc. These and similar condi
tions can prevent vehicles from being ac
curately detected and in some cases they may not be detected at all.
Q) Note
The sensors can be displaced by impacts or
damage to the bumper, wheel housing and
underbody. This can affect the function of
the Audi pre sense system. Have your au
thorized Audi dealer check to make sure
that the system is working properly.
•
•
Page 215 of 292
Checking and filling Engine hood
Releasing the engine hood
The engine hood is released from inside the
vehicle .
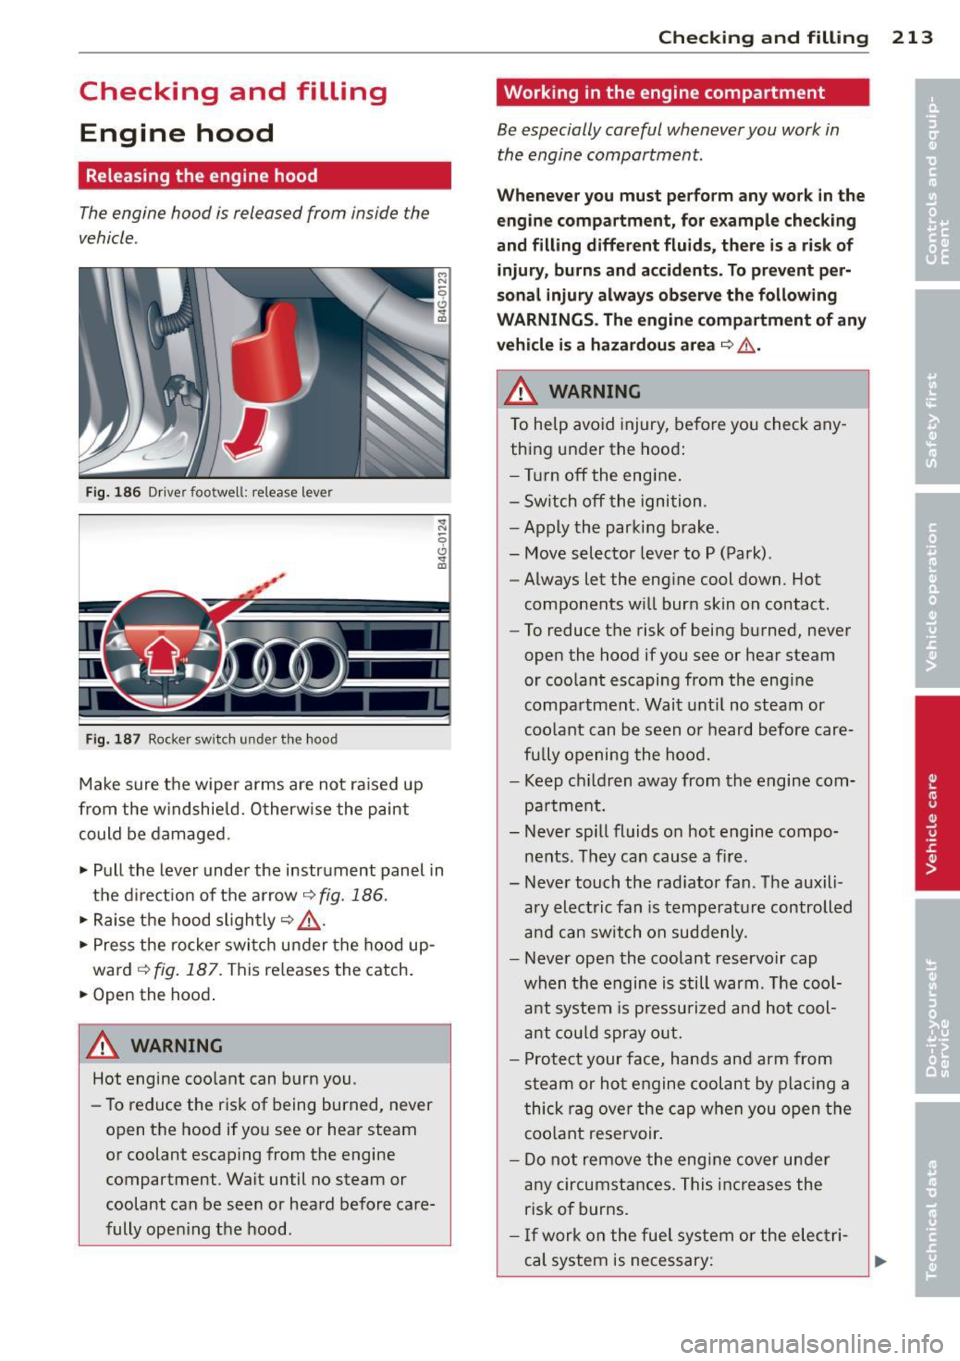
Fig. 186 Dr iver footwell: release lever
Fig. 187 Rocker switch under the hood
Make sure the wiper arms are not raised up
from the w indshield. Otherw ise the paint
could be damaged.
.. Pull the lever under the instrument panel in
the d irect ion of the arrow~
fig. 186.
.. Raise the hood slightly~ &-
.. Press the rocker switch under the hood up
ward
~ fig. 187. This re leases the catch .
.. Open the hood .
A WARNING
Hot engine coo lant can burn you.
- To reduce the r isk of being burned, never
open the hood if you see or hear steam
or coolant escaping from the engine
compartment . Wait until no steam or
coolant can be seen or heard before care
fully opening the hood.
Checkin g and fillin g 213
Working in the engine compartment
Be especially careful whenever you work in
the engine compartment.
W hen ev er y ou must p erform an y wor k in the
en gine com pa rtm ent , for e xample checking
a nd filling diff ere nt fluid s, th ere is a risk of
inju ry, burn s and accid ents. To pr eve nt p er
so nal inju ry always observ e the foll owing
W ARNING S. The engin e compartm ent of any
v e hicle i s a haza rdou s area
~ ,& .
h WARNING
To help avoid injury, before yo u check any
thing under the hood:
- Turn off the engine.
- Sw itch off the ignition.
- Apply the parking brake.
- Move selector leve r to P (Park).
- Always let the engine cool down. Hot
components w ill burn skin on contact .
- To reduce the risk of being burned, never
open the hood if you see or hear steam
or coo lant escaping from the engine
compa rtment. Wait unt il no steam or
coolant can be seen or heard before care
fu lly opening the hood.
- Keep ch ildren away from the engine com
pa rtment.
- Never sp ill fluids on hot engine compo
nents . They can cause a fire .
- Never touch the rad iator fan. The auxili
ary electric fan is temperat ure controlled
and can switch on suddenly .
- Never open the coolant reservoir cap
when the engine is still warm. The cool
ant system is p ressu rized and hot cool
a nt cou ld spray o ut.
- Protect your face, hands and arm from
steam or hot engine coolant by plac ing a
thick rag ove r the cap when you open the
coo lant rese rvoir.
- Do not remove the engine cover under
any circumstances. This inc reases the
ris k of burns.
- If work on the fue l system o r the elec tri
cal system is necessary:
Page 216 of 292

214 Check ing and filling
- Always disconnect the battery.
- Never smoke or work near heaters or open flames . Fluids in the engine com
partment could start a fire.
- Keep an approved fire extinguisher im
mediately available.
- To avoid electrical shock and persona l in
jury while the engine is running or being started, never touch:
- Ignition cables
- Other components of the high voltage
electronic ignition system.
- If you must perform a check or repa ir
with the engine running:
- Fi rst, fully apply the parking bra ke,
move se lec to r lever to P (Pa rk) .
- Always use extreme caution to preven t
clot hing, jewe lry, or long h air from ge t
ting caught in the radiator fan, V -belts
or other moving parts, or from contact ing hot parts. Tie back hair before
start ing, and do not wear cloth ing that
will hang or droop into the eng ine.
- Min imize exposure to emission and
chemica l hazards¢ ,&..
A WARNING
California Propos ition 65 Warning:
- Engine exhaust, some of its constituents,
and certa in veh icle components conta in
or emit chemicals known to the State of
Califor nia to cause cancer and b irth de
fec ts a nd reproduct ive ha rm. In addition,
certain fluids conta ined in vehicles and
certa in prod ucts of co mponent wear co n
ta in o r emi t chemicals known to the
State o f Ca lifornia to cause can cer and
birth defects or ot her reproductive harm. -
Battery posts, terminals and re lated ac
cessories conta in lead and lead com
pounds, chemicals known to the State of
California to cause cance r and reproduc
tive harms. Wash hands after handling .
(D Note
When adding flu ids, always make sure that
they are poured into the proper conta iner
or f iller opening, otherwise serious dam
age to vehicle systems w ill occur.
® For the sake of the environment
To detect leaks in time, inspect the vehicle
floor pan from underneath regularly. If
you see spots from oil or other ve hicle flu
i ds, have yo ur vehicle inspected by a n au
thori zed Audi dea le r.
Closing the engine hood
.,. Pull the hood down un til the pressure from
t he struts is reduced.
.,. Let the hood drop down and latch in p lace .
Do not try to push it shut; it may fail to en
gage ¢&_ .
A WARNING
-
A hood that is not completely latched
could fly up and b lock your view while dr iv
ing.
- When you close the engine hood, check it
to make sure the safety catch has p roper
ly engaged. The hood sho uld be flush
with the surrou nding vehicle body pa rts.
- If you notice while driv ing t hat the hood
is not s ecured prope rly, stop at onc e and
close it.
Page 220 of 292
218 Check ing and filling
Checking the engine oil level
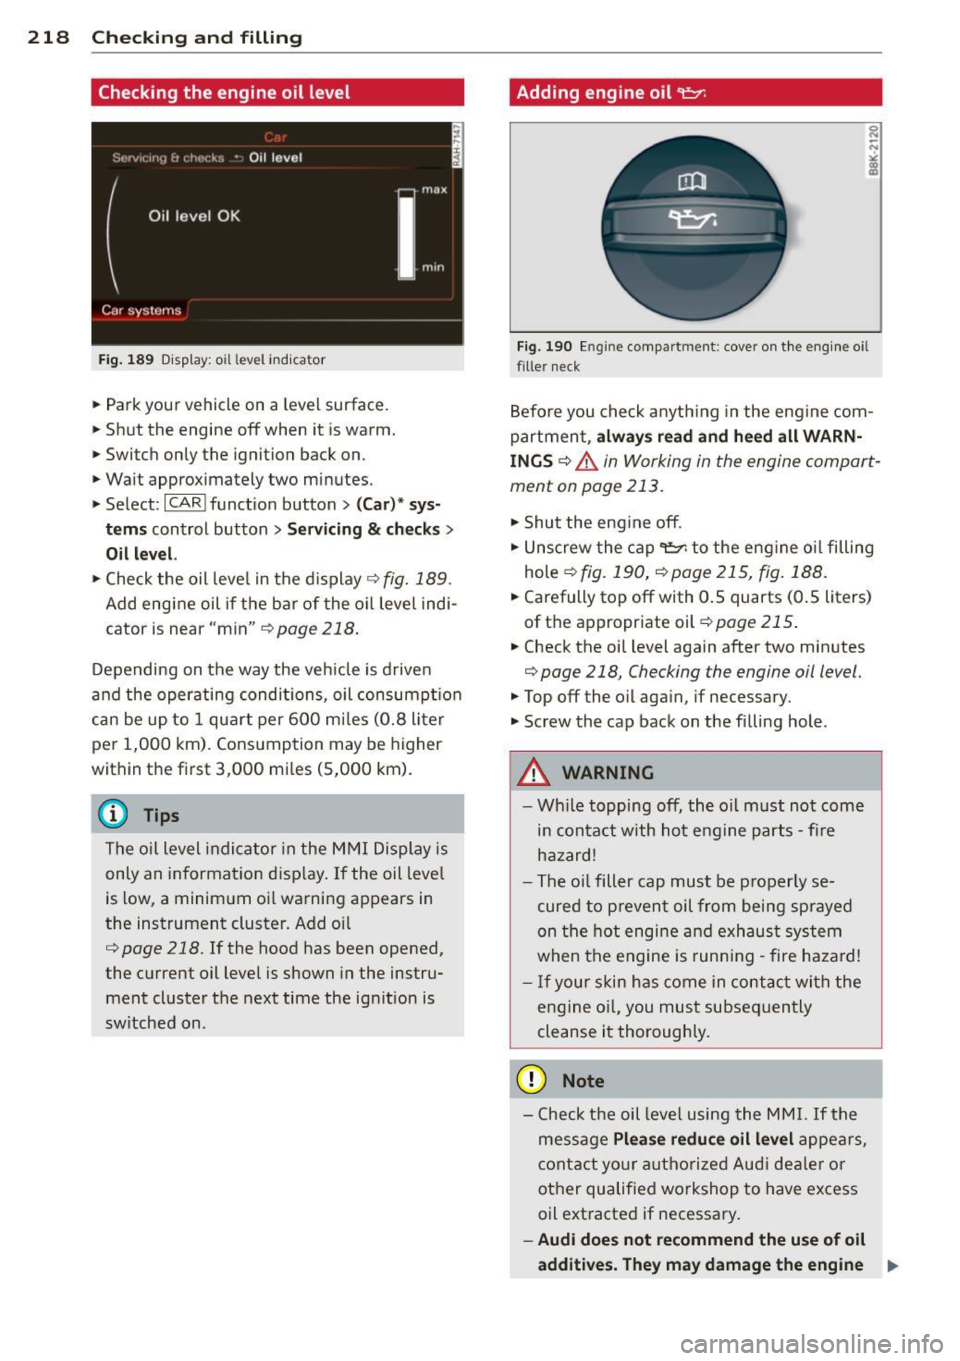
Fig. 189 Disp lay: oil level indica tor
• Park your vehicle on a level surface .
• Shut the engine off when it is warm.
• Switch only the ignition back on .
• Wait approximately two minutes.
• Select :
I CAR I function button> (Ca r)* sys
t e m s
control button > Se rv ici ng & ch ecks >
Oil l evel.
• Check the oil leve l in the d isplay r::;, fig. 189.
Add engine oil if the bar of the oil leve l indi
cator is near "min"
¢page 218.
Depending on the way the veh icle is driven
and the operating condi tions, oil consumpt ion
can be up to 1 qua rt per 600 m iles (0.8 liter
per 1,000 km) . Consumption may be higher
within the first 3 ,000 mi les (5,000 km).
@ Tips
The oil level indicator in the MMI Display is
only an information disp lay . If the oil leve l
is low, a minim um oil warning appears in
the instrument cluster. Add oil
r:::;, page 218. If the hood has been opened,
the current oil level is shown in the instru ment cluster the next time the ignition is
sw itched on .
Adding engin e oil 't:::r.
Fig. 190 Engin e compart men t: cover on the engine oi l
fille r neck
Befo re you check anyth ing in the engine com
partment,
a lw ay s re ad and h eed all WARN
IN GS
r::;, .&. in Working in the engine compart
ment on page 213.
• Shut the eng ine off .
• Unscrew the cap
't=;rl to the eng ine oi l filling
hole
¢ fig. 190, r:=:,page 215, fig. 188 .
• Carefully top off with 0 .5 quarts (0 .5 liters)
of the appropr iate oil¢
page 215.
• Check the oil level again after two minutes
r:::;, page 218, Checking the engine oil level.
• Top off the oil again, if necessary.
• Screw the cap back on the filling hole .
.&_ WARNING
--Wh ile topping off, the o il m ust not come
in conta ct with hot engine parts - fire
hazard!
- The oi l filler cap must be properly se
cured to prevent oil from being sprayed
on the hot engine and exhaust system
when the engine is runn ing -fire haza rd!
- If you r skin has come in contact with the
engine o il, you must subsequen tly
cleanse it thoroughly.
(D Note
- Check the oil level using the MMI. If the
message
Ple ase redu ce oil l evel appears,
contact you r authorized Aud i deale r or
other qualified workshop to have excess
oil extracted if necessary.
- Audi d oes n ot r ecommend the u se of o il
a dd iti ve s. The y may dama ge the en gine
II>-
Page 228 of 292
226 Checking and filling
Battery charging
Starting the engine requires a well charged
battery.
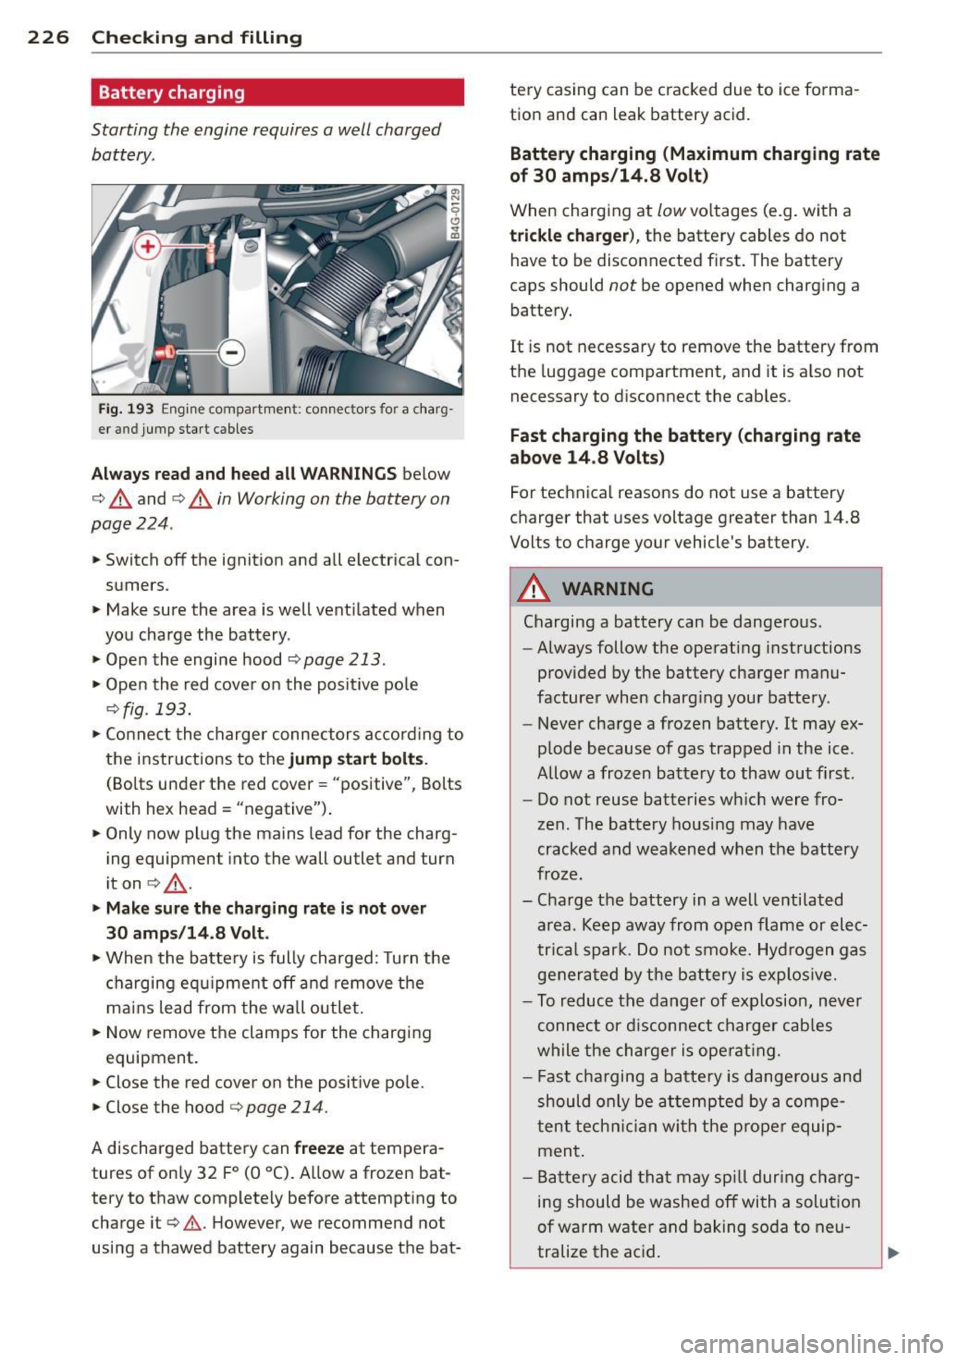
Fig . 193 Engine compartme nt: connecto rs for a charg
er and jump start cables
Always read and heed all WARNINGS below
c:> A and c:> A in Working on the battery on
page 224 .
.,. Switch off the ignition and all electrical con
sumers.
> Make sure the area is well vent ilated when
you charge the battery .
> Open the engine hood c:> page 213 .
> Open the red cover on the posit ive pole
c:>fig. 193.
> Connect the charger connectors according to
the instructions to the
jump start bolts.
(Bolts under the red cover = "positive", Bolts
with hex head= "negative") .
> Only now plug the mains lead for the charg
ing equipment into the wall outlet and turn
iton
c:> &_ .
.,. Make sure the charging rate is not over
30 amps/14.8 Volt.
> When the batte ry is fully charged: Turn the
charging equipment off and remove the
ma ins lead from the wall outlet.
> Now remove the clamps for the charging
equipment.
.. Close the red cover on the positive pole.
> Close the hood c:> page 214.
A discharged battery can freeze at tempera
tures of on ly 32 F
0 (0 °C). Allow a frozen bat
tery to thaw completely before attempting to charge it
c:> .&. However, we recommend not
using a thawed battery again because the bat- tery casing can
be cracked due to ice forma
tion and can leak battery acid.
Battery charging (Maximum charging rate
of 30 amps/14.8 Volt)
When charging at low voltages (e.g. with a
trickle charger), the battery cables do not
have to be disconnected f irst. The battery
caps should
not be opened when charging a
battery.
It i s not necessary to remove the battery from
the luggage compartment, and it is also not
necessary to disconnect the cables.
Fast charging the battery (charging rate
above 14 .8 Volts)
For technical reasons do not use a battery
charger that uses voltage greater than 14.8
Volts to charge your vehicle's battery .
A WARNING
Charging a battery can be dangerous.
- Always follow the operating instructions
provided by the battery charger manu
facturer when charg ing your battery.
- Never charge a frozen battery. It may ex
plode because of gas trapped in the ice .
Allow a frozen battery to thaw out first.
- Do not reuse batteries wh ich were fro
zen. The battery housing may have
cracked and weakened when the battery
froze.
- Charge the battery in a well ventilated area. Keep away from open flame or elec
tr ica l spar k. Do not smoke. Hydrogen gas
generated by the battery is explos ive.
- To reduce the danger of explosion, never
connect or disconnect charger cables
while the charger is operating .
- Fast charging a battery is dangerous and
should only be attempted by a compe
tent technician with the proper equip
ment .
- Battery acid that may spill dur ing charg
ing should be washed off with a solution
of warm water and baking soda to neu
tralize the acid.
Page 282 of 292
280 Index
Defrosting (windows)
automatic climate control . ... ... ... .. 71
Determining correct load limit ... .... . 236
Dimensions ................. .. .... . 271
Dimming the rearview mirror . ..... .. .. 51
Displays Cleaning . .. .......... ...... ... .. . 205
Distance . . . . . . . . . . . . . . . . . . . . . . . . . . . 24
Door/rear lid warning . . . . . . . . . . . . . . . . . 23
Doors Power child safety lock ........ .. .... 40
Driver information system Boost ... .. ............. .. .. .. ... . 28
CD/radio display . . . . . . . . . . . . . . . . . . . . 23
Door/rear lid warning . . . . . . . . . . . . . . . 23
Efficiency program . ........... .. .. .. 25
En gin e oi l tempe rature display .. .. .. . . 28
E xterior tempe rature display . .. .. .. . . 23
On -board computer . . . . . . . . . . . . . . . . . 24
Shifting indicator . . . . . . . . . . . . . . . . . . . 28
Driver seating position . . . . . . . . . . . . . . . 124
drive select ................. .. .... .. 96
adaptive air suspension/sport ... ...... 96
Adaptive dampers . . . . . . . . . . . . . . . . . . 96
Curve light . . . . . . . . . . . . . . . . . . . . . . . . 96
Engine sound .. .... ...... .. .. .. .. .. 96
Safety belt tensioner . . . . . . . . . . . . . . . . 96
Sport different ial . . . . . . . . . . . . . . . . . . . 96
Driving safely . . . . . . . . . . . . . . . . . . . . . . 123
Driving through water .......... .. ... 199
Driving time ............... ... .. .. .. 24
Duplicate key ............... .. .... .. 32
Dust filter
r e fer to Pollutant filter . . . . . . . . . . . . . . 69
Dynamic steering .......... .. .. .. .. . 194
E
Easy entry feature . . . . . . . . . . . . . . . . . . . . 7 4
Efficiency program . . . . . . . . . . . . . . . . . . . 25
Fu el economy messages . . . . . . . . . . . . . 25
Other equipment . . . . . . . . . . . . . . . . . . . 25
E lectrical accessories (sockets) . . . . . . . . . 60
Electro-mechanical power assist .. .. .. . 194
Electromechanical parking brake
Emergency braking . . . . . . . . . . . . . . . . . 78
Operation . . . . . . . . . . . . . . . . . . . . . . . . . 77 Parking ...
.... .. ............. ..... 78
Releasing and closing ............... 77
Starting assist . . . . . . . . . . . . . . . . . . . . . 78
Starting from rest . . . . . . . . . . . . . . . . . . 78
Warning/indicator lights ........ .... . 15
Electronic differential lock
Warning/indicator lights ............ . 18
Electronic differential lock (ED L) . . . . . . . 189
Warning/indicator lights ............ . 19
Elec tronic immobilizer . . . . . . . . . . . . 26, 33
E lectronic power control (EPC)
warning/indicator light .............. 20
Electronic Stabilization Control (ESC) . .. 189
Warning/indicator lights .......... .. . 18
Emergency actuation Doors ...... .. .. .. ...... ..... .. .. . 38
Power sunroof . .. ................ .. 43
Rear lid ....... .. ............. .... . 40
Emergency braking .............. .... . 78
Emergency flasher . . . . . . . . . . . . . . . . . . . 45
Warning/indicator lights ............. 22
Emergency release
Selector lever .... ............. .... 109
Emergency starting ............. ....
264
Emergency towing ................. . 266
Emergency warning triangle .......... 250
Energy management ............ .... 195
Engine Compartment .... ............. .... 215
Coolant ....... .. .. ............ ... 220
starting ....... .. .. .............. .. 74
Starting with jumper cables ....... .. 264
Stopping .. .... .. ............. .... . 75
Engine compartment ................ 215 Closing the hood .............. .... 214
Opening the hood ................ . 213
Safety instructions ............. .... 213
Working in the engine compartment .. 213
Engine coolant .... ................ . 220
Adding coolant ... ................ . 221
Checking the engine coo lant level ..... 220
Expansion tank ... ............. .. .. 220
Malfunction symbol . . . . . . . . . . . . . . . . . 15
Radiator fan ...... .............. .. 222
Temperature gauge ......... ...... .. 10
Page 285 of 292

-----------------------------~I~n~d~e~x 283
Lane Change Assistant
refer to side assist .................. 93
Lap timer
Evaluating times . . . . . . . . . . . . . . . . . . .
30
Pausing timing ........... .. .. .. .... 29
Starting ... ................ ... .... 29
LATCH .. ' .. ... ..... ........... ... '
D . t' escnp 10n . ............. .... .. .. .
Installing a child restraint .. .. .. .. .. .
L ocation
. .. ............. .. .. .. .. .
Mounting and releasing the anchorage
hook
. ... .. .................. ....
182
183
184
183
184
L eather cleaning/protection . .. .. .. .. . 206
Leaving home .. ........... .. .. .. .... 46
Lifting jack .. ................ ... ...
256
Lifting vehicle ..... .. ...... .. .. .. .. . 268
Light
Ambience lighting ........ .. .. .. .. ..
47
Coming/Leaving home ....... .. .. .. .. 46
Daytime running lights ........ ... ... 44
Emergency flashers ........ ... ... ...
45
Exterior lighting ............. ... ... . 44
Headlight range control ... .. .. .. .. .. 44
High beam . .. ........... .. .. .. .... 46
L ow beam .. ............. .... .. ....
44
Rear fog lights .............. .... ... 44
Side marker lights .................. 44
T urn signals .. ........... .. .. .. .. .. 46
L ight/rain sensor
Headlights .............. .. .. .. .. ..
44
Intermittent (windshield wipers) .. .. .. 48
Sensor defective . . . . . . . . . . . . . . . . . . . . 22
Loading the roof rack . . . . . . . . . . . . . . . . . 63
Locking Power locking swi tch . . . . . . . . . . . . . . . . 3 7
Remote control ............... .... .
35
Using the key .... ... ... .. .. .. .. .. .. 37
Low beams .. ............. .... .. .. .. 44
Lower universal anchorages (Canada) .. . 182
Luggage compartment
Bag hooks .................. .... ... 67
Cargo net .................. .... ... 66
carpeting . . . . . . . . . . . . . . . . . . . . . . . . . 67
Cover .. .. .. .... ............. .. .. .. 64
Enlarging ................... .... ..
65
Loading .... ................ ... .... 64
Movement-activated opening ... .. .. ..
40
Ski sack .......................... . 67
Stowing luggage ... .............. .
129
Tie-downs . . . . . . . . . . . . . . . . . . . . . . . . . 66
Trunk pa ss-through ... .... ......... .
68
Lumbar support
Front seats . . . . . . . . . . . . . . . . . . . . . . . . 55
M
M . t am enance .. .. .. .... .. .. ... .... .. 273
Malfunction Indicator Lamp (MIL) . . 20, 30
Manual shift program ............... . 108
Massage function
Front seats . . . . . . . . . . . . . . . . . . . . . . . . 55
Matte finish paint cleaning ......... ..
203
Mechanical key .. .. .. .............. .. 33
Mirrors
Adjust ing the exterior m irrors .... .. .. . SO
d. . 1mmmg .... .. .. .... ............. . 51
Vanity mirrors . .. .. . ... .. ..... .... . 48
Monitoring the Advanced Airbag System 154
Multifunction steering wheel ......... .. 24
N
Natural leather
Cleaning
New tires and wheels
NHTSA Con tac ting
Night vision assistant ............... .
Cleaning camera lenses ............ .
206
239
131
100
204
Number of seats . .. .... ... ... ... .. .. 133
0
Occupant seating positions
Octane rating 124
208
Odometer . . . . . . . . . . . . . . . . . . . . . . . . . . 26
OFF (automatic climate control) . . . . . . . . 70
Oil
re fer to Engine oil 215
On-board computer .... ...... ... .. .. . 24
On-Board Dia gnostic Sy stem (OBD)
Data Link Connector (DLC) . ...... .... .
30
Malfunction Indicator Lamp (MIL) ..... 30
Open door/hood/rea r lid warning .... .. . 23
•
•