2014 AUDI RS7 SPORTBACK belt
[x] Cancel search: beltPage 67 of 292
Removing the cover in the rear lid
• Remove the knobs CD c::> fig. 66 from the ball
mounts.
• Pull the cover @out of the retainers@ in
the direct ion of the arrow .
Installing the cover in the rear lid
• Slide the cover upward into the retainers @.
• Press the knobs
CD onto the ball mounts.
Removing the cover behind th e rear bench
seat
• Pull the cover ¢ fig. 67 back.
• Pull the cover upward to release.
Installing the cover behind the rear bench
seat
• Insert the left and right sides of the cover
into the mounts on the side trim .
• Slide the cover forward until it locks into
place .
A WARNING
-To prevent accidents, never install the
luggage compartment cover unsecured.
- The luggage compartment cover is not a
surface for storing objects. Objects
placed on the cover could endanger all
vehicle occupants during sudden braking
maneuvers or in a crash.
(D Note
Objects located on the rear shelf that rub
aga inst the rear window could damage the
heating wires for the rear window defog
ger .
Seats and storage 65
Enlarging cargo capacity of the vehicle
, interior
The seat backs can be folded forward to en
large the cargo capacity.
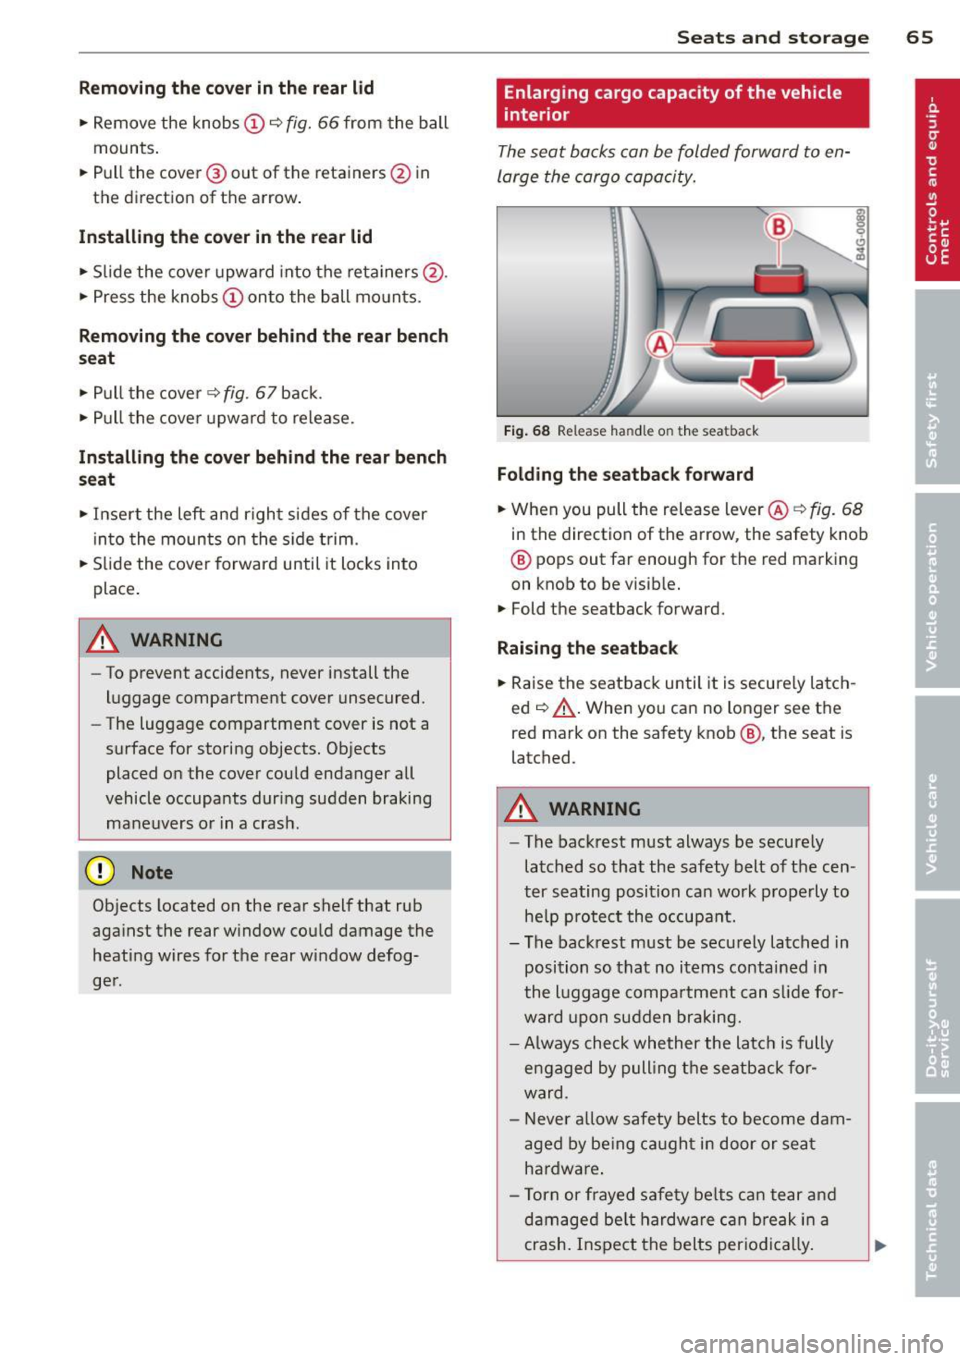
Fig. 68 Release handle on t he seatback
Folding the seatback forward
• When you pull the release lever @<=:> fig. 68
in the direction of the arrow, the safety knob
® pops out far enough for the red marking
on knob to be visib le.
.,. Fold the seatback forward.
Raising the seatback
.,. Raise the seatback until it is secure ly latch
ed¢ &,.. When you can no longer see the
red mark on the safety knob@, the seat is
latched .
_& WARNING
-
-The backrest must always be securely
latched so that the safety belt of the cen
ter seating position can work properly to he lp protect the occupant.
- The backrest must be securely latched in
position so that no items contained in
the luggage compartment can s lide for
ward upon sudden braking.
- Always check whether the latch is fully
engaged by pulling the seatback for
ward .
- N ever a llow safety belts to become dam
aged by being caught in door or seat
hardware .
- Torn or frayed safety belts can tear and
damaged be lt hardware can break in a
crash. Inspect the belts periodical ly.
Page 68 of 292
66 Seats and st o rage
Belts showing damage to webbing, bind
ings, buckles, or retractors must be re
placed.
(D Note
- If you move the front seat back when the
rear seat backrest is fo lded forward, you
could damage the head restraints on the
rear seat.
- Slide the belt guide on the outside safety
belt all the way up before folding the
backrest back forward. Make sure the
seat belt is not p inched or damaged
when the rear seat backrest if folded
back. Other objects shou ld be removed
from the rear seat bench to protect the
seatbac k from d amage.
Tie -downs and cargo net
The cargo net" prevents small objects from
sliding.
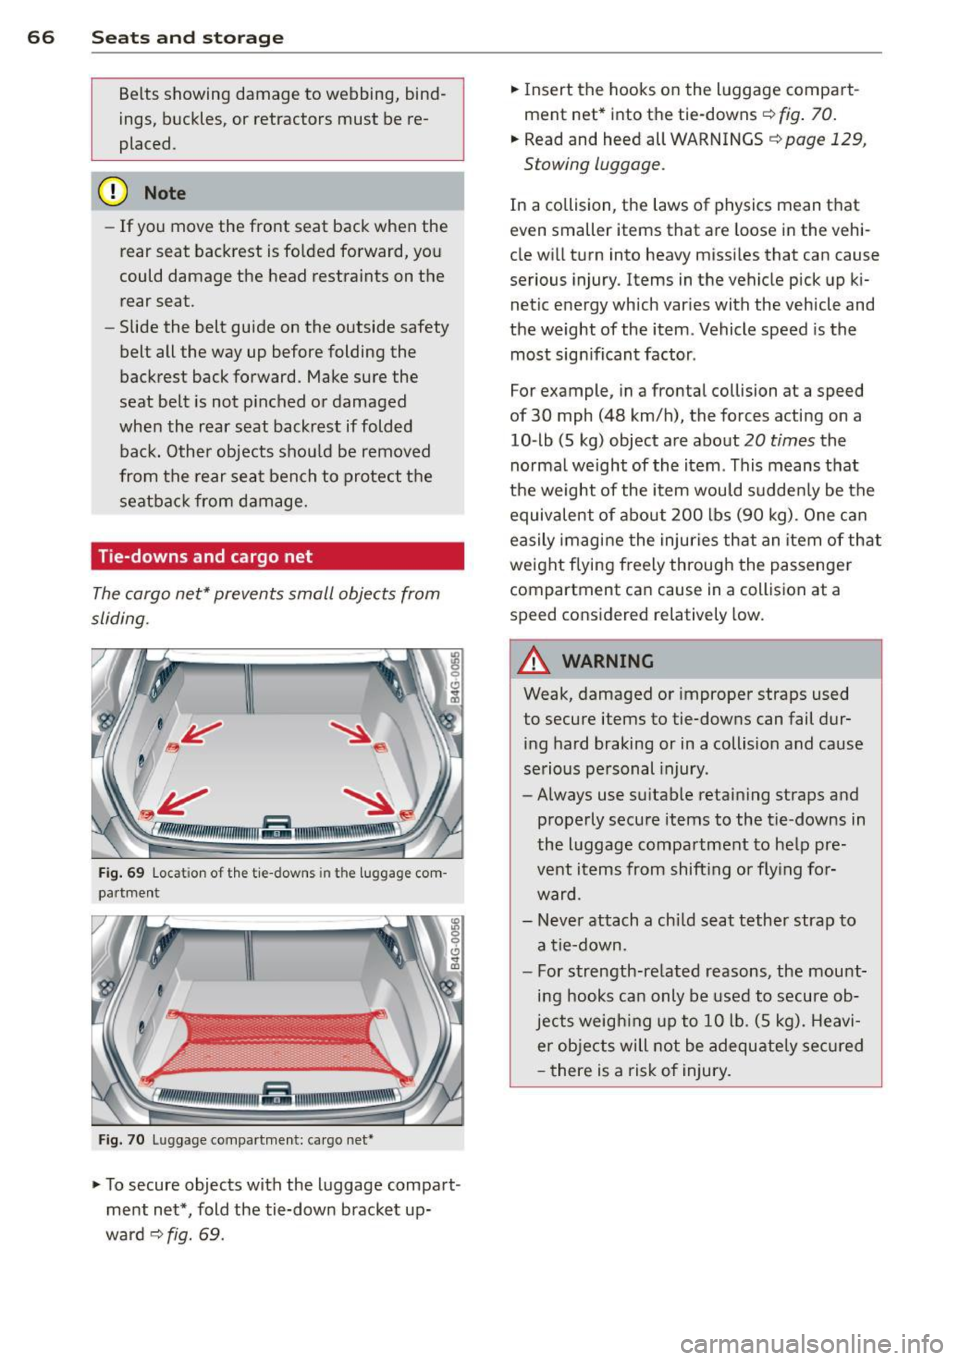
Fig . 69 Locat ion of the tie -downs in the luggage com
partment
Fig. 7 0 Luggage compartme nt: ca rgo net*
... To secure objects with the luggage compart
ment net*, fold the tie-down bracket up
ward
c:::> fig. 69.
... Insert the hooks on the luggage compart
ment net* into the tie-downs
c:::> fig. 70.
... Read and heed all WARNINGS c:::> page 129,
Stowing luggage.
In a collision, the laws of physics mean that
even smaller items that are loose in the vehi
cle will turn into heavy missi les that can cause
serious injury. Items in the vehicle pick up ki
netic energy which varies with the vehicle and
the weight of the item . Vehicle speed is the
most sign ificant factor .
For example, in a frontal collision at a speed
of 30 mph (48 km/h), the forces acting on a
10-lb (5 kg) object are about
20 times the
normal we ight of the item . This means that
the weight of the item would sudden ly be the
equivalent of abo ut 200 lbs (90 kg). One can
easily imagine the injuries that an item of that
weight flying freely through the passenge r
compartment ca n cause in a collision at a
speed considered relatively low.
A WARNING
-
Weak, damaged or improper straps used
to secure items to tie-downs can fail dur
ing hard braking or in a collision and cause
serious personal injury.
- Always use suitable retaining straps and
properly secure items to the tie-downs in
the l uggage compartment to help pre
vent items from shift ing or fly ing for
ward.
- Never attach a chi ld seat tether strap to
a tie-down.
- For strength-related reasons, the mou nt
ing hooks can only be used to secure ob
jects weigh ing up to 10 lb. (5 kg). Heavi
er objects will not be adequ ately sec ured
- there is a risk of injury.
Page 70 of 292

68 Seats and storage
@ Tips
You can a lso open the pass-through from
the luggage compartment. Push the re
lease button down and p ush the cover for
ward.
Securing the ski sack
App lies to vehicles: with sk i sack
The ski sock must be secured in the luggage
compar tmen t.
Fig. 74 Lu ggage compartme nt: Sec uri ng th e bag
Fig. 75 Sec urin g th e o bjects in t he s ki s ack
Securing the ski sack in the luggage
compartment
.. The ski sack has two be lts with hooks o n the
unders ide
r::;, fig. 74@. Hang the hooks to
t h e rear fastening eye lets in the luggage
compartment .
Securing the objects in the ski sack
.. The re is also a securi ng strap r::;, fig . 75 @ in
the sack . Pu ll the strap taut using the free
end of the s trap.
& WARNING
- Th e ski sac k is intended only fo r the
t ransportation of skis and ot her ligh t ob- jects
. To reduce the risk of serio us per
sonal injury, never transport heavy or
pointed objects in the sk i sack.
- When braking rapid ly or during an acci
dent, the load could be d isplaced and
cause injury to occupa nts .
- Sharp edges on the load must be covered
for protection. A lways fasten the belt
tightly around the sack and its contents
r::;, fig. 75.
(D Tips
- Never stow the ski sack away when it is
st ill wet or damp (for example, snow
me lting from skis) . Allow it to dry com
pletely before stow ing it away .
- Pos ition skis in the sk i sack with the
pointed ends facing the front and ski
poles with the pointed ends facing the
rear.
Page 80 of 292
78 On the road
regular intervals . Any associated noises
are norma l.
Parking
• Press the brake peda l to stop the vehicle .
• Pull the switch(®) to set the parking brake .
• Move the selector lever to P.
• Turn the eng ine off ¢.&_ .
• When on incl ines or declines, turn the steer
i ng wheel so that your vehicle will roll into
the curb if it begins to move.
_& WARNING
- When you leave your veh icle - even if on
ly briefly - always take the ignition key
with you . This applies particu la rly when
children remain in the veh icle. Otherw ise
the ch ildren could start the engine, re
lease the parking brake or operate e lec
trical equipment (e.g . power windows) .
The re is the risk of an accident .
- When the vehicle is locked, no one - par
t icu la rly not children should remain in
the vehicle . Locked doo rs make it more
difficult for emergency wor kers to get in
to the vehicle - putt ing lives at risk.
Starting from rest
The starting assist function ensures that the
parking brake is released automatically upon
starting .
Stopping and applying park ing brake
• Pull the switch© to apply the park ing
brake .
Starting and automat ically releasing the
parking brake
• When you start to drive as usua l, the park
ing brake is automatically re leased and your
vehicle begins to move .
When stopp ing at a traff ic signa l or stopp ing
i n city traffic, the parking brake can be ap
plied . The veh icle does not have to be held
with the footbrake. The par king brake e limi
n ates the te ndency to creep with a drive ra nge engaged. As soon as yo
u drive off as usu a l,
the parking brake is re leased automatically
and the vehicle starts to move .
Starting on slopes
When starting on inclines, the starting assist
prevents the vehi cle from u nintent ionally roll
ing back . The braking force of the parking
brake is not re leased unti l sufficient driving
f orce has been built up at the wheels.
(D Tips
F o r safety reasons, the parking brake is re
l eased a utomatically on ly when t he d riv
er's safety belt is engaged in the buckle.
Emergency braking
In the event that the conventional brake sys
tem fails or locks.
• In an emergency, pu ll the switc h C®> and
continue to pull it to s low your vehicle down
with the parking b rake .
• As soon as you re lease the switch «:El) or ac -
celerate, the brak ing process stops.
If you pu ll the switch «:El) and hold it above a
speed of abo ut 5 mph (8 km/h), the eme rgen
cy brak ing f unct ion is initiated . The vehicle is
braked at all four whee ls by activating the hy
draulic brake system . The brake performa nce
i s sim ila r to making an emergency stop
c::> .&. .
In order not to act ivate the eme rgency brak
ing by mistake, an audib le warning tone (bu z
zer) sounds whe n the switch(®) is pulled . As
soon as the sw itch
®) is released, or the accel
erato r peda l is depressed, eme rgency b raking
stops.
_& WARNING
E mergency br aking should only be u sed in
a n emergency, when the norma l foot bra ke
has fai led or the brake pedal is obstruc ted.
Using the parking brake to pe rform eme r
gency b raking will s low your veh icle down
as if you had made a full brake application.
The laws of physics cannot be suspended
~
Page 98 of 292

96 Audi drive select
Audi drive select
Driving settings
Introduction
Aud i d rive select mak es it possible to expe ri
ence diffe ren t types of vehi cle se ttin gs i n o ne
ve hicl e. The dr ive r can se lect th ree
Comfort ,
Auto
and Dynamic modes in the M MI to
switch between a sporty and a comforta ble
driving mo de.
You c an a lso a djust the setti ng according to
your p re ferences in the
Individual mode . F o r
examp le, you ca n combine settings such as a
sporty en gine t uning with comfortab le steer
ing.
A WARNING
Improper use of the A udi drive select can
cause collisions, ot her acc idents and se ri
ous pe rsonal injury.
Description
The vehicle setup in each mode depends on
the veh icl e's featu res. The engine, t ransm is
sion, stee ring, reve rsible sa fe ty belt tension
e rs a nd adap tive air su spension are alw ays in
volved.
Engine and transmission
Depending on the mode, the e ng ine and the
tra nsmission respond quic ker or i n a more bal
an ced manne r to acce le rator pedal move
men ts. In the sporty dyn ami c mode, the
tra nsmission sh ifts at highe r RP Ms.
Air suspension*
The adaptive air suspens ion/adaptive air sus
pension spor t*
(Air suspen sion in the MM I) is
a n e lec tronic ally con trolled air suspension and
da mpi ng sys tem. They are adjus ted depend
ing on the se lected driving mode, the drive r's
steeri ng, braking an d acceleration input and
the road s urface, ve hicle speed and load. A
sporty setting is generally used in ve hicles
with adaptive air suspension sport*. T
he veh icle clearance varies depending on the
se lected mo de an d the speed .
T he highway setti ng is a ct ivated automatic ally
whe n you dr ive above 7 5 mph (120 km/ h) fo r
more than
3 0 seconds in the Auto or Dynamic
mode. The gro und clea rance is increased a uto
matically if the speed drops below
44 mph
(70 km/h) for more than 120 seconds.
Steering
T he s teer ing adap ts in terms of s teer ing effor t
and steering ratios . Indirect stee ring that
moves easily, like the steer ing in comfo rt
mode, is best suited to long drives on a high
way. In contrast, dynamic mode provides sporty, direct steer ing .
The following app lies to veh icles with dynamic
stee ring* : the steer ing rat io changes based on
vehicle speed in order to ma intain optimum
steering effort for the drive r at all times. This
sets the stee ring to be less sens itive at higher
speeds in order to provide improved vehicl e
control. At reduced speeds, howeve r, s te e ring
is mo re dir ect in o rder to keep the stee ring ef
f or t as minima l as possible when the drive r is
mane uveri ng the veh icle. At low and average
speeds, dynamic stee ring ad dit iona lly pro
vides more responsive steering pe rformance .
Adaptive dampers*
The ad aptive dampe rs* use se nsors to re cord
i nforma tion r egarding steering movemen ts,
braking and ac celera tion ope ra tions by the
driver, road surface, d riving speed, and loa d.
T his ma kes it possible to adapt damp ing to
the driving situation v irtually in rea l time.
Drive select also makes it possib le to satisfy
the des ire fo r sporty suspension (Dynamic)
and comfortab le suspens ion (Comfort) with
out giving up ba lance d tuning (Auto) .
Sport differential*
As a component of the all whee l dr ive system
(quattro)
c:> page 195, the Sport d ifferential*
distributes the d riving power to the rear ax le
depe nd ing on the si tuati on. The dis trib ution
of power var ies depend ing on the selected
mode, from balance d (comfo rt) to agile ..,.
Page 100 of 292
98 Audi drive select
Adjusting the Individual mode
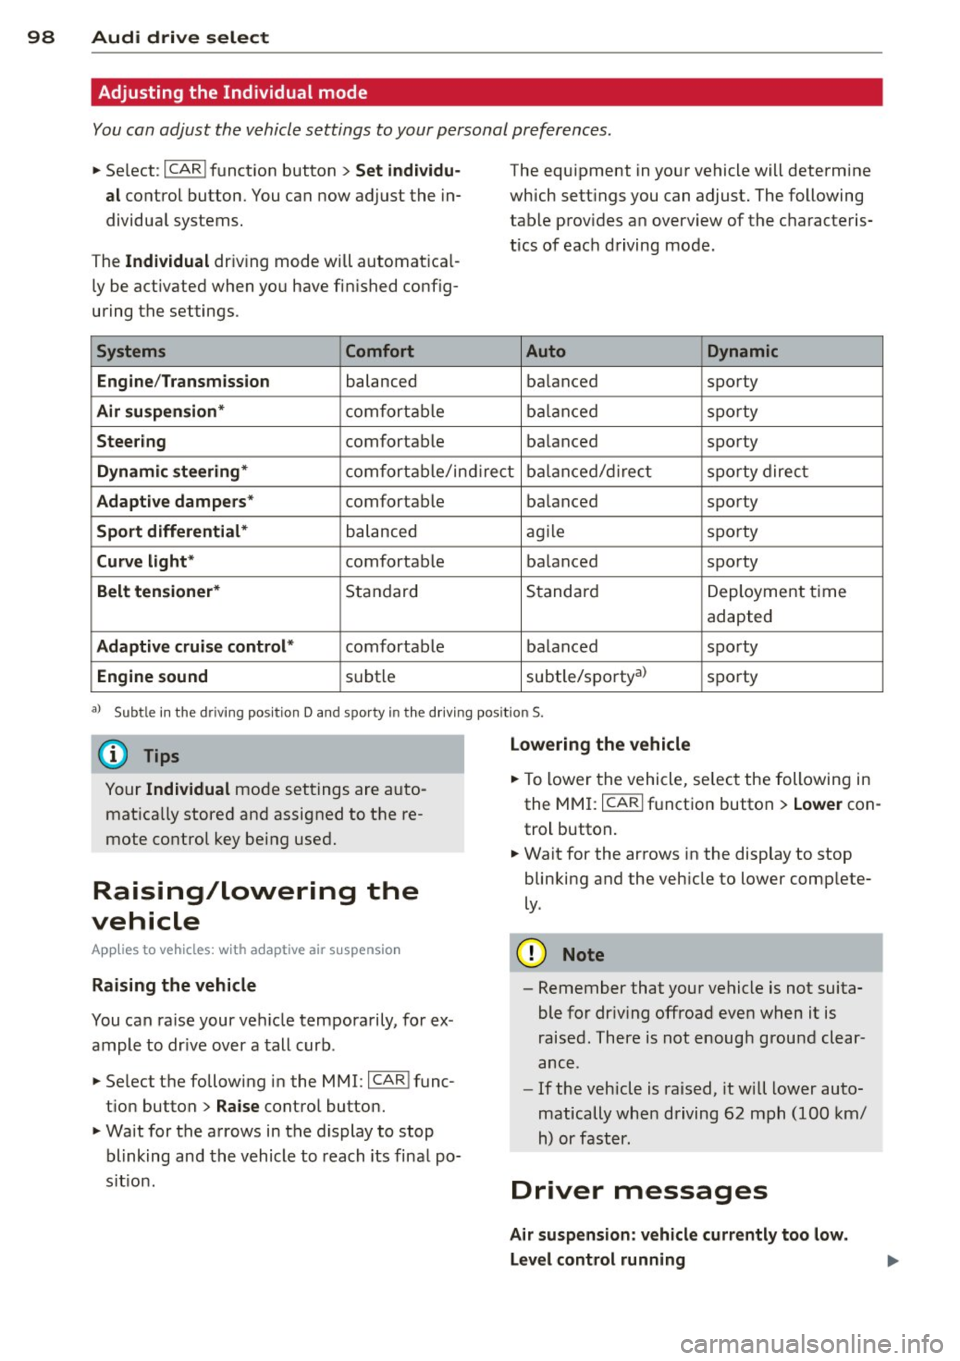
You can adjust the vehicle settings to your personal preferences .
• Se lect : I CAR ! function button > Set individu
al
control button. You can now adjust the in
dividual systems.
The
Individual dr iving mode will automatica l
ly be activated when you have finished config
uring the settings .
Systems Comfort
Engine /Transmission
balanced
Air suspension* comfortable
Steering comfortable The equipment
in your vehicle will determine
which settings you can adjust. The following
table provides an overview of the characteris
tics of each driving mode.
Auto Dynamic
balanced sporty
balanced sporty
balanced sporty
Dynamic steering* comfortable/indirect balanced/direct sporty direct
Adaptive dampers* comfortable balanced sporty
Sport differential* balanced agile sporty
Curve
light* comfortable balanced sporty
Belt tensioner* Standard Standard
Deployment time
adapted
Adaptive cruise control* comfortable balanced sporty
Engine sound subtle subtle/sportyal sporty
al
Sub tle in th e d riving po sit ion D an d sp orty in the driv ing pos itio n S.
(D Tips
Your Individual mode settings are auto
matically stored and assigned to the re
mote control key being used.
Raising/lowering the
vehicle
App lies to vehicles: with adaptive air suspension
Raising the vehicle
You can raise your vehicle temporarily, for ex
ample to drive over a tall curb.
• Se lect the following in the MMI: ICAR!func
tion button>
Raise control button.
• Wait for the arrows in the display to stop
blinking and the vehicle to reach its final po
s it ion .
Lowering the vehicle
• To lower the vehicle, select the following in
the MMI: ICARI function button >
Lower con
trol button.
• Wait for the arrows in the display to stop
blinking and the vehicle to lower complete
ly .
(D Note
- Remember that your vehicle is not suita
ble for dr iv ing offroad even when it is
raised. There is not enough ground clear
ance .
- If the vehicle is raised, it will lower auto
matically when driving 62 mph (100 km/
h) or faster.
Driver messages
Air suspension: vehicle currently too low.
Level control running
Page 108 of 292
106 Automatic Transmission
lever is left in N (Neutral) for more than ap
proximately 2 second, without the brake ped
a l being pressed .
Release button
The release button on the selector lever pre
vents the lever from being accidentally shifted
into certain positions. Depending on the direc
tion of the shift, the se lector lever locks at d if
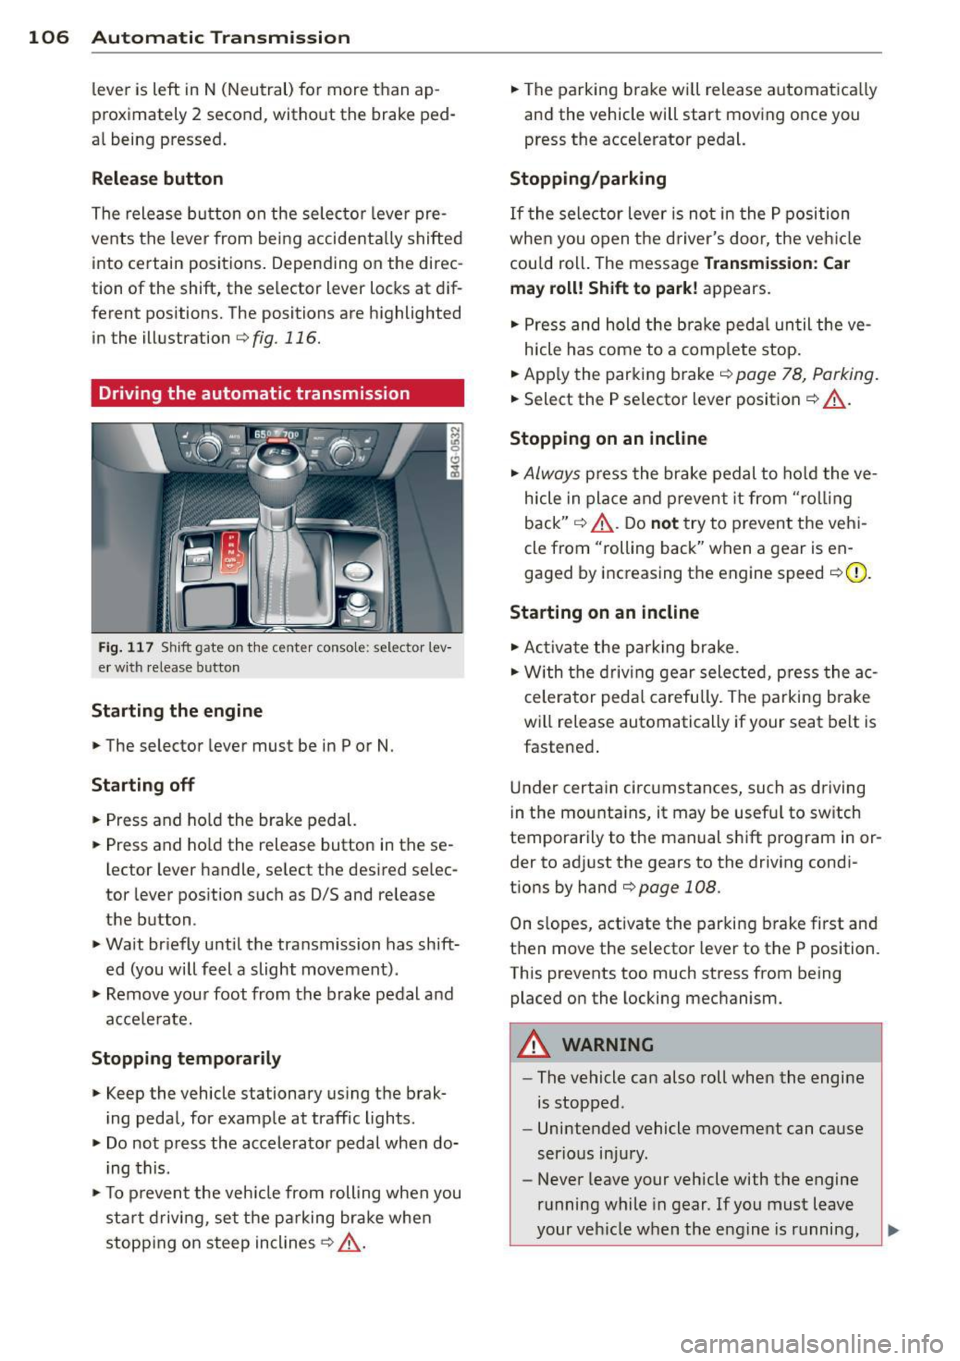
ferent positions. The positions are highlighted in the illustration
c:;, fig. 116.
Driving the automatic transmission
Fig. 117 Sh ift gate on the center conso le: selector lev
er w ith release button
Starting the engine
,.. The selector lever must be in P or N.
Starting off
,.. Press and ho ld the brake pedal.
,.. Press and ho ld the release button in these
lector lever handle, se lect the desired se lec
tor lever position such as 0/5 and release
the button .
,.. Wait briefly until the transmission has shift
ed (you will feel a slight movement) .
,.. Remove your foot from the brake pedal and
acce le rate.
Stopping temporarily
,.. Keep the vehicle stationary us ing the brak
ing peda l, for example at traffic lights.
,.. Do not press the accelerator pedal when do
ing this .
,.. To prevent the veh icle from rolling when you
sta rt driving, set the parking brake whe n
stopping on steep inclines
c:;, _& .
,.. The parking brake will release automatica lly
and the vehicle will start moving once you
press the acce lerator pedal.
Stopping/parking
If the sele ctor lever is not in the P position
whe n you open t he driver's door, the veh icle
could roll. The message
Transmission: Car
may roll! Shift to park!
appears.
,.. Press and hold the brake pedal until the ve-
hicle has come to a complete stop.
,.. App ly the parking brake
c::> page 78, Parking.
,.. Select the P selector lever position c:;, _& .
Stopping on an incline
,.. Always press the brake pedal to hold the ve
hicle in place and prevent it from "rol ling
back"
c:;, _& . Do not try to prevent the vehi
cle from "rolling back" when a gear is en
gaged by increasing the engine speed
c::>(D .
Starting on an incline
,.. Activate the parking brake.
,.. With the driving gear selected, press the ac
celerator pedal carefully. The parking brake
will release automatically if your seat belt is
fastened .
Under certain circumstances, such as driving
in the mounta ins, it may be usefu l to sw itch
temporarily to the manual shift program in or
der to adj ust the gears to the driving condi
t ions by hand
c::>page 108 .
On slopes, activate the parking brake first and
then move the selector lever to the P position.
This prevents too much stress from being placed on the locking mechanism.
A WARNING
-
- The vehicle can also roll when the engine
is stopped .
- Unintended vehicle movement can cause
serious injury.
- Never leave your vehicle with the engine
running while in gear . If you must leave
your vehicle when the engine is running,
Page 109 of 292
activate the parking brake and move the
selector lever to P.
- Power is sti ll transmitted to the wheels
when the engine is running at idle. To
prevent the vehicle from "creeping", you
must keep your foot on the brake when
the engine is running and the selector
lever is in D/S or R or "tiptronic" mode is
selected.
- Do not press the accelerator pedal when changing the selector lever pos ition
wh ile the vehicle is stat ionary and the
engine is running .
- Never shift into
R or P wh ile driving .
- Before driv ing down a steep slope, re -
duce your speed and shift into a lower
gear with "tiptronic".
- Do not ride the brakes or press the brake
peda l too often or too long when dr iv ing
down a hill. Constant braking causes the brakes to ove rheat and substant ially re
duces braking performance, increases
braking distance or ca uses comp lete fail
vre of the brake system .
- To prevent the vehicle from rolling back
when stopping on inclines, always hold it in place with the brake pedal or parking
brake.
- Never hold the vehic le on an incline with
a slipping clutch . The clutch opens auto
matically when it becomes too hot from
the overload. An indicator lamp
[O] illu
minates and a dr iver message appears
~ page 108 when the clutch is overload
ed .
- If the engine must remain running, never have any driv ing position engaged when
check ing under the hood.
M ake sure the
selector lever has secure ly engaged and
is locked in P with the parking bra ke set
¢ page 213 . Otherwise, any increase in
engine speed may set the vehicle in mo
t ion, even with the park ing brake ap
plied.
(D Note
- When stopping on an incline, do not try to hold the vehicle in place by pressing
Aut omat ic Tr ans missio n 107
the acce lerator pedal while a d riving gea r
is se lected. This can cause the transmis
sion to ove rheat and can damage it. Acti
vate the parking brake or press the brake peda l to prevent the vehicle from rolling .
- Allowing the vehicle to roll when the en gine is stopped and the selector lever is
in N will damage the transmission be
cause
i t is not lubricated under those cir
cumstances.
(D Tips
For safety reasons, the parking brake is re
leased automatically o nly when the driv
e r's safety belt is engaged in the buckle .
, Hill descent control
The hill descent control system assists the
driver when driving down declines .
Hill descent contro l is activa ted when these
lector lever is in D/S and you press the brake
pedal. The transmission automatically selects
a gear that is suitable for the incline . H ill de
scent cont ro l t ries to ma inta in the speed ach
ieved a t the t ime of braking, with in phys ica l
and tec hni cal lim itations. If may st ill be nec
essary to adj ust the speed with the brakes .
Hill descent contro l sw itches off once the de
cl in e leve ls out or yo u press the acce le rato r
pedal.
On vehicles with the cruise cont ro l system*
¢ page 79 , hill descent control is also activat
ed whe n the speed is set.
&_ WARNING
-
Hill descent co nt rol cannot overcome
physical lim itations, so it may not be ab le
to maintain a constant speed under a ll
conditions. A lways be ready to apply the
brakes .