2014 Alfa Romeo MiTo ESP
[x] Cancel search: ESPPage 66 of 280

SIDE LIGHTS/DIPPED BEAM
HEADLIGHTSWith the ignition key turned to MAR, turn ring nut A fig. 35 to
.
The daytime running lights are switched off and the side lights and
dipped headlights are switched on. The warning light
switches
on on the instrument panel.
PARKING LIGHTSThese lights can only be switched on with ignition key at STOP or
removed, by moving ring nut A first to position
and then to position
.
When the parking lights are switched on, the number plate lights and
the front and rear side lights switch on as well (the daytime running
lights (DRLs) remain off however).
The warning light
switches on on the instrument panel.
When the direction indicator stalk is activated the side for the lights
(left or right) can be selected.
AUTOMATIC LIGHTING CONTROL
(AUTOLIGHT) (Dusk sensor)(for versions/markets, where provided)
This infrared LED sensor, combined with the rain sensor and located on
the windscreen, detects the variations in outside brightness depending
on the light sensitivity set with the Set-up Menu: the greater the
sensitivity, the less external light is required to activate the exterior
lights.Activation
The dusk sensor activates when ring nut A fig. 35 is turned to
.In
this way the side lights and dipped headlights are activated
automatically according to the external light level.
IMPORTANT The sensor is unable to detect the presence of fog.
Therefore under these circumstances, these lights must be turned on
manually.
When the lights are turned on by the sensor, the fog lights (for
versions/markets, where provided) and the rear fog lights may be
turned on.
When the lights are automatically switched off, the front and rear fog
lights (if activated) are also switched off. The next time the lights are
switched on automatically, the fog lights must be reactivated manually
(if required).
With the sensor active, it is possible to flash the headlights but the
main beam headlights cannot be switched on. If you need to turn these
lights on, turn ring nut A to position
and turn the dipped
headlights on.
When the lights have been activated automatically and are then
switched off by the sensor, the dipped beam headlights are switched
off first, followed by the side lights a few seconds later.
If the sensor is activated but is malfunctioning, the side lights and
dipped beam headlights are switched on irrespective of the outside
light level and the sensor failure is indicated on the instrument panel
display.
It is also possible to deactivate the sensor and switch on these lights if
necessary.
62GETTING TO
KNOW YOUR CAR
SAFETY
STARTING AND
DRIVING
IN AN EMERGENCY
SERVICING AND
MAINTENANCE
TECHNICAL
SPECIFICATIONS
INDEX
Page 67 of 280

MAIN BEAM HEADLIGHTSTo activate the main beam headlights, with ring nut A at
, pull the
stalk towards the steering wheel beyond the end of travel position.
The warning light
switches on on the instrument panel.
When the stalk is pulled towards the steering wheel again, beyond the
end of travel position, the main beam headlights deactivate, the
dipped beam headlights reactivate and the warning light
switches
off.
FLASHINGTo do this, pull the stalk towards the steering wheel (unstable position)
regardless of the position of ring nut A.
The warning light
switches on on the instrument panel.
DIRECTION INDICATORSBring the stalk into (stable) position:
❒upwards: activates right direction indicator;
❒downwards: activates left direction indicator.
Warning light
or
will flash in the instrument panel.
The indicators are switched off automatically when the steering wheel
is straightened."Lane change" function
If you want to signal that you are changing lane, hold the left stalk in
the unstable position for less than half a second. The direction indicator
on the selected side flashes 3 times and then switches off automatically.
"FOLLOW ME HOME" DEVICEThis device allows you to illuminate the area in front of the car for a
certain amount of time.
Activation
With the ignition key at STOP or removed, pull stalk A towards the
steering wheel and move it within 2 minutes of the engine switching
off.
At each single movement of the stalk, the lights will remain on for an
extra 30 seconds up to a maximum of 210 seconds; then the lights are
switched off automatically.
The
warning light on the instrument panel will light up (and the
corresponding message will appear on the display) as long as the
function is active.
The light comes on when the stalk is first moved and stays on until the
function is automatically deactivated. Each movement of the stalk
only increases the amount of time the lights stay on.
Deactivation
Keep stalk A pulled towards the steering wheel for more than 2
seconds.
63GETTING TO
KNOW YOUR CARSAFETY
STARTING AND
DRIVING
IN AN EMERGENCY
SERVICING AND
MAINTENANCE
TECHNICAL
SPECIFICATIONS
INDEX
Page 72 of 280

INCREASING THE MEMORISED SPEEDPress the accelerator and store the new speed or move the lever
upwards (+).
Each movement of the stalk corresponds to an increase in speed of
about 1 km/h, while keeping the stalk held upwards will continuously
increase the speed.REDUCING THE MEMORISED SPEEDDeactivate the device and store the new speed or move the lever
downwards (–) until the new speed is reached. It will then be stored
automatically.
Each movement of the lever corresponds to a slight reduction in speed
of about 1 km/h, while keeping the stalk held downwards will
decrease the speed continuously.TURNING THE DEVICE OFFTo disengage the device:
- turn ring nut A fig. 38 to OFF;
or
- switch the engine off;
or
- press the brake pedal, the clutch or the accelerator; in this last case
the system is not effectively disengaged but the system gives priority to
the acceleration request. The device still remains active, without the
need to press the RES button to return to the previous conditions once
acceleration is concluded.Automatic deactivation
The device deactivates automatically in the following cases:
❒if the ABS or ESC systems intervene;
❒with the car speed below the set limit;
❒in the event of system failure.
When travelling with the device active, never move the
gear lever to neutral.If operation is inadequate or the device is faulty, turn
ring nut A fig. 38 to OFF and contact Alfa Romeo
Authorized Services.
68GETTING TO
KNOW YOUR CAR
SAFETY
STARTING AND
DRIVING
IN AN EMERGENCY
SERVICING AND
MAINTENANCE
TECHNICAL
SPECIFICATIONS
INDEX
Page 76 of 280

FOG LIGHTS(for versions/markets, where provided)
Press the
fig. 45 button to switch the lights on/off.
With the lights on, warning light
in the instrument panel switches
on.
REAR FOG LIGHTPress the
fig. 45 button to switch the light on/off.
The rear fog light switches on only when the dipped headlights are
switched on. With the light on, the
warning light in the instrument
panel switches on.
CENTRAL LOCKINGPress button A fig. 46 to lock all doors at the same time.
Locking takes place irrespective of the position of the ignition key.FUEL CUT-OFF SYSTEMThis intervenes in the case of an impact causing:
❒the interruption of the fuel supply with the engine consequently
cutting out;
❒the automatic unlocking of the doors;
❒the interior lights being switched on.
The intervention of the system is indicated by a message shown on the
display.
Carefully check the car for fuel leaks, for instance in the engine
compartment, under the car or near the tank area.
After a collision, turn the ignition key to STOP to prevent the battery
from running down.
fig. 45
A0J0303
fig. 46
A0J0030
72GETTING TO
KNOW YOUR CAR
SAFETY
STARTING AND
DRIVING
IN AN EMERGENCY
SERVICING AND
MAINTENANCE
TECHNICAL
SPECIFICATIONS
INDEX
Page 97 of 280

HILL HOLDER SYSTEMThis system is an integral part of the ESC system and facilitates starting
on slopes.
It is automatically activated in the following conditions:
❒uphill: vehicle stationary on a road with a gradient higher than 5%,
engine running, brake pedal pressed and gearbox in neutral or
gear (other than reverse) engaged;
❒downhill: vehicle stationary on a road with a gradient higher than
5%, engine running, brake pedal pressed and reverse gear
engaged.
When setting off the ESC system control unit maintains the braking
pressure at the wheels until the engine torque required for departure is
reached or for approximately 2 seconds, allowing your right foot to
be moved easily from the brake pedal to the accelerator.
If the vehicle has not departed after this time, the system will deactivate
automatically by gradually releasing the brake force. A sound may
be heard during this stage: this indicates that the vehicle is about
to move off.
IMPORTANT The Hill Holder system is not a handbrake. Do not leave
the vehicle without having engaged the handbrake, switched off the
engine and engaged a gear.ASR (AntiSlip Regulation) SYSTEMIt is an integral part of the ESC system. It automatically operates in the
event of one or both drive wheels slipping, loss of grip on wet roads
(aquaplaning) and acceleration on slippery, snowy or icy roads, etc.Depending on the slipping conditions, two different control systems are
activated:
❒if the slipping involves both drive wheels, the ASR intervenes
reducing the power transmitted by the engine;
❒if the slipping only involves one of the drive wheels, the ASR
intervenes automatically braking the wheel that is slipping.
For the correct operation of the ESC and ASR systems,
the tyres must be the same make and type on all
wheels, in perfect condition and, above all, of the type,
make and size recommended.The ESC system operates even when the space-saver
wheel is being used. Always remember that the
space-saver wheel, being smaller than the original
wheel, provides less grip.Do not take unnecessary risks, even if your vehicle is
fitted with the ESC and ASR systems. Driving style must
always be adapted to road conditions, visibility and
traffic. The driver is always responsible for road safety.
93GETTING TO
KNOW YOUR CARSAFETY
STARTING AND
DRIVING
IN AN EMERGENCY
SERVICING AND
MAINTENANCE
TECHNICAL
SPECIFICATIONS
INDEX
Page 98 of 280

BRAKE ASSIST(assistance during emergency braking)
The system, which cannot be turned off, recognises emergency braking
(on the basis of the brake pedal operating speed) and speeding up
the response of the braking system. The Brake Assist device is
deactivated if there is a ESC system failure.MSR SYSTEM(Motor Schleppmoment Regelung)
This system is an integral part of the ABS, that intervenes, if there is a
sudden downshifting, restoring torque to the engine, thereby
preventing excessive drive at the drive wheels which, especially in poor
grip conditions, could lead to a loss in stability of the car.CBC (Cornering Brake Control)
SYSTEMThis function improves the distribution of the braking pressure at the
four wheels (to fully exploit the grip available on the ground) when
braking on bends if the ABS intervenes. This improves stopping
distances and above all vehicle stability when cornering.
“ELECTRONIC Q2” SYSTEM (“E-Q2”)The “Electronic Q2” system uses the braking system to create an effect
similar to a limited slip differential.
The front braking system, when accelerating around a curve, acts on
the inside wheel to increase the drive to the outside wheel (increased
load), dynamically and continuously distributing the torque between
the front drive wheels according to driving and road conditions.
The system, combined with MacPherson front suspension, allows
particularly effective and sports driving to be achieved.DST SYSTEM
(Dynamic Steering Torque)This function integrates Dual Pinion active steering into the operation of
ESC. For particular manoeuvres, the ESC system controls the steering
to actuate a steering torque and assist the driver in the best possible
way.
The system operates the brakes and steering in a coordinated manner
to increase the suspension and safety level of the car as a whole.
The steering provides additional torque on the steering wheel.
94GETTING TO
KNOW YOUR CAR
SAFETY
STARTING AND
DRIVING
IN AN EMERGENCY
SERVICING AND
MAINTENANCE
TECHNICAL
SPECIFICATIONS
INDEX
Page 99 of 280

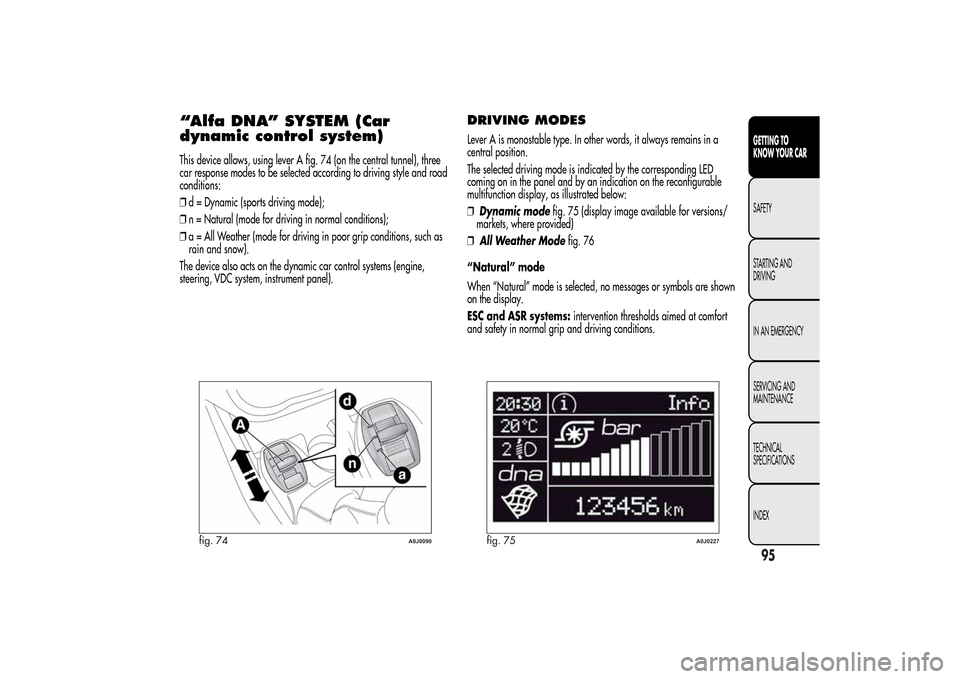
“Alfa DNA” SYSTEM (Car
dynamic control system)This device allows, using lever A fig. 74 (on the central tunnel), three
car response modes to be selected according to driving style and road
conditions:
❒d = Dynamic (sports driving mode);
❒n = Natural (mode for driving in normal conditions);
❒a = All Weather (mode for driving in poor grip conditions, such as
rain and snow).
The device also acts on the dynamic car control systems (engine,
steering, VDC system, instrument panel).
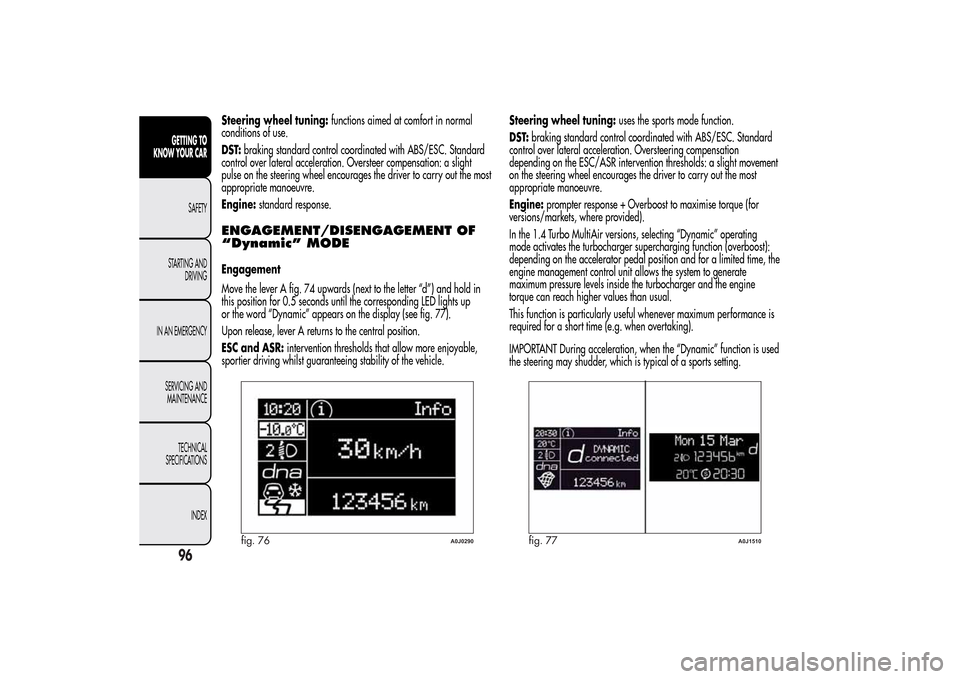
DRIVING MODESLever A is monostable type. In other words, it always remains in a
central position.
The selected driving mode is indicated by the corresponding LED
coming on in the panel and by an indication on the reconfigurable
multifunction display, as illustrated below:
❒Dynamic modefig. 75 (display image available for versions/
markets, where provided)
❒All Weather Modefig. 76
“Natural” mode
When “Natural” mode is selected, no messages or symbols are shown
on the display.
ESC and ASR systems:intervention thresholds aimed at comfort
and safety in normal grip and driving conditions.
fig. 74
A0J0090
fig. 75
A0J0227
95GETTING TO
KNOW YOUR CARSAFETY
STARTING AND
DRIVING
IN AN EMERGENCY
SERVICING AND
MAINTENANCE
TECHNICAL
SPECIFICATIONS
INDEX
Page 100 of 280

Steering wheel tuning:functions aimed at comfort in normal
conditions of use.
DST:braking standard control coordinated with ABS/ESC. Standard
control over lateral acceleration. Oversteer compensation: a slight
pulse on the steering wheel encourages the driver to carry out the most
appropriate manoeuvre.
Engine:standard response.ENGAGEMENT/DISENGAGEMENT OF
“Dynamic” MODEEngagement
Move the lever A fig. 74 upwards (next to the letter “d”) and hold in
this position for 0.5 seconds until the corresponding LED lights up
or the word “Dynamic” appears on the display (see fig. 77).
Upon release, lever A returns to the central position.
ESC and ASR:intervention thresholds that allow more enjoyable,
sportier driving whilst guaranteeing stability of the vehicle.Steering wheel tuning:uses the sports mode function.
DST:braking standard control coordinated with ABS/ESC. Standard
control over lateral acceleration. Oversteering compensation
depending on the ESC/ASR intervention thresholds: a slight movement
on the steering wheel encourages the driver to carry out the most
appropriate manoeuvre.
Engine:prompter response + Overboost to maximise torque (for
versions/markets, where provided).
In the 1.4 Turbo MultiAir versions, selecting “Dynamic” operating
mode activates the turbocharger supercharging function (overboost):
depending on the accelerator pedal position and for a limited time, the
engine management control unit allows the system to generate
maximum pressure levels inside the turbocharger and the engine
torque can reach higher values than usual.
This function is particularly useful whenever maximum performance is
required for a short time (e.g. when overtaking).
IMPORTANT During acceleration, when the “Dynamic” function is used
the steering may shudder, which is typical of a sports setting.
fig. 76
A0J0290
fig. 77
A0J1510
96GETTING TO
KNOW YOUR CAR
SAFETY
STARTING AND
DRIVING
IN AN EMERGENCY
SERVICING AND
MAINTENANCE
TECHNICAL
SPECIFICATIONS
INDEX