Page 349 of 518

uuWhen DrivinguShifting
348Driving
■
Shift Lever Operation
1Shift Lever OperationNOTICEWhen you change the shift lever from
(D to
(R and
vice versa, come to a complete stop and keep the
brake pedal depressed.
Operating the shift lever before the vehicle has come
to a complete standstill can damage the transmission.
Use the shift lever position indicator to check the
lever position before pulling away.
If the transmission indicator blinks when driving, in
any shift position, there is a problem with the
transmission.
Avoid sudden acceleration and have the transmission
checked by a dealer as soon as possible.
The fuel supply may be cut off if you drive at engine
speeds in or over the tachometer’s red zone (engine
speed limit). If this happens, you may experience a
slight jolt.
When the engine speed is increased while the shift
lever is in
(N, (P or
(R, the fuel supply may be cut
off even without the engine speed entering the
tachometer’s red zone.
It may not be possible to operate the shift lever if the
brake pedal is applied while the shift lever release
button is held down.
Depress the brake pedal first.
Shift Lever Position Indicator
Depress the brake pedal
and press the shift lever
release button to shift.
Shift without pressing the
shift lever release button. Press the shift lever
release button and
shift.Tachometer’s red zone
Models without
navigation
system
Page 352 of 518
351
uuWhen DrivinguSPORT Mode
Driving
SPORT ModeTo turn the SPORT mode on and off, press the SPORT button.
The SPORT mode increases engine performance and handling.
This mode is suitable for driving on hills or through curves on mountain roads.
The SPORT mode is turned off every time you start the engine, even if you turned it
on the last time you drove the vehicle.
SPORT Button SPORT Mode
Indicator
Models with
navigation
system
Models without
navigation
system
Page 353 of 518

352
uuWhen DrivinguCruise Control
*
Driving
Cruise Control
*
Maintains a constant vehicle speed without having to keep your foot on the
accelerator. Use cruise control on freeways or open roads where you can travel at a
constant speed with little acceleration or deceleration.
1Cruise Control
*
It may not be possible to maintain a constant speed
when driving uphill or downhill.
When not using cruise control:
Turn off cruise control by pressing the CRUISE
button.
3
WARNING
Improper use of the cruise control can lead
to a crash.
Use the cruise control only when traveling
on open highways in good weather.
When to use■Shift positions for cruise control:
In (DAlways keep sufficient distance
between you and the vehicle in
front of you.
■Vehicle speed for cruise control:
Desired speed in a range above
roughly 25 mph (40 km/h) ~How to use
CRUISE MAIN is on in the
instrument panel.Cruise control is ready to use.
■Press the
CRUISE
button on
the steering wheel.
Models with
navigation systemModels without
navigation system
* Not available on all models
Page 354 of 518
353
uuWhen DrivinguCruise Control
*
Continued
Driving
Take your foot off the pedal and press the RES/+/SET/– switch down when you
reach the desired speed.
The moment you release the RES/+/SET/– switch, the set speed is fixed, and cruise
control begins. The CRUISE CONTROL indicator comes on.■
To Set the Vehicle Speed
On when cruise control begins
On
RES/+/SET/− Switch
Press down and release On
Models with
navigation systemModels without
navigation system
Models with
navigation systemModels without
navigation system
On On
Page 366 of 518

Continued
365
uuWhen DrivinguForward Collision Warning (FCW)
*
Driving
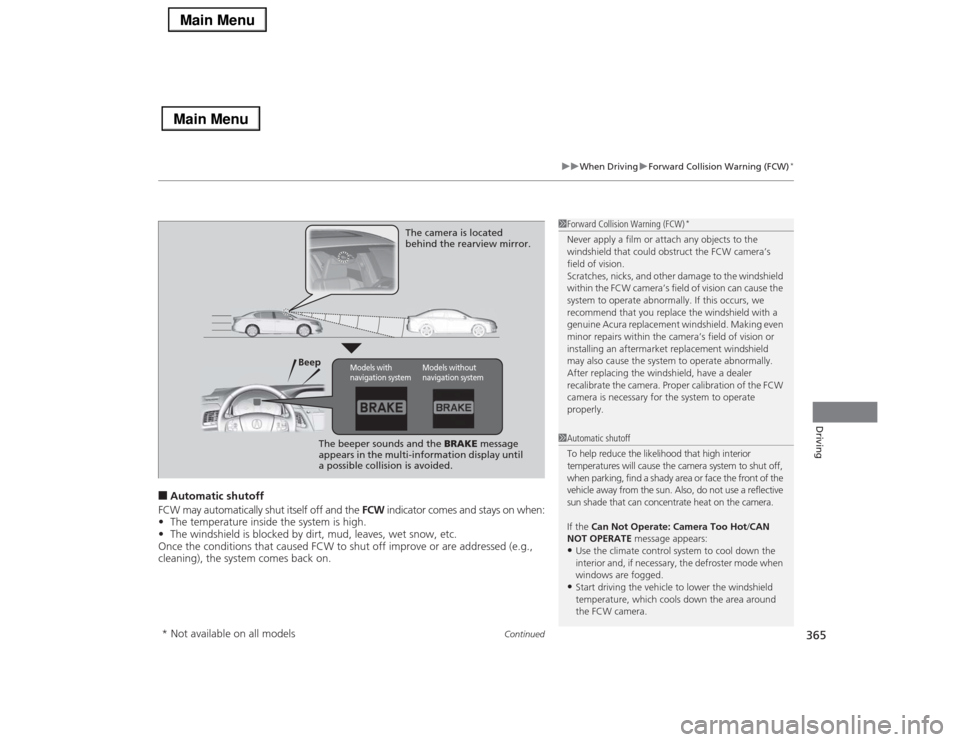
■Automatic shutoff
FCW may automatically shut itself off and the FCW indicator comes and stays on when:
•The temperature inside the system is high.
•The windshield is blocked by dirt, mud, leaves, wet snow, etc.
Once the conditions that caused FCW to shut off improve or are addressed (e.g.,
cleaning), the system comes back on.
1Forward Collision Warning (FCW)
*
Never apply a film or attach any objects to the
windshield that could obstruct the FCW camera’s
field of vision.
Scratches, nicks, and other damage to the windshield
within the FCW camera’s field of vision can cause the
system to operate abnormally. If this occurs, we
recommend that you replace the windshield with a
genuine Acura replacement windshield. Making even
minor repairs within the camera’s field of vision or
installing an aftermarket replacement windshield
may also cause the system to operate abnormally.
After replacing the windshield, have a dealer
recalibrate the camera. Proper calibration of the FCW
camera is necessary for the system to operate
properly.
BeepThe camera is located
behind the rearview mirror.
The beeper sounds and the BRAKE message
appears in the multi-information display until
a possible collision is avoided.
Models with
navigation system
Models without
navigation system
1Automatic shutoff
To help reduce the likelihood that high interior
temperatures will cause the camera system to shut off,
when parking, find a shady area or face the front of the
vehicle away from the sun. Also, do not use a reflective
sun shade that can concentrate heat on the camera.
If the Can Not Operate: Camera Too Hot/CAN
NOT OPERATE message appears:•Use the climate control system to cool down the
interior and, if necessary, the defroster mode when
windows are fogged.•Start driving the vehicle to lower the windshield
temperature, which cools down the area around
the FCW camera.
* Not available on all models
Page 368 of 518

367
uuWhen DrivinguLane Departure Warning (LDW)
Continued
Driving
Lane Departure Warning (LDW)Alerts you when the system detects a possibility of your vehicle unintentionally
crossing over detected lane markings.
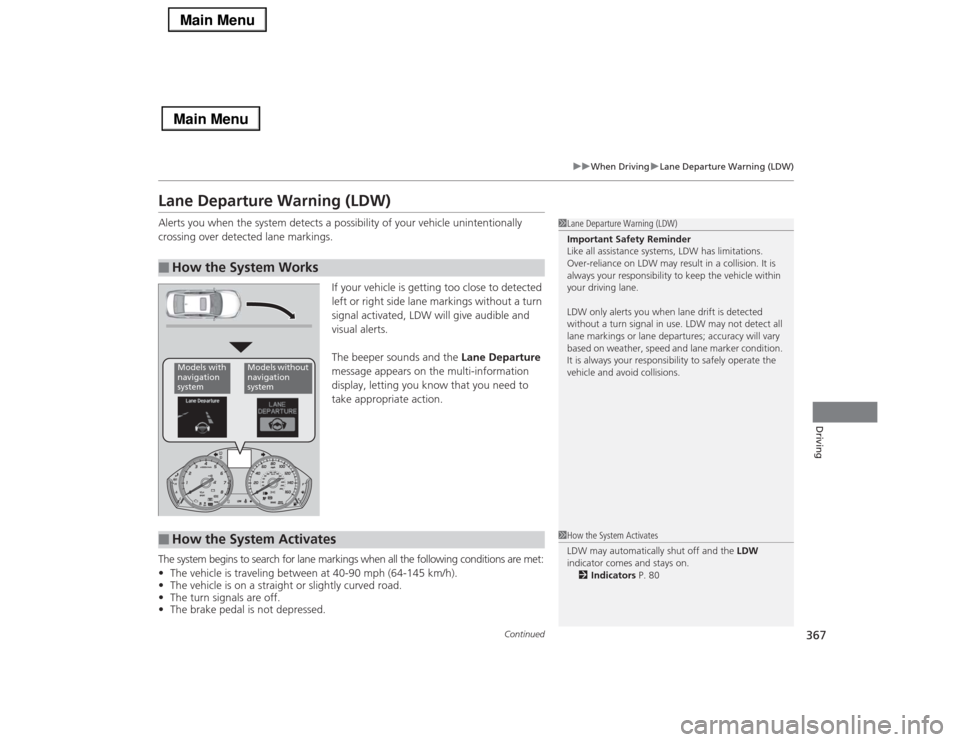
If your vehicle is getting too close to detected
left or right side lane markings without a turn
signal activated, LDW will give audible and
visual alerts.
The beeper sounds and the Lane Departure
message appears on the multi-information
display, letting you know that you need to
take appropriate action.
The system begins to search for lane markings when all the following conditions are met:
•The vehicle is traveling between at 40-90 mph (64-145 km/h).
•The vehicle is on a straight or slightly curved road.
•The turn signals are off.
•The brake pedal is not depressed.■
How the System Works
1Lane Departure Warning (LDW)
Important Safety Reminder
Like all assistance systems, LDW has limitations.
Over-reliance on LDW may result in a collision. It is
always your responsibility to keep the vehicle within
your driving lane.
LDW only alerts you when lane drift is detected
without a turn signal in use. LDW may not detect all
lane markings or lane departures; accuracy will vary
based on weather, speed and lane marker condition.
It is always your responsibility to safely operate the
vehicle and avoid collisions.
Models with
navigation
system
Models without
navigation
system
■
How the System Activates
1How the System Activates
LDW may automatically shut off and the LDW
indicator comes and stays on.
2Indicators P. 80
Page 382 of 518

381
uuWhen DrivinguTire Pressure Monitoring System (TPMS)
Driving
To select the tire pressure monitor, set the power
mode to ON, and roll the right selector wheel
until you see the tire pressure screen.The pressure for each tire is displayed in PSI
(U.S.) or kPa (Canada).
Tire Pressures Low/CHECK TIRE PRESSURE
is displayed when a tire has significantly low
pressure. The specific tire is displayed on the
screen.
■
Tire Pressure Monitor
1Tire Pressure Monitor
The pressure displayed on the multi-information
display can be slightly different from the actual
pressure as measured by a gauge. If there is a
significant difference between the two values, or if
the low tire pressure/TPMS indicator and the message
on the multi-information display do not go off after
you have inflated the tire to the specified pressure,
have the system checked by a dealer.
Tire Pressure Monitor Problem/CHECK TPMS
SYSTEM may appear if you drive with the compact
spare tire
*, or there is a problem with the TPMS.
Models with
navigation
system
Models without
navigation
system
Models with
navigation
system
Models without
navigation
system
* Not available on all models
Page 413 of 518

412
uuMaintenance Minder
TMuTo Use Maintenance Minder
TM
Maintenance
To Use Maintenance Minder
TM
Maintenance items, which should be serviced at the same time that you replace the
engine oil, appear on the multi-information display.
You can view them on the engine oil life screen at any time.
1.Set the power mode to ON.
2.Roll the right selector wheel until the engine oil life appears on the multi-
information display.■
Displaying the Engine Oil Life and Maintenance Items
1Displaying the Engine Oil Life and Maintenance Items
Based on the engine operating conditions, the
remaining engine oil life is calculated and displayed
as a percentage.
There is a list of maintenance main and sub items you
can view on the multi-information display.
2Maintenance Service Items P. 414
Displayed Engine Oil
Life (%)
Calculated Engine Oil
Life (%)
100100 to 91
90
90 to 81
8080 to 71
70
70 to 61
6060 to 51
50
50 to 41
4040 to 31
30
30 to 21
2020 to 16
15
15 to 11
1010 to 6
5
5 to 1
00
Remaining Engine Oil Life
Maintenance Service ItemsModels with
navigation
system
Models without
navigation
system
Right Selector Wheel