Page 219 of 518
uuAudio System Basic OperationuPlaying AM/FM Radio
218Features
To store a station:
1.Tune to the selected station.
2.Press the MENU button.
3.Rotate to select Save Preset, then press .
4.Rotate to select the preset number you want to store that station, then press
.
You can also store that station by the following procedure.
1.Tune to the selected station.
2.Rotate to select the preset number you want to store the station.
3.Press and hold for a few seconds.
1.Tune to the selected station.
2.Select More.
3.Select Save Preset.
4.Select the preset number you want to store that station.
You can also store that station by the following procedure.
1.Tune to the selected station.
2.Change the display to the preset screen.
3.Select and hold the preset number you want to store that station.■
Preset Memory
1Playing AM/FM Radio
You can control the AM/FM radio using voice
commands.
2Voice Control Operation P. 209
The ST indicator appears on the display indicating
stereo FM broadcasts.
Stereo reproduction in AM is not available.
Switching the Audio Mode
Press the SOURCE button on the steering wheel.
2Audio Remote Controls P. 192
You can also switch the mode by pressing the MENU
button and selecting Change Source on the Audio
menu screen.
You can store 6 AM stations and 12 FM stations into
the preset memory.
iTunes Tagging“iTunes” in “iTunes Tagging” is a trademark of Apple Inc.When an HD Radio
TM station is selected, the HD
indicator appears on the audio/information screen
and On Demand Multi-Use Display
TM.
If you want to have the information on the song
played from the HD Radio
TM station, select TAG in On
Demand Multi-Use DisplayTM or select Tag Song in
the menu with Interface dial.
If iPod®/iPhone® is connected, the tag is transferred to
the connected device immediately, otherwise the tag
will be transferred when the device will be connected
and select Tag Song in the menu with Interface dial.
Models with HD Radio
TM feature
Interface DialOn Demand Multi-Use Display
TM
Page 223 of 518
222
uuAudio System Basic OperationuPlaying XM® Radio
Features
Playing XM® RadioAudio/Information Screen
On Demand Multi-Use Display
TM
Category Up/Down Icons
Select or to display and select
an XM® Radio category.MENU Button
Press to display the menu items.
(Power) Button
Press to turn the audio system on
and off.Audio Source
Select to change an audio source.To listen to a stored channel,
select 1-12. Presets
Select to store a station.
Skip/Seek Icons
Select or to the previous
or next channel.
In channel mode, select and hold to
change the channel rapidly.
More
Select to display the menu items.
BACK Button
Press to go back to the previous
display. VOL (Volume) Knob (Pushed out)
Turn to adjust the volume.Interface Dial/ENTER Button
Press and turn to select preset radio
stations.
Move up, down, right and left to
select secondary menu.
Page 224 of 518
Continued
223
uuAudio System Basic OperationuPlaying XM® Radio
Features
1.Select the XM® mode.
2Audio Remote Controls P. 192
2On Demand Multi-Use Display
TM P. 194
2.Press the MENU button.
3.Rotate to select Channel List, then press .
4.Rotate to select a channel from a list, then press .
2.Select a channel using the , , , icons on the tune mode screen or
the preset numbers (1-12) on the preset mode screen.
To change the tune mode:
1.Select the XM® mode.
2.Press the MENU button.
3.Rotate to select XM Tune Mode, then press .
4.Rotate to select Channel Mode or Category Mode, then press .
2.Select More.
3.Select XM Tune Mode.
4.Select Channel Mode or Category Mode.■
To Play the XM® Radio
1Playing XM® Radio
You can control the XM® radio using voice
commands.
2Voice Control Operation P. 209
In the channel mode, all available channels are
selectable. In the category mode, you can select a
channel within a category (Jazz, Rock, Classical, etc.).
There may be instances when XM® Radio does not
broadcast all the data fields (artist name, title). This
does not indicate a problem with your audio system.
Interface DialOn Demand Multi-Use Display
TM
Interface DialOn Demand Multi-Use Display
TM
Page 225 of 518
uuAudio System Basic OperationuPlaying XM® Radio
224Features
To store a station:
1.Tune to the selected station.
2.Press the MENU button.
3.Rotate to select Save Preset, then press .
4.Rotate to select the preset number you want to store that station, then press
.
You can also store that station by the following procedure.
1.Tune to the selected station.
2.Rotate to select the preset number you want to store the station.
3.Press and hold for a few seconds.
1.Tune to the selected station.
2.Select More.
3.Select Save Preset.
4.Select the preset number you want to store that station.
You can also store that station by the following procedure.
1.Tune to the selected station.
2.Change the display to the preset screen.
3.Select and hold the preset number you want to store that station.■
Preset Memory
1Playing XM® Radio
You can store 12 XM® stations into the preset
memory.
Interface DialOn Demand Multi-Use Display
TM
Page 226 of 518
225
uuAudio System Basic OperationuPlaying a CD
Continued
Features
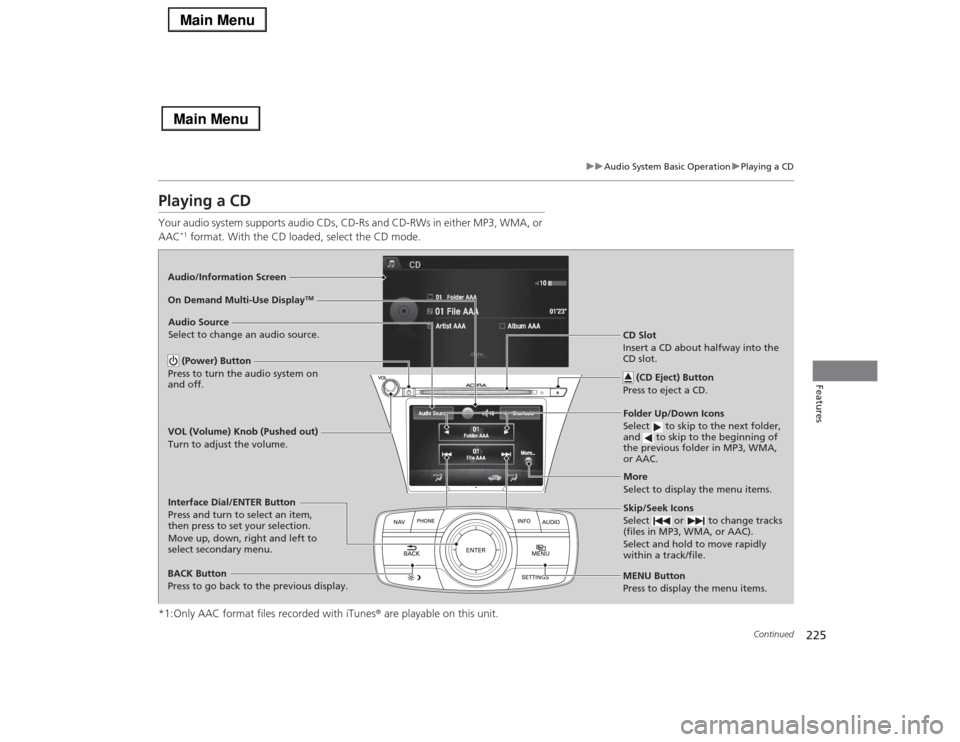
Playing a CDYour audio system supports audio CDs, CD-Rs and CD-RWs in either MP3, WMA, or
AAC
*1 format. With the CD loaded, select the CD mode.
*1:Only AAC format files recorded with iTunes® are playable on this unit.
Audio/Information Screen
MENU Button
Press to display the menu items.
CD Slot
Insert a CD about halfway into the
CD slot.
(CD Eject) Button
Press to eject a CD.Folder Up/Down Icons
Select to skip to the next folder,
and to skip to the beginning of
the previous folder in MP3, WMA,
or AAC.
Audio Source
Select to change an audio source.
Skip/Seek Icons
Select or to change tracks
(files in MP3, WMA, or AAC).
Select and hold to move rapidly
within a track/file.
More
Select to display the menu items.
BACK Button
Press to go back to the previous display.Interface Dial/ENTER Button
Press and turn to select an item,
then press to set your selection.
Move up, down, right and left to
select secondary menu.On Demand Multi-Use Display
TM
(Power) Button
Press to turn the audio system on
and off.VOL (Volume) Knob (Pushed out)
Turn to adjust the volume.
Page 229 of 518
228
uuAudio System Basic OperationuPlaying Hard Disc Drive (HDD) Audio
Features
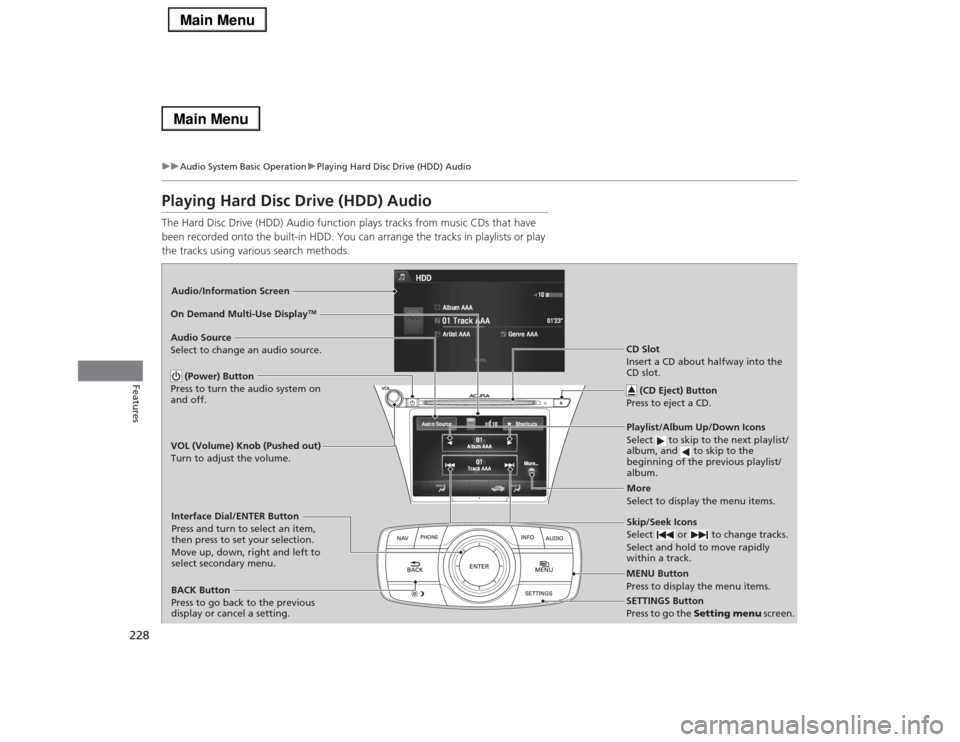
Playing Hard Disc Drive (HDD) AudioThe Hard Disc Drive (HDD) Audio function plays tracks from music CDs that have
been recorded onto the built-in HDD. You can arrange the tracks in playlists or play
the tracks using various search methods.Audio/Information Screen
MENU Button
Press to display the menu items.
CD Slot
Insert a CD about halfway into the
CD slot.
(CD Eject) Button
Press to eject a CD.Playlist/Album Up/Down Icons
Select to skip to the next playlist/
album, and to skip to the
beginning of the previous playlist/
album.
Audio Source
Select to change an audio source.
Skip/Seek Icons
Select or to change tracks.
Select and hold to move rapidly
within a track.
More
Select to display the menu items.
BACK Button
Press to go back to the previous
display or cancel a setting.Interface Dial/ENTER Button
Press and turn to select an item,
then press to set your selection.
Move up, down, right and left to
select secondary menu.
SETTINGS Button
Press to go the Setting menu screen. On Demand Multi-Use Display
TM
(Power) Button
Press to turn the audio system on
and off.VOL (Volume) Knob (Pushed out)
Turn to adjust the volume.
Page 233 of 518
uuAudio System Basic OperationuPlaying Hard Disc Drive (HDD) Audio
232Features
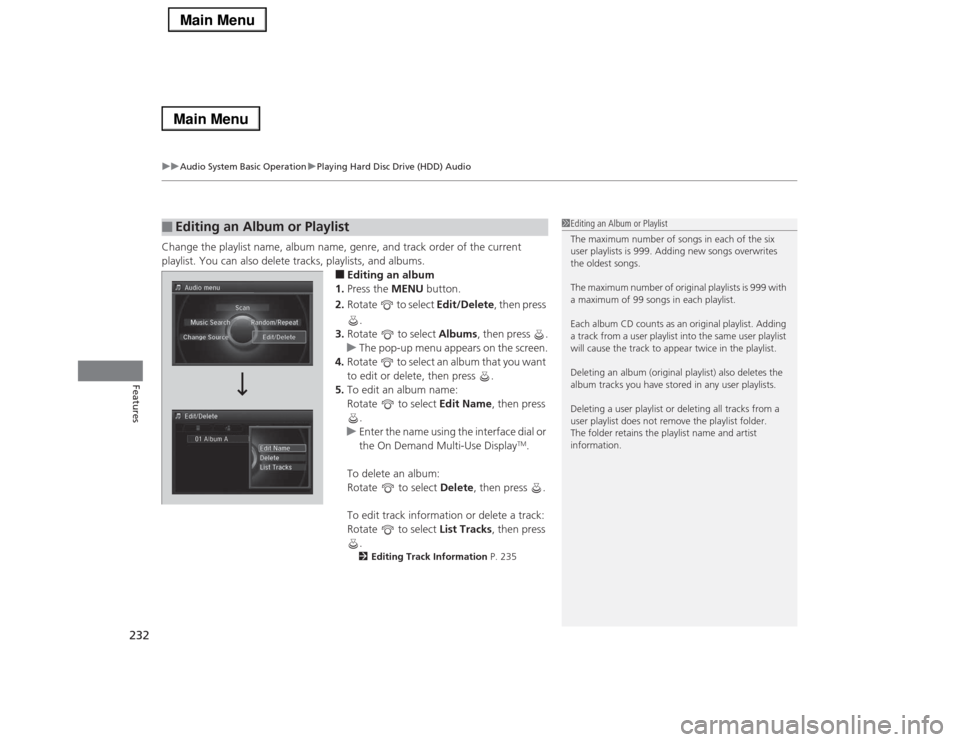
Change the playlist name, album name, genre, and track order of the current
playlist. You can also delete tracks, playlists, and albums.
■Editing an album
1.Press the MENU button.
2.Rotate to select Edit/Delete, then press
.
3.Rotate to select Albums, then press .
uThe pop-up menu appears on the screen.
4.Rotate to select an album that you want
to edit or delete, then press .
5.To edit an album name:
Rotate to select Edit Name, then press
.
uEnter the name using the interface dial or
the On Demand Multi-Use Display
TM.
To delete an album:
Rotate to select Delete, then press .
To edit track information or delete a track:
Rotate to select List Tracks, then press
.
2Editing Track Information P. 235
■
Editing an Album or Playlist
1Editing an Album or Playlist
The maximum number of songs in each of the six
user playlists is 999. Adding new songs overwrites
the oldest songs.
The maximum number of original playlists is 999 with
a maximum of 99 songs in each playlist.
Each album CD counts as an original playlist. Adding
a track from a user playlist into the same user playlist
will cause the track to appear twice in the playlist.
Deleting an album (original playlist) also deletes the
album tracks you have stored in any user playlists.
Deleting a user playlist or deleting all tracks from a
user playlist does not remove the playlist folder.
The folder retains the playlist name and artist
information.
Page 234 of 518
233
uuAudio System Basic OperationuPlaying Hard Disc Drive (HDD) Audio
Continued
Features
■Editing a playlist
1.Press the MENU button.
2.Rotate to select Edit/Delete, then press
.
3.Rotate to select Playlists, then press
.
uThe pop-up menu appears on the screen.
4.Rotate to select a playlist that you want
to edit or delete, then press .
5.To edit a playlist name:
Rotate to select Edit Name, then press
.
uEnter the name using the interface dial or
the On Demand Multi-Use Display
TM.
To delete a playlist:
Rotate to select Delete, then press .
To edit track information or delete a track:
Rotate to select List Tracks, then press
.
2Editing Track Information P. 235