2014.5 Peugeot 308 heating
[x] Cancel search: heatingPage 4 of 415
.
.
Visual search
Instrument panel 12
Indicator and warning lamps
1
3
ga
uges and indicators
2
8
Adjustment buttons
3
3
tr
ip computer
3
5
to
uch screen
3
9
Setting the date and time
4
6Remote control key
5
0
"Keyless e
n
try and Starting" with remote
control 57
"Keyless e
n
try and Starting"
on your person
5
9
Boot
6
2
Alarm
6
9
el
ectric windows
7
3
Panoramic sunroof
7
5
Fuel tank
7
6
Diesel misfuel prevention
7
7
Steering wheel adjustment
7
9
Front seats
8
0
Rear seats (hatchback) 8 5
Rear seats (SW) 8 6
Interior fittings
8
8
Front armrest
9
0
Boot fittings (hatchback)
9
4
Boot fittings (SW)
9
5
Heating and Ventilation
9
9
Heating
101
Manual air conditioning
1
01
Manual air conditioning (
to
uch screen)
1
03
Dual-zone digital air conditioning (
to
uch screen)
1
05
Front demist - defrost
1
10
Rear screen demist - defrost
1
11Driving recommendations
1
12
Starting-switching off the engine
1
13
Manual parking brake
1
20
el
ectric parking brake
1
21
Hill start assist
1
28
5-speed manual gearbox
1
29
6-speed manual gearbox
1
29
ge
ar shift indicator
1
30
Automatic gearbox
1
31
Dynamic pack
1
35
Stop & Start
1
36
Memorising speeds
1
39
Speed limiter
1
40
Cruise control
1
43
Active cruise control
1
46
Display of inter-vehicle time
1
54em
ergency collision alert system,
emergency collision braking system 1 58
Blind spot sensors 1 63
Parking sensors
1
66
Reversing camera
1
69
Park Assist
1
70
eco-driving
M onitoring Access
Comfort Driving
Contents
Page 9 of 415
7
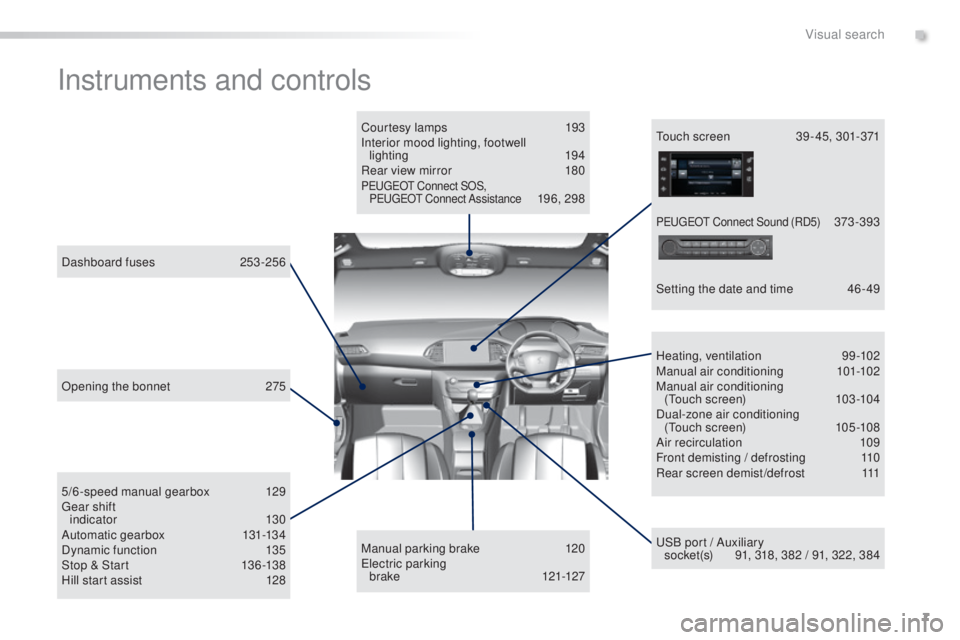
Instruments and controls
Courtesy lamps 193
Interior mood lighting, footwell lighting
194
Rear view mirror
1
80
PeugeOt Connect SOS,
PeugeO t Connect Assistance 196, 298
uS
B port / Auxiliary
socket(s)
9
1, 318, 382 / 91, 322, 384
5/6-speed manual gearbox
1
29
ge
ar shift
indic ator
13 0
Automatic gear box
13
1-13 4
Dynamic function
1
35
Stop & Start
1
36 -138
Hill start assist
1
28
Dashboard fuses
2
53-256
Heating, ventilation
9
9-102
Manual air conditioning
1
01-102
Manual air conditioning (
to
uch screen)
10
3 -104
Dual-zone air conditioning (
to
uch screen)
10
5 -108
Air recirculation
1
09
Front demisting / defrosting
1
10
Rear screen demist/defrost
1
11
Manual parking brake
1
20
el
ectric parking
brake
121-127
to
uch screen
3
9 - 45, 301-371
Setting the date and time
4
6 - 49
Opening the bonnet
2
75
PeugeO t C onnect Sound (RD5) 373 -393
.
Visual search
Page 17 of 415
15
Warning / indicator lamp State Cause Action / Observations
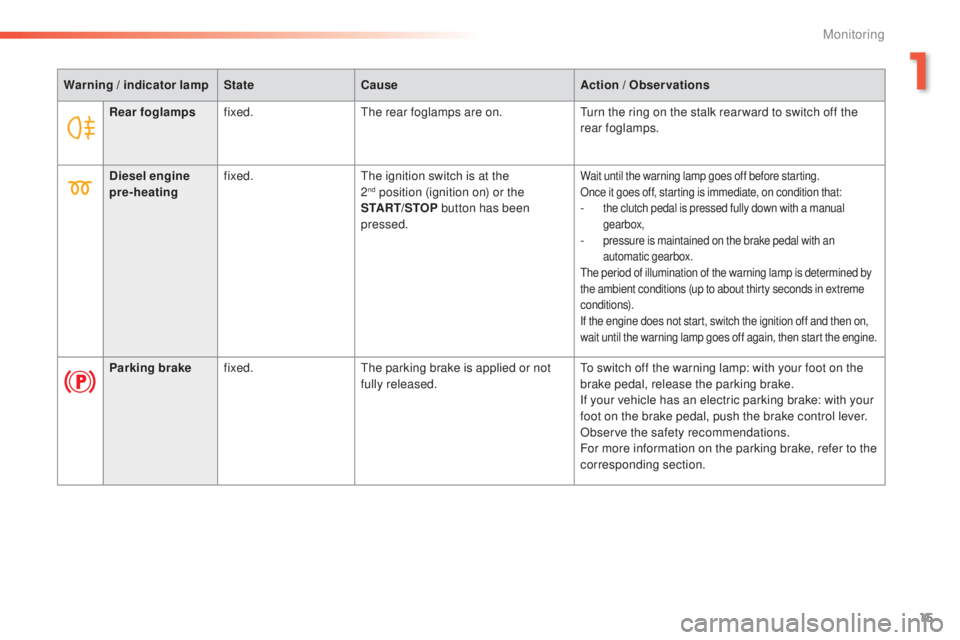
Rear foglamps fixed.
th
e rear foglamps are on.
tu
rn the ring on the stalk rear ward to switch off the
rear foglamps.
Diesel engine
pre-heating fixed.
th
e ignition switch is at the
2
nd position (ignition on) or the
ST ART/STOP button has been
pressed.Wait until the warning lamp goes off before starting.
Once it goes off, starting is immediate, on condition that:
- the clutch pedal is pressed fully down with a manual
gearbox,
- pressure is maintained on the brake pedal with an automatic gearbox.
th
e period of illumination of the warning lamp is determined by
the ambient conditions (up to about thirty seconds in extreme
conditions).
If the engine does not start, switch the ignition off and then on,
wait until the warning lamp goes off again, then start the engine.
Parking brake fixed.th e parking brake is applied or not
fully released.to s witch off the warning lamp: with your foot on the
brake pedal, release the parking brake.
If your vehicle has an electric parking brake: with your
foot on the brake pedal, push the brake control lever.
Observe the safety recommendations.
For more information on the parking brake, refer to the
corresponding section.
1
Monitoring
Page 41 of 415
39
touch screen
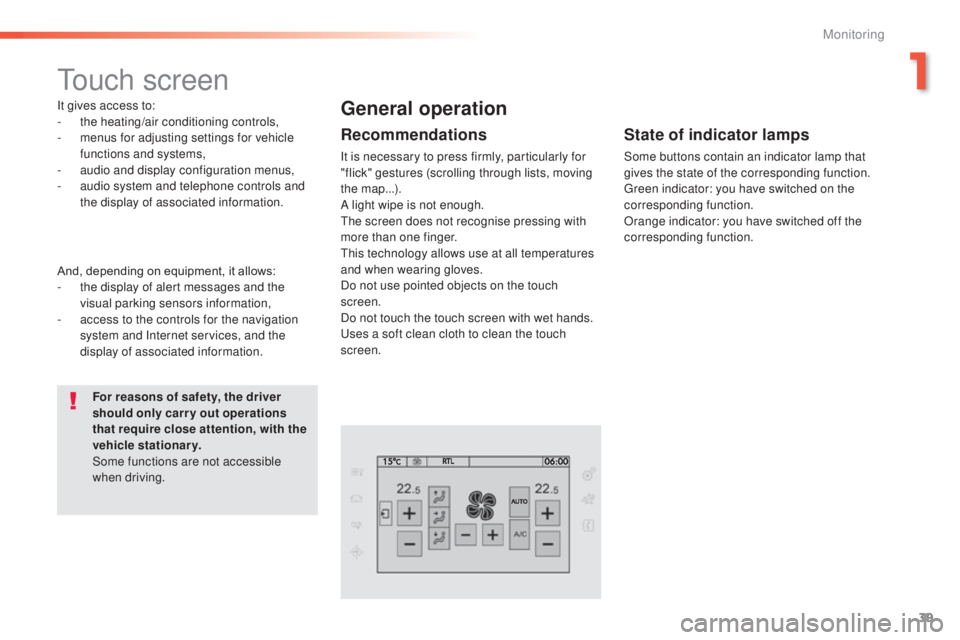
It gives access to:
- the heating/air conditioning controls,
-
m
enus for adjusting settings for vehicle
functions and systems,
-
a
udio and display configuration menus,
-
a
udio system and telephone controls and
the display of associated information.
For reasons of safety, the driver
should only carr y out operations
that require close attention, with the
vehicle stationary.
Some functions are not accessible
when driving.General operation
Recommendations
It is necessary to press firmly, particularly for
"flick" gestures (scrolling through lists, moving
the map...).
A light wipe is not enough.
th
e screen does not recognise pressing with
more than one finger.
th
is technology allows use at all temperatures
and when wearing gloves.
Do not use pointed objects on the touch
screen.
Do not touch the touch screen with wet hands.
us
es a soft clean cloth to clean the touch
screen.
And, depending on equipment, it allows:
-
t
he display of alert messages and the
visual parking sensors information,
-
a
ccess to the controls for the navigation
system and Internet services, and the
display of associated information.
State of indicator lamps
Some buttons contain an indicator lamp that
gives the state of the corresponding function.
gr
een indicator: you have switched on the
corresponding function.
Orange indicator: you have switched off the
corresponding function.
1
Monitoring
Page 42 of 415
40
use this button to go to the
secondary page.
us
e this button to return to the
primary page.
us
e this button for access to
additional information and to the
settings for certain functions.
us
e this button to confirm.
Use this button to quit.
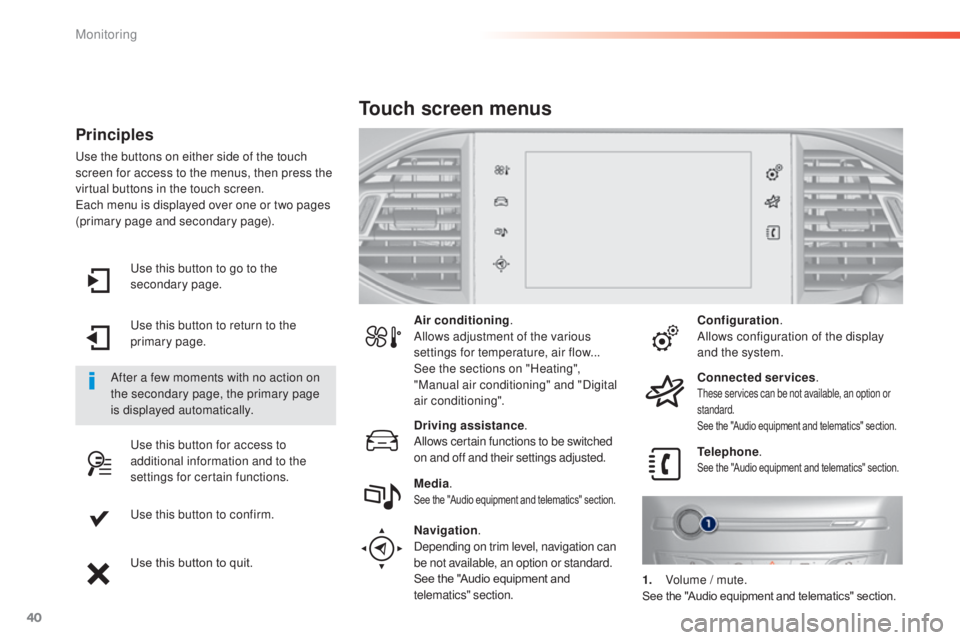
Principles
use the buttons on either side of the touch
screen for access to the menus, then press the
virtual buttons in the touch screen.
ea
ch menu is displayed over one or two pages
(primary page and secondary page).
After a few moments with no action on
the secondary page, the primary page
is displayed automatically. Air conditioning
.
Allows adjustment of the various
settings for temperature, air flow...
See the sections on "Heating",
"Manual air conditioning" and "Digital
air conditioning".
Touch screen menus
Driving assistance .
Allows certain functions to be switched
on and off and their settings adjusted. Telephone
.
See the "Audio equipment and telematics" section.Media.See the "Audio equipment and telematics" section.
Navigation .
Depending on trim level, navigation can
be not available, an option or standard.
See the "Audio equipment and
telematics" section. Configuration
.
Allows configuration of the display
and the system.
Connected services .
these services can be not available, an option or
standard.
See the "Audio equipment and telematics" section.
1. Volume / mute.See the "Audio equipment and telematics" section.
Monitoring
Page 85 of 415
83
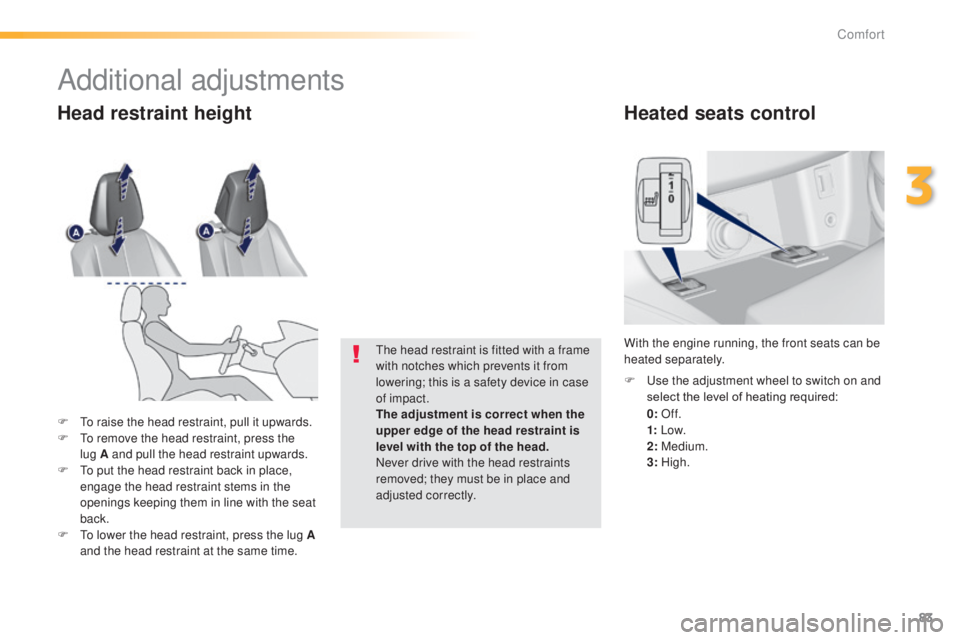
Heated seats control
0: Of f.
1: Low.
2: Medium.
3: High.
F
u
s
e the adjustment wheel to switch on and
select the level of heating required:
With the engine running, the front seats can be
heated separately.
F
to r
aise the head restraint, pull it upwards.
F
t
o r
emove the head restraint, press the
lug
A and pull the head restraint upwards.
F
t
o p
ut the head restraint back in place,
engage the head restraint stems in the
openings keeping them in line with the seat
back.
F
t
o l
ower the head restraint, press the lug A
and the head restraint at the same time.
th
e head restraint is fitted with a frame
with notches which prevents it from
lowering; this is a safety device in case
of impact.
The adjustment is correct when the
upper edge of the head restraint is
level with the top of the head.
Never drive with the head restraints
removed; they must be in place and
adjusted correctly.
Head restraint height
Additional adjustments
3
Comfort
Page 101 of 415
99
Heating and Ventilation
Air intake
the air circulating in the passenger compartment
is filtered and originates either from the outside via
the grille located at the base of the windscreen or
from the inside in air recirculation mode.
Controls
the incoming air follows various routes
depending on the controls selected by
the driver, the front passenger and rear
passengers, according to the level of
equipment.
th
e temperature control enables you to obtain
the level of comfort required by mixing the air of
the various circuits.
th
e air distribution control enables you to
select the air vents used in the passenger
compartment by the combined use of the
associated buttons.
th
e air flow control enables you to increase or
reduce the speed of the ventilation fan.
Depending on your vehicle, the controls are
accessible in the " Air conditioning" menu of
the touch screen or are grouped together on
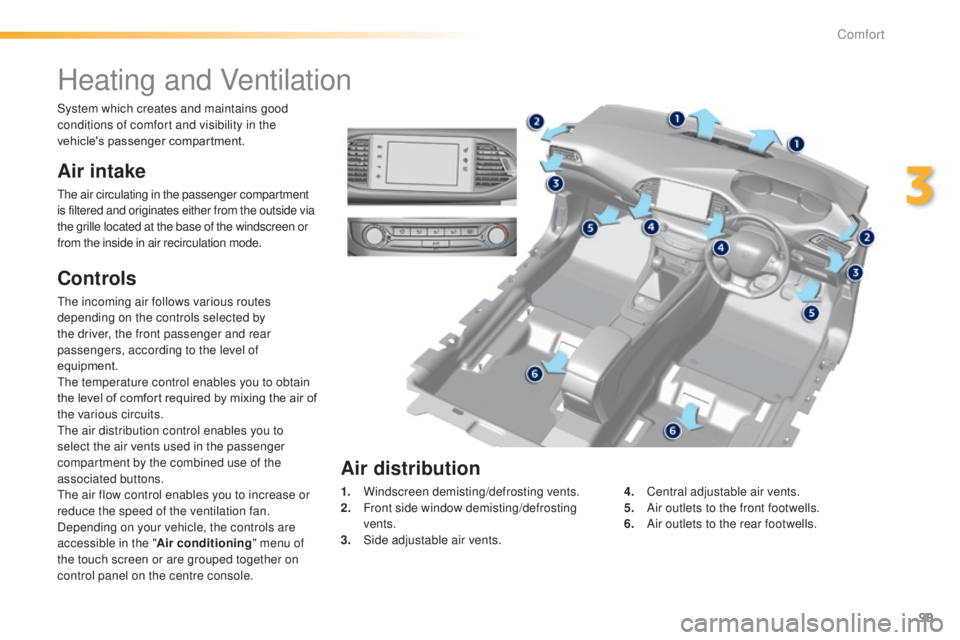
control panel on the centre console. 1.
W
indscreen demisting/defrosting vents.
2.
F
ront side window demisting/defrosting
vents.
3.
S
ide adjustable air vents.4.
C
entral adjustable air vents.
5.
A
ir outlets to the front footwells.
6.
A
ir outlets to the rear footwells.
Air distribution
System which creates and maintains good
conditions of comfort and visibility in the
vehicle's passenger compartment.
3
Comfort
Page 102 of 415
100
In order for these systems to be fully effective, follow the operation and maintenance
guidelines below:
F t
o o
btain an even air distribution, take care not to obstruct the exterior air intake grilles
located at the base of the windscreen, the nozzles, the vents and the air outlets, as well
as the air extractor located in the boot.
F
D
o not cover the sunshine sensor, located on the dashboard; this is used for regulation
of the air conditioning system.
F
O
perate the air conditioning system for at least 5 to 10 minutes, once or twice a month
to keep it in per fect working order.
F
e
n
sure that the passenger compartment filter is in good condition and have the filter
elements replaced regularly.
W
e recommend the use of a combined passenger compartment filter. t
h
anks to its
special active additive, it contributes to the purification of the air breathed by the
occupants and the cleanliness of the passenger compartment (reduction of allergic
symptoms, bad odours and greasy deposits).
F
t
o e
nsure correct operation of the air conditioning system, you are also advised to have
it checked regularly as recommended in the warranty and maintenance record.
F
I
f the system does not produce cold air, switch it off and contact a P
e
uge
Ot
dealer or
a qualified workshop.
Recommendations for ventilation and air conditioning
If after an extended stop in sunshine,
the interior temperature is very high, first
ventilate the passenger compartment for
a few moments.
Put the air flow control at a setting high
enough to quickly change the air in the
passenger compartment.
th
e air conditioning system does not
contain chlorine and does not present
any danger to the ozone layer.
th
e condensation created by the air
conditioning results in a discharge
of water under the vehicle which is
perfectly normal.
When towing the maximum load on a steep gradient in high temperatures, switching off the
air conditioning increases the available engine power and so improves the towing ability.
Stop & Start
the heating and air conditioning
systems only work when the engine
is running. t
o m
aintain a comfortable
temperature in the passenger
compartment, you can temporarily
deactivate the Stop & Start system (see
the corresponding section).
Comfort