2014.5 Citroen C4 engine
[x] Cancel search: enginePage 205 of 494

203
ToTaL & CITRoËn
Partners in performance
and protecting
the environment
Innovation in the search for
performance
For over 40 year, the TOTAL Research and D
evelopment departments have developed for
C
ITROËN, lubricants to match the latest technical
i
nnovations on CITR
oËn
vehicles, both for
competition
and for everyday motoring.
For you, this is an assurance that you will obtain of the
best
per formance for your engine.
Optimum protection for
your engine
By having your CITROËN vehicle serviced with TOTAL lubricants, you are c
ontributing towards improving the life and
p
er formances of your engine, while also
pro
tecting
t
he
e
nvironment.
prefers
10
Checks
Page 207 of 494

205
Fuel used for petrol
engines
The petrol engines are compatible with E
10 bio-petrol (containing 10 % ethanol),
c
onforming to European standards EN 228
and
EN 15376.
E85
type fuels (containing up to 85 % ethanol)
a
re reserved exclusively for vehicles marketed
f
or the use of this type of fuel (BioFlex
v
ehicles). The quality of the ethanol must
c
omply with European standard EN 15293.
Fuel used for Diesel
engines
The Diesel engines are compatible with biofuels which conform to current and future
E
uropean standards (Diesel fuel which
c
omplies with standard EN 590 mixed with a
b
iofuel which complies with standard
EN
14214) available at the pumps (containing
u
p to 7 % Fatty Acid Methyl Ester).
B30
biofuel can be used in certain Diesel
e
ngines. However, this use, even occasional,
r
equires strict application of the special
s
ervicing conditions. Contact a CITROËN
d
ealer or a qualified workshop.
The use of any other type of (bio)fuel
(vegetable
or animal oils, pure or diluted,
d
omestic fuel...) is strictly prohibited (risk of
d
amage to the engine and fuel system).
The
petrol
or
Diesel
engine
of
your
vehicle
is
f
itted
with
a
catalytic
converter,
a
device
which
h
elps
to
reduce
the
level
of
harmful
emissions
i
n
the
exhaust
gases.
For petrol engines, the use of unleaded fuel
is compulsory.
The
filler
neck
is
narrower,
admitting
unleaded
p
etrol
nozzles
only.
Fuel supply cut-off
Your vehicle is equipped with a safety device w hich cuts off the fuel supply in the event of a
collision. If you have put in the wrong fuel for
your vehicle, you must have the tank
drained and refilled with the correct
fuel before you star t the engine.
10
Checks
Page 209 of 494

207
Running out of fuel (Diesel)
1.6 HDi engine2.0 HDi engineOn vehicles fitted with HDi engines, the fuel s
ystem must be primed if you run out of fuel;
r
efer to the corresponding engine compartment
v
iew.
If
the tank on your vehicle is fitted with a
m
isfuel prevention device, refer to the "Misfuel
p
revention
(
Diesel)"
s
ection.
BlueHDi 100, 115 and
120
engines
If the engine does not start first time, d
on't keep trying but start the procedure
a
gain from the beginning. F
F
ill the fuel tank with at least five litres of
d
iesel.
F
O
pen the bonnet.
F
I
f necessary, unclip the styling cover for
a
ccess to the priming pump.
F
S
queeze and release the priming pump
r
epeatedly until resistance is felt (there m
ay be resistance at the first press).
F O perate the starter until the engine starts
(
if the engine does not start at the first
a
ttempt, wait around 15 seconds before
t
rying
ag
ain).
F
I
f the engine does not start after a few
a
ttempts, operate the priming pump again
t
hen start the engine.
F
R
efit the styling cover and clip it in place.
F
C
lose the bonnet.F
F
ill the fuel tank with at least five litres of
D
iesel.
F
O
pen the bonnet.
F
I
f necessary, unclip the style cover for
access to the priming pump.
F
S
lacken the bleed screw.
F
S
queeze and release the priming pump r
epeatedly until fuel appears in the t
ransparent p ipe.
F
T
ighten the bleed screw.
F
O
perate the starter until the engine starts
(
if the engine fails to start at the first
a
ttempt, wait around 15 seconds before
t
rying
ag
ain).
F
I
f the engine fails to start after a few
a
ttempts, operate the priming pump again,
t
hen the starter.
F
P
ut the style cover back in position and
c
lip it in place, ensuring that it has clipped
c
o r r e c t l y.
F
C
lose the bonnet.
F
F
ill the fuel tank with at least five litres of
D
iesel.
F
S
witch on the ignition (without starting the
e
ngine).
F
W
ait around 6 seconds and switch off the
ig
nition.
F
R
epeat the operation 10 times.
F
O
perate the starter to run the engine.
10
Checks
Page 210 of 494

208
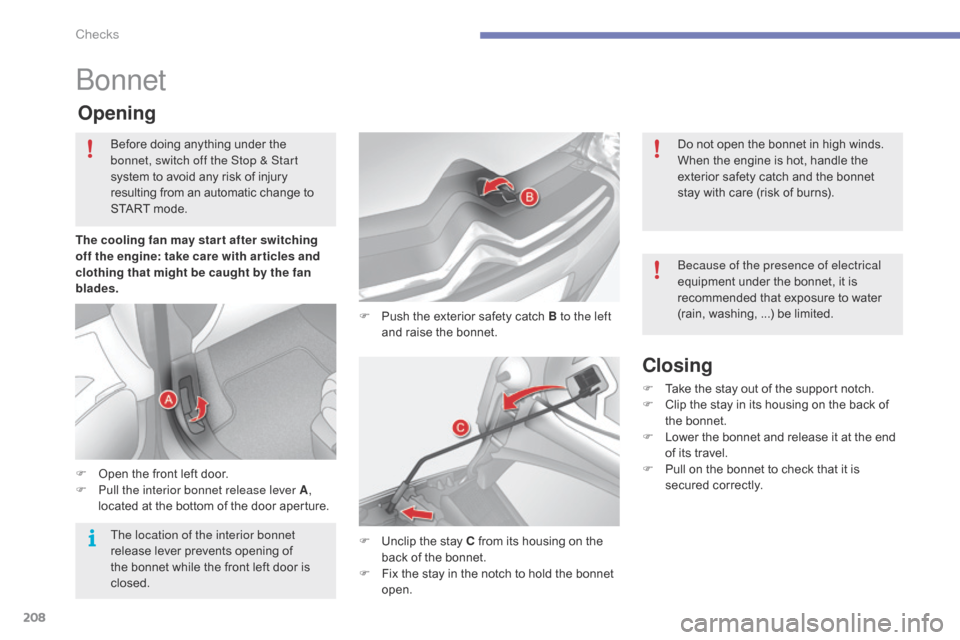
bonnet
F Push the exterior safety catch B to the left
and raise the bonnet.
Opening
F Open the front left door.
F P ull the interior bonnet release lever A,
located
at the bottom of the door aperture.
F
U
nclip the stay C from its housing on the
b
ack of the bonnet.
F
F
ix the stay in the notch to hold the bonnet
ope
n.
Closing
F Take the stay out of the support notch.
F C lip the stay in its housing on the back of
t
he bonnet.
F
L
ower the bonnet and release it at the end
o
f its travel.
F
P
ull on the bonnet to check that it is
s
ecured
c
orrectly.
The cooling fan may star t after switching
off the engine: take care with ar ticles and
clothing that might be caught by the fan
blades.
Before
doing
anything
under
the
b
onnet, switch off the Stop & Start
system
to
avoid
any
risk
of
injury
r
esulting
from
an
automatic
c
hange
t
o
S
TART
mode.
Do not open the bonnet in high winds.
When the engine is hot, handle the
e
xterior safety catch and the bonnet
s
tay with care (risk of burns).
be
cause of the presence of electrical
equipment under the bonnet, it is
r
ecommended that exposure to water
(
rain,
w
ashing, ...) be limited.
The location of the interior bonnet
release
lever
prevents
opening
of
t
he
bonnet
while
the
front
left
door
is
c
losed.
Checks
Page 211 of 494

209
Petrol engines
The various caps and covers allow access for checking the levels of the various fluids and for r
eplacing certain components.
1.
P
ower
s
teering
r
eservoir.
2.
S
creenwash and headlamp wash reservoir.
3.
C
oolant
r
eservoir.
4.
B
rake fluid reservoir.
5.
B
attery/Fuses.
6.
F
usebox.
7.
A
ir filter.
8.
E
ngine oil dipstick.
9.
E
ngine oil filler cap.
10
Checks
Page 212 of 494

210
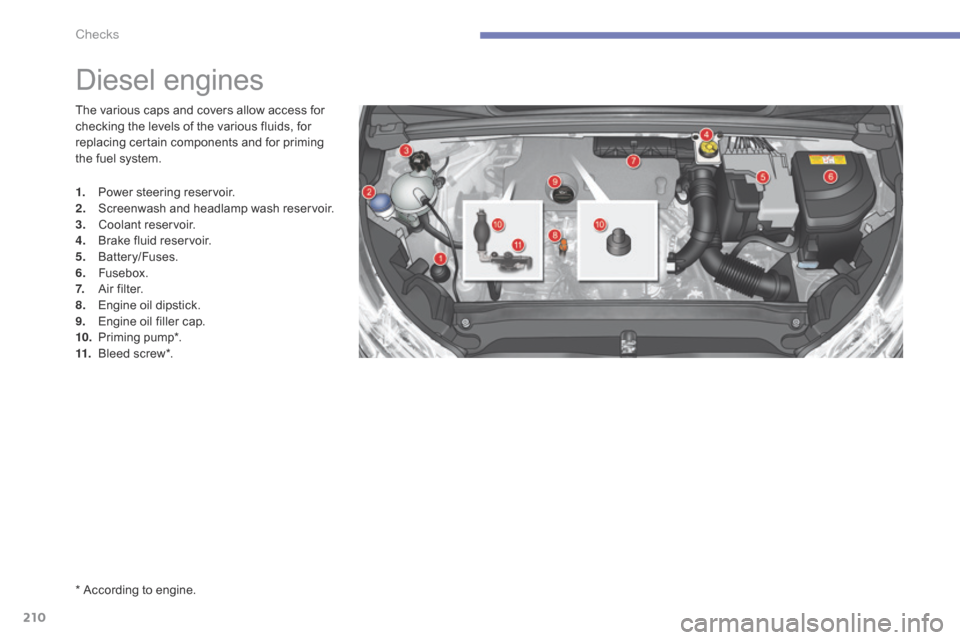
* According to engine.
Diesel engines
The various caps and covers allow access for checking the levels of the various fluids, for
r
eplacing certain components and for priming
t
he fuel system.
1.
P
ower
s
teering
r
eservoir.
2.
S
creenwash and headlamp wash reservoir.
3.
C
oolant
r
eservoir.
4.
B
rake fluid reservoir.
5.
B
attery/Fuses.
6.
F
usebox.
7.
A
ir filter.
8.
E
ngine oil dipstick.
9.
E
ngine oil filler cap.
10.
P
riming
pu
mp*.
11.
B
leed screw*.
Checks
Page 213 of 494

211
Checking levels
The check is carried out either when the ignition is switched on using the
o
il level indicator in the instrument
p
anel for vehicles so equipped, or
u
sing the dipstick.
Engine oil level
Checking using
the dipstick
Check all of these levels regularly, in line with the manufacturer's service schedule. Top them up if necessary, unless other wise indicated.
I f a level drops significantly, have the corresponding system checked by a CITROËN dealer or a qualified workshop.
It
is normal to top up the oil level between
t
wo services (or oil changes). CITROËN
r
ecommends that you check the level, and top
u
p if necessary, every 3 000 miles (5 000 kms).A
= MA X
B
= MINIf
you find that the level is above the A mark or
belo
w the B mark, do not star t the engine.
-
I
f the level is above the MAX
mark (risk
o
f damage to the engine), contact a
C
ITROËN dealer or a qualified workshop.
-
I
f the level is below the MIN
mark, you
m
ust top up the engine oil.
Oil grade
Before topping-up the oil or changing the oil, check that the oil is the correct grade for your
e
ngine and conforms to the manufacturer's
r
ecommendations.
Take
care
when
working
under
the
b
onnet,
as
certain
areas
of
the
engine
m
ay
be
extremely
hot
(risk
of
burns)
and
t
he
cooling
fan
could
start
at
any
time
(
even
with
the
ignition
off).
To
ensure
that
the
reading
is
correct,
y
our
vehicle
must
be
parked
on
a
level
s
ur face
with
the
engine
having
been
off
f
or
more
than
30
minutes. Refer
to
the
"Petrol
engine"
or
"Diesel
engine"
s
ection
for
the
location
of
the
dipstick
in
the
e
ngine
compartment
of
your
vehicle.
F
T
ake
the
dipstick
by
its
coloured
grip
and
r
emove
it
completely.
F
W
ipe
the
end
of
the
dipstick
using
a
clean
n
on-fluffy
cloth.
F
R
efit
the
dipstick
and
push
fully
down,
then
p
ull
it
out
again
to
make
the
visual
check:
t
he
correct
level
is
between
the
marks
A
and
B
.
10
Checks
Page 214 of 494

212
Topping up the engine oil level
Refer to the "Petrol engine" or "Diesel engine" section for the location of the oil filler cap in the
engine
compartment of your vehicle.
F
U
nscrew the oil filler cap to reveal the filler
a
perture.
F
A
dd oil in small quantities, avoiding any
s
pills on engine components (risk of fire).
F
W
ait a few minutes before checking the
l
evel again using the dipstick.
F
A
dd more oil if necessary.
F
A
fter checking the level, carefully refit the
o
il filler cap and the dipstick in its tube.
After
topping up the oil, the check when
s
witching on the ignition with the oil level
i
ndicator in the instrument panel is not valid
d
uring the 30 minutes after topping up.
Engine oil change
Refer to the manufacturer's service schedule for details of the interval for this operation.
In
order to maintain the reliability of the engine
a
nd emission control system, never use
a
dditives in the engine oil.
Brake fluid level
Changing the fluid
Refer to the manufacturer's service schedule for details of the interval for this operation.
Fluid specification
The brake fluid must conform to the manufacturer's r ecommendations.
The
brake fluid level should be close
t
o the "MA X" mark. If it is not, check
t
he brake pad wear.
Power steering
fluid level
The power steering fluid level should b
e close to the "MA X" mark. With the e
ngine cold, unscrew the cap to check
t
he level.
Checks