Page 56 of 116

Equipment operation
50
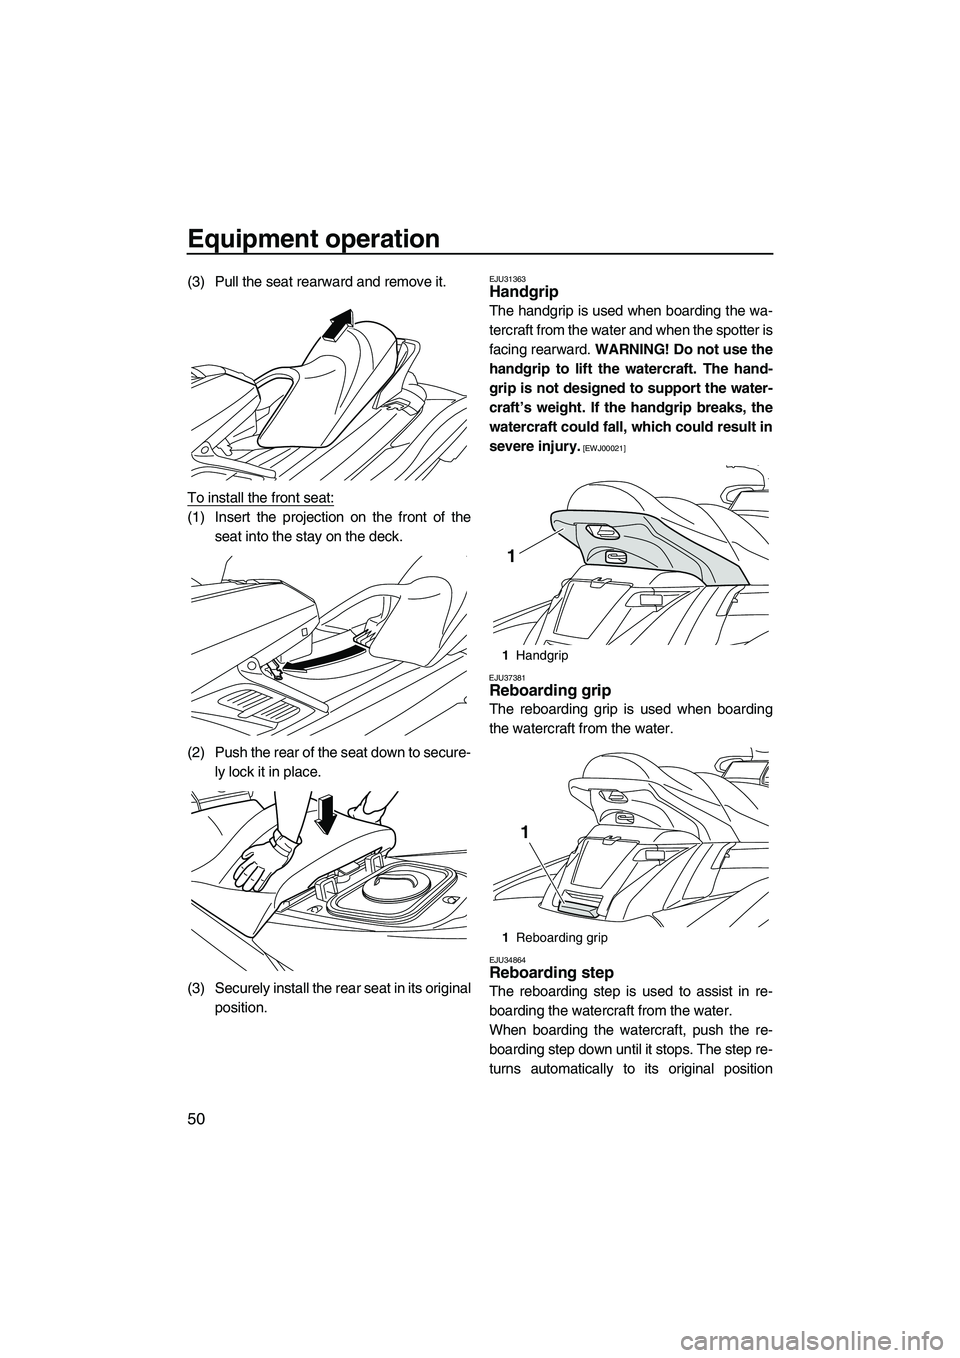
(3) Pull the seat rearward and remove it.
To install the front seat:
(1) Insert the projection on the front of theseat into the stay on the deck.
(2) Push the rear of the seat down to secure- ly lock it in place.
(3) Securely install the rear seat in its original position.
EJU31363Handgrip
The handgrip is used when boarding the wa-
tercraft from the water and when the spotter is
facing rearward. WARNING! Do not use the
handgrip to lift the watercraft. The hand-
grip is not designed to support the water-
craft’s weight. If the handgrip breaks, the
watercraft could fall, which could result in
severe injury.
[EWJ00021]
EJU37381
Reboarding grip
The reboarding grip is used when boarding
the watercraft from the water.
EJU34864Reboarding step
The reboarding step is used to assist in re-
boarding the watercraft from the water.
When boarding the watercraft, push the re-
boarding step down until it stops. The step re-
turns automatically to its original position
1 Handgrip
1 Reboarding grip
1
1
UF2S71E0.book Page 50 Tuesday, August 21, 2012 2:33 PM
Page 58 of 116
![YAMAHA FX HO 2013 Owners Manual Equipment operation
52
breaks, the watercraft could fall, which
could result in severe injury.
[EWJ01510]
EJU34892
Pull-up cleats (FX Cruiser SHO)
The pull-up cleats are used to attach a rope to
the YAMAHA FX HO 2013 Owners Manual Equipment operation
52
breaks, the watercraft could fall, which
could result in severe injury.
[EWJ01510]
EJU34892
Pull-up cleats (FX Cruiser SHO)
The pull-up cleats are used to attach a rope to
the](/manual-img/51/49770/w960_49770-57.png)
Equipment operation
52
breaks, the watercraft could fall, which
could result in severe injury.
[EWJ01510]
EJU34892
Pull-up cleats (FX Cruiser SHO)
The pull-up cleats are used to attach a rope to
the watercraft when mooring it.
To use a pull-up cleat, pull it up. The pull-up
cleat returns automatically to its original posi-
tion when released. WARNING! Do not use
the pull-up cleats to lift the watercraft. The
pull-up cleats are not designed to support
the watercraft’s weight. If the pull-up
cleats break, the watercraft could fall,
which could result in severe injury.
[EWJ00821]
EJU42290
Storage compartments
This watercraft is equipped with the following
storage compartments.
Only the securely closed watertight storage
compartments are waterproof. If you carry ob- jects that must be kept dry, put them in a wa-
terproof bag.
Make sure that the storage compartments are
closed securely before operating the water-
craft.
EJU42210Bow storage compartment
The bow storage compartment is located un-
der the hood.
To open the bow storage compartment:
Pull the hood latch rearward, and then lift up
the rear of the hood.
1
Cleat
1 Pull-up cleat
1
1
1Hood latch
1 Bow storage compartment
Bow storage compartment:
Capacity: 90.0 L (23.8 US gal, 19.8 Imp.gal)
Load limit:
5.0 kg (11 lb)
1
1
UF2S71E0.book Page 52 Tuesday, August 21, 2012 2:33 PM
Page 59 of 116
Equipment operation
53
To close the bow storage compartment:
Push the rear of the hood down to securely
lock it in place.
To drain water from the bow storage compart-
ment:
(1) Remove the drain plug on the bottom ofthe storage compartment to drain the wa-
ter into the engine compartment.
(2) Securely install the drain plug in its origi- nal position.
EJU35163Glove compartment
The glove compartment is located in front of
the seat. To open the glove compartment:
Turn the glove compartment knob 90° to the
left or right, and then lift up the lid.
1
Drain plug
1
1Glove compartment knob
1 Glove compartment
Glove compartment:
Capacity: 7.0 L (1.8 US gal, 1.5 Imp.gal)
Load limit: 1.0 kg (2 lb)
1
1
UF2S71E0.book Page 53 Tuesday, August 21, 2012 2:33 PM
Page 60 of 116

Equipment operation
54
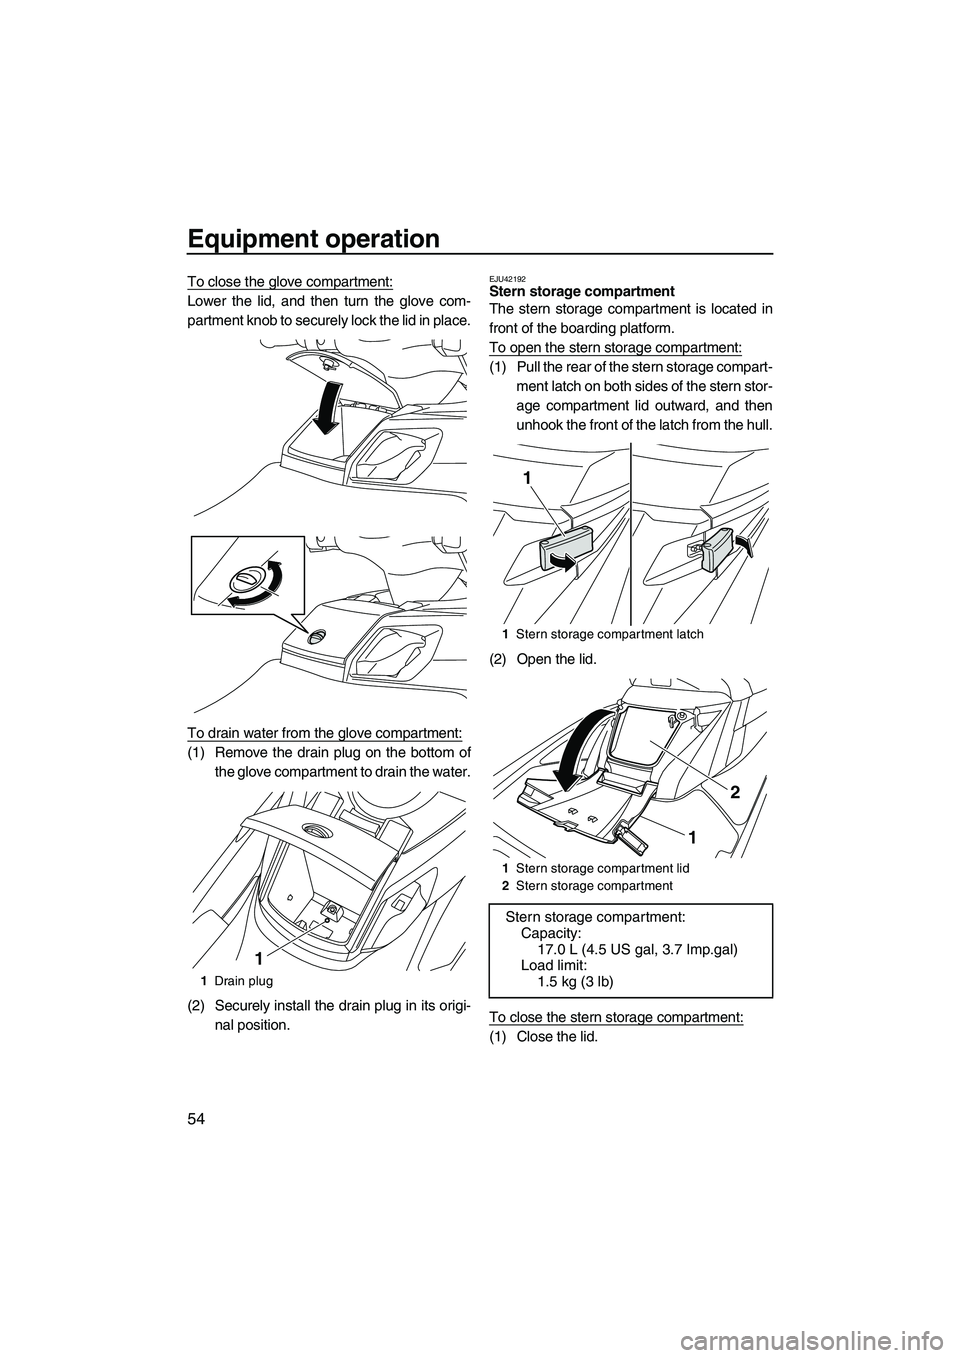
To close the glove compartment:
Lower the lid, and then turn the glove com-
partment knob to securely lock the lid in place.
To drain water from the glove compartment:
(1) Remove the drain plug on the bottom ofthe glove compartment to drain the water.
(2) Securely install the drain plug in its origi- nal position.
EJU42192Stern storage compartment
The stern storage compartment is located in
front of the boarding platform.
To open the stern storage compartment:
(1) Pull the rear of the stern storage compart-ment latch on both sides of the stern stor-
age compartment lid outward, and then
unhook the front of the latch from the hull.
(2) Open the lid.
To close the stern storage compartment:
(1) Close the lid.
1 Drain plug
1
1Stern storage compartment latch
1 Stern storage compartment lid
2 Stern storage compartment
Stern storage compartment:
Capacity:
17.0 L (4.5 US gal, 3.7 Imp.gal)
Load limit: 1.5 kg (3 lb)
1
2
1
UF2S71E0.book Page 54 Tuesday, August 21, 2012 2:33 PM
Page 61 of 116

Equipment operation
55
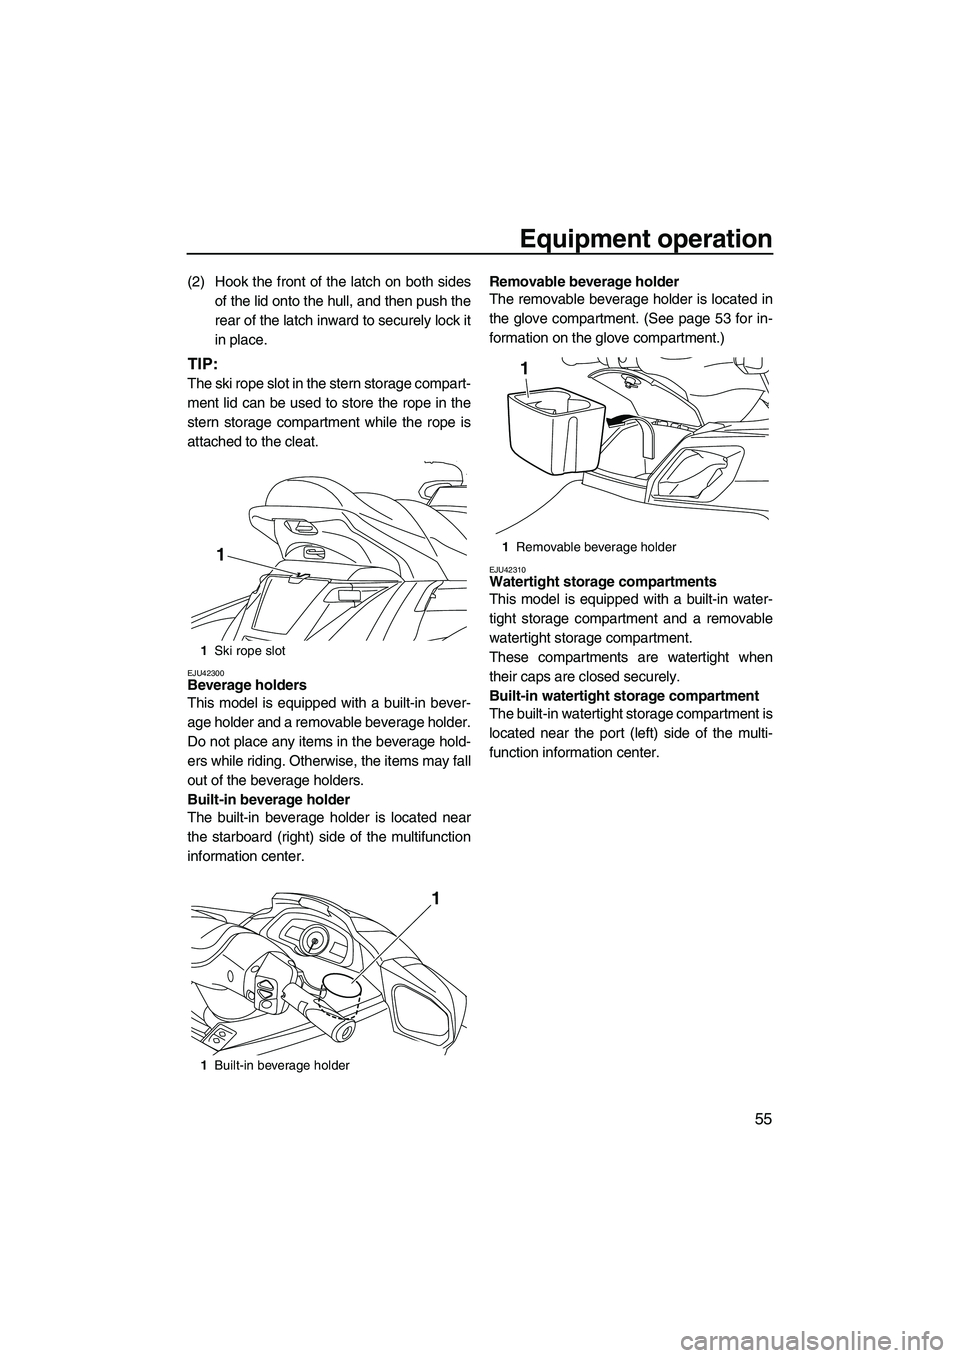
(2) Hook the front of the latch on both sidesof the lid onto the hull, and then push the
rear of the latch inward to securely lock it
in place.
TIP:
The ski rope slot in the stern storage compart-
ment lid can be used to store the rope in the
stern storage compartment while the rope is
attached to the cleat.
EJU42300Beverage holders
This model is equipped with a built-in bever-
age holder and a removable beverage holder.
Do not place any items in the beverage hold-
ers while riding. Otherwise, the items may fall
out of the beverage holders.
Built-in beverage holder
The built-in beverage holder is located near
the starboard (right) side of the multifunction
information center. Removable beverage holder
The removable beverage holder is located in
the glove compartment. (See page 53 for in-
formation on the glove compartment.)
EJU42310Watertight storage compartments
This model is equipped with a built-in water-
tight storage compartment and a removable
watertight storage compartment.
These compartments are watertight when
their caps are closed securely.
Built-in watertight storage compartment
The built-in watertight storage compartment is
located near the port (left) side of the multi-
function information center.
1
Ski rope slot
1 Built-in beverage holder
1
1
1Removable beverage holder
1
UF2S71E0.book Page 55 Tuesday, August 21, 2012 2:33 PM
Page 62 of 116

Equipment operation
56
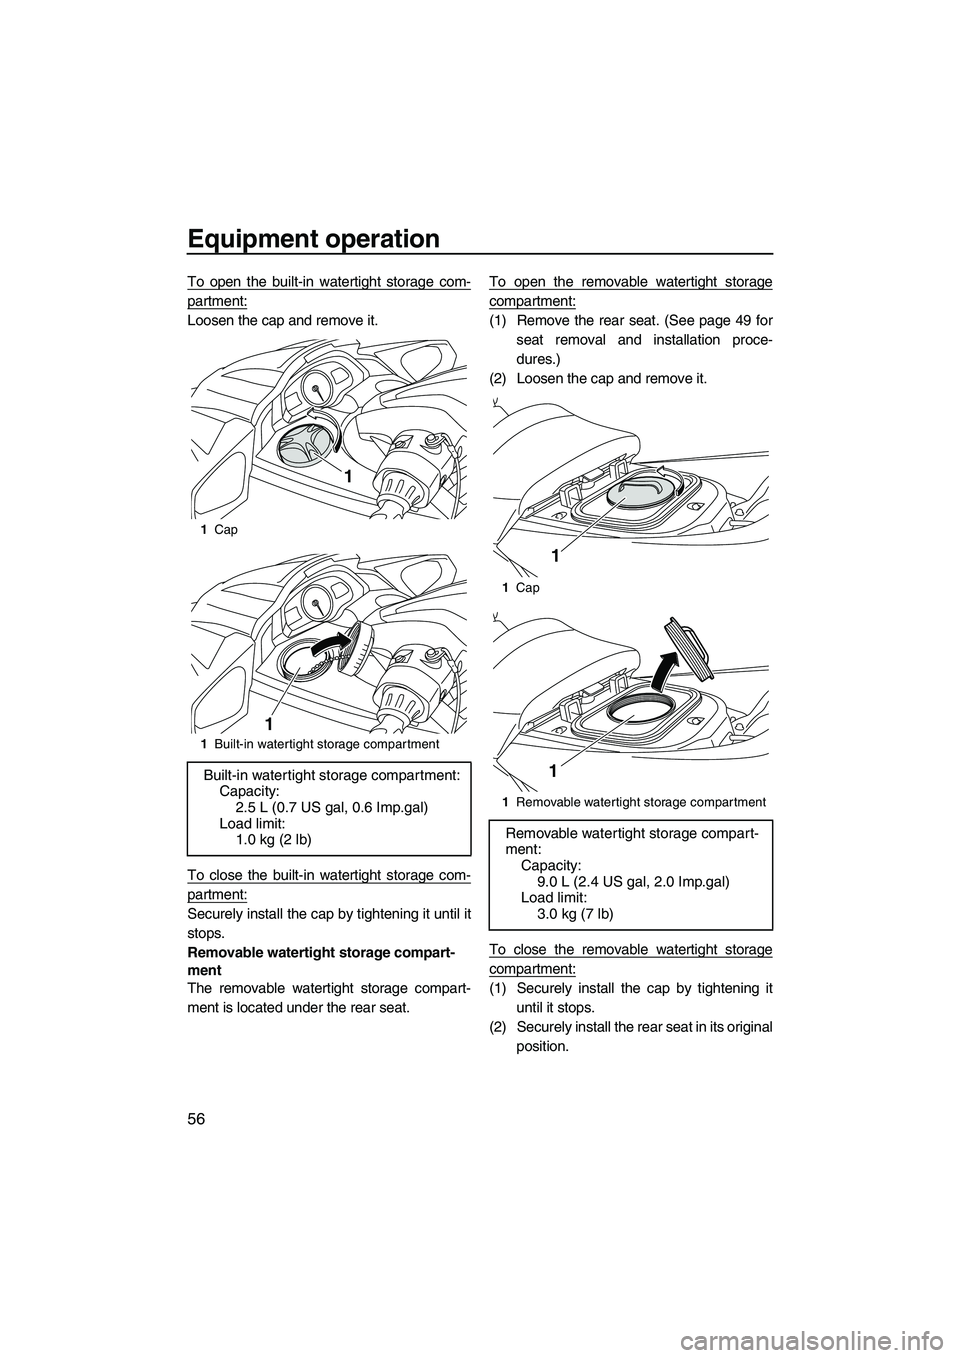
To open the built-in watertight storage com-
partment:
Loosen the cap and remove it.
To close the built-in watertight storage com-
partment:
Securely install the cap by tightening it until it
stops.
Removable watertight storage compart-
ment
The removable watertight storage compart-
ment is located under the rear seat.To open the removable watertight storage
compartment:
(1) Remove the rear seat. (See page 49 for
seat removal and installation proce-
dures.)
(2) Loosen the cap and remove it.
To close the removable watertight storage
compartment:
(1) Securely install the cap by tightening it until it stops.
(2) Securely install the rear seat in its original position.
1Cap
1 Built-in watertight storage compartment
Built-in watertight storage compartment:
Capacity:2.5 L (0.7 US gal, 0.6 Imp.gal)
Load limit: 1.0 kg (2 lb)
1
1
1Cap
1 Removable watertight storage compartment
Removable watertight storage compart-
ment:
Capacity:
9.0 L (2.4 US gal, 2.0 Imp.gal)
Load limit: 3.0 kg (7 lb)
1
1
UF2S71E0.book Page 56 Tuesday, August 21, 2012 2:33 PM
Page 63 of 116
Equipment operation
57
EJU42390Fire extinguisher holder and cover
The fire extinguisher holder and cover are lo-
cated in the bow storage compartment.
To use the fire extinguisher holder and cover:
(1) Pull the hood latch rearward, and then liftup the rear of the hood.
(2) Unhook the band and remove the fire ex- tinguisher cover.
(3) Place the fire extinguisher in the holder, and then place the cover over the fire ex-
tinguisher.
(4) Securely fasten the cover and the fire ex- tinguisher with the band.
(5) Push the rear of the hood down to se- curely lock it in place. Make sure that the hood is securely closed before using the
watercraft.
1
Hood latch
1 Fire extinguisher holder and cover
2 Band
1
1
2
UF2S71E0.book Page 57 Tuesday, August 21, 2012 2:33 PM
Page 65 of 116
Operation and handling requirements
59
(5) Loosen the fuel filler cap and remove it.
(6) Slowly add fuel to the fuel tank.
(7) Stop filling when the fuel level reachesapproximately 50 mm (2 in) from the top
of the fuel tank. Do not overfill the fuel
tank. Because fuel expands when it heats
up, heat from the engine or the sun can
cause fuel to spill out of the fuel tank. Do not leave the watercraft with a full tank in
direct sunlight.
(8) Wipe up any spilled fuel immediately with a dry cloth.
(9) Securely install the fuel filler cap by tight- ening it until it clicks.
(10) Push the rear of the hood down to se- curely lock it in place. Make sure that the
fuel filler cap and the hood are securely
closed before using the watercraft.
(11) Securely install the seats in their original positions.
1Fuel filler cap
Fuel tank capacity:
70 L (18.5 US gal, 15.4 Imp.gal)
1
1Approximately 50 mm (2 in) from top of the
fuel tank
1
UF2S71E0.book Page 59 Tuesday, August 21, 2012 2:33 PM