2013 VOLVO V60 battery warning
[x] Cancel search: battery warningPage 5 of 422

Table of contents
* Option/accessory, for more information, see Introduction.3
03
03 Your driving environment
Instruments and controls.......................... 68
Volvo Sensus ........................................... 77
Key positions............................................ 78
Seats......................................................... 80
Steering wheel.......................................... 85
Lighting..................................................... 86
Wipers and washing.................................. 98
Windows, rearview and door mirrors...... 101
Compass*............................................... 106
Power sunroof*....................................... 107
Alcolock*................................................. 109
Starting the engine.................................. 113
Starting the engine – Flexifuel.................118
Starting the engine – external battery..... 120
Gearboxes............................................... 121
DRIVe Start/Stop*................................... 127
All-wheel drive – AWD*...........................134
Foot brake............................................... 135
Parking brake.......................................... 137
HomeLink
�Ÿ *............................................ 141
04
04 Driver support
DSTC – Stability and traction control sys-
tem.......................................................... 146
Road sign information - RSI*.................. 148
Speed limiter*.......................................... 150
Cruise control*........................................ 152
Adaptive cruise control*.......................... 154
Distance Warning*..................................165
City Safety™........................................... 168
Collision Warning with Auto Brake &
Pedestrian Protection*............................ 173
Driver Alert System*................................ 181
Driver Alert System - DAC*.....................182
Driver Alert System - LDW*..................... 185
Park assist syst*...................................... 188
Park assist camera*................................ 191
BLIS* – Blind Spot Information System. . 194
05
05 Comfort and driving pleasure
Menus and messages............................. 200
Menu source MY CAR............................202
Climate control........................................ 210
Fuel-driven engine block heater and pas-
senger compartment heater*.................. 220
Additional heater*.................................... 223
Trip computer......................................... 224
Adapting driving characteristics............. 226
Comfort inside the passenger compart-
ment........................................................ 227
ProCarManuals.com
Page 31 of 422

01 Safety
When the systems deploy01
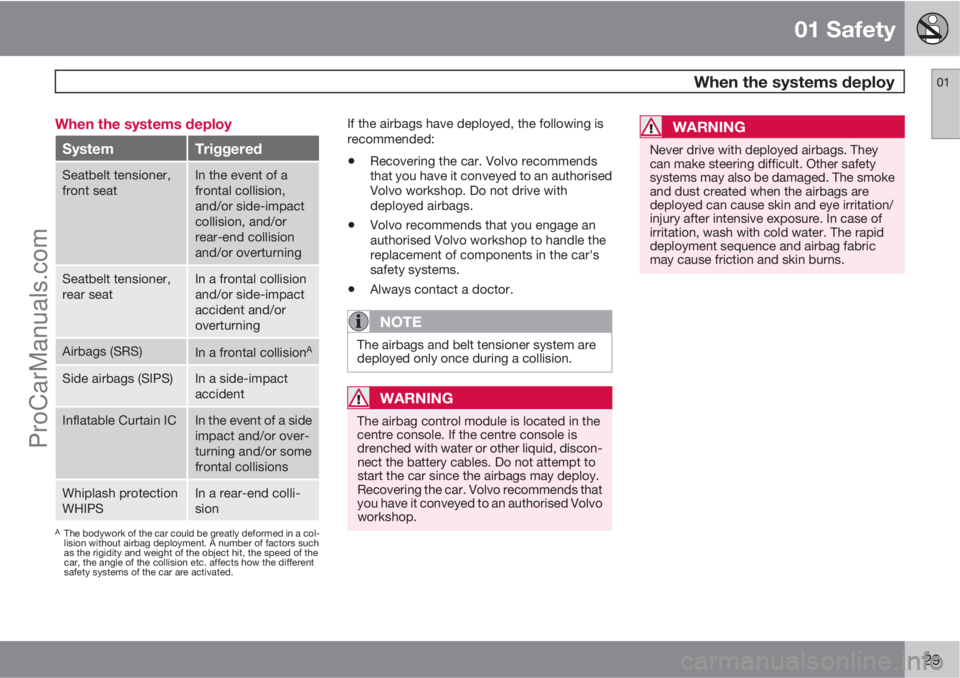
29 When the systems deploy
SystemTriggered
Seatbelt tensioner,
front seatIn the event of a
frontal collision,
and/or side-impact
collision, and/or
rear-end collision
and/or overturning
Seatbelt tensioner,
rear seatIn a frontal collision
and/or side-impact
accident and/or
overturning
Airbags (SRS)In a frontal collisionA
Side airbags (SIPS)In a side-impact
accident
Inflatable Curtain ICIn the event of a side
impact and/or over-
turning and/or some
frontal collisions
Whiplash protection
WHIPSIn a rear-end colli-
sion
AThe bodywork of the car could be greatly deformed in a col-
lision without airbag deployment. A number of factors such
as the rigidity and weight of the object hit, the speed of the
car, the angle of the collision etc. affects how the different
safety systems of the car are activated.
If the airbags have deployed, the following is
recommended:
•Recovering the car. Volvo recommends
that you have it conveyed to an authorised
Volvo workshop. Do not drive with
deployed airbags.
•Volvo recommends that you engage an
authorised Volvo workshop to handle the
replacement of components in the car's
safety systems.
•Always contact a doctor.
NOTE
The airbags and belt tensioner system are
deployed only once during a collision.
WARNING
The airbag control module is located in the
centre console. If the centre console is
drenched with water or other liquid, discon-
nect the battery cables. Do not attempt to
start the car since the airbags may deploy.
Recovering the car. Volvo recommends that
you have it conveyed to an authorised Volvo
workshop.
WARNING
Never drive with deployed airbags. They
can make steering difficult. Other safety
systems may also be damaged. The smoke
and dust created when the airbags are
deployed can cause skin and eye irritation/
injury after intensive exposure. In case of
irritation, wash with cold water. The rapid
deployment sequence and airbag fabric
may cause friction and skin burns.
ProCarManuals.com
Page 59 of 422

02 Locks and alarm
Locking/unlocking
02
* Option/accessory, for more information, see Introduction.57 From the outside
The remote control key can lock/unlock all
doors and the tailgate simultaneously. Different
sequences for unlocking can be selected, see
"Unlocking with the remote control key" page
46.
In order that the lock sequence can be acti-
vated, the driver's door must be closed - if any
of the other doors or the tailgate is open, then
it/they is/are locked and the alarm is activated
only when it/they are closed. With the Key-
less* system all the doors and tailgate must be
closed.
NOTE
Be aware of the risk of locking the remote
control key in the car.
If it is not possible to lock/unlock with the
remote control key, the battery may be dis-
charged - lock or unlock the left-hand front
door with the detachable key blade, see
page 48.
NOTE
Remember that the alarm is triggered when
the door is opened after being unlocked
with the key blade - the alarm is switched
off when the remote control key is inserted
into the ignition switch.
WARNING
Be aware of the risk of being locked in the
car when it is locked from the outside using
the remote control key - it is then not pos-
sible to open any of the doors from the
inside with the door controls. Read more
about this in the section "Deadlocks" later
on.
Automatic relockingIf none of the doors or the tailgate is opened
within 2 minutes of unlocking, all are locked
again automatically. This function reduces the
risk that the car is left unlocked unintentionally.
(For cars with alarm, see page 63.)
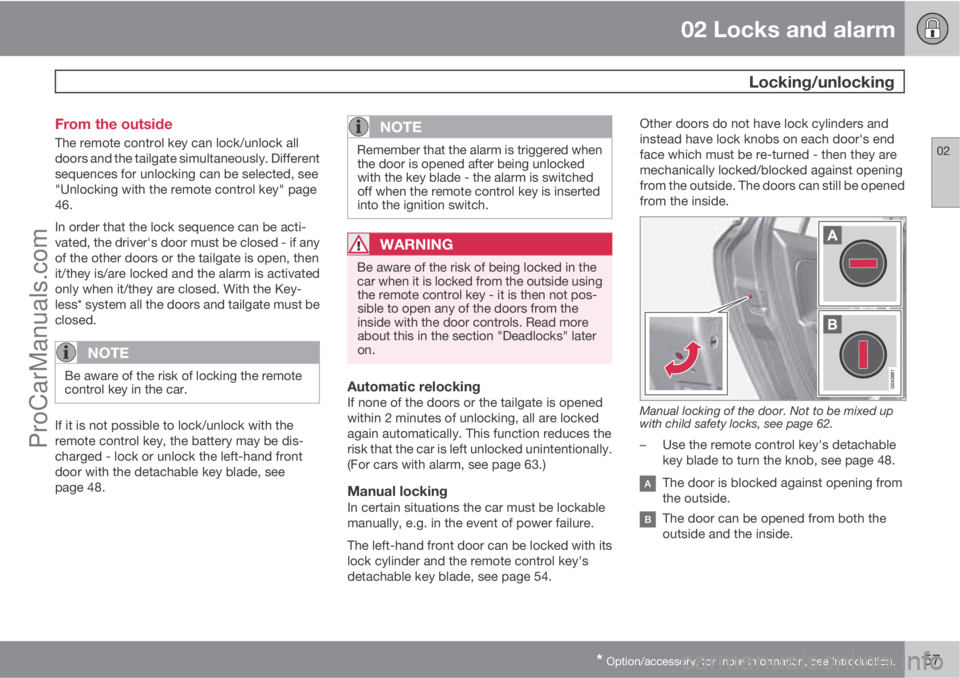
Manual lockingIn certain situations the car must be lockable
manually, e.g. in the event of power failure.
The left-hand front door can be locked with its
lock cylinder and the remote control key's
detachable key blade, see page 54.Other doors do not have lock cylinders and
instead have lock knobs on each door's end
face which must be re-turned - then they are
mechanically locked/blocked against opening
from the outside. The doors can still be opened
from the inside.
Manual locking of the door. Not to be mixed up
with child safety locks, see page 62.
–Use the remote control key's detachable
key blade to turn the knob, see page 48.
The door is blocked against opening from
the outside.
The door can be opened from both the
outside and the inside.
ProCarManuals.com
Page 80 of 422

03 Your driving environment
Key positions
03
78* Option/accessory, for more information, see Introduction.
Insert and remove the remote control
key
Ignition switch with remote control key extracted/
inserted.
NOTE
For cars with the Keyless* function the key
does not need to be inserted into the ignition
switch but can be stored in e.g. a pocket.
For more information on Keyless functions -
see page 53.
Insert the key1. Hold the end of the remote control key with
the detachable key blade and insert the key
in the ignition switch.
2. Then press the key in the lock up to its end
position.
IMPORTANT
Foreign objects in the ignition switch may
jeopardise the function or destroy the lock.
Do not press the remote control key incor-
rectly turned - Hold the end with the detach-
able key blade, see page 48.
Withdraw the key
•Push the remote control key, allow it to
eject, then pull it out from the ignition
switch.
Functions at different levels
In order to enable the use of a limited number
of functions with the engine switched off, the
car's electrical system can be set in 3 different
levels (key positions) - 0, I and II - with the
remote control key. Throughout this owner's
manual these levels are described using the
denomination "key positions".
The following table shows the functions avail-
able in each key position/level.
LevelFunctions
0•Odometer, clock and tem-
perature gauge are illumi-
nated.
•Power seats can be adjusted.
•The audio system can be
used for a limited time - see
page 234.
I•Sunroof, power windows, 12
V socket in the passenger
compartment, RTI, phone,
ventilation fan and wind-
screen wipers can be used.
II•The headlamps come on.
•Warning/indicator lamps illu-
minate for 5 seconds.
•Several other systems are
activated. However, heating
in seat cushions and the rear
window can only be activated
after the engine has been
started.
This key position consumes a
lot of current from the starter
battery and should therefore be
avoided!
ProCarManuals.com
Page 105 of 422

03 Your driving environment
Windows, rearview and door mirrors
03
103
ResettingIf the battery is disconnected then the function
for automatic opening must be reset so that it
can work correctly.
1. Gently raise the front section of the button
to raise the window to its end position and
hold it there for one second.
2. Release the button briefly.
3. Raise the front section of the button again
for one second.
WARNING
Resetting must be carried out to ensure that
pinch protection works.
Door mirrors
Door mirror controls.
Adjusting1.
Press the L button for the left-hand door
mirror or the R button for the right-hand
door mirror. The light in the button illumi-
nates.
2. Adjust the position with the joystick in the
centre.
3.
Press the L or R button again. The light
should no longer be illuminated.
WARNING
The mirror on the driver's side is the wide-
angle type to provide optimal vision.
Objects may appear further away than they
actually are.
Storing the position1
The mirror positions are stored in the key mem-
ory when the car has been locked with the
remote control key. When the car is unlocked
with the same remote control key the mirrors
and the driver's seat adopt the stored positions
when the driver's door is opened.
The function can be activated/deactivated in
the menu system MY CAR under Settings
Car settingsCar key memoryPersonal
settings in key memory. For a description of
the menu system, see page 203.
Angling the door mirror when parking1
The door mirror can be angled down for the
driver to view the side of the road when parking
for example.
–
Engage reverse gear and press the L or R
button.
When reverse gear is disengaged the mirror
automatically returns to its original position
1Only in combination with power seat with memory, see page 81.
ProCarManuals.com
Page 111 of 422

03 Your driving environment
Alcolock*
03
* Option/accessory, for more information, see Introduction.109 General information on the alcolock
The alcolock's1 function is to prevent the car
from being driven by individuals under the
influence of alcohol. Before the engine can be
started the driver must take a breath test that
verifies that he/she is not under the influence
of alcohol. Alcolock calibration takes place in
accordance with each market's limit value in
force for driving legally.
WARNING
The Alcolock is an aid and does not exempt
the driver from responsibility. It is always the
responsibility of the driver to be sober and
to drive the car safely.
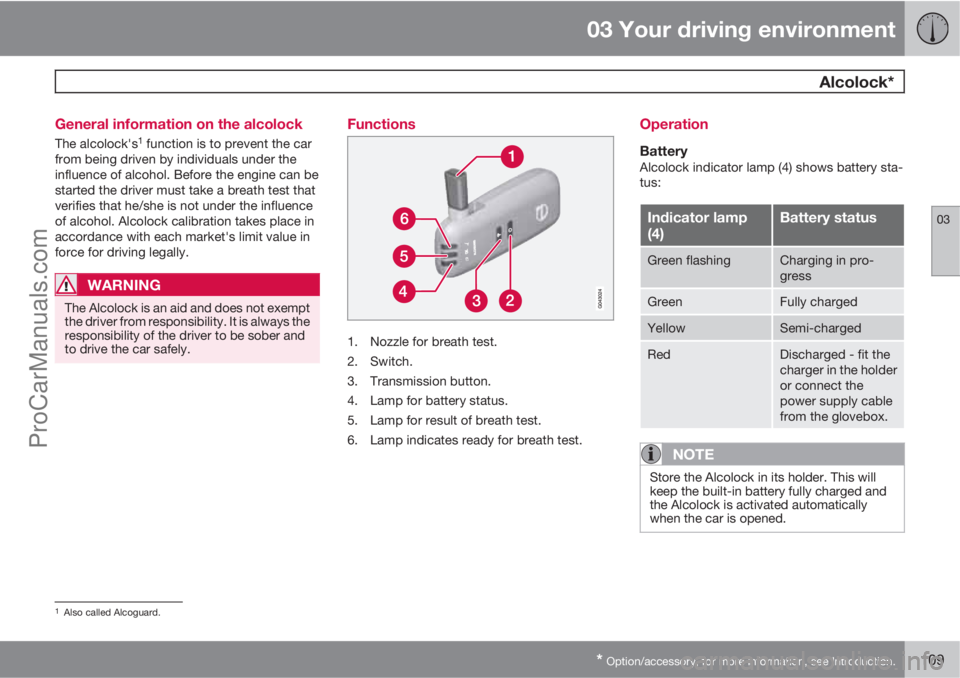
Functions
1. Nozzle for breath test.
2. Switch.
3. Transmission button.
4. Lamp for battery status.
5. Lamp for result of breath test.
6. Lamp indicates ready for breath test.
Operation
BatteryAlcolock indicator lamp (4) shows battery sta-
tus:
Indicator lamp
(4)Battery status
Green flashingCharging in pro-
gress
GreenFully charged
YellowSemi-charged
RedDischarged - fit the
charger in the holder
or connect the
power supply cable
from the glovebox.
NOTE
Store the Alcolock in its holder. This will
keep the built-in battery fully charged and
the Alcolock is activated automatically
when the car is opened.
1Also called Alcoguard.
ProCarManuals.com
Page 115 of 422

03 Your driving environment
Starting the engine
03
* Option/accessory, for more information, see Introduction.113 Petrol and diesel engines
Ignition switch with remote control key extracted/
inserted. and START/STOP ENGINE button.
IMPORTANT
Do not press in the remote control key incor-
rectly turned - Hold the end with the detach-
able key blade, see page 48.
1. Insert the remote control key in the ignition
switch and press it in to its end position.
Note that if the car is equipped with an
alcolock then a breath test must first be
approved before the engine can be started
- see page 109.2.
Hold the clutch pedal fully depressed
1. (For
cars with automatic gearbox - Depress the
brake pedal.)
3.
Press the START/STOP ENGINE button
and then release it.
The starter motor works until the engine starts
or until its overheating protection triggers.
IMPORTANT
If the engine fails to start after 3 attempts -
wait for 3 minutes before making a further
attempt. Starting capacity increases if the
battery is allowed to recover.
WARNING
Never remove the remote control key from
the ignition switch after starting the engine
or when the car is being towed.
WARNING
Always remove the remote control key from
the ignition switch when leaving the car, and
make sure that the key position is 0 - in par-
ticular if there are children in the car. For
information on how this works - see
page 79.
NOTE
The idling speed can be noticeably higher
than normal for certain engine types during
cold starting. This is so that the emissions
system can reach normal operating tem-
perature as quickly as possible, which min-
imises exhaust emissions and protects the
environment.
Keyless drive*Follow steps 2–3 for starting petrol and diesel
engines. For more information on Keyless drive
- see page 53.
NOTE
A prerequisite for the car to start is that one
of the car's remote control keys with the
Keyless drive* function is in the passenger
compartment or cargo area.
WARNING
Never remove the remote control key from
the car while driving or during towing.
Stop the engineTo switch off the engine:
•Press START/STOP ENGINE - the engine
stops.
1If the car is moving then it is enough to press the START/STOP ENGINE button to start the car.
ProCarManuals.com
Page 118 of 422

03 Your driving environment
Starting the engine
03
116
•Accelerator pedal or brake pedal is
depressed
•The gear selector is moved out of P posi-
tion
•There is less than approx.10 litres left in the
fuel tank
•Active ERS time passes 15 minutes.
When an ERS-started engine is switched off,
all direction indicators illuminate with a con-
stant glow for 3 seconds.
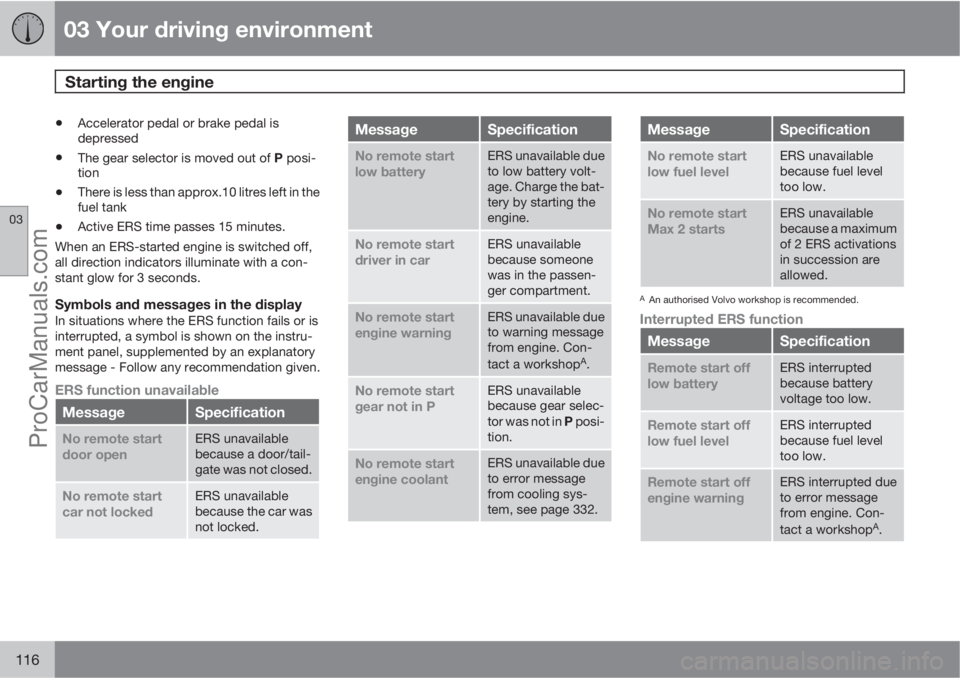
Symbols and messages in the displayIn situations where the ERS function fails or is
interrupted, a symbol is shown on the instru-
ment panel, supplemented by an explanatory
message - Follow any recommendation given.
ERS function unavailable
MessageSpecification
No remote start
door openERS unavailable
because a door/tail-
gate was not closed.
No remote start
car not lockedERS unavailable
because the car was
not locked.
MessageSpecification
No remote start
low batteryERS unavailable due
to low battery volt-
age. Charge the bat-
tery by starting the
engine.
No remote start
driver in carERS unavailable
because someone
was in the passen-
ger compartment.
No remote start
engine warningERS unavailable due
to warning message
from engine. Con-
tact a workshop
A.
No remote start
gear not in PERS unavailable
because gear selec-
tor was not in P posi-
tion.
No remote start
engine coolantERS unavailable due
to error message
from cooling sys-
tem, see page 332.
MessageSpecification
No remote start
low fuel levelERS unavailable
because fuel level
too low.
No remote start
Max 2 startsERS unavailable
because a maximum
of 2 ERS activations
in succession are
allowed.
AAn authorised Volvo workshop is recommended.
Interrupted ERS function
MessageSpecification
Remote start off
low batteryERS interrupted
because battery
voltage too low.
Remote start off
low fuel levelERS interrupted
because fuel level
too low.
Remote start off
engine warningERS interrupted due
to error message
from engine. Con-
tact a workshop
A.
ProCarManuals.com