2013 VOLVO V60 check engine
[x] Cancel search: check enginePage 334 of 422

09 Maintenance and service
Engine compartment 09
332
IMPORTANT
In the event of the message Oil level low
Refill 0.5 Ltr, only fill with 0.5 litres.
NOTE
The oil level is only detected by the system
during driving. The system cannot directly
detect changes when the oil is filled or
drained. The car must be driven
about 30 km before the oil level display is
correct.
WARNING
Do not fill more oil if filling level (3) or (4)
appears as shown in the illustration below.
The level must never be above MAX or
below MIN, as this could lead to engine
damage.
WARNING
Do not spill oil onto the hot exhaust manifold
due to the risk of fire.
Measuring the oil levelIf the oil level needs to be checked then it
should be carried out in accordance with the
sequence below.
1.
Activate key position II, see page 78.
2. Rotate the thumbwheel on the left-hand
stalk switch to position
Engine oil level
Wait....
> You will then see information displayed
about the engine oil level.
The figures 1-4 represent filling level. Do not fill
more oil if filling level (3) or (4) is shown. Recom-
mended filling level is 4.
Coolant
Checking the level and topping up
When topping up the coolant, follow the
instructions on the packaging. It is important
that the mixture of coolant concentrate and
water is correct for the prevailing weather con-
ditions. Never top up with water only. The risk
of freezing increases with both too little and too
much coolant concentrate.
WARNING
Coolant can be very hot. If the coolant
requires topping up when the engine is at
operating temperature, unscrew the expan-
sion tank cap slowly to gently release the
overpressure.
ProCarManuals.com
Page 335 of 422

09 Maintenance and service
Engine compartment09
333
For capacities and for standards regarding
water quality, see page 381.
Check the coolant regularlyThe level must lie between the MIN and MAX
marks on the expansion tank. If the system is
not filled sufficiently, high temperatures could
occur, causing a risk of damage to the engine.
IMPORTANT
•A high content of chlorine, chlorides
and other salts may cause corrosion in
the cooling system.
•Always use coolant with anti-corrosion
agent as recommended by Volvo.
•Ensure that the coolant mixture is 50%
water and 50% coolant.
•Mix the coolant with approved quality
tap water. In the event of any doubt
about water quality, used ready-mixed
coolant in accordance with Volvo rec-
ommendations.
•When changing coolant/replacing cool-
ing system components, flush the cool-
ing system clean with approved quality
tap water or flush with ready-mixed
coolant.
•The engine must only be run with a well-
filled cooling system. Otherwise, tem-
peratures that are too high may occur
resulting in the risk of damage (cracks)
in the cylinder head.
Brake and clutch fluid
Checking the levelBrake and clutch fluid have a common reser-
voir. The level must be between the MIN and
MAX marks that are visible inside the reservoir.
Check the level regularly.
Change the brake fluid every other year or at
every other regular service.
For capacities and recommended fluid grade,
see page 381. The fluid should be changed
annually on cars driven in conditions requiring
hard, frequent braking, such as driving in
mountains or tropical climates with high
humidity.
WARNING
If the brake fluid is under the MIN level in the
brake fluid reservoir, do not drive further
before topping up the brake fluid. Volvo rec-
ommends that the reason for the loss of
brake fluid is investigated by an authorised
Volvo workshop.
ProCarManuals.com
Page 336 of 422

09 Maintenance and service
Engine compartment 09
334
Filling
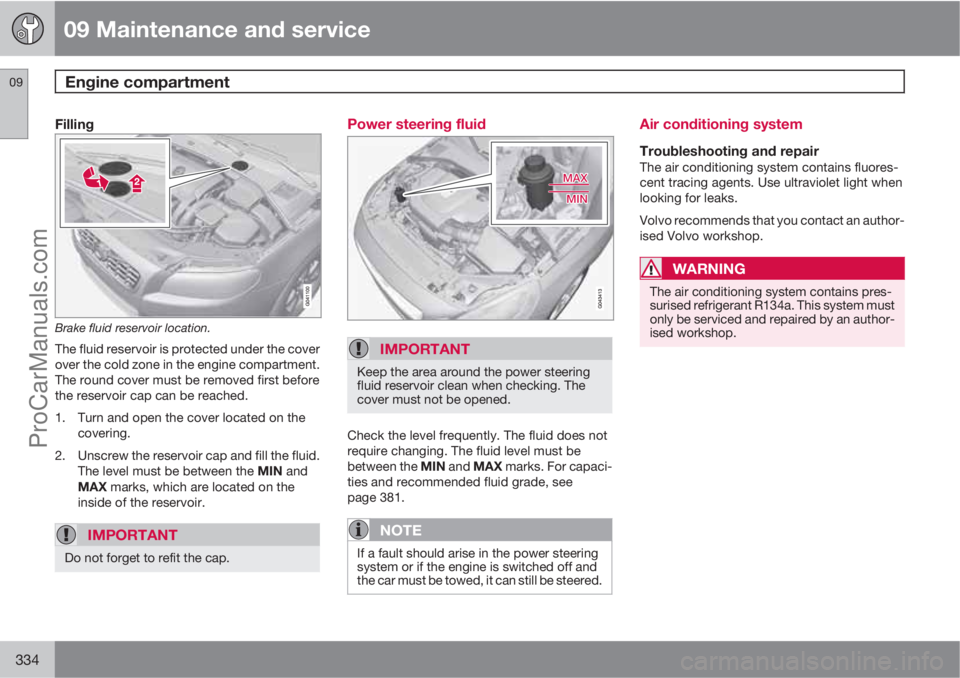
Brake fluid reservoir location.
The fluid reservoir is protected under the cover
over the cold zone in the engine compartment.
The round cover must be removed first before
the reservoir cap can be reached.
1. Turn and open the cover located on the
covering.
2. Unscrew the reservoir cap and fill the fluid.
The level must be between the MIN and
MAX marks, which are located on the
inside of the reservoir.
IMPORTANT
Do not forget to refit the cap.
Power steering fluid
IMPORTANT
Keep the area around the power steering
fluid reservoir clean when checking. The
cover must not be opened.
Check the level frequently. The fluid does not
require changing. The fluid level must be
between the MIN and MAX marks. For capaci-
ties and recommended fluid grade, see
page 381.
NOTE
If a fault should arise in the power steering
system or if the engine is switched off and
the car must be towed, it can still be steered.
Air conditioning system
Troubleshooting and repairThe air conditioning system contains fluores-
cent tracing agents. Use ultraviolet light when
looking for leaks.
Volvo recommends that you contact an author-
ised Volvo workshop.
WARNING
The air conditioning system contains pres-
surised refrigerant R134a. This system must
only be serviced and repaired by an author-
ised workshop.
ProCarManuals.com
Page 344 of 422

09 Maintenance and service
Wiper blades and washer fluid 09
342
Fold up the wiper arm when it is in service
position. Press the button located on the
wiper blade mounting and pull straight out
parallel with the wiper arm.
Slide in the new wiper blade until a "click"
is heard.
Check that the blade is firmly installed.
4. Fold the wiper arm back towards the wind-
screen.
The wipers return from service position to their
starting position when you briefly press the
START/STOP ENGINE button to set the car’s
electrical system to key position I (or when the
car is started).
G021763
NOTE
The wiper blades are different lengths. The
blade on the driver's side is longer than the
blade on the passenger side.
Replacing the wiper blades, rear window
1. Fold out the wiper arm.
2. Grip the inner section of the blade (by the
arrow).
3. Turn anticlockwise to use the blade's end
position against the wiper arm as a lever to
detach the blade more easily.
4. Press the new wiper blade into position.
Check that it is firmly installed.
5. Lower the wiper arm.
CleaningFor cleaning wiper blades and windscreen, see
page 361 and onwards.
IMPORTANT
Check the wiper blades regularly.
Neglected maintenance shortens the serv-
ice life of the wiper blades.
ProCarManuals.com
Page 346 of 422

09 Maintenance and service
Battery 09
344
Operation
The service life and function of the battery is
influenced by factors such as the number of
starts, discharging, driving style, driving con-
ditions, climatic conditions etc.
•Never disconnect the battery when the
engine is running.
•Check that the cables to the battery are
correctly connected and properly tight-
ened.
WARNING
•The battery can generate oxyhydrogen
gas, which is highly explosive. A spark
can be formed if a jump lead is con-
nected incorrectly, and this can be
enough for the battery to explode.
•The battery contains sulphuric acid,
which can cause serious burns.
•If sulphuric acid comes into contact
with eyes, skin or clothing, flush with
large quantities of water. If acid
splashes into the eyes - seek medical
attention immediately.
NOTE
The life of the battery is shortened if it
becomes discharged repeatedly.
The life of the battery is affected by several
factors, including driving conditions and cli-
mate. Battery starting capacity decreases
gradually with time and therefore needs to
be recharged if the car is not used for a
longer time or when it is only driven short
distances. Extreme cold further limits star-
ting capacity.
To maintain the battery in good condition, at
least 15 minutes of driving/week is recom-
mended or that the battery is connected to
a battery charger with automatic trickle
charging.
A battery that is kept fully charged has a
maximum service life.
IMPORTANT
Never use a quick charger to charge the
battery.
IMPORTANT
If the following instruction is not observed
then the energy saving function for infotain-
ment may be temporarily disengaged, and/
or the message in the information display
about the main battery's state of charge
may be temporarily inapplicable, following
the connection of an external battery or bat-
tery charger:
•The negative battery terminal on the
car's main battery must never be used
for connecting an external battery or
battery charger - only the car chassis
may be used as the grounding point.
See the section "Start assistance" - for a
description of how the cable clamps must
be attached.
ProCarManuals.com
Page 352 of 422

09 Maintenance and service
Fuses 09
350
General
All electrical functions and components are
protected by a number of fuses in order to pro-
tect the car's electrical system from damage by
short circuiting or overloading.
If an electrical component or function does not
work, it may be because the component's fuse
was temporarily overloaded and failed. If the
same fuse fails repeatedly then there is a fault
in the circuit. Volvo recommends that you visit
an authorised Volvo workshop for checking.
Changing1. Look in the fuse diagram to locate the fuse.
2. Pull out the fuse and check from the side
to see whether the curved wire has blown.
3. If this is the case, replace it with a new fuse
of the same colour and amperage.
WARNING
Never use a foreign object, or a fuse with an
amperage higher than that specified when
replacing a fuse. This could cause signifi-
cant damage to the electrical system and
possibly lead to fire.
Location, fuse boxes
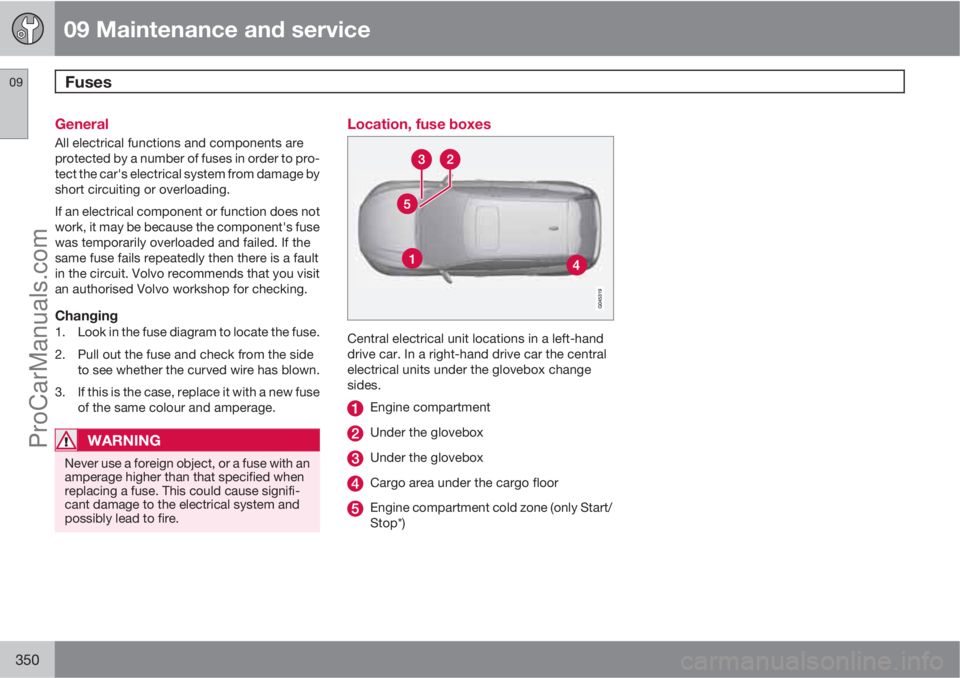
Central electrical unit locations in a left-hand
drive car. In a right-hand drive car the central
electrical units under the glovebox change
sides.
Engine compartment
Under the glovebox
Under the glovebox
Cargo area under the cargo floor
Engine compartment cold zone (only Start/
Stop*)
ProCarManuals.com
Page 380 of 422

10 Specifications
Engine oil
10
378
Adverse driving conditions
Adverse driving conditions can lead to abnor-
mally high oil temperature or oil consumption.
Below are some examples of adverse driving
conditions.
Check the oil level more frequently for long
journeys:
•towing a caravan or trailer
•in mountainous regions
•at high speeds
•in temperatures colder than -30 °C or hot-
ter than +40 °C
The above also apply to shorter driving dis-
tances at low temperatures.Choose a fully synthetic engine oil for adverse
driving conditions. It provides extra protection
for the engine.
Volvo recommends Castrol oil products.
IMPORTANT
In order to fulfil the requirements for the
engine's service intervals all engines are
filled with a specially adapted synthetic
engine oil at the factory. The choice of oil
has been made very carefully with regard to
service life, starting characteristics, fuel
consumption and environmental impact.
An approved engine oil must be used in
order that the recommended service inter-
vals can be applied. Only use a prescribed
grade of oil for both filling and oil change,
otherwise you will risk affecting service life,
starting characteristics, fuel consumption
and environmental impact.
Volvo Car Corporation disclaims all war-
ranty liability if engine oil of the prescribed
grade and viscosity is not used.
Volvo recommends that oil changes are car-
ried out at an authorised Volvo workshop.
ProCarManuals.com
Page 389 of 422

10 Specifications
Fuel
10
387
There are several reasons for increased fuel
consumption compared with the table's val-
ues. Examples of this are:
•The driver's driving style.
•If the customer has specified wheels larger
than those fitted as standard on the mod-
el's basic version, then resistance increa-
ses.
•High speed results in increased wind resis-
tance.
•Fuel quality, road and traffic conditions,
weather and the condition of the car.
Even a combination of the above-mentioned
examples can result in significantly improved
consumption. For further information, please
refer to the regulations referred to
1.
Large deviations in fuel consumption may arise
in a comparison with the EU driving cycles
1
which are used in the certification of the car
and on which the consumption figures in the
table are based.
To bear in mindTips that the driver can use in order to reduce
consumption:
•Drive gently and avoid unnecessary accel-
eration as well as braking too hard.
•Drive with the correct air pressure in the
tyres and check this regularly - select ECO
tyre pressure for best results, see the tyre
pressure table on page 388.
•Choice of tyres can affect fuel consump-
tion - seek advice on suitable tyres from a
dealer.
See further information and more advice on
pages 12 and 284.
See page 288 for general information on fuel.
1Official fuel consumption figures are based on two standardised driving cycles in a laboratory environment ("EU driving cycles") all in accordance with EU Directive 80/1268/EEC (Euro 4), EU Regulation
no 692/2008 (Euro 5) and UN ECE Regulation no 101. The regulations cover the driving cycles for urban driving and extra-urban driving. - Urban driving - the measurement starts with cold starting
the engine. The driving is simulated. - Extra-urban driving - the car is accelerated and braked at speeds between 0 and 120 km/h. The driving is simulated. - A car with D2, D3, D4 or D5 engine and
6-speed manual gearbox is started in 2nd gear. The combined driving value given in the table is a combination of urban driving and extra-urban driving, in accordance with applicable legislation.
CO
2 emissions - the exhaust gases are collected in order to calculate the carbon dioxide emissions during the two driving cycles. These are then analysed and give the value for CO2 emissions.
ProCarManuals.com