2013 VOLVO V60 wheel
[x] Cancel search: wheelPage 333 of 422

09 Maintenance and service
Engine compartment09
331
5 minutes to allow the oil time to run back
to the sump.
2. Pull up and wipe the dipstick.
3. Re-insert the dipstick.
4. Pull it out and check the level.
5.
If the level is close to MIN then 0.5 litres
should be added. If the level is significantly
below, then an additional amount is
required.
6. If required, check the level again, do it after
driving a short distance. Then repeat steps
1 - 4.
WARNING
Never fill above the MAX mark. The level
should never be above MAX or below MIN
as this could lead to engine damage.
WARNING
Do not spill oil onto the hot exhaust manifold
due to the risk of fire.
Engine with electronic oil level sensor3
Filler pipe.4
You do not need to take action with respect to
the engine oil level before a message is shown
in the display, see the illustration below.
Message and graph in the display.
Message
Engine oil level
The oil level is checked using the electronic oil
level gauge with the thumbwheel when the
engine is switched off,see page 200.
WARNING
If the message Oil service required is
shown, visit a workshop. The oil level may
be too high.
3Only applies to 5-cyl. diesel.4Engines with electronic oil level sensor have no dipstick (5-cyl. diesel).
ProCarManuals.com
Page 334 of 422

09 Maintenance and service
Engine compartment 09
332
IMPORTANT
In the event of the message Oil level low
Refill 0.5 Ltr, only fill with 0.5 litres.
NOTE
The oil level is only detected by the system
during driving. The system cannot directly
detect changes when the oil is filled or
drained. The car must be driven
about 30 km before the oil level display is
correct.
WARNING
Do not fill more oil if filling level (3) or (4)
appears as shown in the illustration below.
The level must never be above MAX or
below MIN, as this could lead to engine
damage.
WARNING
Do not spill oil onto the hot exhaust manifold
due to the risk of fire.
Measuring the oil levelIf the oil level needs to be checked then it
should be carried out in accordance with the
sequence below.
1.
Activate key position II, see page 78.
2. Rotate the thumbwheel on the left-hand
stalk switch to position
Engine oil level
Wait....
> You will then see information displayed
about the engine oil level.
The figures 1-4 represent filling level. Do not fill
more oil if filling level (3) or (4) is shown. Recom-
mended filling level is 4.
Coolant
Checking the level and topping up
When topping up the coolant, follow the
instructions on the packaging. It is important
that the mixture of coolant concentrate and
water is correct for the prevailing weather con-
ditions. Never top up with water only. The risk
of freezing increases with both too little and too
much coolant concentrate.
WARNING
Coolant can be very hot. If the coolant
requires topping up when the engine is at
operating temperature, unscrew the expan-
sion tank cap slowly to gently release the
overpressure.
ProCarManuals.com
Page 358 of 422

09 Maintenance and service
Fuses 09
356* Option/accessory, for more information, see Introduction.
Box AFunctionA
--
Infotainment control module5
Audio control unit (ampli-
fier)*
Digital radio*; TV*10
Audio15
Telematics*; Bluetooth*5
--
Sunroof*; Interior lighting
roof; Climate sensor*;
Damper motors, air intake5
12 V socket, tunnel console15
Seat heating, rear right*15
Seat heating, rear left*15
--
Seat heating (passenger
side)15
Seat heating (driver's side)15
Box AFunctionA
Parking assistance*; Park-
ing camera*; Towbar control
module *
BLIS*5
AWD control module*15
Active chassis Four-C*10
Box BFunctionA
Rear window wiper15
--
Interior lighting; Driver's
door control panel, power
windows; Power seats,
front*; Remote controlled
garage door opener*7.5
Information display (DIM)5
Adaptive cruise control,
ACC*; collision warning sys-
tem*10
Interior lighting; Rain sensor7.5
Steering wheel module7.5
Box BFunctionA
Central locking system, fuel
filler flap10
Rear window washer15
Windscreen washers15
Unlocking, tailgate10
Folding head restraint*10
Fuel pump20
Movement detector alarm*;
Climate panel5
Steering lock15
Siren alarm*; Data link con-
nector OBDII5
--
Airbags10
Collision warning system*5
Accelerator pedal sensor,
PTC element air preheater*;
Dimming, interior rearview
mirror*; Seat heating, rear*7.5
ProCarManuals.com
Page 366 of 422
09 Maintenance and service
Car care 09
364
To achieve best results Volvo recommends
cleaning and the application of protective
cream once to four times per year (or more if
necessary). The Volvo Leather Care kit is avail-
able from your Volvo dealer.
IMPORTANT
•Certain items of coloured clothing (for
example, jeans and suede garments)
may stain the upholstery.
•Never use strong solvents. Such prod-
ucts may damage fabric, vinyl and
leather upholstery.
Washing instructions for leather
upholstery
1. Pour the leather cleaner on the dampened
sponge and squeeze out a strong foam.
2. Work the dirt away with gentle circular
movements.
3. Dab accurately with the sponge on the
stains. Allow the sponge to absorb the
stain. Do not rub.
4. Wipe off with soft paper or a cloth and
allow the leather to dry completely.
Protective treatment of leather
upholstery
1. Pour a small amount of the protective
cream on the felted cloth and massage in
a thin layer of cream with gentle circular
movements on the leather.
2. Allow the leather to dry for 20 minutes
before use.
The leather has now been given improved pro-
tection against stains and improved UV pro-
tection.
Washing instructions for the leather
steering wheel
•Remove dirt and dust with a soft pre-mois-
tened sponge and neutral soap.
•Leather needs to breathe. Never cover the
leather steering wheel with protective plas-
tic.
•Use natural oils. Volvo's leather care
agents are recommended for best results.
If the steering wheel has stains:
Group 1 (ink, wine, coffee, milk, sweat and
blood)
–Use a soft cloth or sponge. Mix a 5%
ammonia solution. (For blood stains, use a
solution of 2 dl water and 25g salt.)Group 2 (fats, oils, sauces and chocolate)
1. Same procedure as group 1.
2. Polish with an absorbent paper or cloth.
Group 3 (dry dirt, dust)
1. Use a soft brush to remove the dirt.
2. Same procedure as group 1.
Treating stains on interior plastic, metal
and wood parts
A fibrillated fibre or microfibre cloth, lightly
moistened with water, available from Volvo
dealers, is recommended for cleaning interior
parts and surfaces.
Do not scrape or rub stains. Never use strong
stain removers. A special cleaning agent avail-
able from Volvo dealers can be used for more
difficult cleaning.
Cleaning seatbeltsUse water and a synthetic detergent. A special
textile cleaning agent is available from your
Volvo dealer. Make sure the seatbelt is dry
before allowing it to retract.
ProCarManuals.com
Page 370 of 422
368
Type designations................................................................................. 370
Dimensions and weights....................................................................... 372
Engine specifications............................................................................ 376
Engine oil............................................................................................... 378
Fluids and lubricants............................................................................. 381
Fuel....................................................................................................... 384
Wheel and tyres, dimensions and pressure ......................................... 388
Electrical system................................................................................... 391
Type approval....................................................................................... 392
Symbols in the display.......................................................................... 404
ProCarManuals.com
Page 374 of 422
10 Specifications
Dimensions and weights
10
372
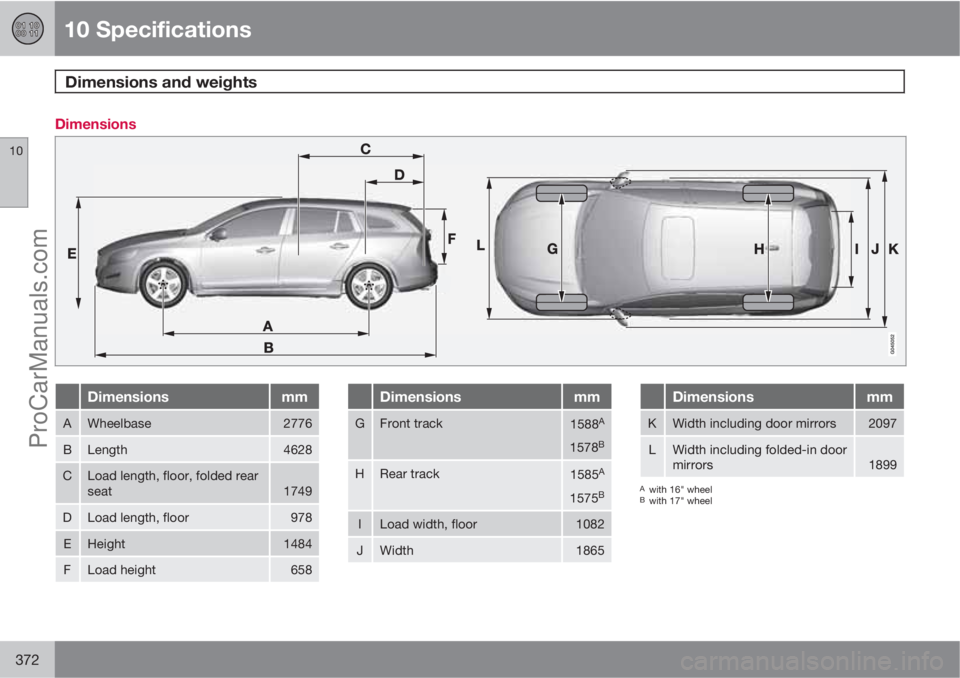
Dimensions
Dimensionsmm
AWheelbase2776
BLength4628
CLoad length, floor, folded rear
seat1749
DLoad length, floor978
EHeight1484
FLoad height658
Dimensionsmm
GFront track1588A
1578B
HRear track1585A
1575B
ILoad width, floor1082
JWidth1865
Dimensionsmm
KWidth including door mirrors2097
LWidth including folded-in door
mirrors1899
Awith 16" wheelBwith 17" wheel
ProCarManuals.com
Page 389 of 422
10 Specifications
Fuel
10
387
There are several reasons for increased fuel
consumption compared with the table's val-
ues. Examples of this are:
•The driver's driving style.
•If the customer has specified wheels larger
than those fitted as standard on the mod-
el's basic version, then resistance increa-
ses.
•High speed results in increased wind resis-
tance.
•Fuel quality, road and traffic conditions,
weather and the condition of the car.
Even a combination of the above-mentioned
examples can result in significantly improved
consumption. For further information, please
refer to the regulations referred to
1.
Large deviations in fuel consumption may arise
in a comparison with the EU driving cycles
1
which are used in the certification of the car
and on which the consumption figures in the
table are based.
To bear in mindTips that the driver can use in order to reduce
consumption:
•Drive gently and avoid unnecessary accel-
eration as well as braking too hard.
•Drive with the correct air pressure in the
tyres and check this regularly - select ECO
tyre pressure for best results, see the tyre
pressure table on page 388.
•Choice of tyres can affect fuel consump-
tion - seek advice on suitable tyres from a
dealer.
See further information and more advice on
pages 12 and 284.
See page 288 for general information on fuel.
1Official fuel consumption figures are based on two standardised driving cycles in a laboratory environment ("EU driving cycles") all in accordance with EU Directive 80/1268/EEC (Euro 4), EU Regulation
no 692/2008 (Euro 5) and UN ECE Regulation no 101. The regulations cover the driving cycles for urban driving and extra-urban driving. - Urban driving - the measurement starts with cold starting
the engine. The driving is simulated. - Extra-urban driving - the car is accelerated and braked at speeds between 0 and 120 km/h. The driving is simulated. - A car with D2, D3, D4 or D5 engine and
6-speed manual gearbox is started in 2nd gear. The combined driving value given in the table is a combination of urban driving and extra-urban driving, in accordance with applicable legislation.
CO
2 emissions - the exhaust gases are collected in order to calculate the carbon dioxide emissions during the two driving cycles. These are then analysed and give the value for CO2 emissions.
ProCarManuals.com
Page 390 of 422
10 Specifications
Wheel and tyres, dimensions and pressure
10
388
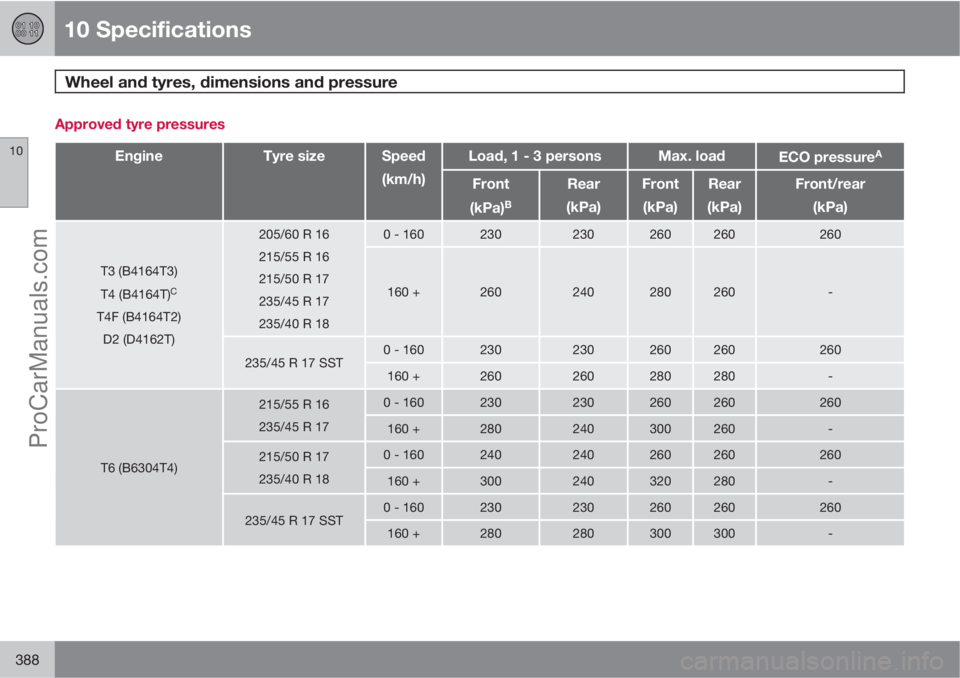
Approved tyre pressures
EngineTyre sizeSpeed
(km/h)Load, 1 - 3 personsMax. loadECO pressureA
Front
(kPa)
B
Rear
(kPa)Front
(kPa)Rear
(kPa)Front/rear
(kPa)
T3 (B4164T3)
T4 (B4164T)
C
T4F (B4164T2)
D2 (D4162T)
205/60 R 16
215/55 R 16
215/50 R 17
235/45 R 17
235/40 R 180 - 160230230260260260
160 +260240280260-
235/45 R 17 SST0 - 160230230260260260
160 +260260280280-
T6 (B6304T4)
215/55 R 16
235/45 R 170 - 160230230260260260
160 +280240300260-
215/50 R 17
235/40 R 180 - 160240240260260260
160 +300240320280-
235/45 R 17 SST0 - 160230230260260260
160 +280280300300-
ProCarManuals.com