2013 VOLKSWAGEN TRANSPORTER seats
[x] Cancel search: seatsPage 94 of 486
A WARNING
The front passenger front airbag should only be switched off in exceptional circumstances.
• To prevent damage to the airbag system, only switch the front passenger front airbag on and off when the ignition is switched off.
• lt is the driver's responsibility to ensure that the key-operated switch is set to the cor-rect position.
Combined curtain and side airbags
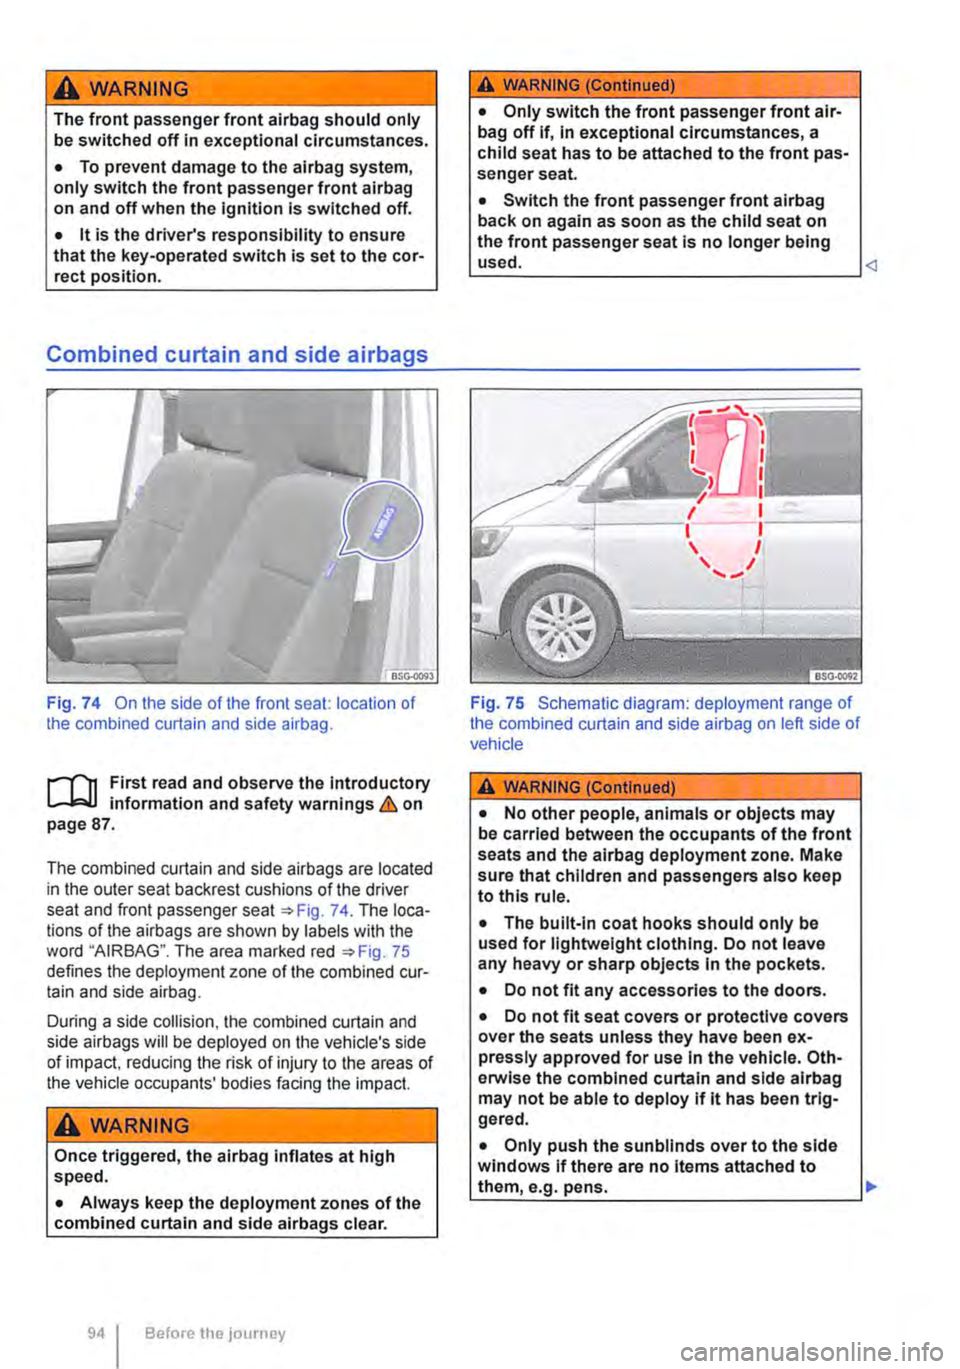
Fig. 74 On the side of the front seat: location of the combined curtain and side airbag.
l""'"'fl1 and observe the introductory L-.lr:J.J mformat1on and safety warnings & on page 87.
The combined curtain and side airbags are located in the outer seat backrest cushions of the driver seat and front passenger seat =:oFig. 74. The loca-tions of the airbags are shown by labels with the word "AIRBAG". The area marked red =:oFig. 75 defines the deployment zone of the combined cur-tain and side airbag.
During a side collision, the combined curtain and side airbags will be deployed on the vehicle's side of impact, reducing the risk of injury to the areas of the vehicle occupants' bodies facing the impact.
A WARNING
Once triggered, the airbag inflates at high speed.
• Always keep the deployment zones of the combined curtain and side airbags clear.
94 Before the journey
A WARNING (Continued)
• Only switch the front passenger front air-bag off if, In exceptional circumstances, a child seat has to be attached to the front pas-senger seat.
• Switch the front passenger front alrbag back on again as soon as the child seat on the front passenger seat is no longer being used.
Fig. 75 Schematic diagram: deployment range of the combined curtain and side airbag on left side of vehicle
A WARNING (Continued)
• No other people, animals or objects may be carried between the occupants of the front seats and the airbag deployment zone. Make sure that children and passengers also keep to this rule.
• The built-in coat hooks should only be used for lightweight clothing. Do not leave any heavy or sharp objects In the pockets.
• Do not fit any accessories to the doors.
• Do not fit seat covers or protective covers over the seats unless they have been ex-pressly approved for use In the vehicle. Oth-erwise the combined curtain and side alrbag may not be able to deploy If lt has been trig-gered.
• Only push the sunblinds over to the side windows if there are no Items attached to them, e.g. pens. .,..
Page 95 of 486
A wARNING
Incorrect use of the driver and front passen-ger seat could hinder the proper function of the combined curtain and side airbags and cause serious injury.
• Never remove the front seats from the ve-hicle or alter any components of these seats.
Curtain airbags
A WARNING (Continued)
• If too much pressure is applied to the back rest side bolster, the combined curtain and side airbags may not be triggered cor-rectly, may not trigger at all or may trigger unexpectedly.
• Any damage to the original seat uphols-tery or around the seams of the combined curtain and side airbag units must be re-paired immediately by a qualified workshop.
r-111 First read and observe the introductory l..-W information and safety warnings & on page 87.
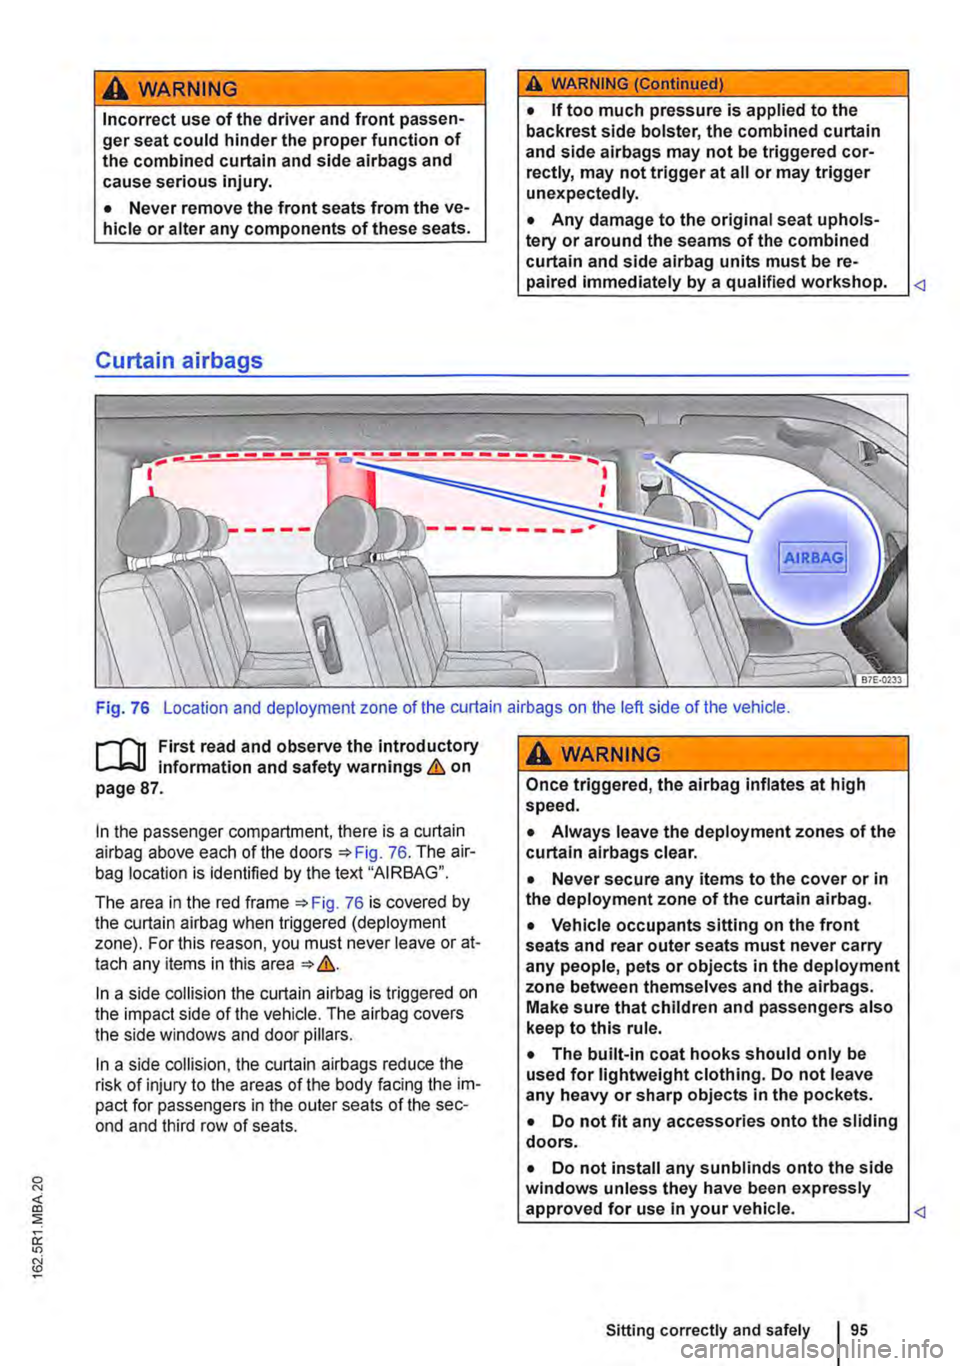
In the passenger compartment, there is a curtain airbag above each of the doors =>Fig. 76. The air-bag location is identified by the text "AIRBAG".
The area in the red frame =>Fig. 76 is covered by the curtain airbag when triggered (deployment zone). For this reason, you must never leave or at-tach any items in this area => &.
In a side collision the curtain airbag is triggered on the impact side of the vehicle. The airbag covers the side windows and door pillars.
In a side collision, the curtain airbags reduce the risk of injury to the areas of the body facing the im-pact for passengers in the outer seats of the sec-ond and third row of seats.
A WARNING
Once triggered, the airbag inflates at high speed.
• Always leave the deployment zones of the curtain alrbags clear.
• Never secure any items to the cover or in the deployment zone of the curtain airbag.
• Vehicle occupants sitting on the front seats and rear outer seats must never carry any people, pets or objects in the deployment zone between themselves and the airbags. Make sure that children and passengers also keep to this rule.
• The built-in coat hooks should only be used for lightweight clothing. Do not leave any heavy or sharp objects in the pockets.
• Do not fit any accessories onto the sliding doors.
• Do not install any sun blinds onto the side windows unless they have been expressly approved for use In your vehicle.
Page 96 of 486
Child seats (accessories)
ClJJ Introduction
This chapter contains information on the following subjects:
Basic information on fitting and using child seats . . . . . . . . . . . . . . . . . . . . . . . . . . . . . . . . . . 97 Types of child seat . . . . . . . . . . . . . . . . . . . . . . . 98 Securing systems . . . . . . . . . . . . . . . . . . . . . . . 99 Securing a child seat with ISOFIX . . . . . . . . . . 100 Securing child seats with the upper strap (top tether) . . . . . . . . . . . . . . . . . . . . . . . . . . . . . . . . . 1 01 Securing child seats with a seat belt . . . . . . . . 102
Using child seats can reduce the risk of Injury to the child if there is an accident. Always use child seats when driving with children.
Note the following:
• Child seats are classified into groups depend-ing on the size, age and weight of child for which they are designed.
• Various securing systems are used to secure child seats in the vehicle.
For safety reasons child seats should always be fit-ted to the rear seats. They should only be fitted to the front passenger seat in exceptional cases.
Volkswagen Commercial Vehicles recommends us-ing child seats from Volkswagen's range of acces-sories. These child seats have been developed and approved for use in Volkswagen vehicles.
Additional information and warnings:
• Seat belts 79
• Airbag system 87
• Integrated child seats 102
A WARNING
If children are not secured or are inadequate-ly secured, they are at greater risk of serious or even fatal injury. Please note the following:
• Children who are either under 12 years of age or less than 150 cm tall must not be car-ried In the vehicle if they are not secured In a suitable child seat while the vehicle Is In mo-tion. Regulations in some countries may dif-fer, and must be complied with.
96 Before the journey
A WARNING (Continued)
• Always secure children in the vehicle in a suitable child seat. The seat used must be ap-propriate to the child's height, weight and age.
• Never fasten more than one child Into one child seat.
• Under no circumstances should children or babies be held in a passenger's or drivers lap while driving.
• Never leave a child unsupervised in a child seat.
• Never allow a child to be carried In a vehi-cle without being properly secured, and nev-er allow a child to stand up or to kneel on a seat, or to sit Incorrectly while the car is In motion. This is particularly Important for chil-dren carried on the front passenger seat. In an accident, children may sustain serious In-juries to themselves and others.
• The child seat can only provide maximum protection if the seat belt Is routed correctly around it. Always ensure that the seat belt is routed as specified In the instructions provi-ded by the child seat manufacturer. If the seat belt is routed Incorrectly it may cause injuries even in a minor accident.
• After an accident, it Is vital to replace any child seats that were in use during the acci-dent, as they could have sustained non-visi· ble damage.
m The standards and regulations governing the l!..J use of child seats and child seat securing mechanisms differ from country to country. Not all countries allow you to transport children on the front passenger seat. Legislation and legal require-ments take precedence over the information given in this owner's manual.
m If a child seat is used on a single seat with l!..J Easy Entry function, the seats located behind that seat are difficult to access. Therefore, a child seat should be used on another rear seat, if possi-ble.
Page 97 of 486
![VOLKSWAGEN TRANSPORTER 2013 Owners Manual Basic information on fitting and using child seats
A AIRBAG
(®
(!]
c:::J
BTT·I20J
Fig. 77 Airbag information sticker on the sun vi-sor.
r""(n First read and observe the introductory L.....J VOLKSWAGEN TRANSPORTER 2013 Owners Manual Basic information on fitting and using child seats
A AIRBAG
(®
(!]
c:::J
BTT·I20J
Fig. 77 Airbag information sticker on the sun vi-sor.
r""(n First read and observe the introductory L.....J](/manual-img/18/55784/w960_55784-96.png)
Basic information on fitting and using child seats
A AIRBAG
(®
(!]
c:::J
BTT·I20J
Fig. 77 Airbag information sticker on the sun vi-sor.
r""'('n First read and observe the introductory L.....Ja,U information and safety warnings & on page 96.
Information on fitting a child seat
Observe the following general information when fit-ling a child seat. This information is relevant what-ever child seat securing system is being used.
• Read and follow the instructions provided by the child seat manufacturer =:-&.
• Whenever possible, fit child seats to one of the rear seats on the front passenger side so that chil-dren can exit the vehicle on the kerb side.
• Deactivate the front passenger front airbag if fit-ting a rear-facing child seat on the front passenger seat.
• If a child seat is fitted on the front passenger seat, move the backrest to the upright position. slide the seat back as far as it will go, and set the seat height adjustment and belt height adjuster to the highest position.
• When fitting a child seat on the vehicle's rear seats, leave as much unencumbered space as possible around the child seat. If necessary, adjust the position of the relevant front seat. When doing so, ensure that the driver or front passenger can stili maintain a correct sitting position =:-page 61.
• Adjust the seat backrest angle so that the child seat lies flush against the backrest.
• When using child seats with a backrest, remove the vehicle head restraints and stow them safely in the vehicle =:-page 61. Reinstall the head restraint after the child seat has been removed.
Airbag sticker
The vehicle may be provided with stickers giving key information about the front passenger front air-bag. The information on these stickers may vary from country to country. The stickers may be at-tached on the sun visor for the driver and/or front passenger=:-Fig. 77.
11 is essential to note the warning information shown on these stickers before installing a rear-facing child seat =:-&.
Risks involved in carrying children on the front passenger seat
If you are using a rear-facing child seat, the front passenger front airbag can cause critical or poten-tially fatal injuries when it inflates =:-&.
Rear-facing child seat may only be used on the front passenger seat if the front passenger front airbag has been deactivated. An indicator lamp in the centre console lights up steadily when the front passenger front airbag has been effectively deacti-vated. Deactivating the front passenger front air-bag =:-page 87.
If using a front-facing child seat, do not deacti-vate the front passenger front airbag.
When fitting a child seat, make sure that it is as far away as possible from the front passenger airbag. The front passenger front airbag can cause severe injuries when it inflates =:-&.
Some child seats are not suitable for use on the front passenger seat. Any child seat fitted on the front passenger seat must be specially authorised by the manufacturer for this use in vehicles with front and side airbags. Volkswagen dealers hips keep an up-to-date list of authorised child seats.
Risks presented by side airbags
Any child on the front passenger seat may be hit on the head and severely injured by the front side airbag inflating =:-&.
If you use a rear-facing child seat on the front passenger seat the child in it is at increased risk of sustaining critical or fatal injuries In the event of an accident.
• Deactivate the front passenger front air-bag. If the front passenger front airbag can-not be deactivated no rear-facing child seat may be used. 11>
Sitting correctly and safely
Page 98 of 486
DANGER (Continued)
• Only use child seats that have been ap· proved by the child seat manufacturer for use on a front passenger seat with front and side airbag.
A WARNING
Child seats present a risk of Injury if incor-rectly installed.
• Always read and follow the installation in· structions and warning information provided by the child seat manufacturer.
A wARNING
Using a front-facing child seat on the front passenger seat presents a risk of injury.
Types of child seat
0/0+
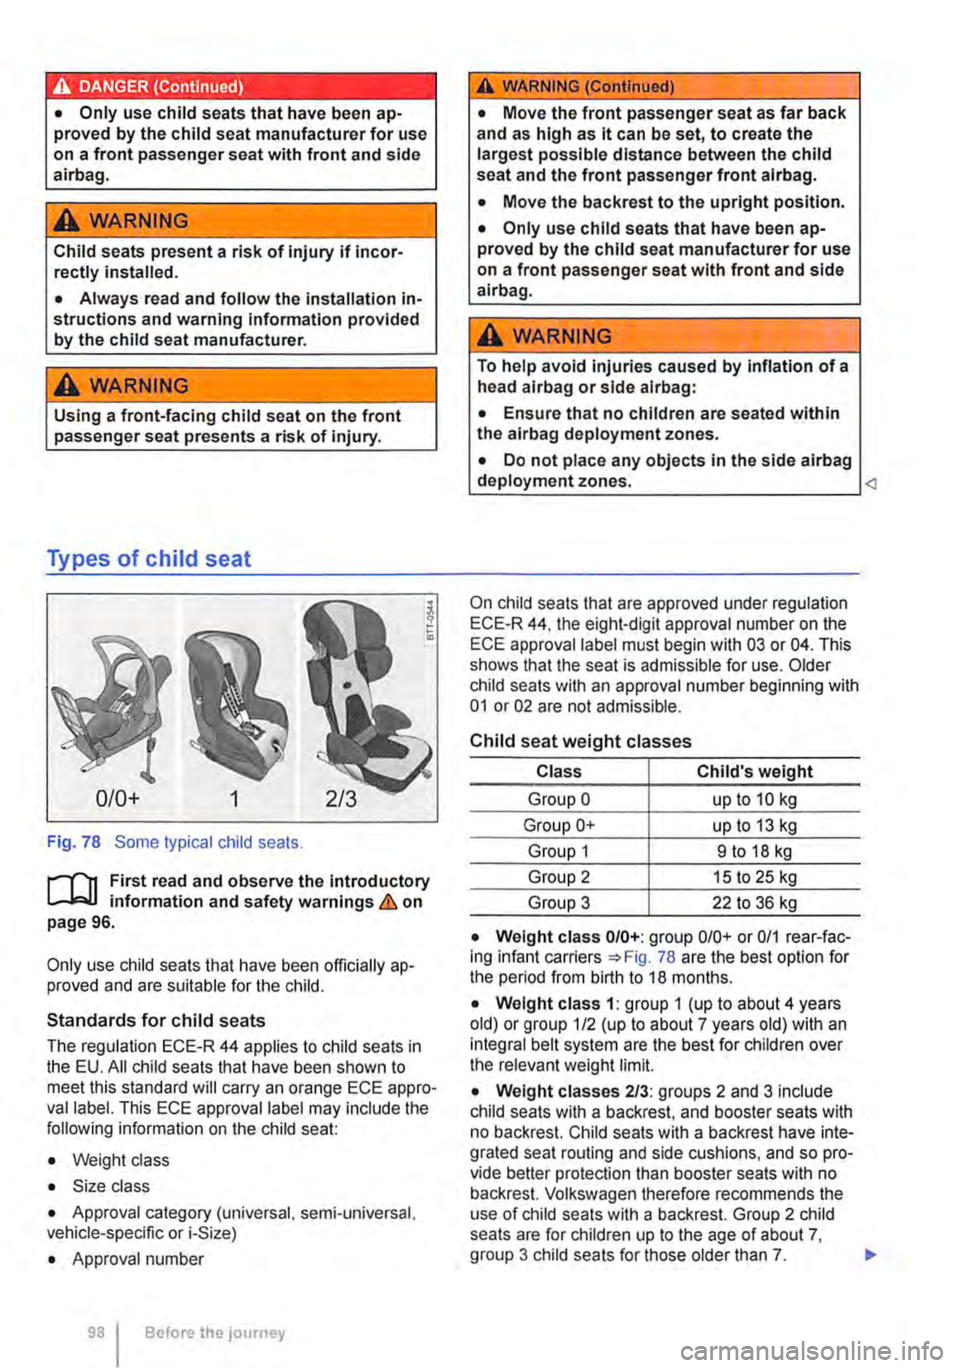
Fig. 78 Some typical child seats.
l""""("'n First read and observe the introductory L-J,::,lJ information and safety warnings & on page 96.
Only use child seats that have been officially ap-proved and are suitable for the child.
Standards for child seats
The regulation ECE·R 44 applies to child seats in the EU. All child seats that have been shown to meet this standard will carry an orange ECE appro· vallabel. This ECE approval label may include the following information on the child seat:
• Weight class
• Size class
• Approval category (universal. semi-universal, vehicle-specific or i-Size)
• Approval number
98 Before the journey
A WARNING (Continued)
• Move the front passenger seat as far back and as high as it can be set, to create the largest possible distance between the child seat and the front passenger front airbag.
• Move the backrest to the upright position .
• Only use child seats that have been ap-proved by the child seat manufacturer for use on a front passenger seat with front and side airbag.
A WARNING
To help avoid injuries caused by inflation of a head airbag or side alrbag:
• Ensure that no children are seated within the airbag deployment zones.
• Do not place any objects in the side airbag deployment zones.
On child seats that are approved under regulation ECE-R 44, the eight-digit approval number on the ECE approval label must begin with 03 or 04. This shows that the seat is admissible for use. Older child seats with an approval number beginning with 01 or 02 are not admissible.
Child seat weight classes
Class Child's weight
Group 0 up to 10 kg
Group 0+ up to 13 kg
Group 1 9 to 18 kg
Group 2 15 to 25 kg
Group 3 22 to 36 kg
• Weight class 0/0+: group 0/0+ or 0/1 rear-fac· ing infant carriers =:>Fig. 78 are the best option for the period from birth to 18 months.
• Weight class 1: group 1 (up to about 4 years old) or group 1/2 (up to about 7 years old) with an integral belt system are the best for children over the relevant weight limit.
• Weight classes 2/3: groups 2 and 3 include child seats with a backrest, and booster seats with no backrest. Child seats with a backrest have inte-grated seat routing and side cushions, and so pro-vide better protection than booster seats with no backrest. Volkswagen therefore recommends the use of child seats with a backrest. Group 2 child seats are for children up to the age of about 7,
Page 99 of 486
Not every child will fit in the child seat specified for their weight group. Likewise, not every seat will fit in every vehicle. Therefore it is vital to check that the child fits properly in their child seat and that the child seat can be securely fastened in the vehicle.
Child seat approval categories
Child seats can be classified as universal, semi-universal or vehicle-specific (all in accordance with regulation ECE-R 44), or as i-Size (in accordance with regulation ECE-R 129).
• Universal: child seats with universal approval are approved for use in all vehicles. No type list is required. ISOFIX child seats with universal appro-val must also be securing using a strap over the top of the vehicle seat (top tether).
• Semi-universal: semi-universal approval re-quires other safety devices for attaching the seat (that require additional testing) in addition to the
Securing systems
1""111 First read and observe the introductory L-J,::.U information and safety warnings & on page 96.
Different countries use different securing systems for safely fitting child seats in the vehicle.
Key terms for securing systems
• ISO FIX: ISOFIX is a standardised securing sys-tem for fitting child seats in the vehicle quickly and safely. The SOFIX attachment system creates a rigid connection between the child seat and the car body.
Any compatible child seat has two rigid attachment arms that click into ISOFIX attachment points at the bottom of the backrest. The ISOFIX securing system as described here is specific to the EU =:o page 100. An upper strap (top tether) and/or support leg may sometimes have to be used in ad-dition to the ISO FIX anchor points described above.
• Three-point automatic seat belt. lt is better to secure child seats using the ISOFIX system, if available, rather than with a three-point automatic seat belt =>page 102.
standard requirements for universal approval. Child seats with semi-universal approval come with a type list. The seats should only be used in vehi-cles that are included on this list.
• Vehicle-specific: child seats with vehicle spe-cific approval must have undergone dynamic test-ing in each model of vehicle for which it is ap-proved. These child seats also come with a type list.
• i-Size: child seats classified as must conform to the installation and safety requirements prescribed in regulation ECE-R 129. Contact the child seat manufacturer to find out which child seats are ap-proved for this vehicle in accordance with i-Size. <1
Additional securing points:
• Top tether: this strap at the top of the child seat is routed over the vehicle seat backrest and hooked to an anchor ring on the seat backs =:.page 101.
• Support leg: some child seats are propped up with a support leg resting on the floor of the vehi-cle. This support leg helps to prevent the child seat from tipping forward in a crash =:.&.
Recommended child seat securing systems
Volkswagen Commercial Vehicles recommends that child seats are secured as follows:
• Infant carrier or rear-facing child seat: ISO-FIX and support leg.
• Front-facing child seat: ISOFIX and top tether and possibly support leg also.
A WARNING
Incorrect use of the support leg can cause severe or fatal injuries.
• Make sure that the support leg is always correctly and safely Installed.
Sitting correctly and safely 99
Page 100 of 486
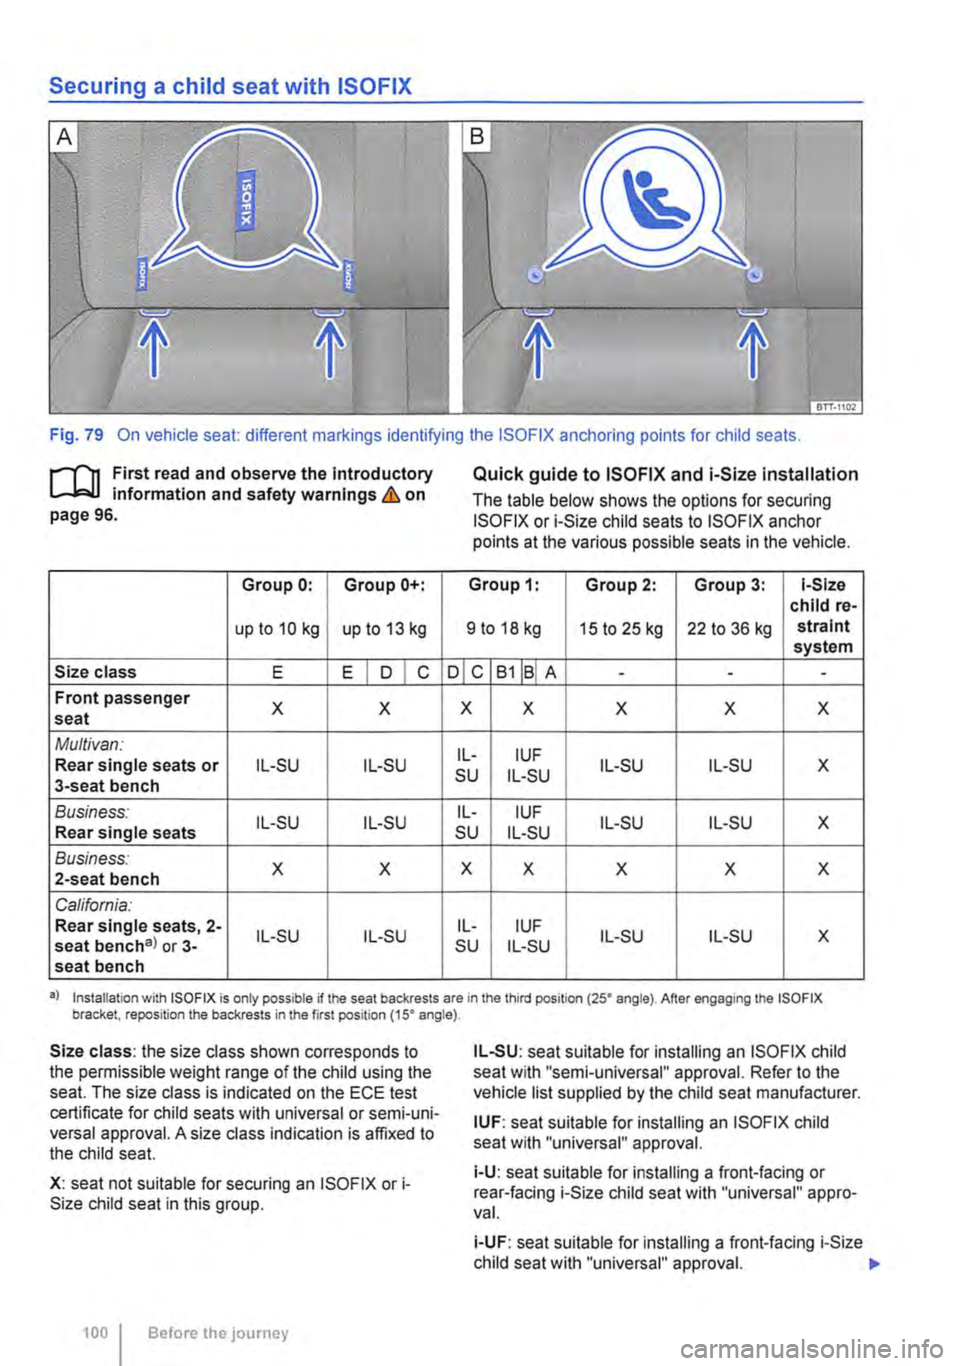
Fig. 79 On vehicle seat: different markings identifying the ISOFIX anchoring points for child seats.
1"'1'11 First read and observe the Introductory l..-J,::,IJ information and safety warnings & on page 96.
Group 0: Group 0+:
upto10kg up to 13 kg
Size class E EIDIC
Front passenger X X seat
Multivan: Rear single seats or IL-SU IL-SU 3-seat bench
Business: IL-SU IL-SU Rear single seats
Business: X X 2-seat bench
California: Rear single seats, 2-IL-SU IL-SU seat bencha> or 3-seat bench
Quick guide to ISO FIX and i-Size installation
The table below shows the options for securing ISO FIX or i-Size child seats to ISOFIX anchor points at the various possible seats in the vehicle.
Group 1: Group 2: Group 3: 1-Size child re-
9 to 18 kg 15 to 25 kg 22 to 36 kg strain! system
ojc B1jBI A ---
X X X X X
IL-IUF su IL-SU IL-SU IL-SU X
IL-IUF IL-SU IL-SU X su IL-SU
X X X X X
IL-IUF IL-SU IL-SU X su IL-SU
•> Installation with ISOFIX is only possible if the seat backrests are in the third position (25' angle). After engaging the ISOFIX bracket, reposition the backrests in the first position (15' angle).
Size class: the size class shown corresponds to the permissible weight range of the child using the seat. The size class is indicated on the ECE test certificate for child seats with universal or semi-uni-versal approval. A size class indication is affixed to the child seat.
X: seat not suitable for securing an ISOFIX or i-Size child seat in this group.
100 I Before the journey
IL-SU: seat suitable for installing an ISOFIX child seat with "semi-universal" approval. Refer to the vehicle list supplied by the child seat manufacturer.
IUF: seat suitable for installing an ISOFIX child seat with "universal" approval.
i-U: seat suitable for installing a front-facing or rear-facing i-Size child seat with "universal" appro-val.
i-UF: seat suitable for installing a front-facing i-Size child seat with "universal" approval.
Page 101 of 486
Installing child seats with ISOFIX ISOFIX/i-
Size
The location of the ISO FIX anchor points is shown either by a symbol or by a label marked "ISOFIX" 79.
• Observe the warnings 97, Basic infor-mation on fitting and using child seats.
• Push the attachment arms on the child seat into the ISOFIX anchor points 79 as shown by the arrows. The child seat must click and audibly securely into place.
• Pull on both sides of the child seat to check whether the seat has clicked properly into place.
• If the child seat is fitted with a support foot, the foot must sit firmly on the floor of the vehicle.
Using insert guides
If the child seat anchor points are not directly ac-cessible, insert guides make fitting and removing the child seat easier. First attach the insert guides to the anchor points. Then secure the child seat as per the installation guide.
CD
Avoid damage to the upholstery and seat cush-ions caused by the Insert guides.
• Always pull the insert guides off the anchor points before folding the rear seat forward, or when removing the child seat.
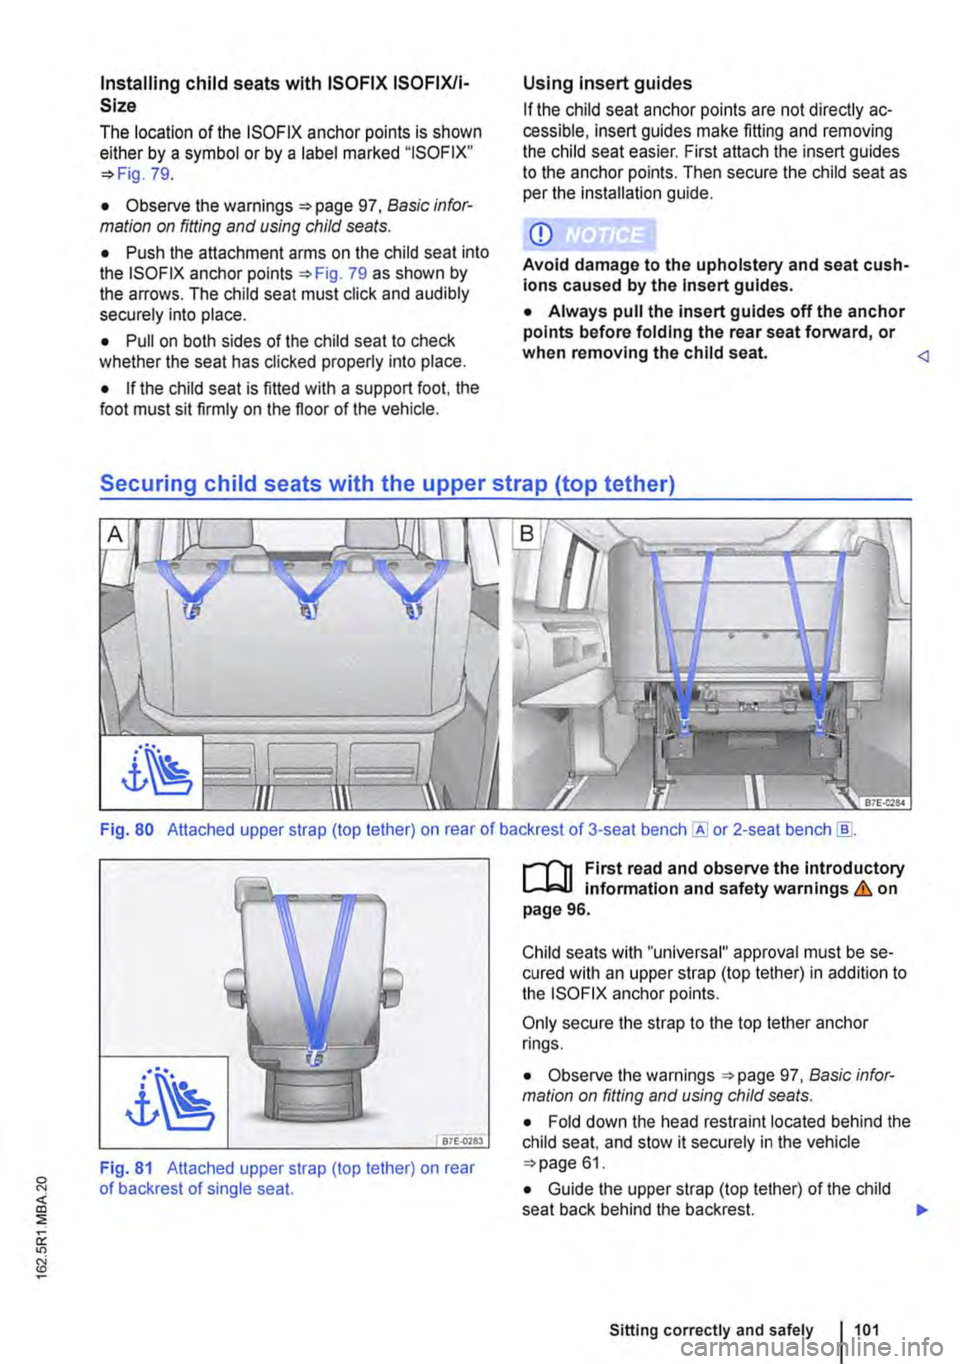
Fig. 80 Attached upper strap (top tether) on rear of backrest of 3-seat or 2-seat bench [ID.
87E-0783
Fig. 81 Attached upper strap (top tether) on rear of backrest of single seat.
r-1'11 First read and observe the Introductory L-lcJ.I Information and safety warnings & on page 96.
Child seats with "universal" approval must be se-cured with an upper strap (top tether) in addition to the ISOFIX anchor points.
Only secure the strap to the top tether anchor rings.
• Observe the warnings 97, Basic infor-mation on fitting and using child seats.
• Fold down the head restraint located behind the child seat, and stow it securely in the vehicle 61.
• Guide the upper strap (top tether) of the child seat back behind the backrest. )I>
Sitting correctly and safely 1101