2013 VOLKSWAGEN TRANSPORTER seats
[x] Cancel search: seatsPage 77 of 486
Bed extension (multi-flex board)
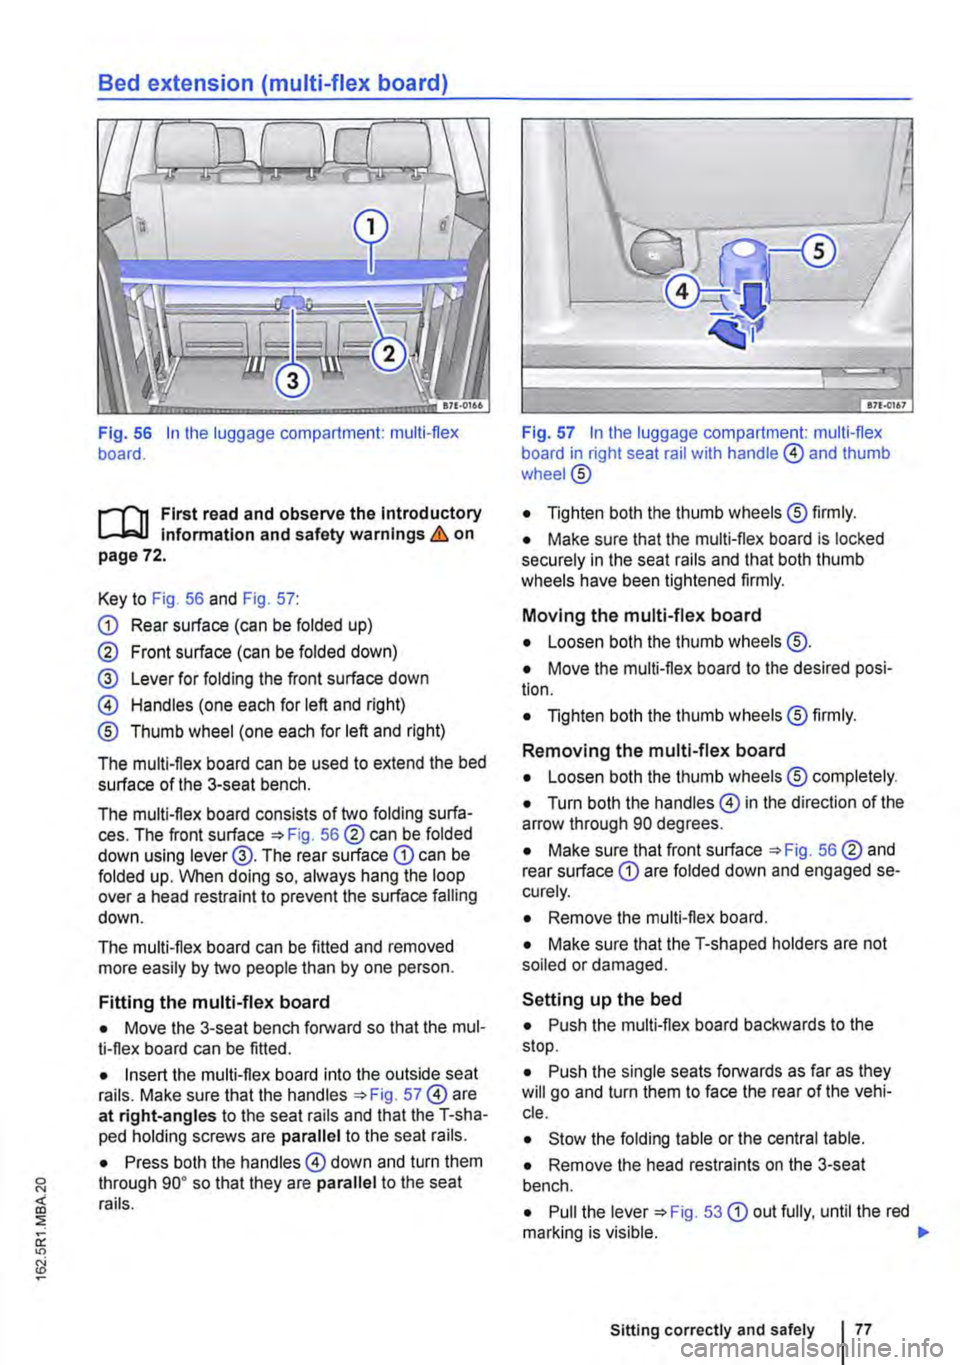
Fig. 56 In the luggage compartment: multi-flex board.
.--m First read and observe the Introductory L-.J,..U lnfonmatlon and safety warnings & on page 72.
Key to Fig. 56 and Fig. 57:
CD Rear surface (can be folded up)
@ Front surface (can be folded down)
@ Lever for folding the front surface down
@ Handles (one each for left and right)
® Thumb wheel (one each for left and right)
The multi-flex board can be used to extend the bed surface of the 3-seat bench.
The multi-flex board consists of two folding surfa-ces. The front surface =>Fig. 56@ can be folded down using lever@. The rear surface CD can be folded up. When doing so, always hang the loop over a head restraint to prevent the surface falling down.
The multi-flex board can be fitted and removed more easily by two people than by one person.
Fitting the multi-flex board
• Move the 3-seat bench forward so that the mul-ti-flex board can be fitted.
• Insert the multi-flex board into the outside seat rails. Make sure that the handles =>Fig. 57@ are at right-angles to the seat rails and that the T-sha-ped holding screws are parallel to the seat rails.
• Press both the handles@ down and turn them through go• so that they are parallel to the seat rails.
Fig. 57 In the luggage compartment: multi-flex board in right seat rail with handle @ and thumb wheel@
• Tighten both the thumb wheels® firmly.
• Make sure that the multi-flex board is locked securely in the seat rails and that both thumb wheels have been tightened firmly.
Moving the multi-flex board
• Loosen both the thumb wheels @.
• Move the multi-flex board to the desired posi-tion.
• Tighten both the thumb wheels® firmly.
Removing the multi-flex board
• Loosen both the thumb wheels® completely.
• Turn both the handles@ in the direction of the arrow through 90 degrees.
• Make sure that front surface =>Fig. 56@ and rear surface CD are folded down and engaged se-curely.
• Remove the multi-flex board.
• Make sure that the T-shaped holders are not soiled or damaged.
Setting up the bed
• Push the multi-flex board backwards to the stop.
• Push the single seats forwards as far as they will go and turn them to face the rear of the vehi-cle.
• Stow the folding table or the central table.
• Remove the head restraints on the 3-seat bench.
• Pull the lever =>Fig. 53 CD out fully, until the red marking is visible. 11>
Sitting correctly and safely
Page 78 of 486
• Fold the backrest of the 3-seat bench com-pletely forwards onto the seat cushion.
• Open the centre cover 53®@ below the bench seat, pull the loop @ under the seat cushion, and hold it in this position.
• Push the 3-seat bench forward to the single seats, and release the loop. The 3-seat bench must contact the seat cushions of the single seats.
• Pull the lever 53 CD out fully, until the red marking is visible.
• Fold the backrest of the 3-seat bench com-pletely backwards.
• Make sure that the lever has returned to its original position. The red marking should no longer be visible.
• Fold up the front surface 56® of the multi-flex board.
• Place the supplied mattress on the multi-flex board.
• Fit the elasticised cover to the bed.
A WARNING
Objects that are not secured, or are secured incorrectly, can cause serious injuries in the event of a sudden driving or braking manoeu-vre or accident.
Centre armrest
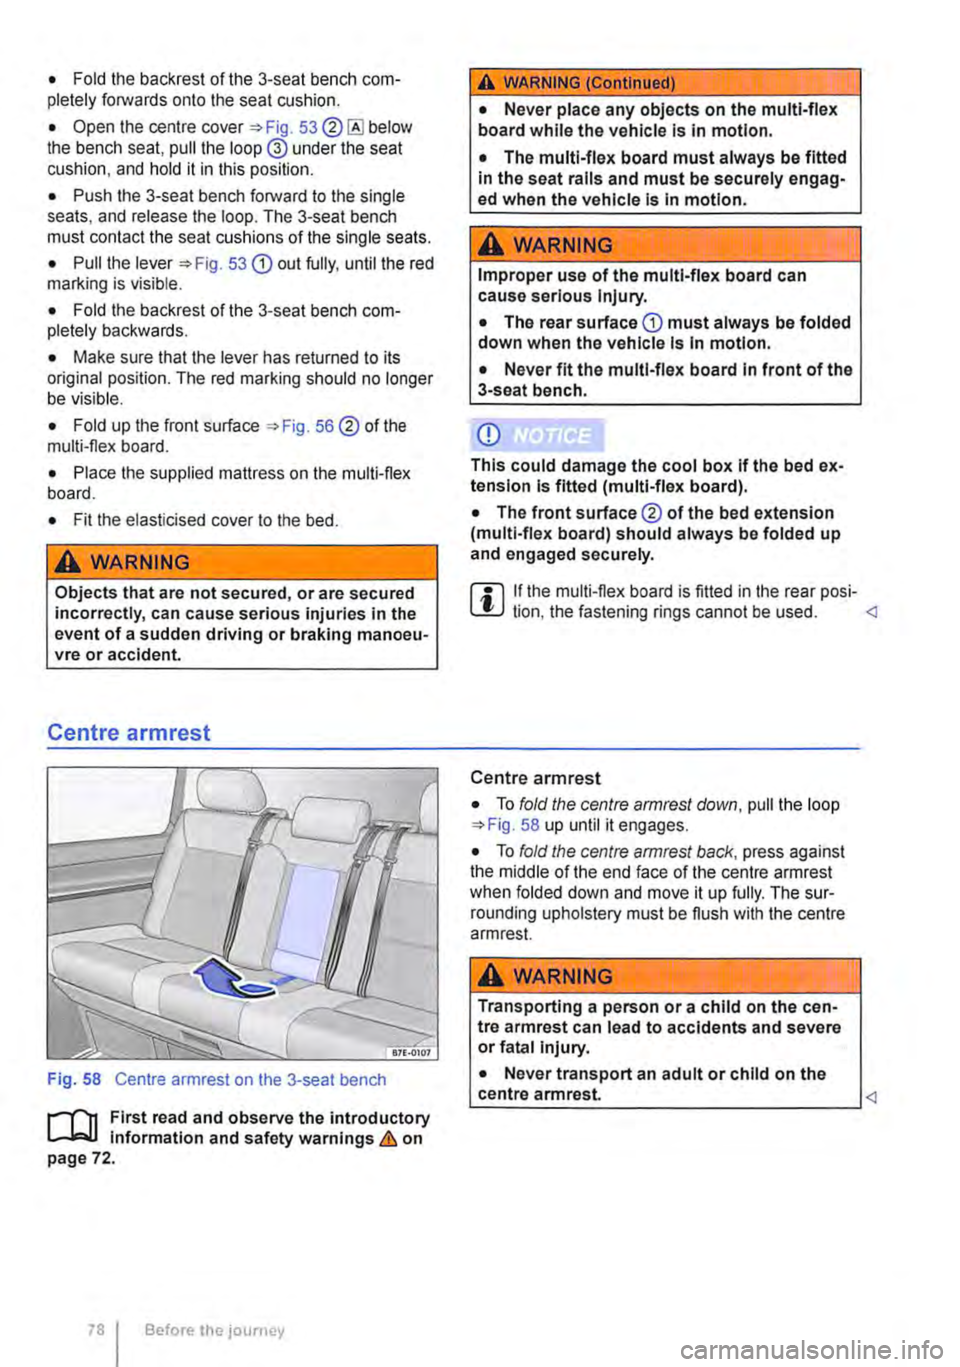
Fig. 58 Centre armrest on the 3-seat bench
1"'1'11 First read and observe the introductory l.-J,::.IJ information and safety warnings & on page 72.
78 Before the journey
A WARNING (Continued)
• Never place any objects on the multi-flex board while the vehicle Is In motion.
• The multi-flex board must always be fitted in the seat rails and must be securely engag-ed when the vehicle Is In motion.
A WARNING
Improper use of the multi-flex board can cause serious Injury.
• The rear surface CD must always be folded down when the vehicle Is In motion.
• Never fit the multi-flex board In front of the 3-seat bench.
Q)
This could damage the cool box If the bed ex-tension Is fitted (multi-flex board).
• The front surface® of the bed extension (multi-flex board) should always be folded up and engaged securely.
m If the multi-flex board is fitted in the rear posi-L!..J lion. the fastening rings cannot be used.
• To fold the centre armrest down, pull the loop 58 up until it engages.
• To fold the centre armrest back, press against the middle of the end face of the centre armrest when folded down and move it up fully. The sur-rounding upholstery must be flush with the centre armrest.
A WARNING
Transporting a person or a child on the cen-tre armrest can lead to accidents and severe or fatal Injury.
• Never transport an adult or child on the
__
Page 79 of 486
Seat belts
o:n Introduction
This chapter contains information on the following subjects:
Warning lamp . . . . . . . . . . . 80
Frontal collisions and the laws of physics 81
What happens to vehicle occupants who have not fastened their seat belts 82
Seat belt protection . . . . . . . . . . . . . . . . . . . . . . 83 Using seat belts . . . . . . . . . . . . . . 83
Fastening and unfastening seat belts . 84 Seat belt routing . . . . . . . . . . . . . . . . . . 85
Belt height adjuster . . . . . . . . . . . . . . . . 86
Automatic belt retractor and belt tensioner . . . 86
Service and disposal of belt tensioners . . 87
Check the condition of all seat belts regularly. If the belt webbing, belt connections, belt retractor or seat belt buckle become damaged, the seat belt in question should be replaced immediately by a qualified workshop=:.&. The qualified workshop must use correct spare parts that are compatible with the vehicle, equipment level and model year. Volkswagen Commercial Vehicles recommends us-ing a Volkswagen Commercial Vehicles dealership for this purpose.
Additional information and warnings:
• Adjusting the seat position =:.page 61
• Seat functions, rear =>page 72
• Airbag system =>page 87
• Child seats (accessories) =:.page 96
• Integrated child seats =:.page 102
• Stowage =>page 150
• Seat functions, rear, Business =>page 182
• Seat functions, rear, California =:.page 193
• Cleaning and caring for the interior =:.page 388
• Accessories, modifications, repairs and renewal of parts =>page 394
A WARNING
Incorrectly fastened or unfastened seat belts increase the risk of severe or fatal injuries. Seat belts will only offer the optimum level of protection when they are fastened and used properly.
A WARNING (Continued)
• Seat belts are the most effective means of reducing the risk of serious and fatal injuries In the event of an accident. Seat belts must always be fastened properly when the vehicle Is In motion to protect the driver and all vehi-cle occupants.
• Before every trip, each vehicle occupant must adopt the correct sitting position, cor-rectly fasten the seat belt belonging to their seat and keep it fastened properly throughout the trip. This applies to all vehicle occupants and also In urban traffic.
• While the vehicle is in motion, secure all children travelling In the vehicle in a restraint system suitable for their weight and height. They must also wear correctly fastened seat belts =>page 96.
• Only start driving when all passengers have correctly fastened their seat belts.
• Only ever insert the latch plate into the buckle of the associated seat, and always en-sure that it engages properly. Using a buckle that does not belong to the seat that you are occupying reduces the level of protection and can lead to severe injuries.
• Avoid allowing foreign bodies or liquids to enter the slot for the seat belt buckle. This could prevent the belt buckle and seat belt from working properly.
• Never unfasten the seat belt while the ve-hicle is in motion.
• Never allow more than one person to share the same seat belt.
• Never travel when children or babies are being carried on somebody's lap and fas-tened with the same belt.
• Never travel wearing loose, bulky clothing (such as an overcoat over a jacket). This could prevent the seat belts from fitting and functioning properly.
A WARNING
Damaged seat belts are very dangerous and can cause severe or fatal Injuries.
• Never damage the belt by trapping it in the door or in the seat mechanism. 11>
Sitting correctly and safely
Page 85 of 486
Seat belt routing
BTT.Q3l4
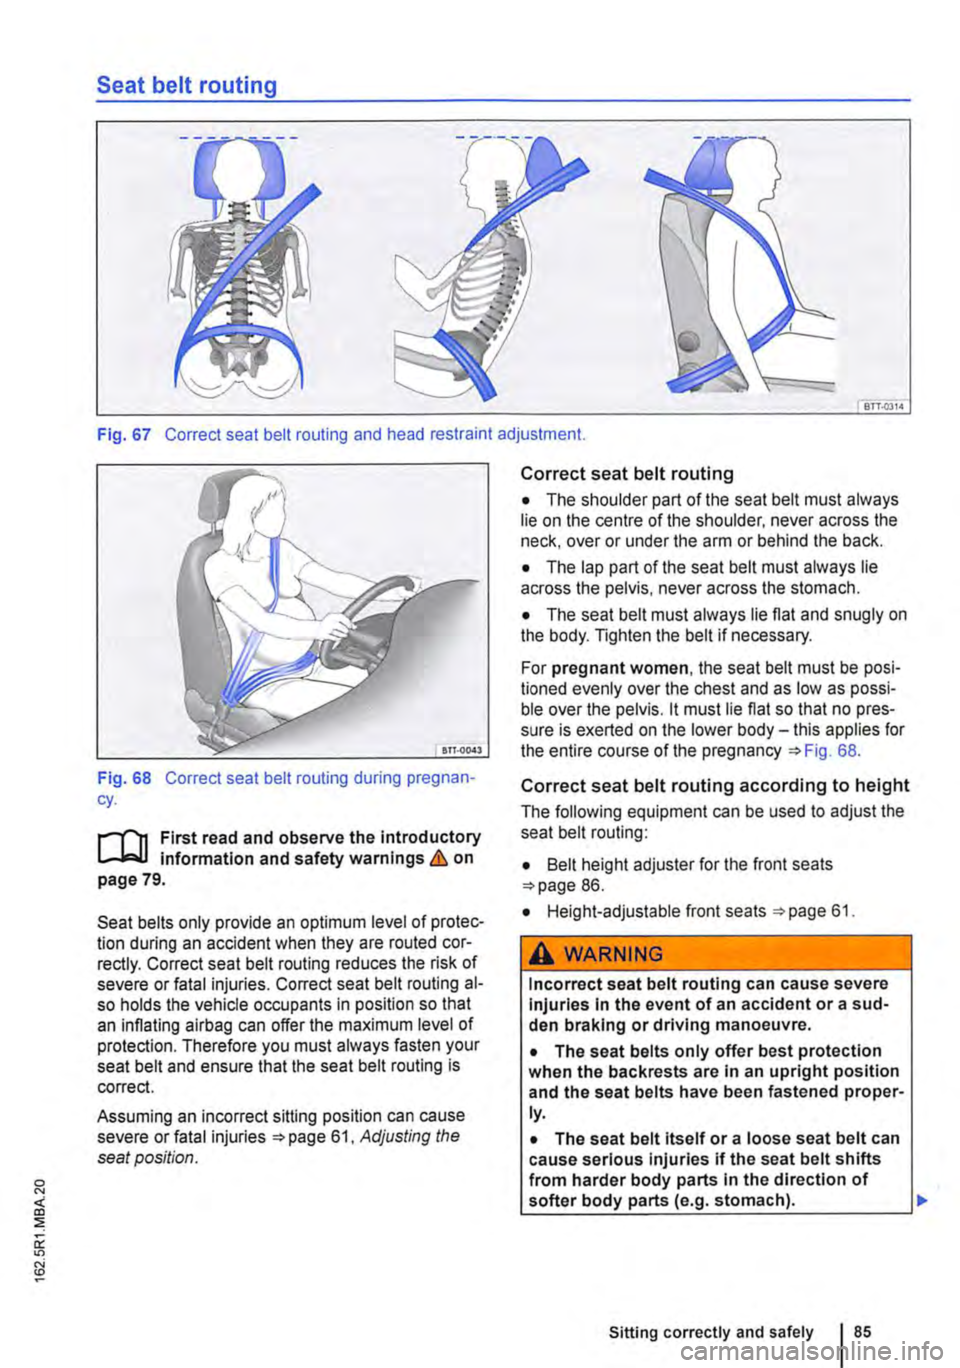
Fig. 67 Correct seat belt routing and head restraint adjustment.
Fig. 68 Correct seat belt routing during pregnan-cy.
r-T'n First read and observe the introductory L-Wl infonmation and safety warnings & on page 79.
Seat belts only provide an optimum level of protec-tion during an accident when they are routed cor-rectly. Correct seat belt routing reduces the risk of severe or fatal injuries. Correct seat belt routing al-so holds the vehicle occupants in position so that an inflating airbag can offer the maximum level of protection. Therefore you must always fasten your seat belt and ensure that the seat belt routing is correct.
Assuming an incorrect sitting position can cause severe or fatal injuries 61, Adjusting the seat position.
Correct seat belt routing
• The shoulder part of the seat belt must always lie on the centre of the shoulder, never across the neck, over or under the arm or behind the back.
• The lap part of the seat belt must always lie across the pelvis, never across the stomach.
• The seat belt must always lie flat and snugly on the body. Tighten the belt if necessary.
For pregnant women, the seat belt must be posi-tioned evenly over the chest and as low as possi-ble over the pelvis. it must lie flat so that no pres-sure is exerted on the lower body-this applies for the entire course of the pregnancy =>Fig. 68.
Correct seat belt routing according to height
The following equipment can be used to adjust the seat belt routing:
• Belt height adjuster for the front seats =>page 86.
• Height-adjustable front seats =>page 61.
A WARNING
Incorrect seat belt routing can cause severe Injuries In the event of an accident or a sud-den braking or driving manoeuvre.
• The seat belts only offer best protection when the backrests are in an upright position and the seat belts have been fastened proper-ly.
• The seat belt itself or a loose seat belt can cause serious injuries if the seat belt shifts from harder body parts In the direction of softer body parts (e.g. stomach). .,.
Sitting correctly and safely
Page 86 of 486
A WARNING !Continued)
• The shoulder part of the seat belt must lie on the centre of the shoulder and never un-der the arm or across the neck.
• The seat belt must lie flat and snugly on the chest.
• The lap part of the seat belt must lie across the pelvis and never across the stom-ach. The seat belt must lie flat and snugly on the pelvis. Tighten the belt if necessary.
• For pregnant women, the lap part of the seat belt must be as low as possible over the pelvis and lie flat around the bulge of the bel-ly.
• Do not twist the belt webbing while the seat belt is being worn.
• Never hold the seat belt away from the body by hand.
Belt height adjuster
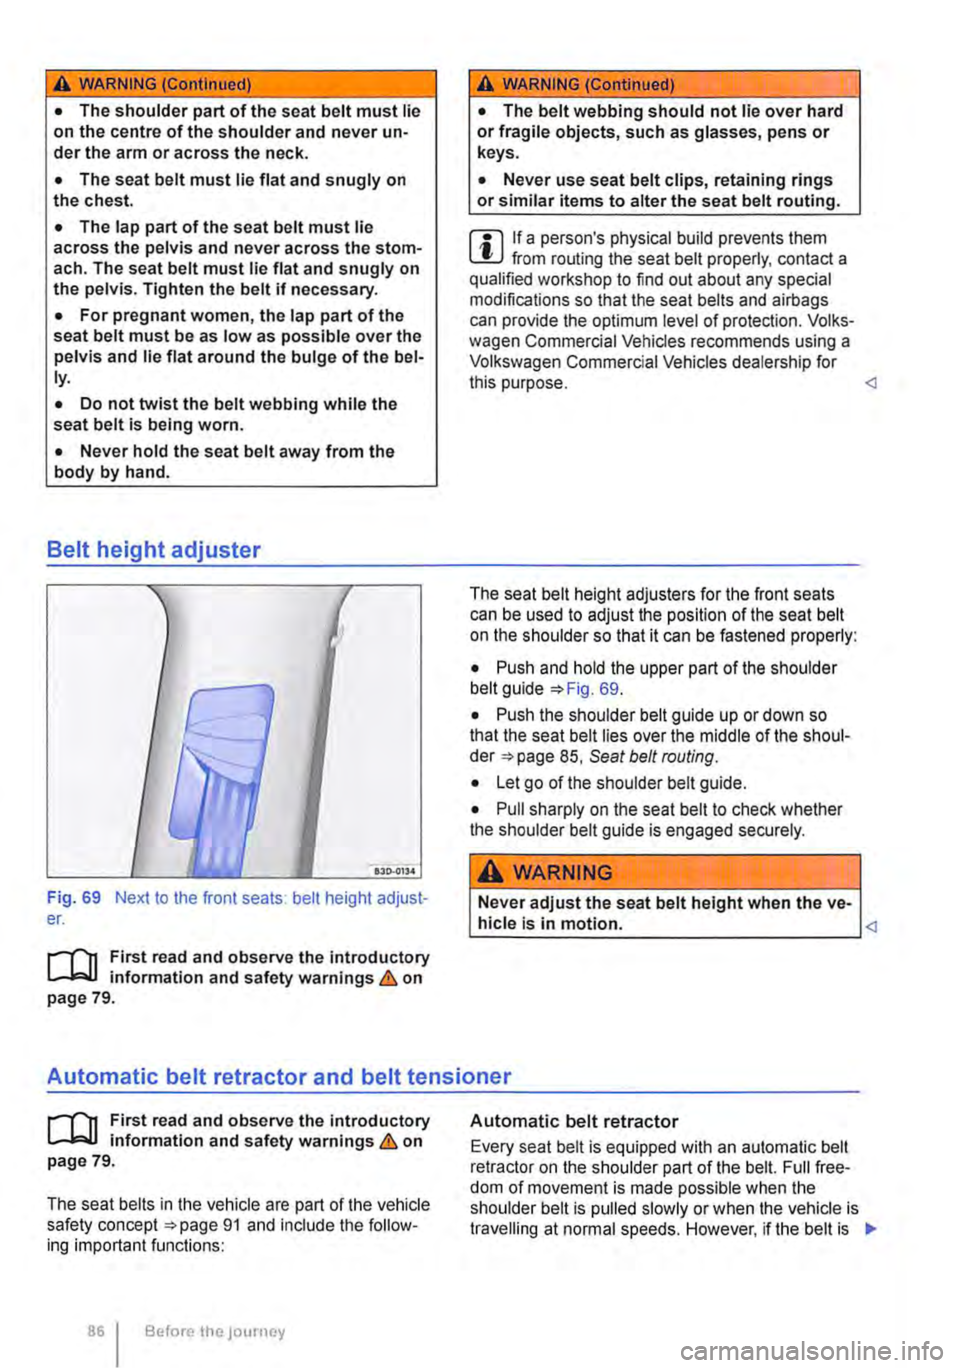
Fig. 69 Next to the front seats: belt height adjust-er.
r--T'n First read and observe the introductory L-W.I information and safety warnings & on page 79.
A WARNING !Continued)
• The belt webbing should not lie over hard or fragile objects, such as glasses, pens or keys.
• Never use seat belt clips, retaining rings or similar items to alter the seat belt routing.
m If a person's physical build prevents them L.!:J from routing the seat belt properly, contact a qualified workshop to find out about any special modifications so that the seat bells and airbags can provide the optimum level of protection. Volks-wagen Commercial Vehicles recommends using a Volkswagen Commercial Vehicles dealership for this purpose.
• Push and hold the upper part of the shoulder belt guide 69.
• Push the shoulder belt guide up or down so that the seat belt lies over the middle of the shoul-der 85, Seat belt routing.
• Let go of the shoulder belt guide.
• Pull sharply on the seat bell to check whether the shoulder belt guide is engaged securely.
Never adjust the seat belt height when the ve-hicle is in motion.
r--f"'n First read and observe the introductory L-W.I information and safety warnings & on page 79.
The seat belts in the vehicle are part of the vehicle safety concept 91 and include the follow-ing important functions:
86 Before the journey
Automatic belt retractor
Every seat belt is equipped with an automatic belt retractor on the shoulder part of the belt. Full free-dom of movement is made possible when the shoulder belt is pulled slowly or when the vehicle is travelling at normal speeds. However, if the belt is IIJ>
Page 88 of 486
are not a substitute for seat belts. Seat belts must always be worn, even when the front seats are equipped with front airbags.
Additional information and warnings:
• Driving tips 33
• Central locking system 39
• Correct sitting position 61
• Seat belts 79
• Child seats (accessories) 96
• Cleaning and caring for the interior 388
• Accessories, modifications, repairs and renewal of parts 394
• Consumer information 404
A WARNING
Never rely solely on the airbag system for your protection.
• Even if an alrbag is triggered, it only offers auxiliary protection.
• The airbag system offers the best level of protection, and reduces the risk of injury, when seat belts are properly worn 79, Seat belts.
• Before every trip, each vehicle occupant must adopt the correct sitting position, cor-rectly fasten the seat belt belonging to their seat and keep it fastened properly throughout the trip. This applies to ail vehicle occupants and also in urban traffic.
A WARNING
The risk of injury increases if there are any objects between the vehicle occupants and the deployment area of the airbag when it is triggered. This will alter the deployment zone of the airbag, or the objects will be flung against the body.
• Never hold any objects in your hand or on your lap while the vehicle is in motion.
• Never transport any objects on the front passenger seal The objects could enter the deployment zone of the airbag during sudden braking or driving manoeuvres and then be flung dangerously through the vehicle interi-or if the airbag is activated.
• Vehicle occupants sitting on the front seats and rear outer seats must never carry any people, pets or objects in the deployment zone between themselves and the airbags. Make sure that children and passengers also keep to this rule.
BB I Before the journey
A WARNING
External devices in the vehicle that are not properly secured can be flung though the in-terior and cause injuries, if there is a sudden driving or braking manoeuvre, or in the event of an accident.
• You should never position or attach an ex-ternal device on a door, on the windscreen or above or near to the areas marked "AIRBAG" on the steering wheel, the dash panel and the seat backrests, or between these areas and the vehicle occupants. External devices can cause serious Injury in an accident, especial-ly when the airbags deploy.
A WARNING
The alrbag system can only be triggered once. The system will have to be replaced if the airbags have been triggered.
• Alrbags that have deployed and any affec-ted system parts must be immediately re-placed with new parts that are approved by Volkswagen Commercial Vehicles for the re-spective vehicle.
• Repairs and modifications to your vehicle should only be carried out by a qualified workshop. Qualified workshops have the nec-essary tools, diagnostic equipment, repair in-formation and qualified personnel.
• Never use recycled alrbag components or components that have been taken from end-of-life vehicles in your vehicle.
• Never alter any components of the airbag system.
A WARNING
Fine dust particles or steam may be released when the alrbags trigger. This Is normal and does not mean that there is a fire in the vehi-cle.
• The fine dust can cause irritation to the skin and eye membranes and cause breath-ing difficulties, particularly for people suffer-ing from asthma or people who have {had) other respiratory problems. To help reduce breathing difficulties, get out of the vehicle or open the windows or doors for more fresh air.
• If you come into contact with the dust, you should wash your hands and face with a mild soap and water before eating.
• Do not let the dust get into your eyes or into open wounds.
Page 91 of 486

The airbag system is part of the vehicle's overall passive safety concept. The airbag system can on-ly work effectively when the occupants are wearing their seat belts correctly and have assumed a proper sitting position & 61.
Components of the vehicle safety concept
The following vehicle safety equipment makes up the vehicle's safety concept to reduce the risk of severe and fatal injuries. Some of this equipment may not be fitted in your particular vehicle. lt may not be available at all in some countries.
• Optimised seat belts for all seats.
• Belt tensioners for the driver and front passen-ger in conjunction with curtain and side airbags.
• Belt height adjuster for the front seats.
• Seat belt warning lamp.
• Front airbags for driver and front passenger.
• Combined curtain and side airbags for the driv-er and front passenger.
• Multivan: if fitted, curtain airbags on the rear outer seats of the second and third row of seats.
• Airbag indicator lamp.
• PASSENGER AIR BAG indicator lamp.
• Control units and sensors.
• Height-adjustable head restraints optimised for rear Impact.
• Adjustable steering column.
• If fitted, anchor points for child seats on the sin-gle seats in the passenger compartment and the outer seats of the bench seat.
Situations in which the front, the combined curtain and side airbag and the curtain airbag will not be triggered:
• If the ignition is switched off during a collision.
• If the level of deceleration measured by the control unit is too low during a collision at the front of the vehicle.
• During a minor side collision.
• During rear collisions.
• If the vehicle rolls over.
• If the impact speed in a collision is lower than the reference value specified in the control unit. <1
Sitting correctly and safely I 91
Page 93 of 486
A DANGE;R (Continued) --
• No other people, animals or objects may be carried between the occupants of the front seats and the alrbag deployment zone. Make sure that children and passengers also keep to this rule.
• Do not attach any objects, e.g. mobile nav-igation devices, to the windscreen above the front alrbag on the front passenger side.
• Do not cover or stick anything on the steering wheel hub or the soft plastic surface of the alrbag unit In the dash panel on the front passenger side, and do not modify them In any way.
A WARNING
The front alrbags are deployed In front of the steering wheel "*Fig. 71 and dash panel '*Fig. 72.
• When driving, always hold the steering wheel with both hands on the outside of the ring at the 9 o'clock and 3 o'clock positions.
• Adjust the driver seat so that there is at least 25 cm between your breastbone and the hub of the steering wheel. Contact a qualified workshop if your physical build makes this Impracticable.
• Adjust the front passenger seat so that the distance between the passenger and the
__ ____
Switching the front passenger front airbag on and off manually using the
key-operated switch
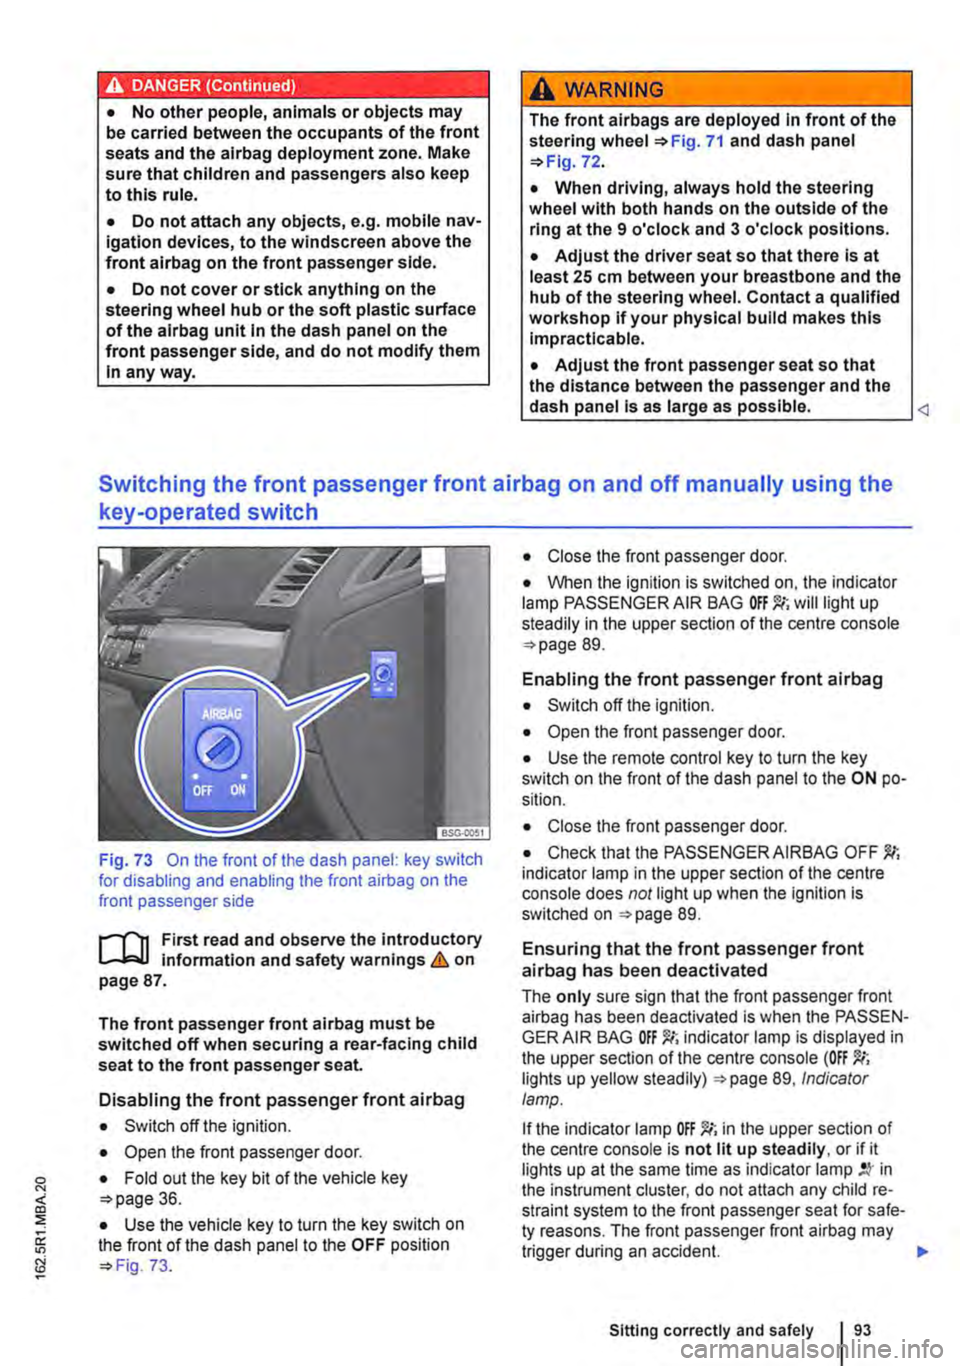
Fig. 73 On the front of the dash panel: key switch for disabling and enabling the front airbag on the front passenger side
l""'rn First read and observe the introductory L-J,::.U information and safety warnings&. on page 87.
The front passenger front airbag must be switched off when securing a rear-facing child seat to the front passenger seat.
Disabling the front passenger front airbag
• Switch off the ignition.
• Open the front passenger door.
• Fold out the key bit of the vehicle key o>page 36.
• Use the vehicle key to turn the key switch on the front of the dash panel to the OFF position o> Fig. 73.
• Close the front passenger door.
• When the ignition is switched on, the indicator lamp PASSENGER AIR BAG will light up steadily in the upper section of the centre console o> page 89.
Enabling the front passenger front airbag
• Switch off the ignition.
• Open the front passenger door.
• Use the remote control key to turn the key switch on the front of the dash panel to the ON po-sition.
• Close the front passenger door.
• Check that the PASSENGER AIRBAG OFF indicator lamp in the upper section of the centre console does not light up when the Ignition is switched on =>page 89.
Ensuring that the front passenger front airbag has been deactivated
The only sure sign that the front passenger front airbag has been deactivated is when the PASSEN-GER AIR BAG indicator lamp is displayed in the upper section of the centre console (OFF lights up yellow steadily) =>page 89, Indicator lamp.
If the indicator lamp OFF )!(; in the upper section of the centre console is not lit up steadily, or if it lights up at the same time as indicator lamp in the instrument cluster, do not attach any child re-straint system to the front passenger seat for safe-ty reasons. The front passenger front airbag may trigger during an accident.
Sitting correctly and safely