2013 VOLKSWAGEN TIGUAN change time
[x] Cancel search: change timePage 28 of 356

Possible MFI menu displays
The following displays can be accessed in the MFI menu if enabled under Settings > MFI data.
Displays that are not enabled will not appear.
Display Function
Travel time Driving time in hours (h) and minutes (min) corresponding to trip mem-
ories 1 and 2 (toggle).
Curr. consumption --
- mpg
Current fuel consumption in miles per gallon (l/ km) while driving.
When units are set to miles, dashes appear instead of a number when
the engine is running and the vehicle is standing still.
When units are set to kilometers, the display shows liters consumed
per hour when the engine is running and the vehicle is standing still.
Av. consumption ø --
- mpg
Average fuel consumption in miles per gallon (l/ km) on trips per trip
memories 1 and 2 (toggle) is displayed once the vehicle has been
driven about feet ( m). Until then, dashes appear instead of a num-
ber. The value displayed is updated every 5 seconds.
Range
Estimated distance in miles (km) that the vehicle can go with the fuel
left in the tank the way you are currently driving. Takes account of the
current fuel consumption, among other things.
Route Distance driven in miles (km) per trip memories 1 and 2 (toggle).
Av. speed ø
Average speed on trips per trip memories 1 and 2 (toggle). Displayed
once the vehicle has been once the vehicle has been driven about
feet ( m). Until then, dashes appear instead of a number. The value
displayed is updated every 5 seconds.
Digit. speed Digital display of current vehicle speed.
Speed warn. --- mph
(km/h)
When the set speed (from 20 to mph - 30 to km/h) is exceeded, an
acoustic warning sounds, and a visual message may also appear in the
instrument cluster display.
Switching between the displays
�x Use the arrow up and down buttons �* and �+ on the multi-function steering wheel.
Storing speed for the speed warning
�x Navigate to MFI > Speed warning (Speed warning at --- mph).
�x Press the OK button to save the current speed and to activate the warning.
�x If the speed is not right, press buttons �* or �+ on the multi-function steering wheel to set a different
speed within about 5 seconds. Then press the OK button a second time or just wait a few seconds.
The speed is saved and the warning is activated.
�x To deactivate, toggle to --- mph and press the OK button. The set speed is deleted.
Manually erasing trip memory 1 or 2
�x Navigate to MFI > Route.
�x Select the memory to be erased.
�x Press the OK button for about 2 seconds.
Enabling and disabling displays
Use the Settings menu, submenu MFI data (Settings > MFI data) to enable displays you want to
be available under the MFI menu in the instrument cluster display. The units in which data is displayed
can also be changed
Page 45 of 356

All turn signals flash twice to confirm that the vehicle has been unlocked and once to confirm that it
has been locked.
If the vehicle was unlocked and within the next few seconds no door or the rear hatch has been
opened, the vehicle is automatically locked again.
Unlocking and opening doors (Keyless Entry)
�x Grasp the door handle of the driver or front passenger door so that you touch the unlocking sensor
surface (1).
�x Open the door.
Closing and locking doors (Keyless Exit)
�x Close the driver door.
�x Touch the sensor surface in the door handle on the driver or front passenger door (2) once. The
vehicle is locked. The door being locked must be closed.
Unlocking and locking the rear hatch
If the vehicle is locked and if a valid vehicle key is within range ⇒ fig. 26 of the rear hatch, it unlocks
automatically when opened.
�x Open and close the rear hatch as you would a standard rear hatch
The rear hatch locks automatically when it is closed except in the following situations:
�x The vehicle is completely unlocked.
�x When an authorized vehicle key is inside the vehicle.
Locking with a second vehicle key
If a remote control vehicle key is inside the passenger compartment, the vehicle can be locked from
the outside only if a second valid vehicle key is within range.
When the vehicle is locked from the outside, the keyless go (starting) function of any keys left in the
passenger compartment will be deactivated. All other functions (remote central locking and unlocking
as well as emergency starting) remain active and unchanged.
A key that was inside the vehicle when it was locked from the outside is reactivated:
�x by pressing a button on the deactivated key.
�x by pressing a door handle sensor when the deactivated key is outside of the vehicle, but within
range.
�x by starting the engine with the starter button on the center console.
Automatic deactivation of sensors
If the vehicle has not been unlocked or locked for a longer period of time, the proximity sensors in the
passenger door are automatically deactivated.
If a sensor on the door handle of a locked vehicle is activated too often, for instance by a bush or
hedge that rubs against the vehicle, the sensors in the door handle on that side of the vehicle are
switched off for about 30 minutes.
The door handle sensors become active again if one of the following events occurs:
�x 30 minutes have passed.
�x OR: The vehicle is unlocked using the �0 button in the remote control vehicle key.
�x OR: The rear hatch is opened.
�x OR: The vehicle is mechanically unlocked with the vehicle key.
Convenience features
To use the convenience closing feature to close all power windows, hold your finger on the lock sensor
surface ⇒ fig. 27 on the outside of the door handle for a few seconds until the windows close.
Page 69 of 356

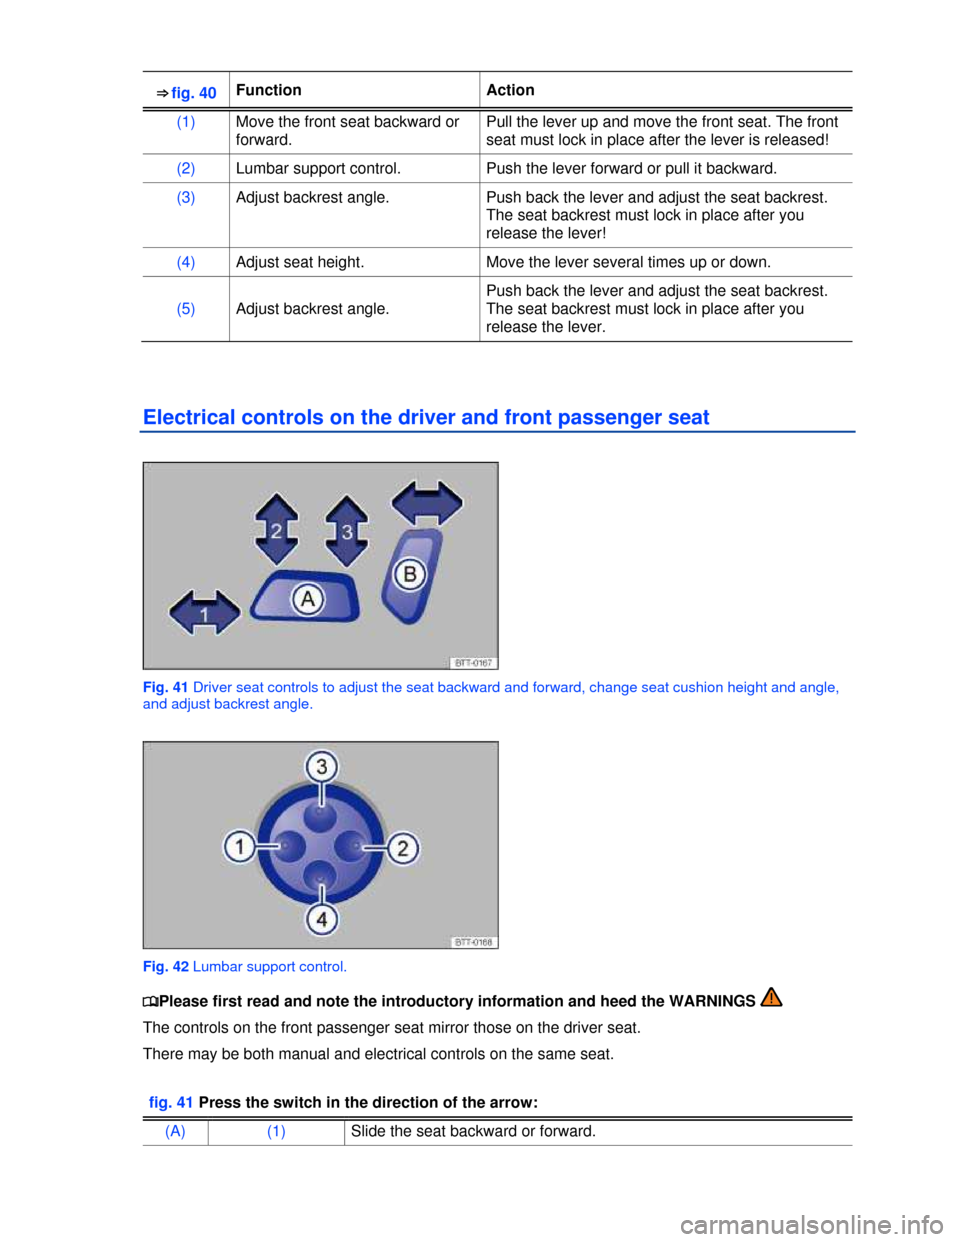
⇒ fig. 40 Function Action
(1) Move the front seat backward or
forward.
Pull the lever up and move the front seat. The front
seat must lock in place after the lever is released!
(2) Lumbar support control. Push the lever forward or pull it backward.
(3) Adjust backrest angle. Push back the lever and adjust the seat backrest.
The seat backrest must lock in place after you
release the lever!
(4) Adjust seat height. Move the lever several times up or down.
(5) Adjust backrest angle.
Push back the lever and adjust the seat backrest.
The seat backrest must lock in place after you
release the lever.
Electrical controls on the driver and front passenger seat
Fig. 41 Driver seat controls to adjust the seat backward and forward, change seat cushion height and angle,
and adjust backrest angle.
Fig. 42 Lumbar support control.
�
Page 147 of 356

�x Weight distribution is especially bad if the towing vehicle is empty and the trailer is loaded. If you
absolutely must drive with this combination, drive with extra care and at a reduced speed.
Starting off with a trailer on hills
Depending on how steep the hill is and the combined towing weight, a parked vehicle with trailer can
roll backwards when you first start moving.
When starting off with a trailer on a hill:
�x Depress and hold the brake pedal (and depress and hold the clutch - manual transmission).
�x Shift into first gear or drive position (D)191, Braking, stopping, and parking.
�x Press the �Gbutton once to deactivate the electronic parking brake , Braking, stopping, and parking.
�x Pull and hold the �Gbutton to hold the vehicle and trailer with the electronic parking brake 191,
Braking, stopping, and parking.
�x At the same time, release the brake pedal and gradually depress the accelerator and, for manual
transmission, let out the clutch until you can feel the car moving forward. If applicable, follow the
instructions for the Hill Hold feature.
�x Do not release the �G button until the engine starts to move the vehicle forward. If your vehicle has
an automatic transmission, you can also depress and hold the brake pedal for added braking and then
let up on the brake pedal when you feel that the vehicle “wants” to move forward.
�x Drive ahead slowly.
WARNING
Improper trailer towing can cause loss of vehicle control and serious personal injury.
�x Driving with a trailer and carrying heavy or bulky items changes the way the vehicle
handles and increases the distance it needs to stop safely.
�x Always watch what is happening up ahead and around you. Brake earlier than you would
if you were not towing a trailer.
�x Always adapt your speed and driving to the heavier load and the weight distribution in the
vehicle. Take road, weather, traffic, and visibility conditions into account as well.
�x Reduce your speed even more than you otherwise would when going downhill and under
unfavorable load, weather, or wind conditions.
�x Drive especially carefully and accelerate gently. Always avoid sudden maneuvers and
hard braking.
�x Be especially careful when passing other vehicles.
�x Reduce speed immediately if the trailer shows even the slightest sign of swaying.
�x Never try to stop the swaying by accelerating.
�x Always obey speed limits. In some areas speed limits for vehicles towing trailers are lower
than for vehicles without trailers.
Page 186 of 356

Selector
lever
position
Designation Meaning ⇒
P Park The drive wheels are mechanically locked.
Select only when the vehicle is not moving. To change the
selector lever position, switch on the ignition (if it is off) and then
press the selector lever release button while holding down the
brake pedal.
R Reverse The reverse gear is engaged.
Shift into Reverse only when the vehicle is not moving.
N Neutral Transmission is in Neutral position. No power is transmitted to
the wheels and no engine braking effect is available.
D Drive (standard
driving position)
All forward gears shift up and down automatically. The
transmission shifts as needed depending on engine load,
individual driving style, and vehicle speed.
S Sport Drive (Sport
driving position)
All forward gears automatically upshift later and downshift
earlier than in the (D) (Drive) position, to take full advantage of
the engine's power reserves. The transmission shifts as needed
depending on engine load, individual driving style, and vehicle
speed.
Automatic Shift Lock (ASL)
The Automatic Shift Lock (ASL) in Park (P) and Neutral (N) prevents drive positions from being
engaged inadvertently, which would cause the vehicle to move.
To release the ASL, depress and hold the brake pedal with the ignition switched on. Press the release
button on the selector lever at the same time.
The ASL is not engaged if the selector lever is moved quickly through Neutral (N) (e.g., when shifting
from Reverse (R) to Drive (D)). This makes it possible to “rock” the vehicle backwards and forwards if
it is stuck in snow or mud. The ASL engages automatically if the brake pedal is not depressed and the
lever is in Neutral (N) for more than about 1 second and the vehicle is traveling no faster than about
3 mph (5 km/h).
�x Depress and then release the brake pedal.
WARNING
Moving the selector lever to the wrong position can cause loss of vehicle control, a collision,
and serious personal injury.
�x Never accelerate when moving the selector lever.
�x When the engine is running and a drive position is engaged, the vehicle will start to move
as soon as the brake pedal is released.
�x Never shift into Reverse or Park when the vehicle is moving.
Page 201 of 356

Brake fluid specifications
Volkswagen has developed a special brake fluid that is optimized for the brake system in your
Volkswagen. Volkswagen recommends that you expressly use brake fluid that conforms to quality
standard VW Standard 14 for optimum performance of the brake system. Check the information on
the container for the brake fluid you want to use to make sure it meets the requirements for your
vehicle.
Brake fluid that complies with VW Standard 14 can be purchased from your authorized Volkswagen
dealer or authorized Volkswagen Service Facility.
If this special brake fluid is not available you may – under these circumstances – use another high-
quality brake fluid that complies with U.S. Federal Motor Vehicle Safety Standard (FMVSS) DOT 4
⇒ .
Please note, however, that not all brake fluids that comply with U.S. Federal Motor Vehicle Safety
Standard FMVSS DOT 4 have the same chemical composition. Some of these brake fluids can
contain chemicals that could, over time, degrade or damage internal parts of the vehicle’s brake
system.
Volkswagen therefore recommends that you use brake fluid that expressly complies with VW
Standard 14 for optimum brake system performance over the long term.
Brake fluid level
The fluid level in the transparent brake fluid reservoir must always be between the MIN and MAX
marking ⇒ .
On some vehicles, engine components block the view of the brake fluid reservoir and make it
impossible to see the brake fluid level. If you cannot clearly see the brake fluid level in the brake fluid
reservoir, please see an authorized Volkswagen dealer or authorized Volkswagen Service Facility.
The brake fluid level drops slightly when the vehicle is being used as the brake pads wear and the
brakes are automatically adjusted.
Changing brake fluid
Brake fluid must be changed according to the service schedule in your ⇒ Booklet Warranty and
Maintenance. Have the brake fluid checked by an authorized Volkswagen dealer or an authorized
Volkswagen Service Facility. Refill only with new brake fluid that meets the standards listed above.
WARNING
Brake failure and reduced brake performance can be caused by not having enough brake
fluid in the reservoir or by old or incorrect brake fluid.
�x Check the brake system and brake fluid level regularly.
�x Always change the brake fluid according to the service schedule in your
⇒ Booklet Warranty and Maintenance.
�x Hard braking with old brake fluid may cause vapor lock. Vapor lock reduces braking
performance, increases stopping distances and can even cause total brake failure.
�x Always make sure that only the correct brake fluid is used. Only use brake fluid that
expressly conforms to VW Standard 14 or if it is not available, only use a high-quality brake
fluid that conforms to U.S. Standard FMVSS DOT 4 requirements.
�x Using another brake fluid, or one that is not of high quality, can impair the function of the
brake system and reduce its effectiveness. If the container does not say that the brake fluid
complies with VW Standard 14, or U.S. Standard FMVSS DOT 4, do not use it.
�x The brake fluid must be new.
Page 227 of 356

tires are identical to those that were removed and even if the tire pressure does not change Tire
inflation pressure.
�x If you have to adjust the tire pressure on a warm tire, fill the tire with 2.0 - 4.35 psi (20 - 30 kPa)
more than the pressure specified on the tire pressure label
�x If the TPMS determines that the air pressure in at least one tire is too low, carefully check the
pressure in all four tires with an accurate tire pressure gauge. Low tire pressure usually cannot be
determined by looking at the tire. This is especially true of low-profile tires.
If you have work done on your wheels or tires, inform the workshop that the vehicle is equipped
with a Tire Pressure Monitoring System (TPMS).
New tires may expand slightly the first time they are driven at high speeds, which can trigger a
tire pressure warning. Remember that tire pressure can only be properly measured when the tire is
“cold”
Only replace old tires with tires that have been approved by Volkswagen for your vehicle type.
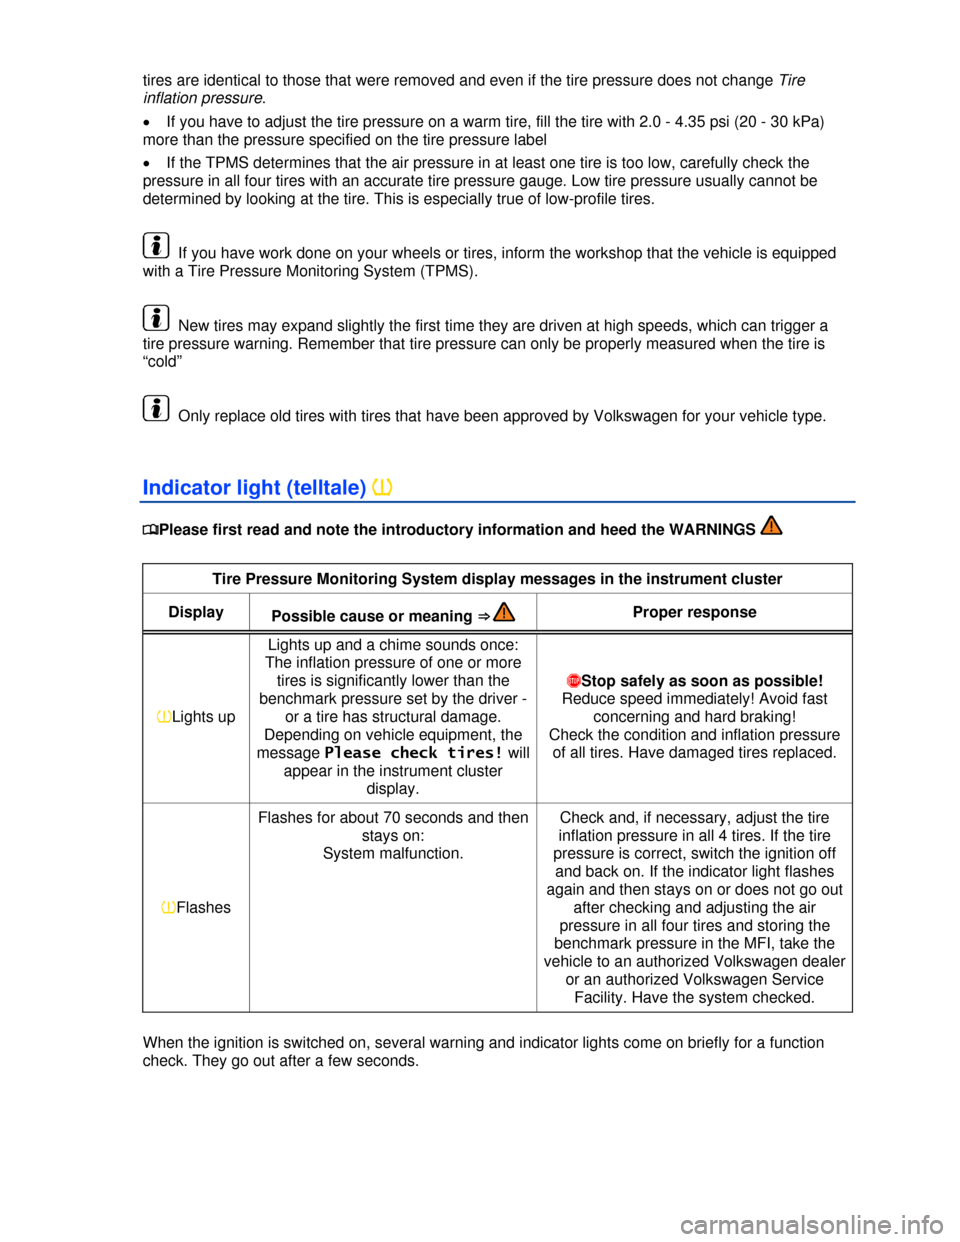
Indicator light (telltale) �
Page 229 of 356

NOTICE
Failure to heed warning lights or text WARNINGS can result in vehicle damage.
If the ignition is switched on, an acoustic warning sounds when low tire pressure is detected. If a
system malfunction is detected, no acoustic warning sounds.
Driving for a longer period of time on rough roads or with a dynamic and sporty style can make
the TPMS system temporarily unavailable. The indicator light will come on, signaling a malfunction, but
will go out again once road condition or driving style change.
Tire Pressure Monitoring System and recalibration with the MFI
�