Page 17 of 52

OVERVIEWELECTRIC VEHICLE SYSTEM FEATURES/OPERATIONS
SAFETY AND EMERGENCY FEATURES
15
Step 1 Plug the charging cable into the electrical receptacle of the external
power source.
- Ensure that the standards of the electrical receptacle and the
charging cable’s plug match.
- Check that the power indicator of the CCID (Charging Circuit
Interrupting Device) is illuminated.
- Hanging the CCID on a hook is recommended to reduce the strain
on the electrical receptacle and
charging cable plug.
- When charging outdoors, use a “while-in-use” cover.
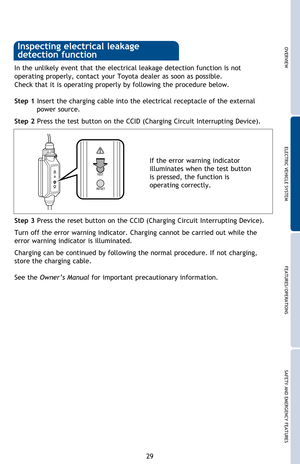
Step 2 Press the test button on the CCID to check that the electrical leakage detection function operates properly.
- If the error warning indicator illuminates when test button is
pressed, the function is operating
correctly.
- After the test is completed, press reset button to turn off the error
warning. Charging cannot occur
while error warning is illuminated.
- If the error warning indicator does not come on when test button is
pressed, the function may not be
operating correctly. Stop charging
immediately and contact your
Toyota dealer.
Step 3 Pull up the charging port door lever.
Step 4 Open the charging port cap by releasing the clip.
Step 5 Remove the charging connector cap. Affix the cap to the cable.
Push to
open
2013Rav4EV.indd 1512/3/12 11:37 PM
Page 18 of 52

16
ELECTRIC VEHICLE SYSTEM
Step 6 Insert the charging cable connector into the charging port.
- Do not press the latch release button when inserting the connector.
- Align with the guide position shown on underside of the charging
connector, and push it in straight
and firmly until it clicks. Confirm
connector is securely locked.
- The plug-in indicator on the meter illuminates in green if correctly
plugged in. Incorrect plug-in results
in a yellow plug-in indicator.
- If no schedule is set, or the charge immediately function is selected,
charging will begin by simply
plugging in the charging cable.
- If EV System is on when the vehicle is plugged in, the READY indicator
will turn off and a message will show
in the Multi-Information Display.
Step 7 Check the status of the charging indicator.
Ligh t ALight B
The charging indicator consists of two lights that display charging status by
illuminating, flashing and turning off as follows:
The indicator lights will not flash or turn on if the charging cable is not
connected properly. During charging, current charging status and the estimated
time until charge completion can be checked on the Multi-Information Display or
navigation display.
Charging status Charging indicator
Light A Light B
Charging cable is connected to
vehicle and the charging and/or
Pre-climate schedule is set Lights A and B flash on and off alternatively
for 10 minutes (after 10 minutes, lights
remain off until charging starts).
Charge level is less than 49% FlashesOff
Charge level is between 50% and
less than 99% Illuminates
Flashes
Charging is complete Both lights A and B illuminate for 10 minutes
(after 10 minutes, both lights turn off).
Malfunction occurred during
charging Both lights A and B quickly flash
simultaneously for 10 seconds (after 10
seconds both lights turn off).
2013Rav4EV.indd 1612/3/12 11:37 PM
Page 19 of 52

OVERVIEWELECTRIC VEHICLE SYSTEM FEATURES/OPERATIONS
SAFETY AND EMERGENCY FEATURES
17
Step 6 Insert the charging cable connector into the charging port.
- Do not press the latch release button
when inserting the connector.
- Align with the guide position shown on underside of the charging
connector, and push it in straight
and firmly until it clicks. Confirm
connector is securely locked.
- The plug-in indicator on the meter illuminates in green if correctly
plugged in. Incorrect plug-in results
in a yellow plug-in indicator.
- If no schedule is set, or the charge immediately function is selected,
charging will begin by simply
plugging in the charging cable.
- If EV System is on when the vehicle is plugged in, the READY indicator
will turn off and a message will show
in the Multi-Information Display.
Step 7 Check the status of the charging indicator.
Ligh t AL ight B
The charging indicator consists of two lights that display charging status by
illuminating, flashing and turning off as follows:
The indicator lights will not flash or turn on if the charging cable is not
connected properly. During charging, current charging status and the estimated
time until charge completion can be checked on the Multi-Information Display or
navigation display.
Charging status Charging indicator
Light A Light B
Charging cable is connected to
vehicle and the charging and/or
Pre-climate schedule is set Lights A and B flash on and off alternatively
for 10 minutes (after 10 minutes, lights
remain off until charging starts).
Charge level is less than 49% FlashesOff
Charge level is between 50% and
less than 99% Illuminates
Flashes
Charging is complete Both lights A and B illuminate for 10 minutes
(after 10 minutes, both lights turn off).
Malfunction occurred during
charging Both lights A and B quickly flash
simultaneously for 10 seconds (after 10
seconds both lights turn off).
2013Rav4EV.indd 1712/3/12 11:37 PM
Page 20 of 52

18
Charging cable-Unplugging
Step 1 Pull the charging connector toward you while pressing the latch release button.
Step 2 Attach the charging connector cap.
ELECTRIC VEHICLE SYSTEM
Firmly push the charging port cap
and charging port door, and check
that they are securely locked.
Step 3 Close the charging port cap, and then close the charging port door.
- Hold the body of the plug while
removing.
- Make sure to put the cable away immediately after disconnecting.
- When leaving the plug inserted, check the plug and connector once a month
for accumulation of dirt or dust.
Step 4 Remove the plug from the electrical receptacle when the charging
equipment will not be used for a long period of time.
Depending on the charge settings, the vehicle may not start charging just by
plugging in the charging cable. Use the navigation screen to set the charging and
Pre-climate/remote climate control schedules. Before either function starts, it is
recommended that:
-Parking brake is securely set with shift position in “P”
-All windows and doors are closed
-Engine hood is securely closed
-All lights are turned off
When the EV System is turned off, the screen changes to the charging and
Pre-climate settings screen. If no operations are performed for approximately 30
seconds, the screen turns off.
Next charge start schedule
Battery charge amount
Charge complete schedule
Charge immediately button
Next departure schedule
Departure schedule Edit button
Extended charge mode setting button
By My Departure schedule setting
Charge and Pre-climate schedule setting screen
Charging
2013Rav4EV.indd 1812/3/12 11:38 PM
Page 21 of 52

OVERVIEWELECTRIC VEHICLE SYSTEM FEATURES/OPERATIONS
SAFETY AND EMERGENCY FEATURES
19
Step 1 Pull the charging connector toward you while pressing the latch release
button.
Step 2 Attach the charging connector cap.
Firmly push the charging port cap
and charging port door, and check
that they are securely locked.
Step 3 Close the charging port cap, and then close the charging port door.
- Hold the body of the plug while
removing.
- Make sure to put the cable away immediately after disconnecting.
- When leaving the plug inserted, check the plug and connector once a month
for accumulation of dirt or dust.
Step 4 Remove the plug from the electrical receptacle when the charging
equipment will not be used for a long period of time.
Depending on the charge settings, the vehicle may not start charging just by
plugging in the charging cable. Use the navigation screen to set the charging and
Pre-climate/remote climate control schedules. Before either function starts, it is
recommended that:
-Parking brake is securely set with shift position in “P”
-All windows and doors are closed
-Engine hood is securely closed
-All lights are turned off
When the EV System is turned off, the screen changes to the charging and
Pre-climate settings screen. If no operations are performed for approximately 30
seconds, the screen turns off.
Next charge start schedule
Battery charge amount
Charge complete schedule
Charge immediately button
Next departure schedule
Departure schedule Edit button
Extended charge mode setting button
By My Departure schedule setting
Charge and Pre-climate schedule setting screen
Set departure time dial
Charge Only button
Pre-climate Only button
Charge and Pre-climate button
Add/Delete button
Charging
2013Rav4EV.indd 1912/3/12 11:38 PM
Page 22 of 52

Adjusting cabin temperature before driving reduces traction battery consumption
after departure, thereby increasing driving range. If the amount of charge
re")
20
Pre-climate (Remote Climate Control)
Adjusting cabin temperature before driving reduces traction battery consumption
after departure, thereby increasing driving range. If the amount of charge
remaining in the traction battery is less than 50% at the time Pre-climate
operation is scheduled to begin, Pre-climate operations will not be performed in
order to preserve driving range.
The climate control system can be turned on before entering the vehicle by
setting the Pre-climate schedule or using the Smartphone Entune
® EV Remote
Climate application on a smartphone.
Pre-climate operations completion can be set for a specific time on each day of
the week.
Charging settings
The RAV4 EV may be charged immediately, or scheduled to charge at a specific
time each day.
Smartphone Entune® EV Applications
Drivers with a smartphone and active Entune® and Safety Connect® subscriptions
may remotely interact with several features of the RAV4 EV.
For details, please refer to http://www.toyota.com/entune or call
1-800-331-4331.
ELECTRIC VEHICLE SYSTEM
Start Charge Immediately
Step 1 Turn the EV System off. The charge settings screen will be displayed. If no actions are performed, screen will turn off after 30 seconds.
Step 2 Touch “Charge Immediately.”
Step 3 Plug in the charging cable. Charging will start.
Preset Charge Immediately
Step 1 Touch EV on the Main Menu.
Step 2 Touch “Charging & Pre-climate Setup.”
Step 3 Touch
to display the “Charge Immediately on Plug-in” screen.
Touch “Save.”
Step 4 A screen advising that charge mode has been changed to Charge
Immediately is displayed. The EV screen returns after a few seconds.
Step 5 Turn the EV System off. The charge settings screen will be displayed for
about 30 seconds.
Step 6 Plug in the charging cable. Charging will start. Depending on the charge settings, the vehicle may not automatically start
charging upon plug-in. You may set it to Charge Immediately in one of two ways.
This setting will temporarily override any schedule that may already be set.
Charge Immediately
System Details
Charging Charge immediately Starts charging immediately
regardless of charging schedule settings.
Scheduled charging Charge completion can be set
for a specific time on each day of the week. If no
schedule is set, the system defaults to the Charge
Immediately function.
2013Rav4EV.indd 2012/3/12 11:38 PM
Page 23 of 52

Adjusting cabin temperature before driving reduces traction battery consumpti")
OVERVIEWELECTRIC VEHICLE SYSTEM FEATURES/OPERATIONS
SAFETY AND EMERGENCY FEATURES
21
Pre-climate (Remote Climate Control)
Adjusting cabin temperature before driving reduces traction battery consumption
after departure, thereby increasing driving range. If the amount of charge
remaining in the traction battery is less than 50% at the time Pre-climate
operation is scheduled to begin, Pre-climate operations will not be performed in
order to preserve driving range.
The climate control system can be turned on before entering the vehicle by
setting the Pre-climate schedule or using the Smartphone Entune
® EV Remote
Climate application on a smartphone.
Pre-climate operations completion can be set for a specific time on each day of
the week.
Charging settings
The RAV4 EV may be charged immediately, or scheduled to charge at a specific
time each day.
Smartphone Entune® EV Applications
Drivers with a smartphone and active Entune® and Safety Connect® subscriptions
may remotely interact with several features of the RAV4 EV.
For details, please refer to http://www.toyota.com/entune or call
1-800-331-4331.
Start Charge Immediately
Step 1 Turn the EV System off. The charge settings screen will be displayed. If no actions are performed, screen will turn off after 30 seconds.
Step 2 Touch “Charge Immediately.”
After operations have been
completed, the “Charge
Immediately” screen button
indicator illuminates.
Step 3 Plug in the charging cable. Charging will start.
Preset Charge Immediately
Step 1 Touch EV on the Main Menu.
Step 2 Touch “Charging & Pre-climate Setup.”
Step 3 Touch
to display the “Charge Immediately on Plug-in” screen.
Touch “Save.”
Step 4 A screen advising that charge mode has been changed to Charge
Immediately is displayed. The EV screen returns after a few seconds.
Step 5 Turn the EV System off. The charge settings screen will be displayed for
about 30 seconds.
Step 6 Plug in the charging cable. Charging will start. Depending on the charge settings, the vehicle may not automatically start
charging upon plug-in. You may set it to Charge Immediately in one of two ways.
This setting will temporarily override any schedule that may already be set.
Charge Immediately
System Details
Charging Charge immediately Starts charging immediately
regardless of charging schedule settings.
Scheduled charging Charge completion can be set
for a specific time on each day of the week. If no
schedule is set, the system defaults to the Charge
Immediately function.
2013Rav4EV.indd 2112/3/12 11:38 PM
Page 24 of 52

22
ELECTRIC VEHICLE SYSTEM
Charging and Pre-climate operations may be programmed to complete at a specific
time on any or all days of the week.
Set charging/Pre-climate schedule
Step 1 Touch EV.
Step 2 Touch “Charging & Pre-climate Setup.”
Step 3 Touch
to display the “My Departure Schedule” screen. Touch
“Schedule Setup.”
Step 4 Touch desired day.
- Up to three actions can be set for a single day by touching “Add.”
- To delete the set action, touch “Delete.”
- Two actions cannot be set at the same time.
Step 5 Flick the schedule to the desired time for charging and/or Pre-climate
completion. Select Charge Only, Pre-climate Only or Charge & Pre-climate.
Step 6 After settings have been completed, touch twice to return to the “By
My Departure Schedule.”
Step 7 Touch “Save.” If “Save” is not touched, the changes will not be reflected in the charging schedule.
Scheduled chargingStep 8 When charging schedule is only set for some days of the week:
If “Keep My Schedule” is touched, setting the charging schedule is done and the
EV screen returns. Touch “Return to Schedule Setup” to set the charging schedule
for additional days.
Step 9 When charging schedule is set for each day of the week:
A screen advising that settings have been completed appears. The EV screen
returns after a few seconds.
2013Rav4EV.indd 2212/3/12 11:38 PM