2013 TOYOTA PRIUS PLUG-IN HYBRID USB
[x] Cancel search: USBPage 7 of 359

7
1
2
3
4
5
6
7
8
9
PRIUS_Navi_OM47805U_(U)
12.08.07 17:59
1. PHONE OPERATION .................... 132
QUICK REFERENCE .......................... 132
PHONE (HANDS-FREE SYSTEM FOR CELLULAR PHONE)......................... 134
REGISTER A Bluetooth
® PHONE ....... 139
CALL ON THE Bluetooth® PHONE ..... 143
RECEIVE ON THE Bluetooth®
PHONE ............................................. 150
TALK ON THE Bluetooth
® PHONE ..... 151
Bluetooth® PHONE MESSAGE
FUNCTION........................................ 154
2. SETUP ........................................... 157
PHONE SETTINGS ............................. 157
Bluetooth® SETTINGS ........................ 179
1. AUDIO/VIDEO SYSTEM OPERATION ................................ 192
QUICK REFERENCE .......................... 192
SOME BASICS .................................... 194
RADIO OPERATION ........................... 201
HD Radio™ TECHNOLOGY
INFORMATION ................................. 204
RADIO OPERATION (XM Satellite Radio BROADCAST) ........................ 209
RADIO OPERATION (INTERNET RADIO BROADCAST) ...................... 215
DVD PLAYER OPERATION................ 216
USB MEMORY OPERATION .............. 237
iPod OPERATION ............................... 242
Bluetooth
® AUDIO OPERATION ......... 246
AUDIO/VIDEO REMOTE CONTROLS (STEERING SWITCHES) ................. 256
AUDIO/VIDEO SYSTEM OPERATING HINTS ......................... 258
2. SETUP ........................................... 268
AUDIO SETTINGS .............................. 268
1. VOICE COMMAND SYSTEM OPERATION................................ 272
VOICE COMMAND SYSTEM .............. 272
NATURAL SPEECH INFORMATION
(ENGLISH ONLY) ............................. 278
EXPANDED VOICE COMMANDS ....... 280
COMMAND LIST ................................. 281
1. INFORMATION DISPLAY ............. 286
FUEL CONSUMPTION ........................ 286
MAP DATABASE VERSION AND COVERAGE AREA ................... 287
2. XM FUNCTION-O VERVIEW ......... 289
XM SERVICES .................................... 289
3. XM FUNCTION OPERATION ....... 290
XM Sports ............................................ 290
XM Stocks ............................................ 293
XM Fuel Prices..................................... 296
XM NavWeather™ ............................... 299
XM NavTraffic
®.................................... 302
4. SETUP ........................................... 305
XM SETTINGS..................................... 305
4PHONE
5AUDIO/VIDEO SYSTEM
6VOICE COMMAND SYSTEM
7INFORMATION
Page 48 of 359

48
2. SETUP
PRIUS_Navi_OM47805U_(U)
12.08.07 17:59
■LAYOUT TYPE
“ABC” type
“QWERTY” type
CHANGING THE STARTUP
IMAGE
When the “POWER” switch is in AC-
CESSORY or ON mode, the initial
screen will be displayed.
An image can be copied from a USB
memory and used as the startup im-
age. (For information regarding the
startup image, see “INITIAL SCREEN”
on page 26.)
INFORMATION
● When saving the images to a USB,
name the folder that the startup image is
saved to “StartupImage” and name the
folder that the screen off image is saved
to “DisplayOffImage”. If these folder
names are not used, the navigation sys-
tem cannot download the images. (The
folder names are case sensitive.)
● The images file extension is JPG or
JPEG.
● The images file name, including the file
extension, can be up to 32 characters.
● Image files of 10 MB or less can be
saved.
● Up to 3 images can be downloaded.
Page 49 of 359

49
2. SETUP
2
BASIC FUNCTION
PRIUS_Navi_OM47805U_(U)
12.08.07 17:59
■TRANSFERRING DATA
1Open the console box.
2Open the cover and connect a USB
memory.
Turn on the power of the USB memory if it
is not turned on.
3Close the console box.
4Press the “SETUP” button.
5Touch “General” on the “Setup”
screen.
6Touch “Customize Startup Image” .
7Touch “Transfer”.
8Touch “Yes”.
Page 50 of 359

50
2. SETUP
PRIUS_Navi_OM47805U_(U)
12.08.07 17:59
■SETTING THE STARTUP IMAGE
1Press the “SETUP” button.
2Touch “General” on the “Setup”
screen.
3Touch “Customize Startup Image”
on the “General Settings” screen.
4Touch the desired image.
5Touch “Save” .
■DELETING TRANSFERRED IMAG-
ES
1Press the “SETUP” button.
2Touch “General” on the “Setup”
screen.
3Touch “Customize Startup Image”
on the “General Settings” screen.
4Touch “Delete All” .
5Touch “Yes”.
■TRANSFERRING DATA
1Open the console box.
2Open the cover and connect a USB
memory.
Turn on the power of the USB memory if it
is not turned on.
3Close the console box.
CHANGING THE SCREEN OFF
IMAGE
Touch “Screen Off” to turn off the
screen. An image can be copied from a
USB memory and can be set to display
when “Screen Off” is touched. (For
more information on “Screen Off”,
see “SCREEN ADJUSTMENT” on
page 31.)
Page 190 of 359

190
PRIUS_Navi_OM47805U_(U)
12.08.07 17:59
1. QUICK REFERENCE .................. 192
2. SOME BASICS ............................ 194
VOICE COMMAND SYSTEM .............. 195
AUDIO SPLIT SCREEN DISPLAY ....... 195
TURNING THE SYSTEM ON AND OFF..................................... 195
SWITCHING BETWEEN FUNCTIONS ...................................... 196
DSP CONTROL ................................... 197
TONE AND BALANCE ......................... 197
SELECTING SCREEN SIZE ................ 198
DVD PLAYER....................................... 199
AUX PORT ........................................... 199
USB PORT ........................................... 200
3. RADIO OPERATION ... ................ 201
LISTENING TO THE RADIO ................ 201
PRESETTING A STATION .................. 201
SELECTING A STATION ..................... 202
RADIO BROADCAST DATA
SYSTEM ............................................ 202
TRAFFIC ANNOUNCEMENT .............. 203
4. HD Radio™ TECHNOLOGY INFORMATION ......................... 204
USING HD Radio™
TECHNOLOGY.................................. 204
AVAILABLE HD Radio™ TECHNOLOGY.................................. 205
TROUBLESHOOTING GUIDE ............. 207
1AUDIO/VIDEO SYSTEM
OPERATION
AUDIO/VIDEO SYSTEM
5
Page 191 of 359

5
191
1
2
3
4
5
6
7
8
9
PRIUS_Navi_OM47805U_(U)
12.08.07 17:59
5. RADIO OPERATION (XM Satellite Radio
BROADCAST) ........... ................ 209
HOW TO SUBSCRIBE TO AN
XM Satellite Radio............................. 209
DISPLAYING THE RADIO ID .............. 210
LISTENING TO SATELLITE RADIO ... 210
CHANNEL CATEGORY ...................... 211
PRESETTING A CHANNEL ................ 211
SELECTING A CHANNEL................... 211
DISPLAYING THE TITLE AND NAME 212
IF THE SATELLITE RADIO TUNER MALFUNCTIONS .............................. 213
6. RADIO OPERATION (INTERNET RADIO BROADCAST)............... 215
LISTENING TO INTERNET RADIO .... 215
7. DVD PLAYER OPERATION ........ 216
INSERTING A DISC ............................ 216
EJECTING A DISC .............................. 216
PLAYING A DISC ................................ 217
PLAYING AN AUDIO DISC ................. 218
PLAYING AN MP3/WMA DISC ........... 220
OPERATING A DVD DISC .................. 223
PLAYING A DVD DISC ....................... 224
DVD OPTIONS .................................... 225
IF THE PLAYER MALFUNCTIONS..... 234
DVD PLAYER AND DVD VIDEO DISC
INFORMATION ................................. 234
8. USB MEMORY OPERATION ...... 237
CONNECTING A USB MEMORY ........ 237
PLAYING A USB MEMORY ................ 238
9. iPod OPERATION ....................... 242
CONNECTING iPod ............................. 242
PLAYING iPod ..................................... 243
10. Bluetooth® AUDIO
OPERATION ............................. 246
CONNECTING A Bluetooth®
AUDIO PLAYER ................................ 249
PLAYING Bluetooth
® AUDIO ............... 251
11. AUDIO/VIDEO REMOTE CONTROLS (STEERING
SWITCHES)............................... 256
12. AUDIO/VIDEO SYSTEM OPERATING HINTS.................. 258
RADIO RECEPTION ............................ 258
iPod ...................................................... 259
USB MEMORY .................................... 260
CARING FOR YOUR DVD PLAYER
AND DISC ......................................... 260
MP3/WMA FILES ................................. 262
CD-R AND CD-RW DISCS .................. 264
TERMS ................................................ 264
1. AUDIO SETTINGS ...................... 268
HD Radio™ SYSTEM SETTINGS ....... 268
iPod SETTINGS ................................... 269
2SETUP
AUDIO/VIDEO SYSTEM
Page 193 of 359

193
1. AUDIO/VIDEO SYSTEM OPERATION
5
AUDIO/VIDEO SYSTEM
PRIUS_Navi_OM47805U_(U)
12.08.08 13:01
“SEEK/TRACK”
buttonPress the “” or “” button to seek up or down
for a station or channel, or to access a desired
track, file or chapter.202, 211,
218, 220,
224, 238,
243, 251
“SETUP” buttonPress to display the “Setup” screen.268
“AUDIO” buttonPress to display the audio control screen.195
“DISC” buttonPress to turn the DVD player on.196, 217, 224
“USB·AUX” buttonPress to turn the Bluetooth® audio, AUX, USB
memory or iPod on.196, 238, 243, 251
“SAT” buttonPress to choose a SAT station.196, 201, 210
“FM” buttonPress to choose an FM station.196, 201
“AM” buttonPress to choose an AM station.196, 201
“ ·CLOSE”
buttonPress to insert or eject a disc.199, 216
“PWR VOL” knobPress to turn the audio/video system on and off,
and turn to adjust the volume.195
No.NameFunctionPage
Page 196 of 359

196
1. AUDIO/VIDEO SYSTEM OPERATION
PRIUS_Navi_OM47805U_(U)
12.08.08 13:01
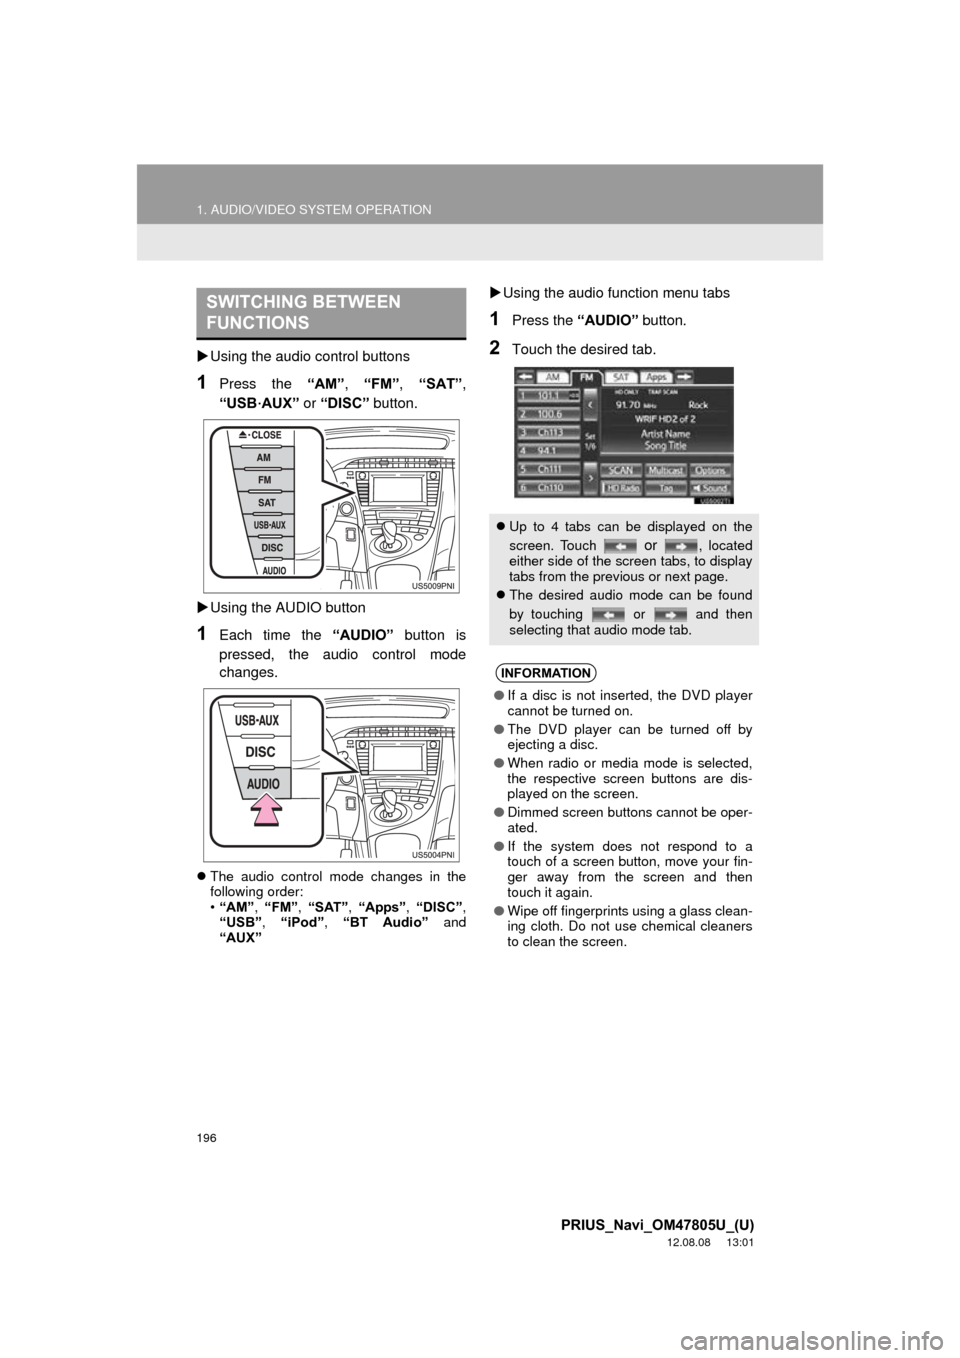
Using the audio control buttons
1Press the “AM”, “FM” , “SAT” ,
“USB
·AUX” or “DISC” button.
Using the AUDIO button
1Each time the “AUDIO” button is
pressed, the audio control mode
changes.
The audio control mode changes in the
following order:
•“AM”, “FM”, “SAT” , “Apps” , “DISC” ,
“USB” , “iPod” , “BT Audio” and
“AUX”
Using the audio function menu tabs
1Press the “AUDIO” button.
2Touch the desired tab.
SWITCHING BETWEEN
FUNCTIONS
Up to 4 tabs can be displayed on the
screen. Touch
or , located
either side of the screen tabs, to display
tabs from the previous or next page.
The desired audio mode can be found
by touching or and then
selecting that audio mode tab.
INFORMATION
● If a disc is not inserted, the DVD player
cannot be turned on.
● The DVD player can be turned off by
ejecting a disc.
● When radio or media mode is selected,
the respective screen buttons are dis-
played on the screen.
● Dimmed screen buttons cannot be oper-
ated.
● If the system does not respond to a
touch of a screen button, move your fin-
ger away from the screen and then
touch it again.
● Wipe off fingerprints using a glass clean-
ing cloth. Do not use chemical cleaners
to clean the screen.