Page 114 of 336
114
4. SETUP
1Press the “SETUP” button.
2Touch “Vehicle” on the “Setup”
screen.
3Touch “Maintenance” on the “Vehicle
Settings” screen.
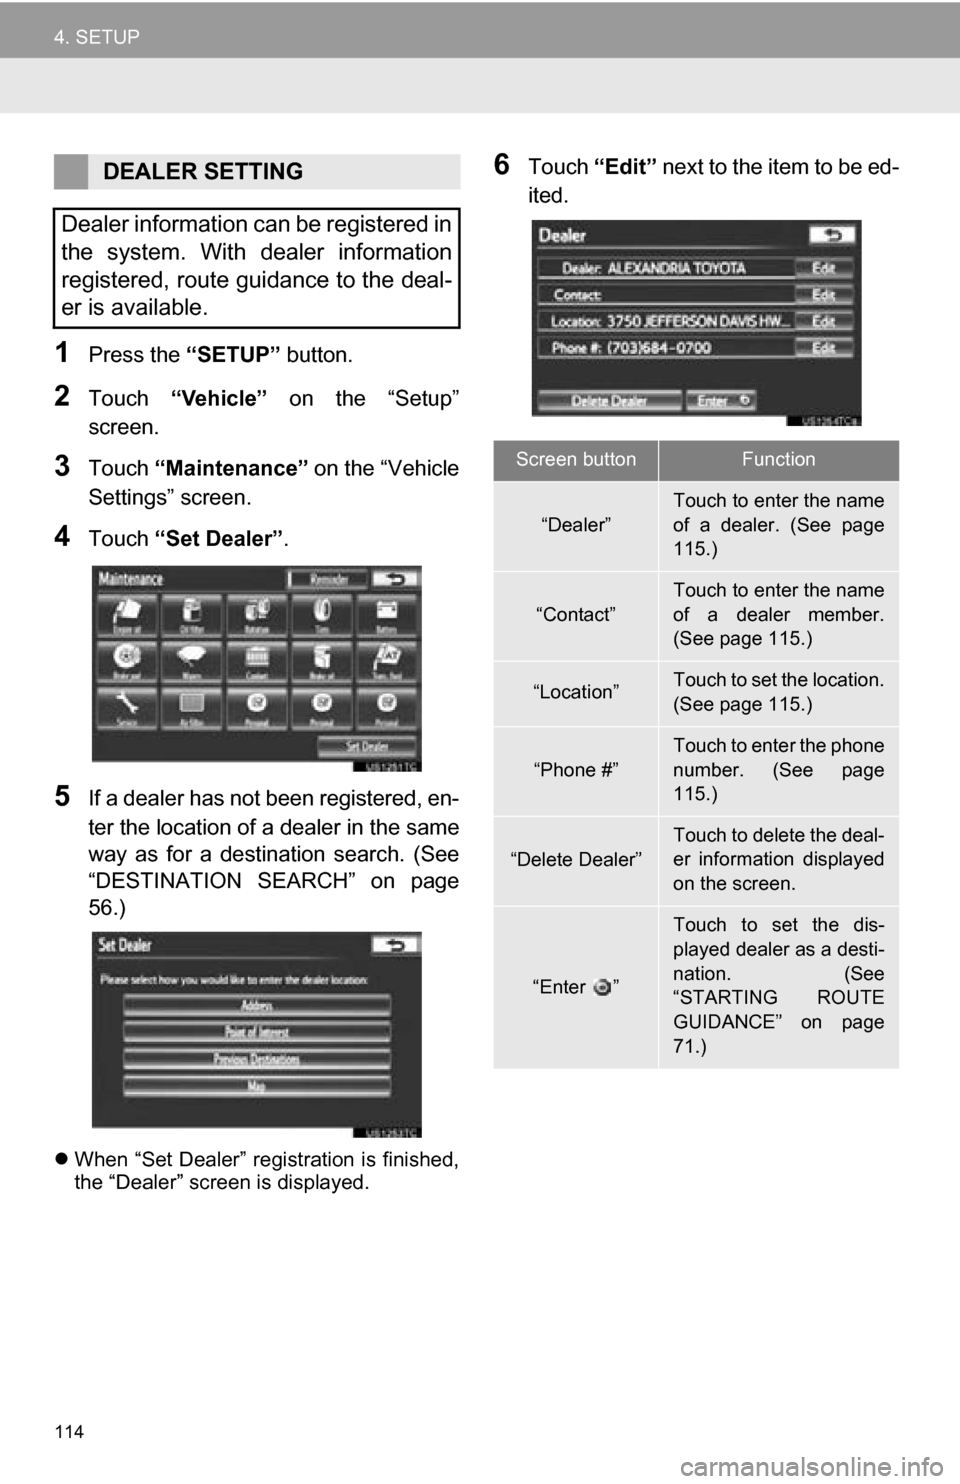
4Touch “Set Dealer” .
5If a dealer has not been registered, en-
ter the location of a dealer in the same
way as for a destination search. (See
“DESTINATION SEARCH” on page
56.)
When “Set Dealer” registration is finished,
the “Dealer” screen is displayed.
6Touch “Edit” next to the item to be ed-
ited.DEALER SETTING
Dealer information can be registered in
the system. With dealer information
registered, route guidance to the deal-
er is available.
Screen buttonFunction
“Dealer”
Touch to enter the name
of a dealer. (See page
115.)
“Contact”
Touch to enter the name
of a dealer member.
(See page 115.)
“Location”Touch to set the location.
(See page 115.)
“Phone #”
Touch to enter the phone
number. (See page
115.)
“Delete Dealer”Touch to delete the deal-
er information displayed
on the screen.
“Enter ”
Touch to set the dis-
played dealer as a desti-
nation. (See
“STARTING ROUTE
GUIDANCE” on page
71.)
Page 115 of 336
115
4. SETUP
3
NAVIGATION SYSTEM
■TO EDIT “Dealer” OR “Contact”
1Touch “Edit” next to “Dealer” or “Con-
tact”.
2Enter the name using the alphanumer-
ic keys.
Up to 70 characters can be entered for
dealer and 24 characters for contact.
3Touch “OK”.
The previous screen will be displayed.
■TO EDIT “Location”
1Touch “Edit” next to “Location”.
2Touch one of the 8 directional screen
buttons to move the cursor to the
desired point on the map screen.
3Touch “OK”.
The previous screen will be displayed.
■TO EDIT “Phone #” (PHONE NUM-
BER)
1Touch “Edit” next to “Phone #”.
2Enter the number using number keys.
3Touch “OK”.
The previous screen will be displayed.
Page 116 of 336
116
4. SETUP
1Press the “SETUP” button.
2Touch “Vehicle” on the “Setup”
screen.
3Touch “Vehicle Customization” .
4Touch the desired items to be set.
For a list of the settings that can be
changed, refer to “Owner’s Manual” .
5After changing the settings, touch
“Save”. A message indicating that the
settings are being saved will appear.
Do not perform any other operations
while this message is displayed.
VEHICLE CUSTOMIZATION
Vehicle settings can be changed.
CAUTION
● When performing the customization pro-
cedure, ensure that there is sufficient
ventilation in the vehicle and surround-
ing area. If there is insufficient ventila-
tion, exhaust gases may collect and
enter the vehicle. Exhaust gases include
harmful carbon monoxide (CO) and
inhaling them may lead to death or a
serious health hazard.
INFORMATION
●To avoid discharging the 12-volt battery,
perform the customization procedure
with the hybrid system operating
engine running>.
Page 118 of 336
118
5. GPS (GLOBAL POSITIONING SYSTEM)
Inappropriate route guidance may occur in
the following cases:
• When turning at an intersection off the
designated route guidance.
• If you set more than one destination but
skip any of them, auto reroute will dis-
play a route returning to the destination
on the previous route.
• When turning at an intersection for which there is no route guidance.
• When passing through an intersection
for which there is no route guidance.
• During auto reroute, the route guidance may not be available for the next turn to
the right or left.
• During high speed driving, it may take a long time for auto reroute to operate. In
auto reroute, a detour route may be
shown.
• After auto reroute, the route may not be
changed.
• If an unnecessary U-turn is shown or announced.
• If a location has multiple names and the system announces one or more of them.
• When a route cannot be searched.
• If the route to your destination includes gravel, unpaved roads or alleys, the
route guidance may not be shown.
• Your destination point might be shown on the opposite side of the street.
• When a portion of the route has regula-
tions prohibiting the entry of the vehicle
that vary by time or season or other rea-
sons.
• The road and map data stored in the navigation system may not be complete
or may not be the latest version. After replacing a tire, implement the
operation described in the “TIRE
CHANGE CALIBRATION”. (See page
110.)
INFORMATION
●This navigation system uses tire turning
data and is designed to work with fac-
tory-specified tires for the vehicle.
Installing tires that are larger or smaller
than the originally equipped diameter
may cause inaccurate display of the cur-
rent position. The tire pressure also
affects the diameter of the tires, so make
sure that the tire pressure of all 4 tires is
correct.
Page 119 of 336
4
119
1
2
3
4
5
6
7
8
9
1. QUICK REFERENCE ................... 120
2. PHONE (HANDS-FREE SYSTEM FOR
CELLULAR PHONE) ................. 122
USING THE PHONE SWITCH ............ 123
USING THE STEERING
SWITCHES ....................................... 124
ABOUT THE PHONEBOOK IN THIS SYSTEM.............................. 124
WHEN SELLING OR DISPOSING OF THE VEHICLE............................. 124
3. REGISTER A Bluetooth® PHONE................... 127
CONNECTING A
Bluetooth® PHONE ........................... 128
RECONNECTING THE Bluetooth
® PHONE ........................... 130
4. CALL ON THE Bluetooth® PHONE................... 131
BY DIAL ............................................... 131
BY PHONEBOOK................................ 131
BY SPEED DIAL.................................. 133
BY CALL HISTORY ............................. 133
BY VOICE RECOGNITION ................. 134
CALLING USING AN
SMS/MMS MESSAGE ...................... 136
BY POI* CALL ..................................... 137
5. RECEIVE ON THE Bluetooth® PHONE .................. 138
6. TALK ON THE Bluetooth
® PHONE .................. 139
WHEN YOU SELECT “0-9”.................. 140
INCOMING CALL WAITING ................ 141
7. Bluetooth® PHONE
MESSAGE FUNCTION ............. 142
CHECKING MESSAGES ..................... 142
REPLYING (QUICK REPLY) ............... 143
NEW MESSAGE NOTIFICATION ....... 144
1. PHONE SETTINGS ..................... 145
PHONE SOUND SETTINGS ............... 145
PHONEBOOK ...................................... 146
MESSAGE SETTINGS ........................ 158
PHONE DISPLAY SETTINGS ............. 161
2. Bluetooth® SETTINGS ............... 164
REGISTERED DEVICES ..................... 164
SELECTING A Bluetooth® PHONE ..... 167
SELECTING PORTABLE PLAYER ..... 169
DETAILED Bluetooth
® SETTINGS ...... 170
1PHONE OPERATION
2SETUP
PHONE
*: Point of Interest
Page 120 of 336
120
1. PHONE OPERATION
1. QUICK REFERENCE
Bluetooth® phones can be operated via the navigation system’s screen. To display
the hands-free operation screen, press the button or the switch on the steer-
ing wheel.
No.NameFunction
The condition of
Bluetooth® con-
nection
No connection Good
An antenna for the Bluetooth® connection is built in the instrument
panel. The condition of the Bluetooth® connection may deteriorate
and the system may not function when a Bluetooth® phone is used
in the following conditions and/or places:
The cellular phone is obstructed by certain objects (such as when
it is behind the seat or in the glove box and console box).
The cellular phone touches or is covered with metal materials.
Leave the Bluetooth
® phone in a place where the condition of the
Bluetooth® connection is good.
When the cellular phone is not connected, “No Connect” is dis-
played.
Page 121 of 336
121
1. PHONE OPERATION
4
PHONE
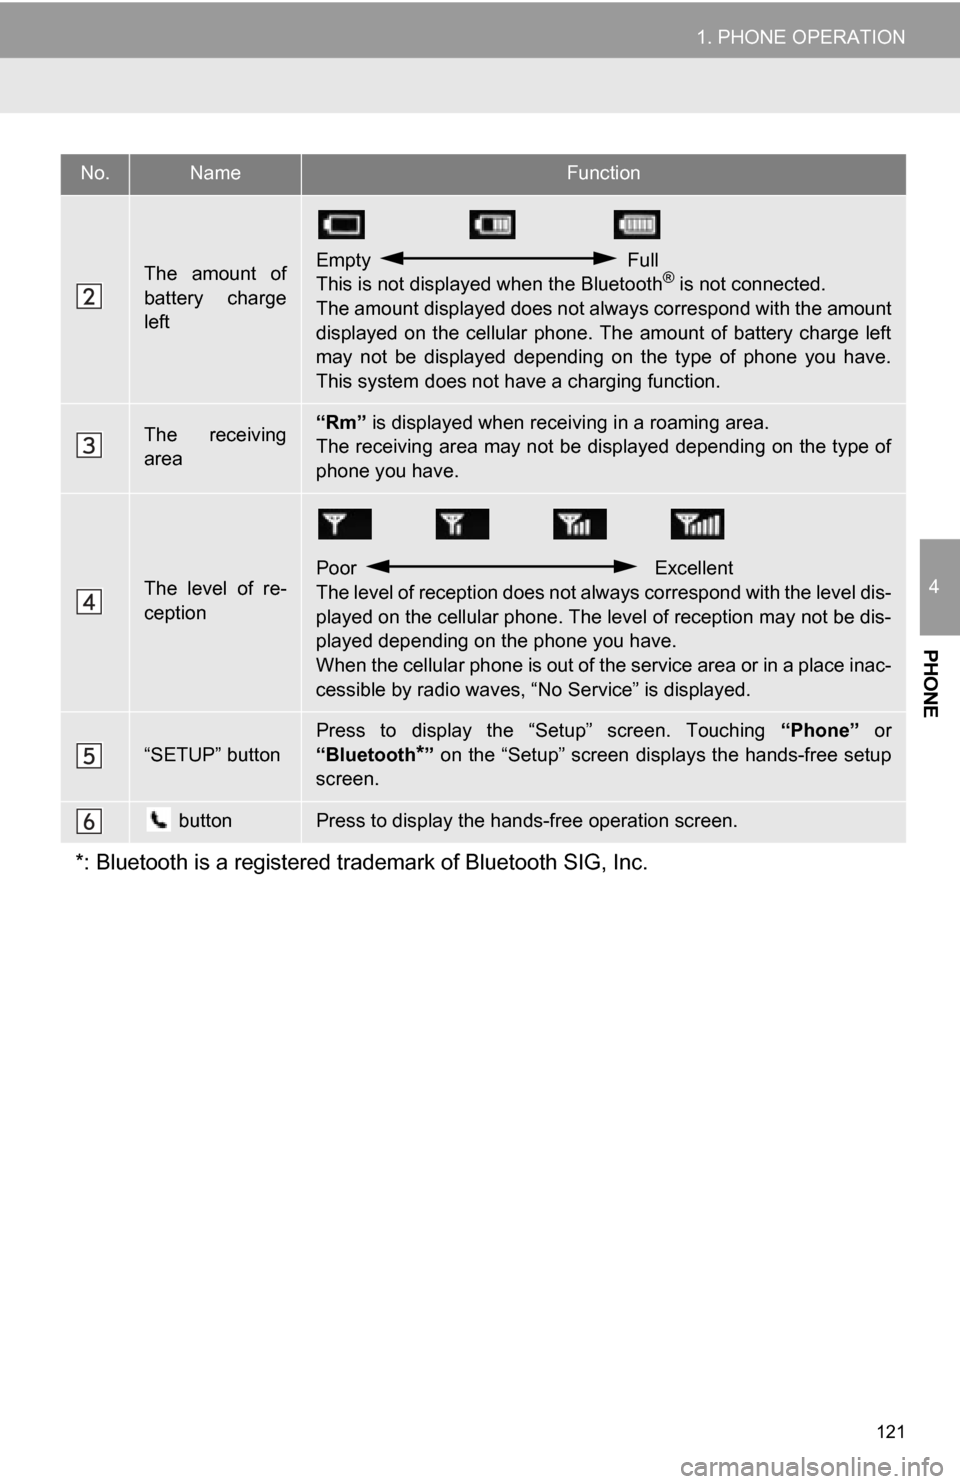
The amount of
battery charge
leftEmpty Full
This is not displayed when the Bluetooth® is not connected.
The amount displayed does not al ways correspond with the amount
displayed on the cellular phone. The amount of battery charge left
may not be displayed depending on the type of phone you have.
This system does not have a charging function.
The receiving
area“Rm” is displayed when receiv ing in a roaming area.
The receiving area may not be displayed depending on the type of
phone you have.
The level of re-
ception
Poor Excellent
The level of reception does not always correspond with the level dis-
played on the cellular phone. The level of reception may not be dis-
played depending on the phone you have.
When the cellular phone is out of t he service area or in a place inac-
cessible by radio waves, “N o Service” is displayed.
“SETUP” button
Press to display the “Setup” screen. Touching “Phone” or
“Bluetooth
*” on the “Setup” screen displays the hands-free setup
screen.
buttonPress to display the hands-free operation screen.
*: Bluetooth is a registered tr ademark of Bluetooth SIG, Inc.
No.NameFunction
Page 124 of 336
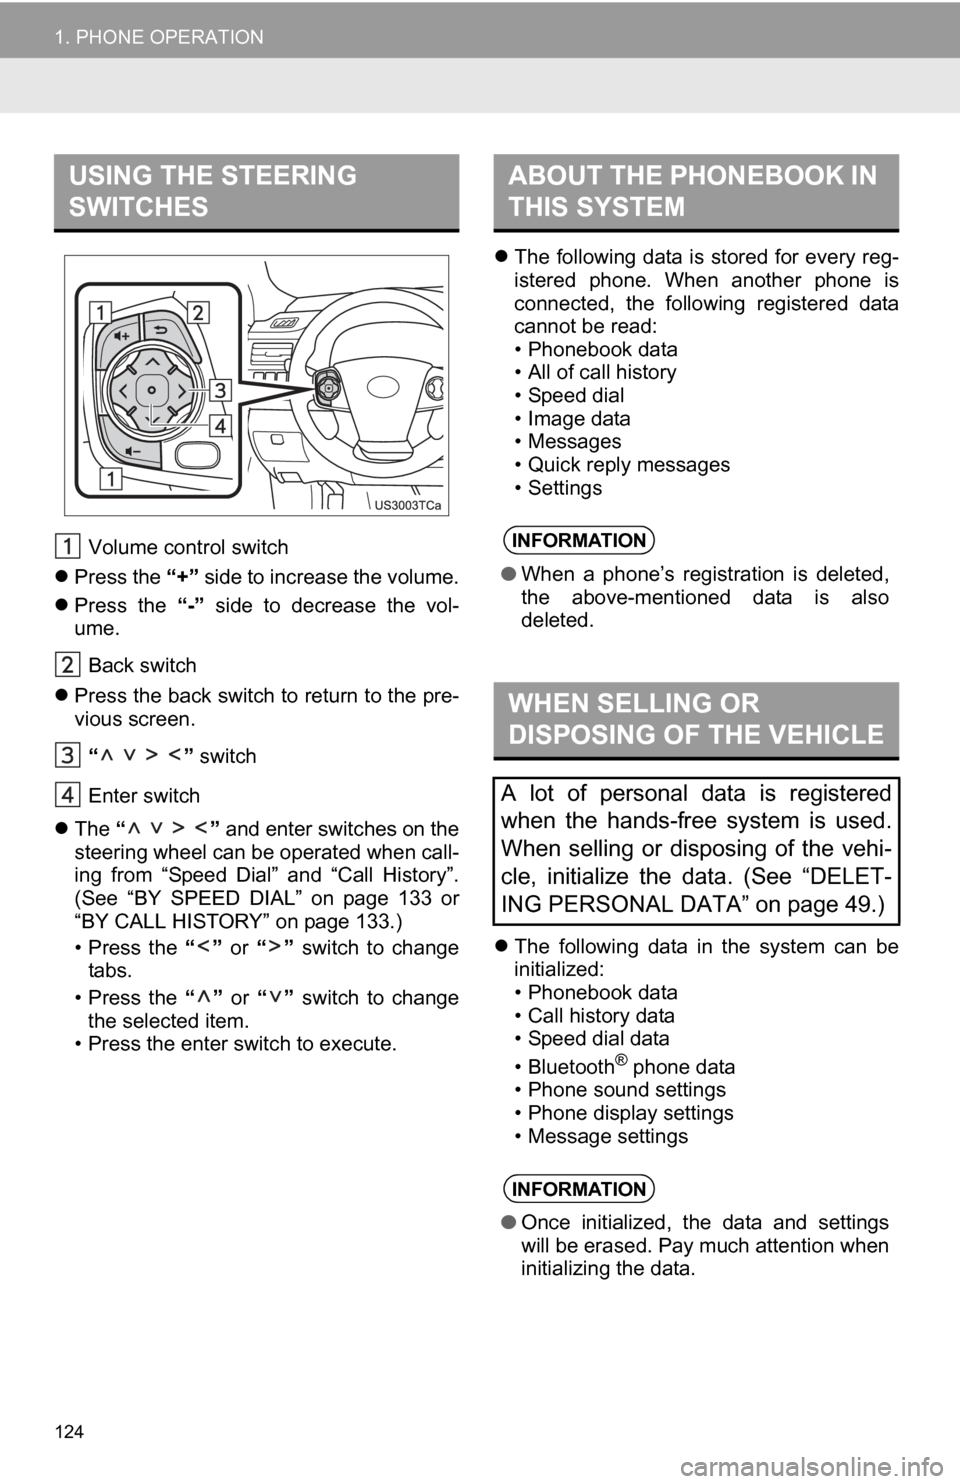
124
1. PHONE OPERATION
Volume control switch
Press the “+” side to increase the volume.
Press the “-” side to decrease the vol-
ume.
Back switch
Press the back switch to return to the pre-
vious screen.
“ ” switch
Enter switch
The “ ” and enter switches on the
steering wheel can be operated when call-
ing from “Speed Dial” and “Call History”.
(See “BY SPEED DIAL” on page 133 or
“BY CALL HISTORY” on page 133.)
• Press the “” or “” switch to change
tabs.
• Press the “” or “” switch to change
the selected item.
• Press the enter switch to execute.
The following data is stored for every reg-
istered phone. When another phone is
connected, the following registered data
cannot be read:
• Phonebook data
• All of call history
• Speed dial
• Image data
• Messages
• Quick reply messages
• Settings
The following data in the system can be
initialized:
• Phonebook data
• Call history data
• Speed dial data
•Bluetooth
® phone data
• Phone sound settings
• Phone display settings
• Message settings
USING THE STEERING
SWITCHESABOUT THE PHONEBOOK IN
THIS SYSTEM
INFORMATION
● When a phone’s registration is deleted,
the above-mentioned data is also
deleted.
WHEN SELLING OR
DISPOSING OF THE VEHICLE
A lot of personal data is registered
when the hands-free system is used.
When selling or disposing of the vehi-
cle, initialize the data. (See “DELET-
ING PERSONAL DATA” on page 49.)
INFORMATION
●Once initialized, the data and settings
will be erased. Pay much attention when
initializing the data.