Page 71 of 768
711-1. For safe use
1
For safety and security
UK_AURIS/AURIS_HV_EE (OM12F76E)
Junior seat
Place the child restraint system on the seat facing the front of the
vehicle.
If your child restraint system interferes with a head restraint and cannot
be installed properly, install the child restraint system after removing the
head restraint. (P. 211)
Sit the child in the child
restraint system. Fit the seat
belt to the child restraint sys-
tem according to the manu-
facturer’s instructions and
insert the plate into the
buckle. Make sure that the
belt is not twisted.
Check that the shoulder belt is
correctly positioned over the
child’s shoulder and that the lap
belt is as low as possible.
(P. 42)
1
High back typeBooster type
2
Page 73 of 768
731-1. For safe use
1
For safety and security
UK_AURIS/AURIS_HV_EE (OM12F76E)
Adjust the head restraint to the
uppermost position.
If your child restraint system
interferes with a head restraint
and cannot be installed properly,
install the child restraint system
after removing the head
restraint. (P. 211)
If the child restraint has a top strap, remove the luggage cover.
(P. 467)
Latch the buckles onto the exclusive fixing bars.
Hybrid model only: To align
the ISOFIX connectors with
the gap between the seat
cushion and seatback, tem-
porarily put the connectors
on the edge of the seat cush-
ion.
Insert the ISOFIX connectors
into the gap until they latch
onto the exclusive fixing
bars.
If the child restraint has a top strap, the top strap should be latched onto
the anchor bracket.
Run the top strap under the head restraint.
Installation with ISOFIX rigid anchors
1
2
3
1
2
Page 74 of 768
741-1. For safe use
UK_AURIS/AURIS_HV_EE (OM12F76E)
Adjust the head restraint to the
uppermost position.
If your child restraint system
interferes with a head restraint
and cannot be installed properly,
install the child restraint system
after removing the head
restraint. (P. 211)
Secure the child restraint sys-
tem using the seat belt or ISO-
FIX rigid anchors.
Remove the luggage cover. (P. 467)
Latch the hook onto the anchor
bracket and tighten the top
strap.
Run the top strap under the head
restraint.
Make sure the top strap is securely
latched.
Child restraint systems with a top strap
1
2
3
4
Page 75 of 768

751-1. For safe use
1
For safety and security
UK_AURIS/AURIS_HV_EE (OM12F76E)
When installing a child restraint system
You need a locking clip to install the child restraint system. Follow the instruc-
tions provided by the manufacturer of the system. If your child restraint sys-
tem does not provide a locking clip, you can purchase the following item from
any authorized Toyota dealer or repairer, or another duly qualified and
equipped professional:
Locking clip for child restraint system
(Part No. 73119-22010)
CAUTION
When installing a child restraint system
Follow the directions given in the child restraint system installation manual
and fix the child restraint system securely in place.
If the child restraint system is not correctly fixed in place, the child or other
passengers may be seriously injured or even killed in the event of a sudden
braking or an accident.
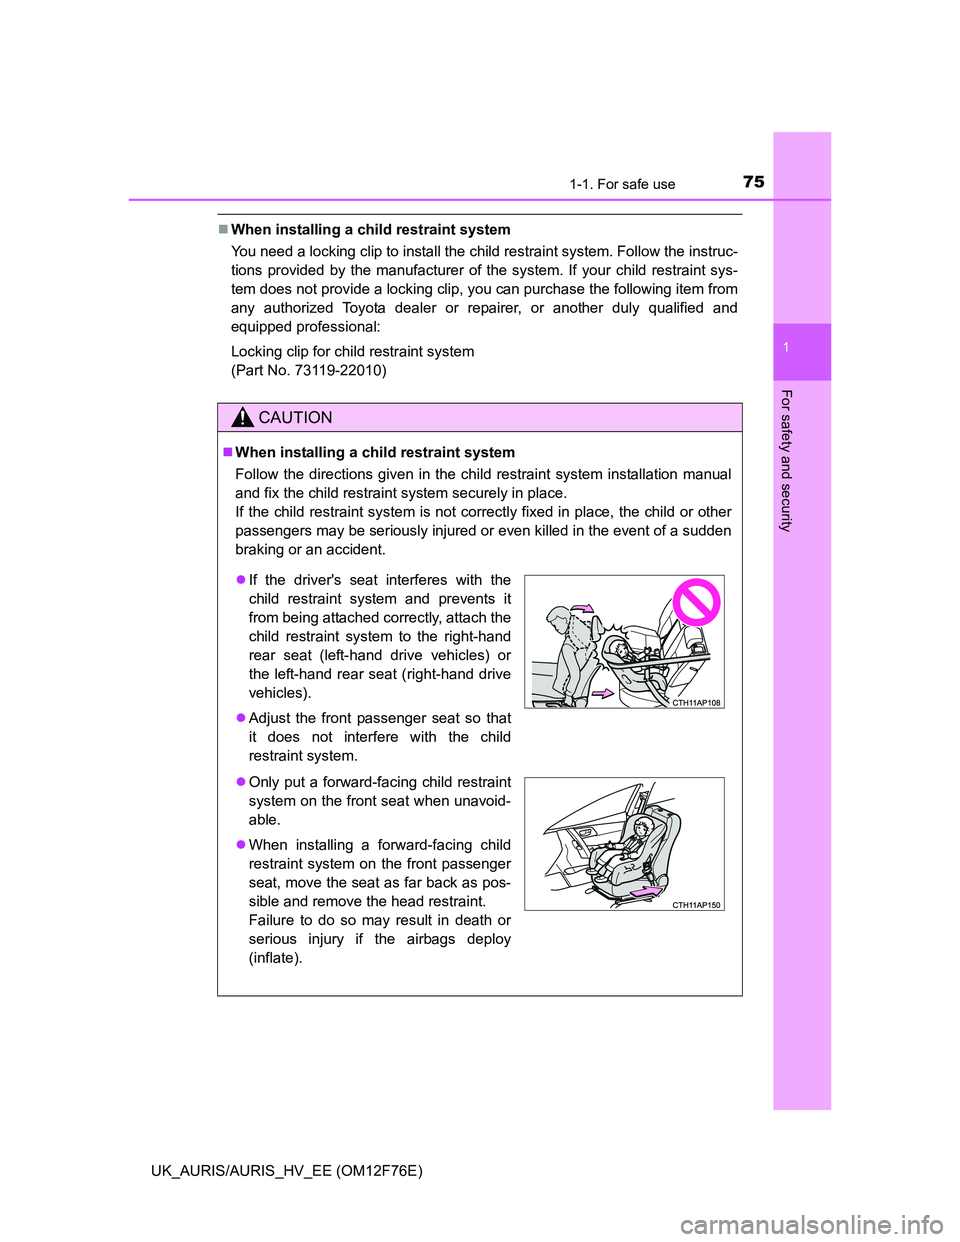
If the driver's seat interferes with the
child restraint system and prevents it
from being attached correctly, attach the
child restraint system to the right-hand
rear seat (left-hand drive vehicles) or
the left-hand rear seat (right-hand drive
vehicles).
Adjust the front passenger seat so that
it does not interfere with the child
restraint system.
Only put a forward-facing child restraint
system on the front seat when unavoid-
able.
When installing a forward-facing child
restraint system on the front passenger
seat, move the seat as far back as pos-
sible and remove the head restraint.
Failure to do so may result in death or
serious injury if the airbags deploy
(inflate).
Page 77 of 768

771-1. For safe use
1
For safety and security
UK_AURIS/AURIS_HV_EE (OM12F76E)
CAUTION
When installing a child restraint system
If child restraint system regulations exist in the country where you reside,
please contact any authorized Toyota dealer or repairer, or another duly
qualified and equipped professional for the child restraint system installa-
tion.
When a junior seat is installed, always ensure that the shoulder belt is
positioned across the center of the child’s shoulder. The belt should be
kept away from the child’s neck, but not so that it could fall off the child’s
shoulder. Failing to do so may result in death or serious injury in the event
of sudden braking, sudden swerving or an accident.
Ensure that the belt and plate are securely locked and the seat belt is not
twisted.
Shake the child restraint system left and right, and forward and backward
to ensure that it has been securely installed.
After securing a child restraint system, never adjust the seat.
Follow all installation instructions provided by the child restraint system
manufacturer.
To correctly attach a child restraint system to the anchors
When using the lower anchors, be sure that there are no foreign objects
around the anchors and that the seat belt is not caught behind the child
restraint system. Make sure the child restraint system is securely attached,
or it may cause death or serious injury to the child or other passengers in
the event of a sudden braking or an accident.
When the child restraint system is not in use
If it is necessary to detach the child restraint system, remove it from the
vehicle or store it securely in the luggage compartment. If a head restraint
was removed when installing a child restraint system, always install the
head restraint before driving. This will prevent it from injuring passengers in
the event of a sudden stop or accident.
Page 79 of 768
791-1. For safe use
1
For safety and security
UK_AURIS/AURIS_HV_EE (OM12F76E)
CAUTION
Exhaust pipe
The exhaust system needs to be checked periodically. If there is a hole or
crack caused by corrosion, damage to a joint or abnormal exhaust noise, be
sure to have the vehicle inspected and repaired by any authorized Toyota
dealer or repairer, or another duly qualified and equipped professional.
Page 81 of 768
811-2. Hybrid system
1
For safety and security
UK_AURIS/AURIS_HV_EE (OM12F76E)
When stopped/during start off
The gasoline engine stops when the vehicle is stopped. During start
off, the electric motor (traction motor) drives the vehicle. At slow
speeds or when traveling down a gentle slope, the engine is
stopped and the electric motor (traction motor) is used.
During normal driving
The gasoline engine is predominantly used. The electric motor
(traction motor) charges the hybrid battery (traction battery) as nec-
essary.
When accelerating sharply
When the accelerator pedal is depressed heavily, the power of the
hybrid battery (traction battery) is added to that of the gasoline
engine via the electric motor (traction motor).
When braking (regenerative braking)
The electric motor (traction motor) charges the hybrid battery (trac-
tion battery).
Page 83 of 768

831-2. Hybrid system
1
For safety and security
UK_AURIS/AURIS_HV_EE (OM12F76E)After the 12-volt battery has discharged or has been changed or
removed
The gasoline engine may not stop even if the vehicle is running on the hybrid
battery (traction battery). If this continues for a few days, contact any autho-
rized Toyota dealer or repairer, or another duly qualified and equipped profes-
sional.
Sounds and vibrations specific to a hybrid vehicle
There may be no engine sounds or vibration even though the vehicle is able
to move. For safety, apply the parking brake and make sure to shift the shift
position to P when parked.
The following sounds or vibrations may occur when the hybrid system is
operating and are not a malfunction:
Motor sounds may be heard from the engine compartment.
Sounds may be heard from the hybrid battery (traction battery) under the
rear seats when the hybrid system starts or stops.
Sounds from the hybrid system may be heard when the back door is open.
Sounds may be heard from the hybrid transmission when the gasoline
engine starts or stops, when driving at low speeds, or during idling.
Engine sounds may be heard when accelerating sharply.
Sounds may be heard due to regenerative braking when the brake pedal is
depressed.
Vibration may be felt when the gasoline engine starts or stops.
Cooling fan sounds may be heard from the air intake vents on the side of the
lower part of the rear left seats.
Maintenance, repair, recycling, and disposal
Contact any authorized Toyota dealer or repairer, or another duly qualified
and equipped professional regarding maintenance, repair, recycling and dis-
posal. Do not dispose of the vehicle yourself.
Customization
Settings (e.g. on/off operation of the EV indicator) can be changed.
(Customizable features P. 133)