2013 SUBARU TRIBECA keyless
[x] Cancel search: keylessPage 12 of 420
&On-road and off-road driving
This vehicle is classified as a utility
vehicle. Utility vehicles have a significantly
higher rollover rate than other types of
vehicles. Your vehicle has a higher ground
clearance and higher center of gravity,
making it more likely to roll over than
ordinary passenger cars. It also handles
and maneuvers differently from other
passenger cars. For this reason, please
read carefully the following section and
follow the instructions and precautions in
order to prevent serious injury or death
due to loss of control, rollover and other
accidents. Refer to “On-road and off-road
driving ”F 8-6. General information &
California proposition 65 warning
WARNING
Engine exhaust, some of its consti-
tuents, and certain vehicle compo-
nents contain or emit chemicals
known to the State of California to
cause cancer and birth defects or
other reproductive harm. In addi-
tion, certain fluids in vehicles and
certain components of product wear
contain or emit chemicals known to
the State of California to cause
cancer and birth defects or other
reproductive harm.
& California Perchlorate Advi- sory
Certain vehicle components such as air-
bag modules, seatbelt pretensioners and
keyless entry transmitter batteries may
contain perchlorate material. Special
handling may apply for service or vehicle
end of life disposal. See www.dtsc.ca.gov/hazardouswaste/perchlorate. &
Noise from under the vehicle
NOTE
You may hear a noise from under the
vehicle approximately 5 to 10 hours
after the engine is turned off. However,
this does not indicate a malfunction.
This noise is caused by the operation
of the fuel evaporation leakage check-
ing system and is normal. The noise
will stop after approximately 15 min-utes. 9
Page 27 of 420

24
Function settings
A SUBARU dealer can change the settings of the functions shown in the following table to meet your personal requirements. Contact
the nearest SUBARU dealer for details. If your vehicle is equipped with the genuine SUBARU navigation system, the settings for some
of these functions can be changed using the navigation monitor. For details, please refer to the Owner’s Manual supplement for the
navigation system.
Item Function Possible settings Default setting Page
Alarm system Alarm system Operation/Non-operation Operation 2-16
Monitoring start delay time (after closure of doors) 0 second/30 seconds 30 seconds 2-17
Impact sensor operation (only models with shock
sensors (dealer option)) Operation/Non-operation Non-operation 2-20
Passive arming Operation/Non-operation Non-operation 2-19
Dome light/map lights illumination ON/OFF OFF 2-16
Remote keyless entry sys- tem Hazard warning flasher Operation/Non-operation Operation 2-8
Audible signal
Operation/Non-operation Operation 2-11
Key lock-in prevention Key lock-in prevention Operation/Non-operation Operation 2-7
Remote engine start system
(dealer option) Horn chirp confirmation ON/OFF ON 7-10
Rear window defogger Rear window defogger Operation for 15 minutes/ Continuous operationOperation for 15 minutes 3-37
Windshield wiper deicer Windshield wiper deicer Operation for 15 minutes/ Continuous operationOperation for 15 minutes 3-36
Map lights/Dome light Operation of map lights/dome light OFF delay timer OFF/Short/Normal/Long Normal 6-2/6-3
Map lights Illumination in conjunction with a door open Operation/Non-operation Operation (Illumination - ON)6-3
Battery drainage prevention function Battery drainage prevention function Operation/Non-operation Operation 2-6
Page 104 of 420

Keys..................................................................... 2-2
Key number plate ................................................ 2-2
Immobilizer .......................................................... 2-3
Security ID plate .................................................. 2-3
Security indicator light ........................................ 2-4
Key replacement ................................................. 2-4
Door locks ........................................................... 2-5
Locking and unlocking from the outside .. ............ 2-5
Locking and unlocking from the inside ................ 2-5
Battery drainage prevention function ................... 2-6
Power door locking switches ............................. 2-7
Key lock-in prevention function ........................... 2-8
Remote keyless entry system ............................ 2-8
Locking the doors ............................................... 2-9
Unlocking the doors ........................................... 2-10
Unlocking the rear gate ...................................... 2-10
Illuminated entry ................................................ 2-10
Vehicle finder function ........................................ 2-10
Sounding a panic alarm ...................................... 2-11
Selecting audible signal operation ...................... 2-11
Replacing the battery ......................................... 2-11 Replacing lost transmitters
................................ 2-12
Alarm system ..................................................... 2-16
System operation ............................................... 2-16
Activating and deactivating the alarm system ..... 2-16
If you have accidentally triggered the alarm system ............................................................ 2-17
Arming the system ............................................ 2-17
Disarming the system ........................................ 2-18
Valet mode ........................................................ 2-18
Passive arming .................................................. 2-19
Tripped sensor identification .............................. 2-20
Shock sensors (dealer option).. .......................... 2-20
Child safety locks .............................................. 2-21
Windows ............................................................. 2-21
Power windows ................................................. 2-21
Rear gate ............................................................ 2-24
Moonroof (if equipped) ...................................... 2-25
Tilt function ....................................................... 2-26
Sliding function ................................................. 2-26
Anti-entrapment function .................................... 2-26
Sun shade ......................................................... 2-27 Keys and doors
2
Page 111 of 420
2-8Keys and doors/Remote keyless entry system
door locking switches. &Key lock-in prevention func- tion
This function prevents the doors from
being locked with the key still in the
ignition switch. ! Behavior with key lock-in preven-
tion function operational
. With either the driver ’s or front passen-
ger ’s door open, the doors automatically
remain unlocked even if the “
”side of the
door locking switch is pushed. . It is possible to lock the all doors and
the rear gate by holding the “
”side of the
door locking switch pushed for 3 seconds
with the driver ’s door open and then
closing the driver ’s door.
! Behavior with key lock-in preven-
tion function non-operational
. If the lock lever is turned to the rear
( “ LOCK ”) position with the driver ’s door
open and the driver ’s door is then closed
with the lock lever in that position, thedriver ’s door is locked.
. If the spare key is used to lock the
driver ’s door from the outside of the
vehicle, the door is locked.
This function ’s operational/non-opera- tional setting can be changed by a
SUBARU dealer. Contact a SUBARU
dealer for details.
NOTE
When leaving the vehicle, make sure
you are holding the key before locking
the doors. Remote keyless entry system
CAUTION
. Do not expose the remote trans-
mitter to severe shocks, such as
those experienced as a result of
dropping or throwing.
. Do not take the remote transmit-
ter apart except when replacing
the battery.
. Do not get the remote transmitter
wet. If it gets wet, wipe it dry with
a cloth immediately.
. When you carry the remote trans-
mitteronanairplane,donot
press the button of the remote
transmitter while in the airplane.
When any button of the remote
transmitter is pressed, radio
waves are sent and may affect
the operation of the airplane.
When you carry the remote trans-
mitter in a bag on an airplane,
take measures to prevent the
buttons of the remote transmitter
from being pressed.
This device complies with Part 15 of
the FCC Rules and with RSS-210 of
Industry Canada. Operation is subject
Page 112 of 420
to the following two conditions: (1) This
device may not cause harmful inter-
ference, and (2) this device must
accept any interference received, in-
cluding interference that may cause
undesired operation.
Changes or modifications not ex-
pressly approved by the party respon-
sible for compliance could void theuser’s authority to operate the equip-
ment.
The transmitter for the remote keyless
entry system is located inside the keyhead.
The remote keyless entry system has the
following functions. . Locking and unlocking the doors and
rear gate without a key. Unlocking the rear gate without key
. Sounding a panic alarm
. Arming and disarming the alarm sys-
tem. For detailed information, refer to “ Alarm system ”F 2-16.
The operable distance of the remote
keyless entry system is approximately 30
feet (10 meters). However, this distance
will vary depending on environmental conditions.
The system ’s operable distance will be
shorter in areas near a facility or electronic equipment emitting strong radio waves
such as a power plant, broadcast station,
TV tower, or remote controller of home
electronic appliances.
NOTE
The remote keyless entry system does
not operate when the ignition key is
inserted in the ignition switch or when
any of the doors or the rear gate is not
fully closed.
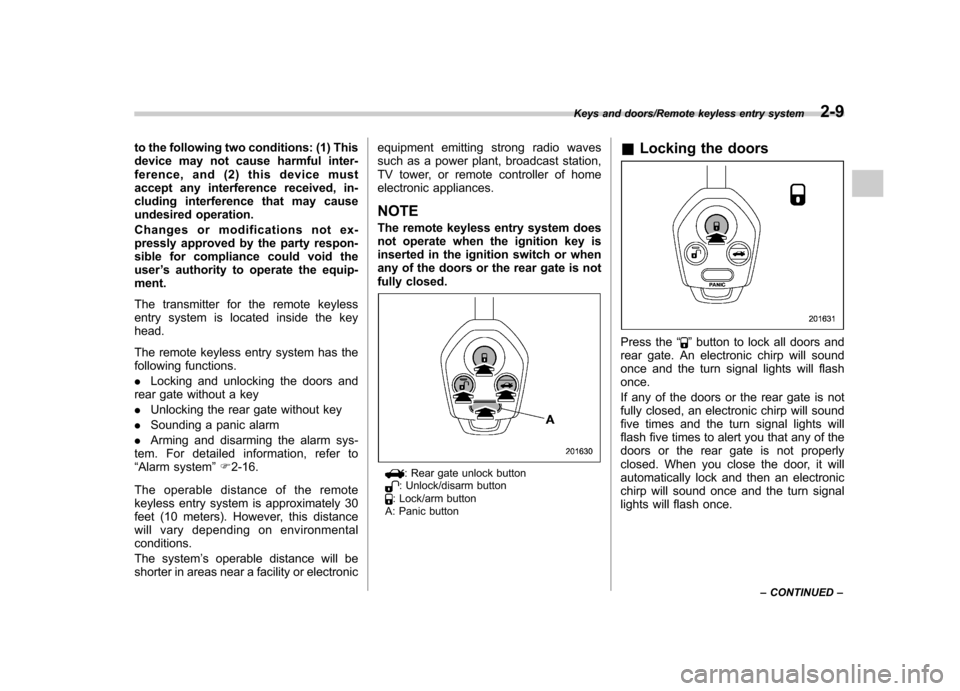
: Rear gate unlock button: Unlock/disarm button: Lock/arm button
A: Panic button &
Locking the doors
Press the “”button to lock all doors and
rear gate. An electronic chirp will sound
once and the turn signal lights will flashonce.
If any of the doors or the rear gate is not
fully closed, an electronic chirp will sound
five times and the turn signal lights will
flash five times to alert you that any of the
doors or the rear gate is not properly
closed. When you close the door, it will
automatically lock and then an electronic
chirp will sound once and the turn signal
lights will flash once.
Keys and doors/Remote keyless entry system2-9
– CONTINUED –
Page 113 of 420
2-10Keys and doors/Remote keyless entry system
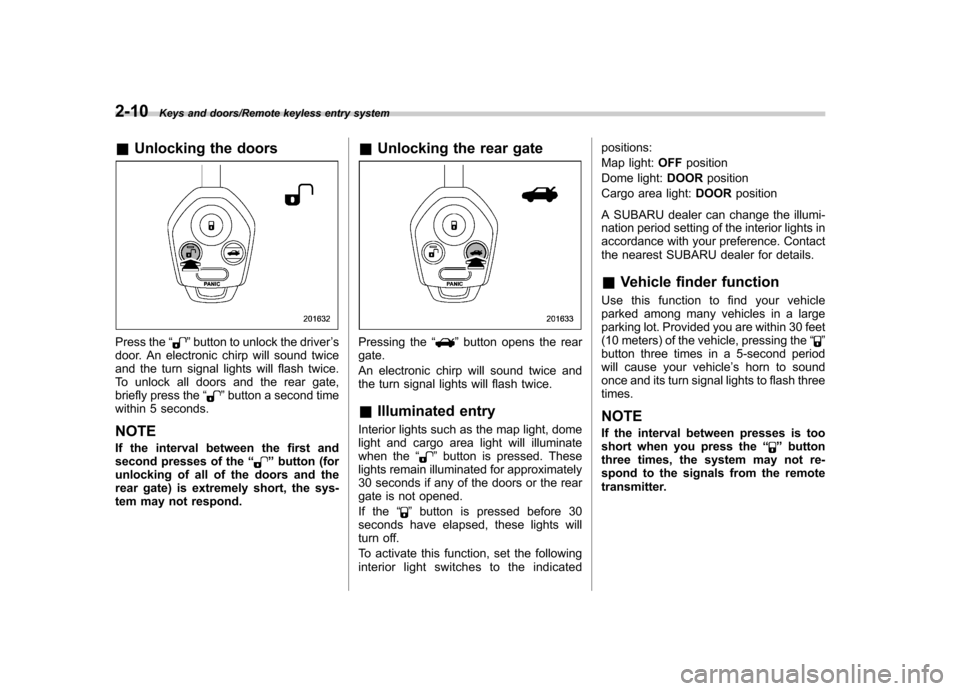
&Unlocking the doors
Press the “”button to unlock the driver ’s
door. An electronic chirp will sound twice
and the turn signal lights will flash twice.
To unlock all doors and the rear gate,
briefly press the “
”button a second time
within 5 seconds. NOTE
If the interval between the first and
second presses of the “
”button (for
unlocking of all of the doors and the
rear gate) is extremely short, the sys-
tem may not respond. &
Unlocking the rear gate
Pressing the “”button opens the rear
gate.
An electronic chirp will sound twice and
the turn signal lights will flash twice.
& Illuminated entry
Interior lights such as the map light, dome
light and cargo area light will illuminate
when the “
”button is pressed. These
lights remain illuminated for approximately
30 seconds if any of the doors or the rear
gate is not opened.
If the “
”button is pressed before 30
seconds have elapsed, these lights will
turn off.
To activate this function, set the following
interior light switches to the indicated positions:
Map light:
OFFposition
Dome light: DOORposition
Cargo area light: DOORposition
A SUBARU dealer can change the illumi-
nation period setting of the interior lights in
accordance with your preference. Contact
the nearest SUBARU dealer for details.
& Vehicle finder function
Use this function to find your vehicle
parked among many vehicles in a large
parking lot. Provided you are within 30 feet
(10 meters) of the vehicle, pressing the “
”
button three times in a 5-second period
will cause your vehicle ’s horn to sound
once and its turn signal lights to flash three times. NOTE
If the interval between presses is too
short when you press the “
”button
three times, the system may not re-
spond to the signals from the remote
transmitter.
Page 114 of 420
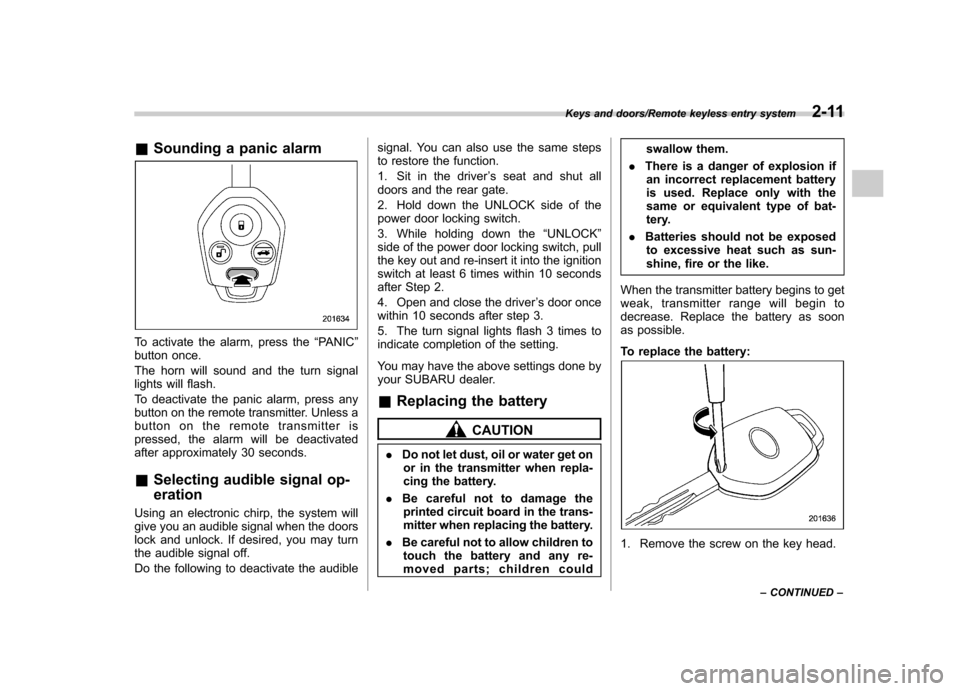
&Sounding a panic alarm
To activate the alarm, press the “PANIC ”
button once.
The horn will sound and the turn signal
lights will flash.
To deactivate the panic alarm, press any
button on the remote transmitter. Unless a
button on the remote transmitter is
pressed, the alarm will be deactivated
after approximately 30 seconds. & Selecting audible signal op- eration
Using an electronic chirp, the system will
give you an audible signal when the doors
lock and unlock. If desired, you may turn
the audible signal off.
Do the following to deactivate the audible signal. You can also use the same steps
to restore the function.
1. Sit in the driver
’s seat and shut all
doors and the rear gate.
2. Hold down the UNLOCK side of the
power door locking switch.
3. While holding down the “UNLOCK ”
side of the power door locking switch, pull
the key out and re-insert it into the ignition
switch at least 6 times within 10 seconds
after Step 2.
4. Open and close the driver ’s door once
within 10 seconds after step 3.
5. The turn signal lights flash 3 times to
indicate completion of the setting.
You may have the above settings done by
your SUBARU dealer.
& Replacing the battery
CAUTION
. Do not let dust, oil or water get on
or in the transmitter when repla-
cing the battery.
. Be careful not to damage the
printed circuit board in the trans-
mitter when replacing the battery.
. Be careful not to allow children to
touch the battery and any re-
moved parts; children could swallow them.
. There is a danger of explosion if
an incorrect replacement battery
is used. Replace only with the
same or equivalent type of bat-
tery.
. Batteries should not be exposed
to excessive heat such as sun-
shine, fire or the like.
When the transmitter battery begins to get
weak, transmitter range will begin to
decrease. Replace the battery as soon
as possible.
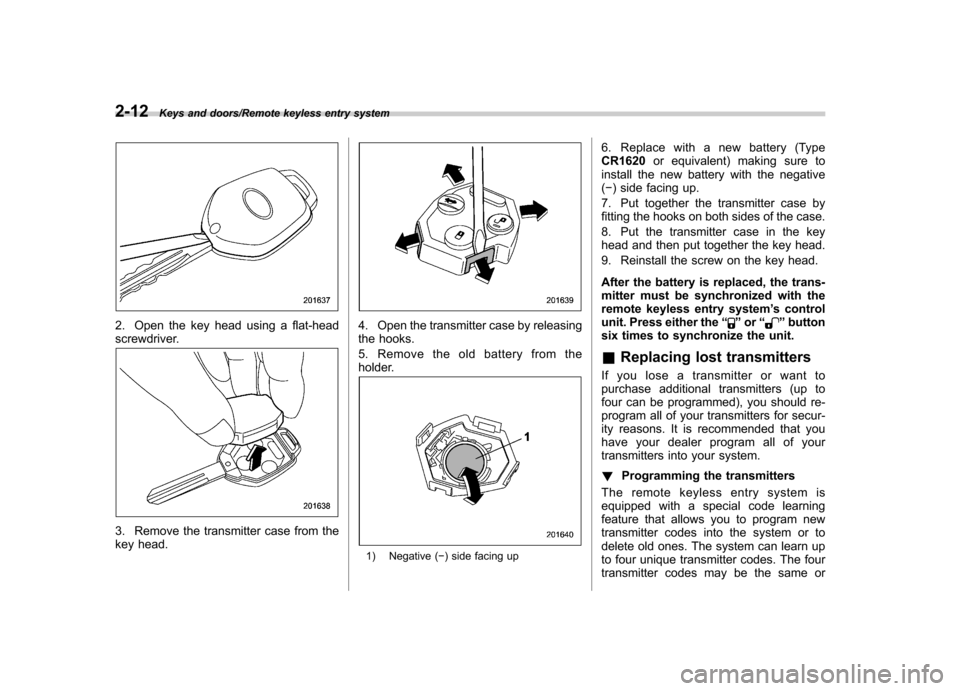
To replace the battery:
1. Remove the screw on the key head.
Keys and doors/Remote keyless entry system2-11
– CONTINUED –
Page 115 of 420
2-12Keys and doors/Remote keyless entry system
2. Open the key head using a flat-head
screwdriver.
3. Remove the transmitter case from the
key head.
4. Open the transmitter case by releasing
the hooks.
5. Remove the old battery from the
holder.
1) Negative (�) side facing up 6. Replace with a new battery (Type CR1620
or equivalent) making sure to
install the new battery with the negative( � ) side facing up.
7. Put together the transmitter case by
fitting the hooks on both sides of the case.
8. Put the transmitter case in the key
head and then put together the key head.
9. Reinstall the screw on the key head.
After the battery is replaced, the trans-
mitter must be synchronized with the
remote keyless entry system ’s control
unit. Press either the “
”or “”button
six times to synchronize the unit. & Replacing lost transmitters
If you lose a transmitter or want to
purchase additional transmitters (up to
four can be programmed), you should re-
program all of your transmitters for secur-
ity reasons. It is recommended that you
have your dealer program all of your
transmitters into your system. ! Programming the transmitters
The remote keyless entry system is
equipped with a special code learning
feature that allows you to program new
transmitter codes into the system or to
delete old ones. The system can learn up
to four unique transmitter codes. The four
transmitter codes may be the same or