Page 25 of 36

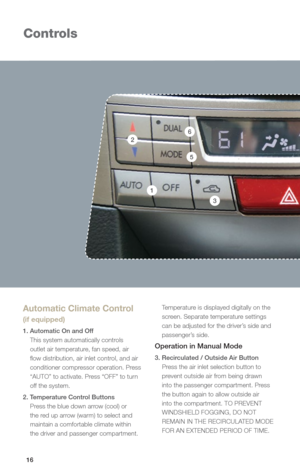
• Push the switch up to increase or down to
reduce volume.
• Press the button to select the desired audio mode – FM,
AM, S AT, CD, AU")
22
Controls
Steering Wheel Audio Controls (if equipped)
• Push the switch up to increase or down to
reduce volume.
• Press the button to select the desired audio mode – FM,
AM, S AT, CD, AUX, MEDIA.
• With any of the radio modes selected, push
the switch up or down to skip through your
presets. In CD mode, push the switch up or
down to skip forward or back a track.
• Talk switch, please refer to the “Bluetooth audio”
section in your Owner’s
Manual Guide.
Auxiliar Input Jack
The 3.5mm auxiliary input jack is located in the center console.
You can connect a portable music player to the auxiliary jack and
hear the music stored on it through the vehicle speakers. Press
the “CD/AUX” button located on the audio system to select the
auxiliary mode.
USB Storage Device /
iPod® (if equipped)
You can connect a USB
equipped portable music player
to the USB connector and hear
the music stored on it through the
vehicle speakers. Press the “CD/
AUX” button located on the audio
system repeatedly until the USB /
iPod
® mode is selected.
Page 26 of 36

Decrease speed
Push down the “RES/SET” switch
to the “SET” side; hold until your
vehicle slows to the desired speed
and release. To decrease the speed
using the brake pedal, press the
pedal to release cruise control
temporarily. When the speed
decreases to the desired speed,
push down the “RES/SET” switch
to the “SET” side to set the speed.
23
Getting
Started Instrument
Panel Gauges
Personalize Controls
While
Operating Safety / In Case
of Emergency Additional
Information
23
Getting Started
Instrument Panel
Gauges
Personalize
Controls
While Operating
Safety / In Case of Emergency
Additional Information
Controls
Cruise Control
• To activate the cruise control, press the
button. The indicator light on the instrument
panel will turn on. To deactivate cruise
control, press the
button again.
• Press the accelerator pedal until your vehicle reaches the desired
speed. Push the switch to the
“SET” side and release. Ease off
the accelerator pedal. Your vehicle
will maintain the desired speed.
•
To cancel the cruise control, push
the brake pedal or press the
“CANCEL” button. If you have
a manual transmission, you can
push in the clutch pedal. •
To resume your speed after
canceling, push the switch
to the “RES” side.
Increase speed
Push up the “RES/SET” switch
to the “RES” side; hold until your
vehicle reaches the desired speed
and release. To increase speed
using the accelerator pedal, press
the pedal until you reach the
desired speed. Push down the
“RES/SET” switch to the “SET”
side to set the speed.
Page 27 of 36

2424
While Operating
Electronic Parking Brake
To apply, push the brake pedal and press the parking brake switch
firmly. The brake system warning light on the instrument panel and the
indicator light on the parking brake switch will illuminate.
To release, make sure all doors are closed and your seatbelt is fastened,
then gently push the accelerator pedal. Or, while the ignition switch is in
the ON position and the brake pedal and the clutch pedal (MT models
only) are pushed in, pull the parking brake switch toward you.
Hill Holder™ Function
When the Hill Holder function is activated, the parking brake will be
automatically applied when stopped on an uphill or downhill slope with
the brake pedal pushed down. The brake system warning light and the
indicator light on the parking brake switch will illuminate. To activate,
press the Hill Holder switch. To deactivate, press the Hill Holder
switch again.
Automatic Transmission
Shift Mode
The 5-Speed automatic transmission or the
Continuously Variable Transmission (CVT) gives
you ultimate control with two different driving
modes: Normal Mode and Manual Mode.
Normal Mode
When the selector lever is in the “D” (Drive)
position, the transmission is in Normal
shift mode. The shift position indicator on
the instrument panel shows “D” and the
transmission automatically shifts into a
suitable forward gear.
Manual Mode
In Manual Mode, you select the desired gear
position to obtain necessary acceleration and engine braking. Moving the selector
lever left into the manual gate
1 from “D”
(Drive) position causes the transmission
to change into Manual Mode. To shift, use
the paddle shift control switches. The shift
position indicator shows the selected
gear position.
1
Page 28 of 36

25
Getting
Started Instrument
Panel Gauges
Personalize Controls
While
Operating Safety / In Case
of Emergency Additional
Information
Paddle Shift Control Switches
• Temporary use: Even when the selector is in the “D” (Drive) position, you can
temporarily shift the gear by pulling the “+” or “-” paddle shift control switch.
The transmission will automatically switch back to Normal Mode.
• When the selector lever is in Manual Mode, shift to the next higher gear by pulling the “+” paddle shift control switch on the steering wheel. Pull the “-”
paddle shift control switch to shift into the next lower gear.
When Manual Shifting Operation Is Possible
• Arrow-shaped lights in the center of the instrument panel show whether an upshift is possible and whether a downshift is possible.
• Both arrows are on: Upshifting and downshifting are both possible.
• Up arrow only is on: Only upshifting is possible.
• Down arrow only is on: Only downshifting is possible.
25
Getting Started
Instrument Panel
Gauges
Personalize
Controls
While Operating
Safety / In Case of Emergency
Additional Information
While
Operating
Page 29 of 36
2626
Safety / In Case of Emergency
Child Restraint System
For maximum safety, first carefully read the LATCH system instructions from the device
manufacturer, as well as the installation instructions in your Owner’s Manual, to properly
install the LATCH compatible restraint system. Use the appropriate seatbelts or anchorages
provided in your vehicle. Children age 12 and under must properly occupy the rear seat at
all times.
Child Safety Locks
The child safety locks are located on the inside edges of the rear doors. In the locked
position, the rear doors can only be opened from the outside.
Page 30 of 36

27
Getting
Started Instrument
Panel Gauges
Personalize Controls
While
Operating Safety / In Case
of Emergency Additional
Information
27
Getting Started
Instrument Panel
Gauges
Personalize
Controls
While Operating
Safety / In Case of Emergency
Additional Information
Safety /
In Case of
Emergency
Location of Spare Tire and Jack
A jack and other maintenance tools are stored in the tool bucket in the center of the
spare tire, located in the trunk or cargo area. Raise the center lid and remove the bucket
from the center of the spare tire. Take the jack out of the bucket. The jack handle is
stowed on the back of the center lid of the cargo area.
Towing Your All-Wheel Drive Vehicle
Since all-wheel drive distributes engine power to all four wheels, improper
towing will severely damage your AWD system. A flatbed truck is the only
recommended way to properly transport your AWD vehicle. If towing is
necessary, it is best done by your Subaru dealer or a commercial towing service.
Subaru Roadside Assistance
Subaru Roadside Assistance is free and standard on every 2012 Subaru vehicle.
Coverage is automatic; there are no forms to complete. Subaru Roadside
Assistance is available anytime during the 3-year/36,000-mile Subaru Lim\
ited
Warranty, whichever comes first.* A Subaru Roadside Assistance decal has
been affixed to the driver’s door window.
Subaru Roadside Assistance: 1-800-261-2155
Exclusions
Specifically excluded from Subaru Roadside Assistance coverage are service
requests or claims resulting from: accidents, vandalism, acts of God, violation
of any laws, or vehicle modifications not recommended by the manufacturer.
*See your dealer for details
Page 31 of 36
28
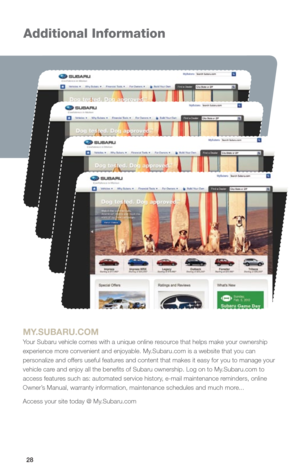
Additional Information
MY.SUBARU.COM
Your Subaru vehicle comes with a unique online resource that helps make your ownership
experience more convenient and enjoyable. My.Subaru.com is a website that you can
personalize and offers useful features and content that makes it easy for you to manage your
vehicle care and enjoy all the benefits of Subaru ownership. Log on to My.Subaru.com to
access features such as: automated service history, e-mail maintenance reminders, online
Owner’s Manual, warranty information, maintenance schedules and much more...
Access your site today @ My.Subaru.com
Page 32 of 36

29
Getting
Started Instrument
Panel Gauges
Personalize Controls
While
Operating Safety / In Case
of Emergency Additional
Information
29
Getting Started
Instrument Panel
Gauges
Personalize
Controls
While Operating
Safety / In Case of Emergency
Additional InformationAdditional
Information
Fuel
Use regular unleaded gasoline with an octane rating of 87 AKI
or higher.
Fuel Capacity
• 18.5 US gal (70 liters, 15.4 Imp gal)
• When the low fuel indicator light is displayed on the
instrument panel, approximately 2.6 U.S. gallons of fuel remain.
• If you have recently fueled your vehicle, the check
engine light on the instrument panel may stay on due
to a missing or loose fuel filler cap (the cap should be
tightened until a click is heard).
- 2.5 liter 4-cyl. DOHC models use 0W-20 synthetic.
- 3.6 liter 6-cyl. models use 5W-30.
Engine Oil
Use only the following oils:
• API classification SM or SN with the words “ENERGY
CONSERVING” or “RESOURCE CONSERVING”.
• Or ILSAC GF-4 or GF-5, which can be identified with the ILSAC
certification mark (Starburst mark).
Engine Oil Capacity
• 2.5 liter 4-cyl. models: 5.1 US qt (4.8 liters, 4.2 lmp qt)
• 3.6 liter 6-cyl. models: 6.9 US qt (6.5 liters, 5.7 Imp qt)