Page 17 of 36
14
Controls
Manual Climate Control
(if equipped)
1. Temperature Control Dial Rotate the temperature control dial from
blue for cool, to red for warm.
2. Air Conditioning Button Press the “A/C” button to activate the
air conditioning. Press it again to turn off
the air conditioning. 3. Recirculated / Outside Air Button
Press the air inlet selection button to
prevent outside air from being drawn into
the passenger compartment. If the button
is pushed in, press it again to draw outside
air into the compartment. TO PREVENT
WINDSHIELD FOGGING, DO NOT
REMAIN IN THE RECIRCULATED MODE
FOR AN EXTENDED PERIOD OF TIME.
4. Fan Speed Control Dial Rotate the fan speed control dial to select
one of four fan speeds.
234
7
Page 18 of 36

15
Getting
Started Instrument
Panel Gauges
Personalize Controls
While
Operating Safety / In Case
of Emergency Additional
Information
15
Getting Started
Instrument Panel
Gauges
Personalize
Controls
While Operating
Safety / In Case of Emergency
Additional Information
Controls
5. Rear Window Defogger Button Press the rear window defogger button
to turn on the defogger. The defogger
will automatically shut off after about
15 minutes. If the window clears
before that time, you can press the
button again to turn it off.
6. Defrost / Defog To clear the windshield and front door
windows of fog or frost, press the
defrost button, set the temperature
control to the red position, and set the
fan speed control to the fastest speed.
While in defrost mode, the air inlet selection and A/C will operate
automatically (although the A/C
indicator will illuminate if the button
was depressed prior to or during
defrost mode).
7. Air Flow Control Buttons The air flow control buttons allow
you to choose the direction of air flow.
Press in the desired button.
1
5
6
Page 19 of 36
16
Controls
1
2
3
5
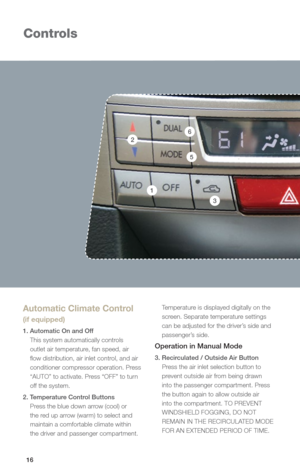
Automatic Climate Control
(if equipped)
1. Automatic On and Off This system automatically controls
outlet air temperature, fan speed, air
flow distribution, air inlet control, and air
conditioner compressor operation. Press
“AUTO” to activate. Press “OFF” to turn
off the system.
2. Temperature Control Buttons Press the blue down arrow (cool) or
the red up arrow (warm) to select and
maintain a comfortable climate within
the driver and passenger compartment. Temperature is displayed digitally on the
screen. Separate temperature settings
can be adjusted for the driver’s side and
passenger’s side.
Operation in Manual Mode
3. Recirculated / Outside Air Button
Press the air inlet selection button to
prevent outside air from being drawn
into the passenger compartment. Press
the button again to allow outside air
into the compartment. TO PREVENT
WINDSHIELD FOGGING, DO NOT
REMAIN IN THE RECIRCULATED MODE
FOR AN EXTENDED PERIOD OF TIME.
6
Page 20 of 36

17
Getting
Started Instrument
Panel Gauges
Personalize Controls
While
Operating Safety / In Case
of Emergency Additional
Information
17
Getting Started
Instrument Panel
Gauges
Personalize
Controls
While Operating
Safety / In Case of Emergency
Additional Information
Controls
4
78
4. Fan Speed Control Buttons Press the fan speed control buttons to
select six different fan speed positions.
5. Air Flow Mode Selection Button Press the button to select the desired
air flow mode. The selected air flow
mode – either ventilation, bi-level,
heat, heat-defrost or defrost – is
shown on the display.
6. Dual Mode Button Press the “DUAL” button to activate
or deactivate the dual mode. Dual
mode makes it possible to have
separate temperature settings for the
driver’s side and passenger’s side. 7. Air Conditioner Button
Press the “A/C” button to activate the air conditioning. Press it again to turn
off the air conditioning.
8. Defroster Button Press the button to defrost or
dehumidify the windshield and front
door windows.
9. Rear Window Defogger Button Press the button to turn on the
defogger. It will automatically shut off
after about 15 minutes. If the window
clears before that time, you can
press the button again to turn it off.9
2
Page 21 of 36

Radio Functions
1. Power / Volume Control Press the power / volume control knob
for on or off; rotate the knob to control
the")
18
Controls
1
AM/FM Stereo with Single
Disc CD Player
(if equipped)
Radio Functions
1. Power / Volume Control Press the power / volume control knob
for on or off; rotate the knob to control
the volume.
2. Bass, Middle, Treble, Fader and Balance
Each press of the “TUNE/TRACK/CH”
button will cycle you through Bass,
Midrange, Treble, Fade or Balance. Rotate
the “TUNE/TRACK/CH” knob to adjust
the desired level.
3. FM / AM Press the “FM” button to choose FM1,
FM2 or FM3 reception. Press the “AM”
button to choose AM reception.
4. Tune / Track Rotate the “TUNE/TRACK/CH”
knob clockwise to increase the
tuning frequency; rotate the knob
counter-clockwise to decrease it. 5. Seek
Press the right or left arrow of the “SEEK”
button to pick up the next highest or
lowest frequency.
6. Presets You can save up to six favorite stations
for each band – FM1, FM2, FM3 and AM.
Select a frequency and press one of the
preset buttons for more than 1.5 seconds
to store it.
7. Satellite Radio An optional satellite radio tuner and
antenna can be connected to this audio
unit. You can hear satellite radio programs
by pressing the “SAT” button after
connecting optional equipment. To receive
satellite radio service, it is necessary to
enter into a separate contract with a
satellite radio provider.
11
93
8
15
13513
37
1617
14
10
4
2
66
12
Page 22 of 36

19
Getting
Started Instrument
Panel Gauges
Personalize Controls
While
Operating Safety / In Case
of Emergency Additional
Information
19
Getting Started
Instrument Panel
Gauges
Personalize
Controls
While Operating
Safety / In Case of Emergency
Additional Information
Controls
CD Player functions
8. Load
Insert a disc into the slot. The CD
will automatically be drawn in and
will begin play at the first track.
9. Play CD
Press the “CD/AUX” button
and playback will begin.
10. Repeat / Random
Press the “RPT/RDM” button
once to repeat the current
track; press twice to repeat the
current folder.
Press and hold the “RPT/RDM”
button to randomize tracks on
a CD.
11. Eject
Press the button to eject the disc.
12. Forward / Reverse
Rotate the “TUNE/TRACK/CH”
knob clockwise to skip to the
beginning of the next track; rotate
the knob counter-clockwise to
skip to the beginning of the
current track. Rotate the knob
counter-clockwise again to go to
the previous selection.
13. Fast Forward / Fast Reverse
Press and hold the right arrow
of the “SEEK” button for more
than one second to fast forward.
Release the button to stop. To fast
reverse, press and hold the left
arrow for more than one second
and release the button to stop. 14.
Scan
Press the “SCAN” button to begin
previewing the first 10 seconds
of each track on the disc. Normal
playback will resume after all
tracks have been scanned. Press
the “SCAN” button again to stop
scanning and listen to the track
being previewed.
MP3/WMA Formatted CD
Player Functions
15. Folder Selection
Press the up arrow of the
“FOLDER” button to select the
next folder. Press the down
arrow to go back to the first
music file. Quickly press the
down arrow again to go back
to the previous folder.
16. Page Scroll
Press the “TEXT” button to select
title display. Press and hold again
to scroll through the title, 8
characters at a time. Up to a
maximum of 64 characters.
17. Display
Press and hold the “TEXT” button
during playback to change the
display to show the play time,
disc title, artist name and track
title. If the disc is formatted with
MP3/WMAs, press the “TEXT”
button to change the display to
show play time, folder name
and file name.
Page 23 of 36

Radio Functions
1. Power / Volume Control
Press the power / volume control knob
for on or off; rotate the knob to co")
20
Controls
1
AM/FM Stereo HD Radio®
with Single Disc CD Player
(if equipped)
Radio Functions
1. Power / Volume Control
Press the power / volume control knob
for on or off; rotate the knob to control
the volume.
2. Bass, Middle, Treble, Fader and Balance
Press the “SETTING” knob; rotate the
knob to select the preferred menu. Press
the knob again to enter the selected
menu; rotate the knob to adjust the feature.
3. FM / AM Press the “FM/AM” button to choose
FM1, FM2, FM3 or AM reception.
4. Tune / Track Rotate the “SCROLL/TUNE”
knob clockwise to increase the
tuning frequency; rotate the knob
counter-clockwise to decrease it.
5. Seek
Press the right or left arrow of the “SEEK”
button to pick up the next highest or
lowest frequency.
6. Presets You can save up to six favorite stations
for each band – FM1, FM2, FM3 and AM.
Select a frequency and press one of the
preset buttons until a confirmation beep
is heard.
7. Satellite Radio You can hear satellite radio programs by
pressing the “SAT” button. To receive
satellite radio service after your trial
period, it is necessary to enter into a
separate contract with the satellite
radio provider.
11
9
3
8
13512
7
16
14
10
4
2
66
15
Page 24 of 36

21
Getting
Started Instrument
Panel Gauges
Personalize Controls
While
Operating Safety / In Case
of Emergency Additional
Information
21
Getting Started
Instrument Panel
Gauges
Personalize
Controls
While Operating
Safety / In Case of Emergency
Additional Information
Controls
CD Player functions
8. Load
Insert a disc into the slot. The CD
will automatically be drawn in and
will begin play at the first track.
9. Play CD
Press the “CD/AUX” button and
playback will begin.
10. Repeat / Random
Press the “RPT” button once to
repeat the current folder; press
twice to repeat the current track.
Press the “RDM” button once to
randomize tracks on a CD; press
twice to randomize all tracks in
a folder.
11. Eject
Press the button to eject the disc.
12. Forward / Reverse
Press the right arrow of the
“SEEK” button to skip to the
beginning of the next track.
Press the left arrow to skip to the
beginning of the current track;
press again to go to the previous
selection.
13. Fast Forward / Fast Reverse
Press and hold the right arrow
of the “SEEK” button for more
than one second to fast forward.
Release the button to stop. To fast
reverse, press and hold the left
arrow for more than one second
and release the button to stop. 14.
Scan
Press the “SCAN/A.S” button
to begin previewing the first 10
seconds of each track on the
disc. Normal playback will
resume after all tracks have
been scanned. Press the
“SCAN/A.S” button again to
stop scanning and listen to the
track being previewed.
MP3/WMA Formatted CD
Player Functions
15. Folder Selection
Rotate the “SCROLL/TUNE”
knob clockwise to select the
next folder. Rotate the knob
counter-clockwise to go to the
previous folder.
HD Radio® Functions
16. HD Radio® Selection
Press the “HD/TEXT” button while
listening to FM radio (will not
work in AM broadcast). The next
channel of the station that is being
received will play.
Yo u can change the HD Radio
®
settings by going into the
settings menu.


1. Temperature Control Dial Rotate the temperature control dial from
blue for cool, to red for warm.
2. Air Conditioning Button Press the “A/C”")

1. Automatic On and Off This system automatically controls
outlet air temperature, fan speed, air
flow distribution, air inlet control,")