2013 SUBARU FORESTER ignition
[x] Cancel search: ignitionPage 214 of 436

gistering procedure was not successful
and the mode changes to theBluetooth®
audio setting mode. NOTE
After the ignition switch is turned to the “LOCK ”position, the registered device
is not automatically connected to the
system even if the ignition switch is
turned to the “Acc ”or “ON ”position.
! Selecting device
1. Select the “SELECT AUDIO ”(type C
audio)/ “Select Audio Player ”(type D
audio) menu. If no devices are registered,“ EMPTY ”is displayed and the mode
changes to the Bluetooth
®audio setting
mode.
2. Select the “CONFIRM ”menu. If the
device is connected, “SELECTED ”is
displayed and the selecting procedure is
finished. If the device cannot be con-nected, “FAILED ”is displayed and the
selecting procedure was not successful. ! Setting passkey
1. Select the “SET PASSKEY ”menu.
After the currently set passkey is dis-
played, a new passkey can be entered.
2. Input the new passkey by operating the “TUNE/TRACK/CH ”dial. 3. Select the
“CONFIRM ”menu. The new
passkey is displayed, the passkey is
changed and the mode changes to theBluetooth
®audio setting mode.
! Deleting device
1. Select the “DELETE AUDIO ”(type C
audio)/ “Delete Audio Player ”(type D
audio) menu. If no devices are registered,“ EMPTY ”is displayed and the mode
changes to the Bluetooth
®audio setting
mode.
2. Select the “CONFIRM ”menu. “DE-
LETED ”is displayed and the mode
changes to the Bluetooth
®audio setting
mode. & Bluetooth
®audio operation
NOTE
Depending on the connected device, it
may not activate as per the following
items or not work smoothly. ! How to play back
Press the
button and select the “BT-
A ” (type C audio)/ “BT Audio ”(type D
audio) mode. ! To select a track from its beginning
Select a track in the same way as for a
CD. Refer to “To select a track from the
beginning ”F 5-24. !
Repeating
Repeating is operated in the same way as
for a CD. Refer to “Repeating ”F 5-25.
Each time you briefly press the
button (type C audio)/button (the
“ RPT ”button) (type D audio), the mode
changes in the following sequence.
! Random playback
Random playback is operated in the same
way as for a CD. Refer to “Random
playback ”F 5-26. Each time you press
and hold the
button (type C audio)/
press thebutton (the “RDM ”button)
briefly (type D audio), the mode changes
in the following sequence.
! Display selection (type C audio)
Select an item to be displayed using the
same way as for a CD. Refer to “Display
selection (type A, B and C audio) ”F 5-27.
Each time you briefly press the
Audio 5-41
– CONTINUED –
Page 215 of 436
5-42Audio
button, the indication changes in the
following sequence.
!Folder selection
Select a folder in the same way as for a
CD. Refer to “Folder selection ”F 5-28. Hands-free system (if equipped) NOTE .
For models with the genuine
SUBARU navigation system, refer to
the Owner ’s Manual supplement for the
navigation system.. When selling your vehicle, make
sure that you initialize the Hands-free
system to prevent personal data from
being improperly accessed.
The Hands-free system operates while the
ignition switch is in the “Acc ”or “ON ”
position. &
Tips for the Hands-free sys- tem
! Bluetooth
®
It is possible to connect a cell phone to the
in-vehicle equipment through the Blue-
tooth
®format (wireless) to make a phone
call from the in-vehicle equipment or take
an incoming phone call.
Since the Bluetooth
®format is wireless, a
connection between the in-vehicle equip-
ment and the cell phone can be made
without placing them in close proximity of
each other. The cell phone can be used
with it left in the breast pocket or bag. NOTE . The Hands-free system may not
operate properly under the following conditions.
–The cell phone is turned off.
– The cell phone is not in the
phone call area. – The battery of the cell phone has
run down.– The cell phone is not connected
to the Hands-free system.– The cell phone is behind the seat
or in the glove box.– A metal material covers or
touches the cell phone.
. Depending on the type of cell phone
Page 216 of 436

that is used, the screen on the cell
phone may remain illuminated while
the ignition switch is in the“ON ”
position. If this occurs, turn the illumi-
nation off by adjusting the cell phonesettings. . Depending on the setting of the cell
phone, the dial lock function may be
activated after making a call. Deacti-
vate the automatic dial lock function of
the cell phone before using the Hands-
free system. . Depending on the type of cell phone
that is used, operation and the sound
volume may be different from those of
cell phones currently used. . When the ignition switch is turned to
the “LOCK ”position during a call, the
call may be disconnected or continued
on the cell phone depending on the
type of cell phone that is used. Note
that operation of the cell phone may be
necessary if the call is continued on the
cell phone. . Do not speak at the same time as the
other party during a call. If you and the
party speak at the same time, it may be
difficult for the other party to hear your
voice and vice versa. This is normal. . The receiver sound volume should
be set as low as possible. Otherwise,
the party you are calling may notice an undesirable echo sound. .
Speak clearly and loudly.
. Your voice may be difficult to be
heard by the party under the following conditions.
–Driving on a rough road.
– Driving at a high speed.
– Driving with a window open.
– When air from the ventilator
blows directly towards the micro-phone. – When the sound coming from the
ventilator is loud.– When the cell phone is too close
to the microphone.
. The sound quality may degrade due
to the influence of the cell phone that is
connected to the system or the circum-
stances of the Bluetooth network. . When another Bluetooth
®device is
simultaneously connected, noise may
be heard in the voice coming from the
hands-free phone. ! Corresponding profiles for the cell phone
. HFP (Hands Free Profile): Ver. 1.0
. OPP (Object Push Profile): Ver. 1.1 &
Certification for the Hands-
free system
CAUTION
FCC WARNING
Changes or modifications not ex-
pressly approved by the party re-
sponsible for compliance could void
the user ’s authority to operate the
equipment.
NOTE
This device complies with Part 15 of
the FCC Rules and RSS-Gen of IC
Rules. Operation is subject to the
following two conditions: (1) this de-
vice may not cause harmful interfer-
ence, and (2) this device must accept
any interference received, including
interference that may cause undesiredoperation. NOTE
This equipment has been tested and
found to comply with the limits for a
Class B digital device, pursuant to Part
15 of the FCC Rules. These limits are
designed to provide reasonable protec-
tion against harmful interference in a
residential installation. This equipment Audio
5-43
– CONTINUED –
Page 218 of 436
If there is detrimental radio inter-
ference from this equipment to“other radio stations, ”move the
equipment to another location as
soon as possible to avoid radio
interference. The frequency band
used by this equipment is in the
2.4 GHz zone. The FH-SS mod-
ulation is employed as a modula-
tion method. The expected inflict-
ing interference distance is less
than 10 m (33 ft). This equipment
uses a full band and can avoid a
band used by a movable body
identification device. &
Using the Hands-free system
! Turning on/off the Hands-free mode
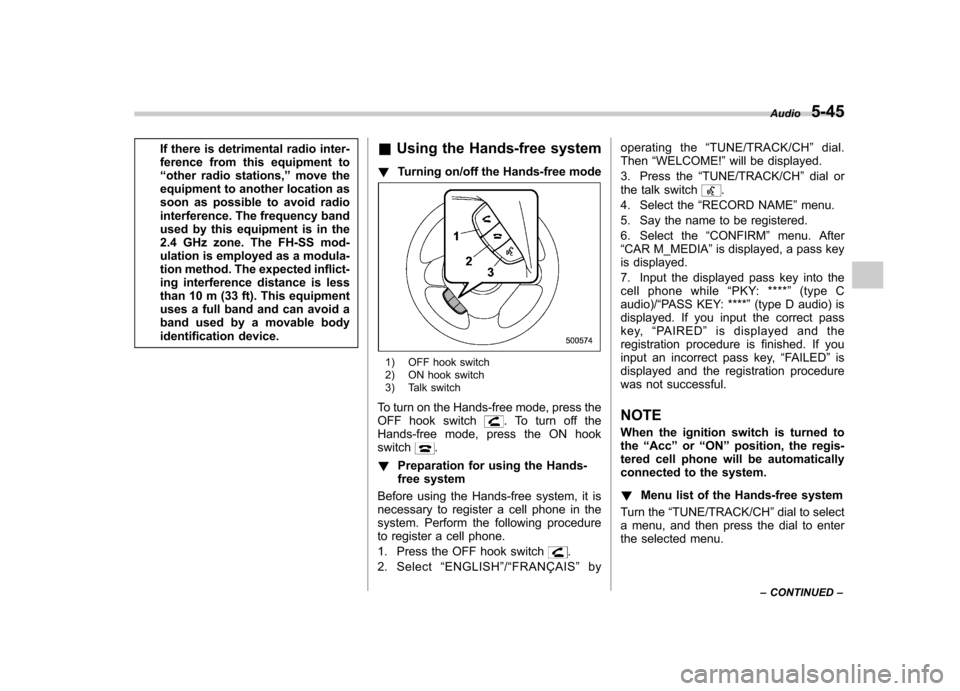
1) OFF hook switch
2) ON hook switch
3) Talk switch
To turn on the Hands-free mode, press the
OFF hook switch
. To turn off the
Hands-free mode, press the ON hook switch
.
! Preparation for using the Hands-
free system
Before using the Hands-free system, it is
necessary to register a cell phone in the
system. Perform the following procedure
to register a cell phone.
1. Press the OFF hook switch
.
2. Select “ENGLISH ”/“ FRANÇAIS ”by operating the
“TUNE/TRACK/CH ”dial.
Then “WELCOME! ”will be displayed.
3. Press the “TUNE/TRACK/CH ”dial or
the talk switch
.
4. Select the “RECORD NAME ”menu.
5. Say the name to be registered.
6. Select the “CONFIRM ”menu. After
“ CAR M_MEDIA ”is displayed, a pass key
is displayed.
7. Input the displayed pass key into the
cell phone while “PKY: **** ”(type C
audio)/ “PASS KEY: **** ”(type D audio) is
displayed. If you input the correct pass
key, “PA I R E D ”is displayed and the
registration procedure is finished. If you
input an incorrect pass key, “FAILED ”is
displayed and the registration procedure
was not successful.
NOTE
When the ignition switch is turned to the “Acc ”or “ON ”position, the regis-
tered cell phone will be automatically
connected to the system. ! Menu list of the Hands-free system
Turn the “TUNE/TRACK/CH ”dial to select
a menu, and then press the dial to enter
the selected menu. Audio
5-45
– CONTINUED –
Page 229 of 436
5-56Audio
– Pressing the power switch
. Insert a CD (except reloading a CD)
. Connect a USB storage device or an
iPod
®
NOTE
The screensaver is not displayed under
the following conditions. . While the ignition switch is in the
“ LOCK ”position
. While the audio is OFF
. While the screen is OFF
. While talking on a cell phone regis-
tered in the Hands-free system . While setting the audio
. While seek tuning, PTY group tun-
ing, scan tuning or auto-storing while
the FM/AM radio is on.. While in the category search mode
of the satellite radio. While the rear view camera is being
used & Downloading picture
Perform the following procedure to down-
load a picture to be used as screensaver.
1. Connect a USB storage device. Refer to “Connecting USB storage device /
iPod
®” F 5-33.
2. Select the “Picture Download ”menu
by operating the “TUNE/TRACK/CH ”dial. For details, refer to
“Audio settings (type D
audio) ”F 5-10.
3. Select the preferred JPEG file by
operating the “TUNE/TRACK/CH ”dial.
4. Select “Wide ”or “Normal ”by operating
the “TUNE/TRACK/CH ”dial.
NOTE . JPEG files that are 10 MB or less can
be saved. . If the file name is too long, the file
may not be saved.. Up to two JPEG files can be saved in
the in-vehicle equipment.. If the aspect ratio of the displayed
picture is 16:9, “Wide ”cannot be
selected.. If the aspect ratio of the displayed
picture is 4:3, “Normal ”cannot be
selected.
& Selecting picture
1. Select the “Picture Select ”menu by
operating the “TUNE/TRACK/CH ”dial. For
details, refer to “Audio settings (type D
audio) ”F 5-10. If no pictures are saved,
“ No Data ”is displayed. Press thebutton to return to the “Screen Saver ”
mode.
2. Select the preferred picture by operat-
ing the “TUNE/TRACK/CH ”dial. &
Erasing picture
1. Select the “Picture Erase ”menu by
operating the “TUNE/TRACK/CH ”dial. For
details, refer to “Audio settings (type D
audio) ”F 5-10. If no pictures are saved,
“ No Data ”is displayed. Press the
button to return to the “Screen Saver ”
mode.
2. Select the preferred picture by operat-
ing the “TUNE/TRACK/CH ”dial.
3. Operate the “TUNE/TRACK/CH ”dial
to select “OK ”to erase the picture or
“ Cancel ”to cancel the operation.
Page 231 of 436
6-2Interior equipment
Interior lights
When leaving your vehicle, make sure the
lights are turned off to avoid batterydischarge. &Dome light
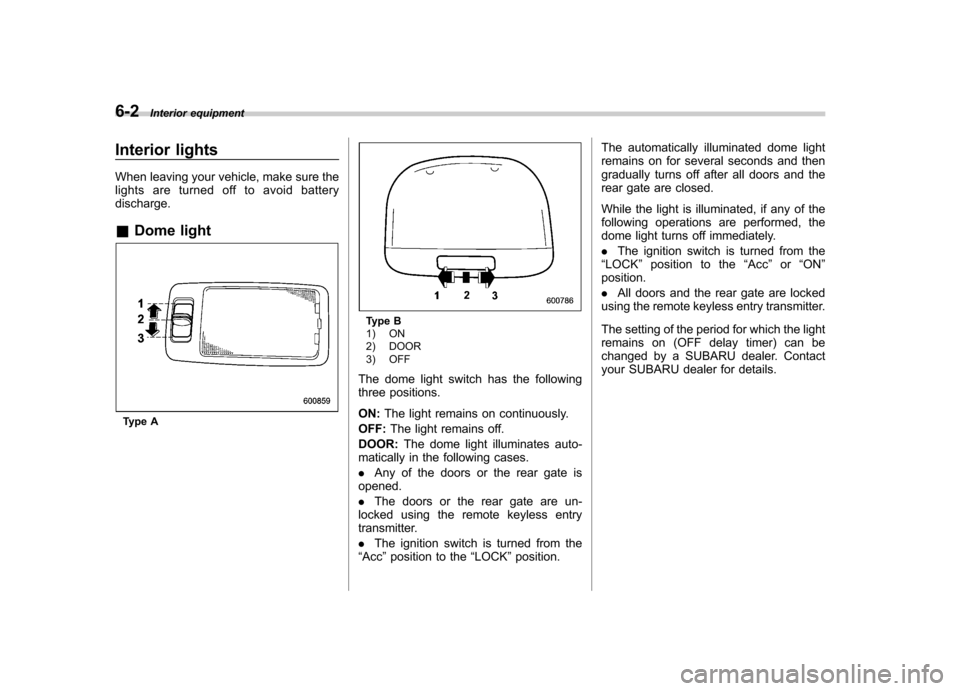
Type A
Type B
1) ON
2) DOOR
3) OFF
The dome light switch has the following
three positions. ON: The light remains on continuously.
OFF: The light remains off.
DOOR: The dome light illuminates auto-
matically in the following cases. . Any of the doors or the rear gate is
opened.. The doors or the rear gate are un-
locked using the remote keyless entry
transmitter. . The ignition switch is turned from the
“ Acc ”position to the “LOCK ”position. The automatically illuminated dome light
remains on for several seconds and then
gradually turns off after all doors and the
rear gate are closed.
While the light is illuminated, if any of the
following operations are performed, the
dome light turns off immediately. .
The ignition switch is turned from the
“ LOCK ”position to the “Acc ”or “ON ”
position.. All doors and the rear gate are locked
using the remote keyless entry transmitter.
The setting of the period for which the light
remains on (OFF delay timer) can be
changed by a SUBARU dealer. Contact
your SUBARU dealer for details.
Page 233 of 436
6-4Interior equipment
illuminate when only the rear gate is opened.) .The doors are unlocked using the
remote keyless entry transmitter.. The ignition switch is turned from the
“ Acc ”position to the “LOCK ”position.
The automatically illuminated map lights
remain on for several seconds and then
gradually turn off after all doors are
closed. While the lights are on, if any of
the following operations are performed,
the map lights turn off immediately. . The ignition switch is turned from the
“ LOCK ”position to the “Acc ”or “ON ”
position.. All doors and the rear gate are locked
using the remote keyless entry transmitter.
The setting of the period for which the
lights remain on (OFF delay timer) can be
changed by a SUBARU dealer. Contact
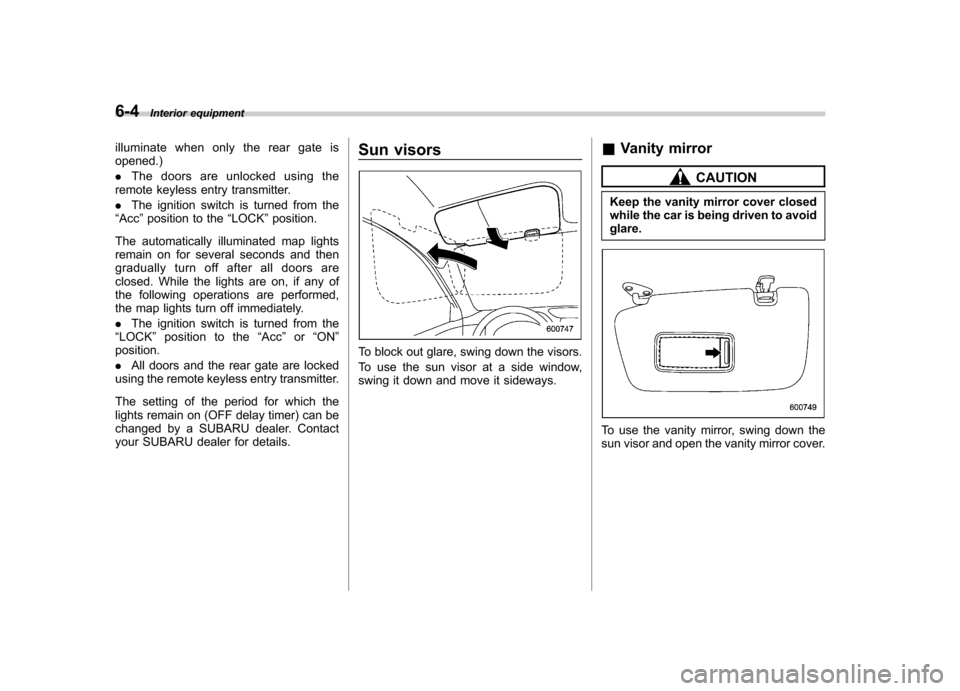
your SUBARU dealer for details. Sun visors
To block out glare, swing down the visors.
To use the sun visor at a side window,
swing it down and move it sideways.
&
Vanity mirror
CAUTION
Keep the vanity mirror cover closed
while the car is being driven to avoidglare.
To use the vanity mirror, swing down the
sun visor and open the vanity mirror cover.
Page 239 of 436
6-10Interior equipment
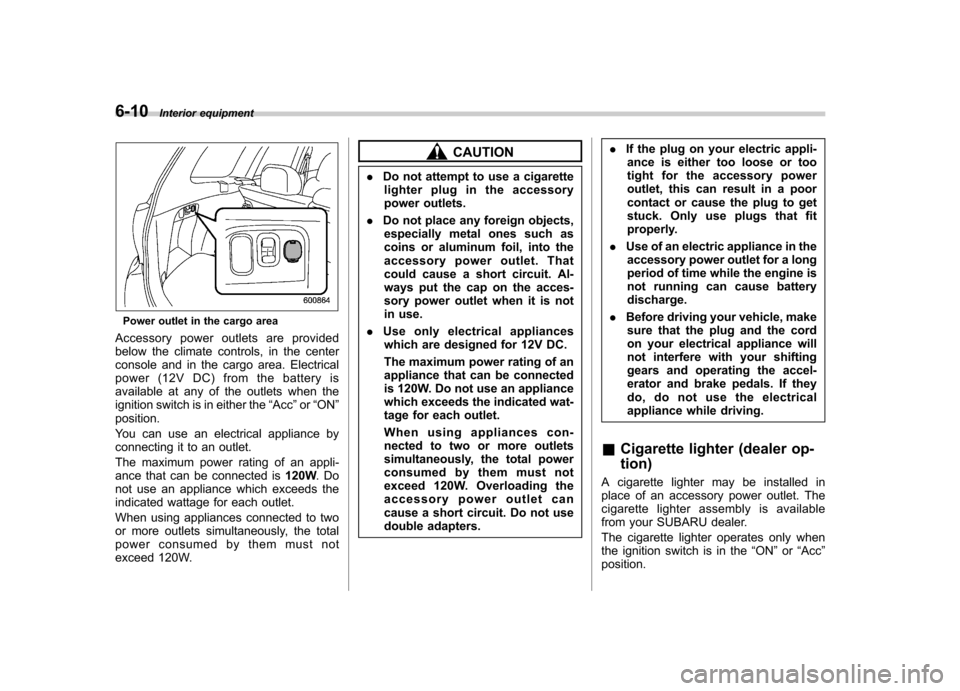
Power outlet in the cargo area
Accessory power outlets are provided
below the climate controls, in the center
console and in the cargo area. Electrical
power (12V DC) from the battery is
available at any of the outlets when the
ignition switch is in either the “Acc ”or “ON ”
position.
You can use an electrical appliance by
connecting it to an outlet.
The maximum power rating of an appli-
ance that can be connected is 120W.Do
not use an appliance which exceeds the
indicated wattage for each outlet.
When using appliances connected to two
or more outlets simultaneously, the total
power consumed by them must not
exceed 120W.
CAUTION
. Do not attempt to use a cigarette
lighter plug in the accessory
power outlets.
. Do not place any foreign objects,
especially metal ones such as
coins or aluminum foil, into the
accessory power outlet. That
could cause a short circuit. Al-
ways put the cap on the acces-
sory power outlet when it is not
in use.
. Use only electrical appliances
which are designed for 12V DC.
The maximum power rating of an
appliance that can be connected
is 120W. Do not use an appliance
which exceeds the indicated wat-
tage for each outlet.
When using appliances con-
nected to two or more outlets
simultaneously, the total power
consumed by them must not
exceed 120W. Overloading the
accessory power outlet can
cause a short circuit. Do not use
double adapters. .
If the plug on your electric appli-
ance is either too loose or too
tight for the accessory power
outlet, this can result in a poor
contact or cause the plug to get
stuck. Only use plugs that fit
properly.
. Use of an electric appliance in the
accessory power outlet for a long
period of time while the engine is
not running can cause batterydischarge.
. Before driving your vehicle, make
sure that the plug and the cord
on your electrical appliance will
not interfere with your shifting
gears and operating the accel-
erator and brake pedals. If they
do, do not use the electrical
appliance while driving.
& Cigarette lighter (dealer op- tion)
A cigarette lighter may be installed in
place of an accessory power outlet. The
cigarette lighter assembly is available
from your SUBARU dealer.
The cigarette lighter operates only when
the ignition switch is in the “ON ”or “Acc ”
position.