2013 SUBARU FORESTER towing
[x] Cancel search: towingPage 15 of 436

12
Illustrated index &Exterior1) Engine hood (page 11-5)
2) Headlight switch (page 3-29)
3) Replacing bulbs (page 11-45)
4) Wiper switch (page 3-34)
5) Moonroof (page 2-24)
6) Roof rail (page 8-14)
7) Door locks (page 2-4)
8) Tire pressure (page 11-31)
9) Flat tires (page 9-6)
10) Tire chains (page 8-11)
11) Front fog light switch (page 3-32)
12) Tie-down hooks (page 9-14)
13) Towing hook (page 9-14)
Page 16 of 436
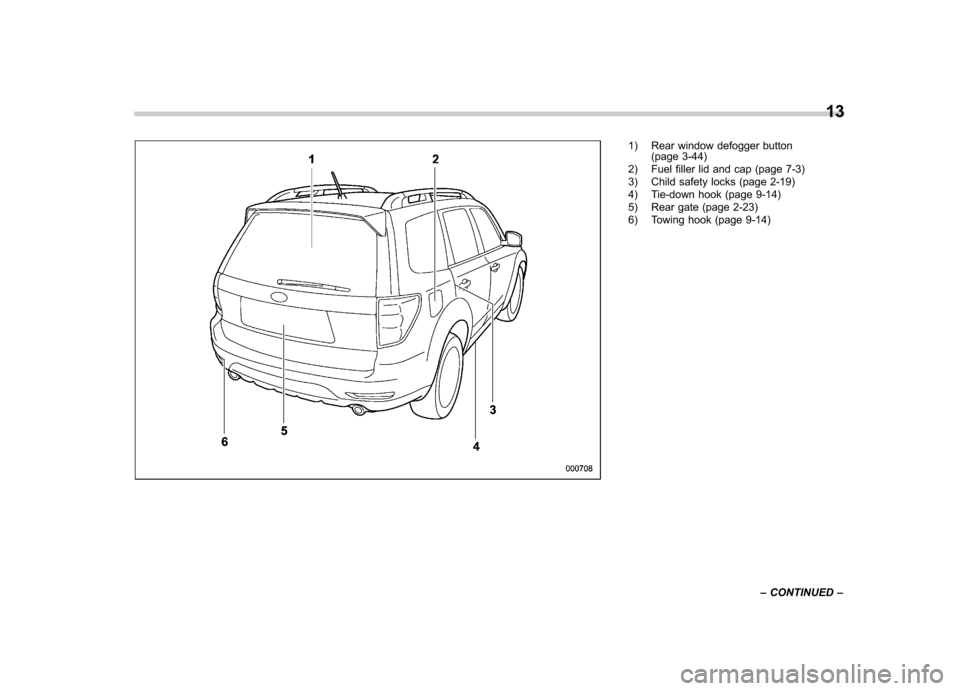
1) Rear window defogger button(page 3-44)
2) Fuel filler lid and cap (page 7-3)
3) Child safety locks (page 2-19)
4) Tie-down hook (page 9-14)
5) Rear gate (page 2-23)
6) Towing hook (page 9-14) 13
– CONTINUED –
Page 283 of 436

7-32Starting and operating
&Hill start assist warning light
Refer to “Hill start assist warning light (MT
models) ”F 3-21. Cruise control
Cruise control enables you to maintain a
constant vehicle speed without holding
your foot on the accelerator pedal. It is
operative when the vehicle speed is 25
mph (40 km/h) or more.
WARNING
Do not use the cruise control under
any of the following conditions. This
may cause loss of vehicle control. . Driving up or down a steep grade
. Driving on slippery or winding
roads
. Driving in heavy traffic
. Towing a trailer
NOTE . If you press the “CRUISE ”main
switch button while turning the ignition switch “ON ”, the cruise control func-
tion is deactivated and the cruise
control indicator light flashes. To re-
activate the cruise control function,
turn the ignition switch back to the“ Acc ”or “LOCK ”position, and then
turn it again to the “ON ”position.
. Make sure the “CRUISE ”main
switch is turned off when the cruise control is not in use to avoid uninten-
tionally setting the cruise control.
& To set cruise control
1. Push the “CRUISE ”main switch but-
ton.
Page 288 of 436
New vehicle break-in driving–the first
1,000 miles (1,600 km) ..................................... 8-2
Fuel economy hints ............................................ 8-2
Engine exhaust gas (carbon monoxide) ............ 8-2
Catalytic converter .............................................. 8-3
Periodic inspections ........................................... 8-4
Driving in foreign countries ............................... 8-4
Driving tips for AWD models .............................. 8-5
On-road and off-road driving .............................. 8-6
Winter driving ...................................................... 8-8
Operation during cold weather ............................. 8-8
Driving on snowy and icy roads ......................... 8-10
Corrosion protection .......................................... 8-11
Snow tires ......................................................... 8-11
Tire chains ......................................................... 8-11
Rocking the vehicle ............................................ 8-12 Loading your vehicle
......................................... 8-12
Vehicle capacity weight ...................................... 8-13
GVWR and GAWR (Gross Vehicle Weight Rating and Gross Axle Weight Rating) ........................ 8-13
Roof rails (if equipped) ...................................... 8-14
Roof molding and crossbar (if equipped) ............ 8-15
Trailer hitch (dealer option) ............................... 8-16
Connecting a trailer ........................................... 8-16
When you do not tow a trailer .. .......................... 8-18
Trailer towing ..................................................... 8-18
Warranties and maintenance .............................. 8-18
Maximum load limits .......................................... 8-18
Trailer hitches .................................................... 8-21
Connecting a trailer ........................................... 8-22
Trailer towing tips .............................................. 8-23Driving tips
8
Page 293 of 436

8-6Driving tips
conditions than a two wheel drive vehicle.
There is little difference in handling,
however, during extremely sharp turns or
sudden braking. Therefore, when driving
down a slope or turning corners, be sure
to reduce your speed and maintain an
ample distance from other vehicles. .Always check the cold tire pressure
before starting to drive. The recom-
mended tire pressure is provided on the
tire placard, which is located under the
door latch on the driver ’s side.
. Frequent driving of an AWD vehicle in
hard driving conditions such as steep hills
or dusty roads will necessitate more
frequent replacement of engine oil, brake
fluid and transmission oil than that speci-
fied in the “Warranty and Maintenance
Booklet ”.
. There are some precautions that you
must observe when towing your vehicle.
For detail information, refer to “Towing ”
F 9-14. On-road and off-road driving
WARNING
. In a rollover crash, an unbelted
person is significantly more
likely to die than a person wear-
ing a seat belt. You the driver and
all your passengers should fas-
ten the seatbelts before starting
to drive in order to minimize the
chance of serious injury or death.
. Do not make sharp turns and
quick maneuvers unless abso-
lutely unavoidable. Such actions
are dangerous as you may lose
control, possibly resulting in a
rollover which could cause death
or serious injury.
. Always maintain a safe driving
speed according to the road and
weather conditions in order to
avoid having an accident on a
sharp turn, during sudden brak-
ing or under other similar condi- tions.
. Whenever strong crosswinds are
present, slow down sufficiently
to maintain control of your vehi-
cle. Remember that your vehicle,
with its higher profile and center of gravity, is more likely to be
affected by crosswinds than or-
dinary passenger cars.
. Always use the utmost care in
driving –overconfidence be-
cause you are driving an All-
Wheel Drive model could easily
lead to a serious accident.
Your vehicle is classified as a utility
vehicle. Utility vehicles feature a higher
ground clearance which enables them to
be used for wide applications including off-
road driving. But please keep in mind that
your vehicle is neither a conventional off-
road vehicle nor an all-terrain vehicle. A
higher center of gravity in relation to the
tread width as compared with ordinary
passenger cars makes vehicles of this
type more likely to roll over. In reality, utility
vehicles have a significantly higher roll-
over rate than other types of vehicles. The
high ground clearance of this vehicle is a
real advantage, giving you a better view of
the road and allowing you to anticipate
problems earlier. However, remember that
your utility vehicle is not designed for high-
speed cornering comparable to ordinary
passenger cars and that your vehicle
could roll over if you make a sharp turn
at high speed.
If you take your SUBARU off-road, certain
Page 294 of 436
common sense precautions such as those
in the following list should be taken. .Make certain that you and all of your
passengers are wearing seatbelts.. Carry some emergency equipment,
such as a towing rope or chain, a shovel,
wheel blocks, first aid kit and cell phone or
citizens band radio. . Drive carefully. Do not take unneces-
sary risks by driving in dangerous areas or
over rough terrain. . Slow down and employ extra caution at
all times. When driving off-road, you will
not have the benefit of marked traffic
lanes, banked curves, traffic signs and
the like. . Do not drive across steep slopes.
Instead, drive either straight up or straight
down the slopes. A vehicle can much
more easily tip over sideways than it can
end over end. Avoid driving straight up or
down slopes that are too steep. . Avoid sharp turning maneuvers, espe-
cially at higher speeds.. Do not grip the inside or spokes of the
steering wheel. A bad bump could jerk the
wheel and injure your hands. Instead drive
with your fingers and thumbs on the
outside of the rim. . If driving through water, such as when
crossing shallow streams, first check the depth of the water and the bottom of the
stream bed for firmness and ensure that
the bed of the stream is flat. Drive slowly
and cross the stream without stopping.
The water should be shallow enough that
it does not reach the vehicle
’s under-
carriage. Water entering the engine air
intake or the exhaust pipe or water
splashing onto electrical parts may da-
mage your vehicle and may cause it to
stall. Never attempt to drive through
rushing water; regardless of its depth, it
can wash away the ground from under
your tires, resulting in possible loss of
traction and even vehicle rollover. . Always check your brakes for effec-
tiveness immediately after driving in sand,
mud or water. Do this by driving slowly
and stepping on the brake pedal. Repeat
that process several times to dry out the
brake discs and brake pads. . Do not drive or park over or near
flammable materials such as dry grass or
fallen leaves, as they may burn easily. The
exhaust system is very hot while the
engine is running and right after engine
stops. This could create a fire hazard. . After driving through tall grass, mud,
rocks, sand, rivers, etc., check that there
is no grass, bush, paper, rags, stones,
sand, etc. adhering to or trapped on the
underbody. Clear off any such matter from the underbody. If the vehicle is used with
these materials trapped or adhering to the
underbody, a mechanical breakdown or
fire could occur. .
Secure all cargo carried inside the
vehicle and make certain that it is not
piled higher than the seatbacks. During
sudden stops or jolts, unsecured cargo
could be thrown around in the vehicle and
cause injury. Do not pile heavy loads on
the roof. Those loads raise the vehicle ’s
center of gravity and make it more prone
to tip over. . If you must rock the vehicle to free it
from sand or mud, depress the accelerator
pedal slightly and move the shift lever/
select lever back and forth between “1 ”/
“ D ” and “R ” repeatedly. Do not race the
engine. For the best possible traction,
avoid spinning the wheels when trying to
free the vehicle. . When the road surface is extremely
slippery, you can obtain better traction by
starting the vehicle with the transmission
in 2nd than 1st. For AT models, refer to“ Selection of manual mode ”F 7-19.
. Never equip your vehicle with tires
larger than those specified in this manual. . Wash the vehicle ’s underbody after off-
road driving. Suspension components are
particularly prone to dirt buildup, so they
need to be washed thoroughly. Driving tips
8-7
– CONTINUED –
Page 303 of 436
8-16Driving tips
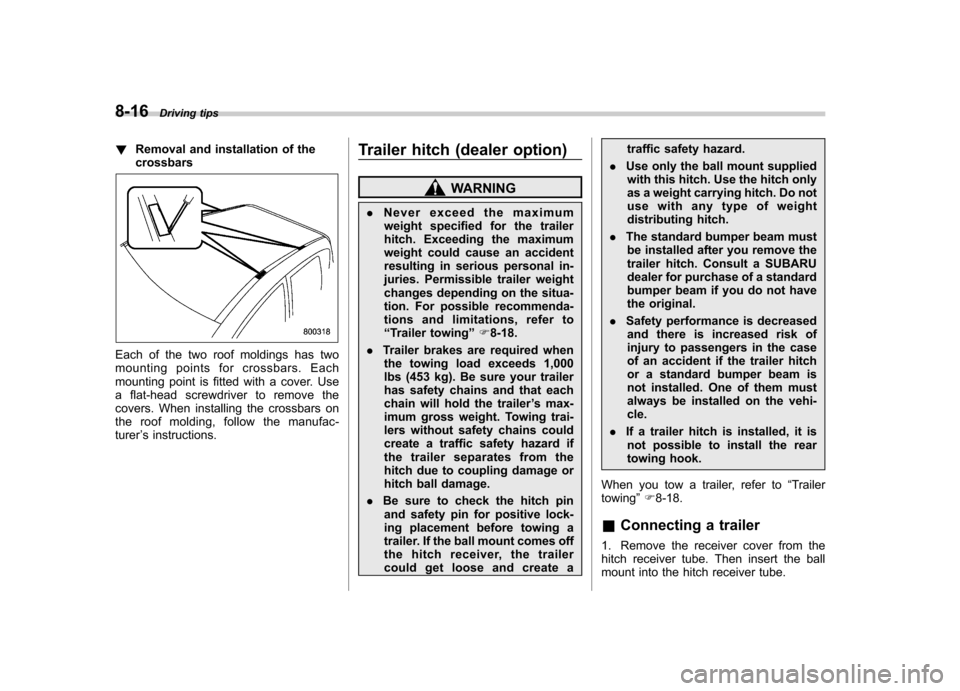
!Removal and installation of the crossbars
Each of the two roof moldings has two
mounting points for crossbars. Each
mounting point is fitted with a cover. Use
a flat-head screwdriver to remove the
covers. When installing the crossbars on
the roof molding, follow the manufac- turer ’s instructions. Trailer hitch (dealer option)
WARNING
. Never exceed the maximum
weight specified for the trailer
hitch. Exceeding the maximum
weight could cause an accident
resulting in serious personal in-
juries. Permissible trailer weight
changes depending on the situa-
tion. For possible recommenda-
tions and limitations, refer to“ Trailer towing ”F 8-18.
. Trailer brakes are required when
the towing load exceeds 1,000
lbs (453 kg). Be sure your trailer
has safety chains and that each
chain will hold the trailer ’s max-
imum gross weight. Towing trai-
lers without safety chains could
create a traffic safety hazard if
the trailer separates from the
hitch due to coupling damage or
hitch ball damage.
. Be sure to check the hitch pin
and safety pin for positive lock-
ing placement before towing a
trailer. If the ball mount comes off
the hitch receiver, the trailer
could get loose and create a traffic safety hazard.
. Use only the ball mount supplied
with this hitch. Use the hitch only
as a weight carrying hitch. Do not
use with any type of weight
distributing hitch.
. The standard bumper beam must
be installed after you remove the
trailer hitch. Consult a SUBARU
dealer for purchase of a standard
bumper beam if you do not have
the original.
. Safety performance is decreased
and there is increased risk of
injury to passengers in the case
of an accident if the trailer hitch
or a standard bumper beam is
not installed. One of them must
always be installed on the vehi-cle.
. If a trailer hitch is installed, it is
not possible to install the rear
towing hook.
When you tow a trailer, refer to “Trailer
towing ”F 8-18.
& Connecting a trailer
1. Remove the receiver cover from the
hitch receiver tube. Then insert the ball
mount into the hitch receiver tube.
Page 304 of 436
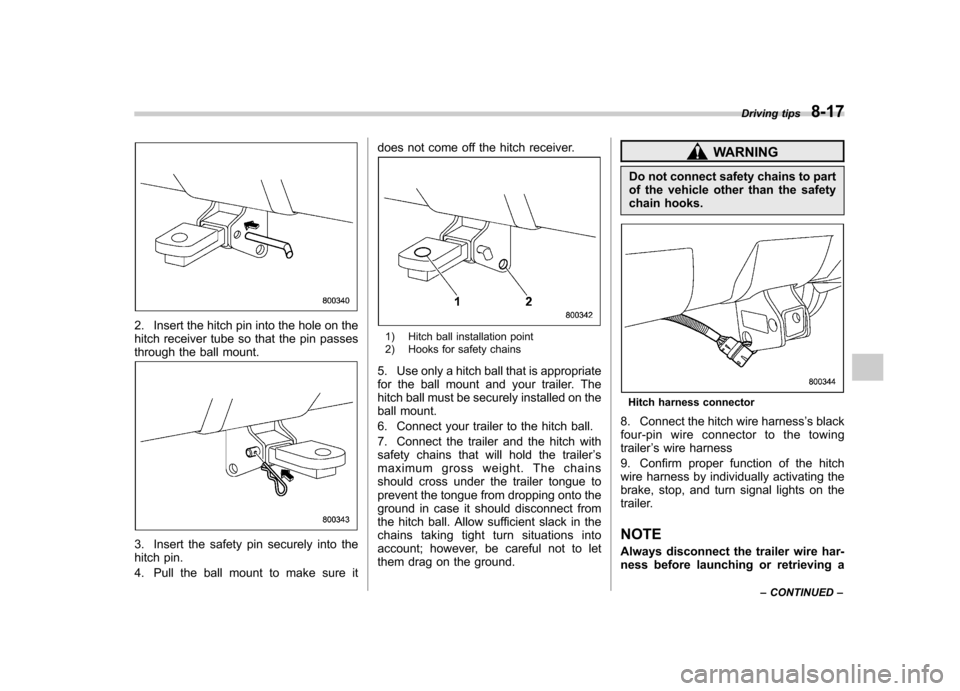
2. Insert the hitch pin into the hole on the
hitch receiver tube so that the pin passes
through the ball mount.
3. Insert the safety pin securely into the
hitch pin.
4. Pull the ball mount to make sure itdoes not come off the hitch receiver.
1) Hitch ball installation point
2) Hooks for safety chains
5. Use only a hitch ball that is appropriate
for the ball mount and your trailer. The
hitch ball must be securely installed on the
ball mount.
6. Connect your trailer to the hitch ball.
7. Connect the trailer and the hitch with
safety chains that will hold the trailer ’s
maximum gross weight. The chains
should cross under the trailer tongue to
prevent the tongue from dropping onto the
ground in case it should disconnect from
the hitch ball. Allow sufficient slack in the
chains taking tight turn situations into
account; however, be careful not to let
them drag on the ground.
WARNING
Do not connect safety chains to part
of the vehicle other than the safety
chain hooks.
Hitch harness connector
8. Connect the hitch wire harness ’s black
four-pin wire connector to the towing trailer ’s wire harness
9. Confirm proper function of the hitch
wire harness by individually activating the
brake, stop, and turn signal lights on the
trailer.
NOTE
Always disconnect the trailer wire har-
ness before launching or retrieving a Driving tips
8-17
– CONTINUED –