2013 SUBARU FORESTER ECO mode
[x] Cancel search: ECO modePage 338 of 436

Maintenance schedule....................................... 11-3
Maintenance precautions ................................... 11-3
Before checking or servicing in the engine compartment .................................................... 11-4
When checking or servicing in the engine compartment (non-turbo models) ...................... 11-4
When checking or servicing in the engine compartment while the engine is running .......... 11-5
Engine hood ....................................................... 11-5
Engine compartment overview .......................... 11-7
Non-turbo models .............................................. 11-7
Turbo models ..................................................... 11-8
Engine oil ............................................................ 11-9
Checking the oil level ......................................... 11-9
Changing the oil and oil filter ............................ 11-11
Recommended grade and viscosity .................. 11-13
Synthetic oil ..................................................... 11-13
Cooling system ................................................ 11-13
Cooling fan, hose and connections ................... 11-14
Engine coolant ................................................. 11-14
Air cleaner element .......................................... 11-15
Replacing the air cleaner element ..................... 11-15
Spark plugs ...................................................... 11-17
Drive belts ........................................................ 11-18
Turbo models ................................................... 11-18
Non-turbo models ............................................ 11-18
Manual transmission oil .................................. 11-19
Checking the oil level ....................................... 11-19
Recommended grade and viscosity .................. 11-19Automatic transmission fluid
.......................... 11-20
Checking the fluid level .................................... 11-20
Recommended fluid ......................................... 11-21
Front differential gear oil (AT models) ........... 11-21
Checking the oil level ...................................... 11-21
Recommended grade and viscosity .................. 11-22
Rear differential gear oil .................................. 11-22
Recommended grade and viscosity .................. 11-22
Power steering fluid ........................................ 11-22
Checking the fluid level .................................... 11-22
Recommended fluid ......................................... 11-23
Brake fluid ........................................................ 11-23
Checking the fluid level .................................... 11-23
Recommended brake fluid ............................... 11-24
Clutch fluid (MT models) ................................. 11-24
Checking the fluid level .................................... 11-24
Recommended clutch fluid ............................... 11-25
Brake booster .................................................. 11-25
Brake pedal ...................................................... 11-26
Checking the brake pedal free play .................. 11-26
Checking the brake pedal reserve distance....... 11-26
Clutch pedal (MT models) ............................... 11-27
Checking the clutch function ............................ 11-27
Checking the clutch pedal free play .................. 11-27
Hill start assist system (MT models) .............. 11-27
Replacement of brake pad and lining ............ 11-28
Breaking-in of new brake pads and linings ....... 11-28
Parking brake stroke ....................................... 11-29
Maintenance and service
11
Page 341 of 436
11-4Maintenance and service
guard against getting oil or fluids
in your eyes. If something does
get in your eyes, thoroughly
wash them out with clean water.
. Do not tamper with the wiring of
the SRS airbag system or seat-
belt pretensioner system, or at-
tempt to take its connectors
apart, as that may activate the
system or it can render it inop-
erative. NEVER use a circuit
tester for this wiring. If your
SRS airbag or seatbelt preten-
sioner needs service, consult
your nearest SUBARU dealer. &
Before checking or servicing
in the engine compartment
WARNING
. Always stop the engine and apply
the parking brake firmly to pre-
vent the vehicle from moving.
. Always let the engine cool down.
Engine parts become very hot
when the engine is running and
remain hot for some time after
the engine is stopped.
. Do not spill engine oil, engine
coolant, brake fluid or any other
fluid on hot engine components.
This may cause a fire.
. Always remove the key from the
ignition switch. When the ignition
switch is in the “ON ”position,
thecoolingfanmayoperate
suddenly even when the engine
is stopped.
. Before performing any servicing
on a vehicle equipped with a
remote engine start system (a
dealer option) temporarily place
that system in the service mode
to prevent it from unexpectedly
starting the engine. &
When checking or servicing
in the engine compartment
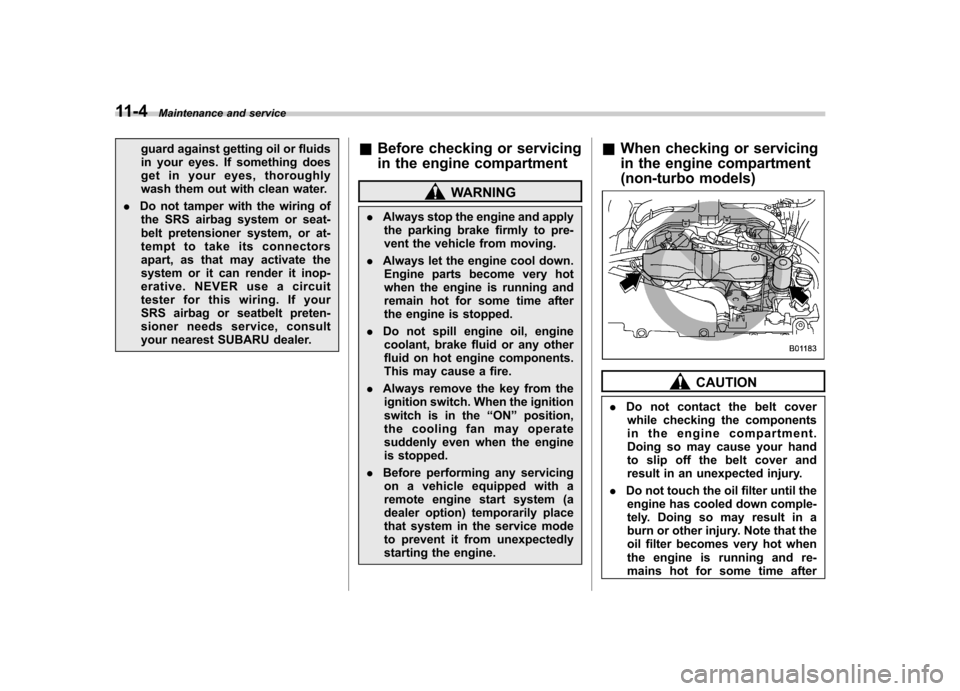
(non-turbo models)
CAUTION
. Do not contact the belt cover
while checking the components
in the engine compartment.
Doing so may cause your hand
to slip off the belt cover and
result in an unexpected injury.
. Do not touch the oil filter until the
engine has cooled down comple-
tely. Doing so may result in a
burn or other injury. Note that the
oil filter becomes very hot when
the engine is running and re-
mains hot for some time after
Page 346 of 436
Engine oil NOTE .The engine oil consumption rate is
not stabilized, and therefore cannot be
determined until the vehicle has tra-
veled at least several thousand miles
(kilometers). Even after break-in, when
the vehicle is used under severe driv-
ing conditions such as those men-
tionedintheWarrantyandMainte-
nance Booklet, engine oil is consumed
or deteriorated more quickly than un-
der normal driving conditions. If you
drive your vehicle under these severe
conditions, you should check the oil
level at least at every second fuel fill-up
time, and change the oil more fre-
quently. Please refer to the Warranty
and Maintenance Booklet for more de-tails.. If the oil consumption rate seems
abnormally high after the break-in
period, for example more than 1 quart
per 1,200 miles (1 liter per 2,000 kilo-
meters), contact your SUBARU dealer. &
Checking the oil level
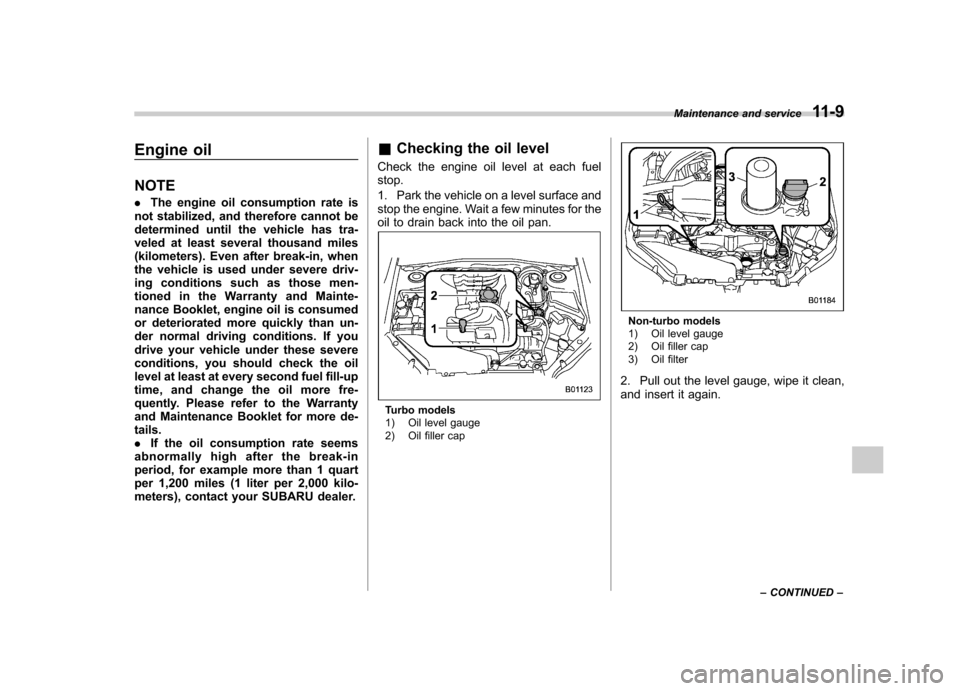
Check the engine oil level at each fuelstop.
1. Park the vehicle on a level surface and
stop the engine. Wait a few minutes for the
oil to drain back into the oil pan.
Turbo models
1) Oil level gauge
2) Oil filler cap
Non-turbo models
1) Oil level gauge
2) Oil filler cap
3) Oil filter
2. Pull out the level gauge, wipe it clean,
and insert it again. Maintenance and service
11-9
– CONTINUED –
Page 347 of 436
11-10Maintenance and service
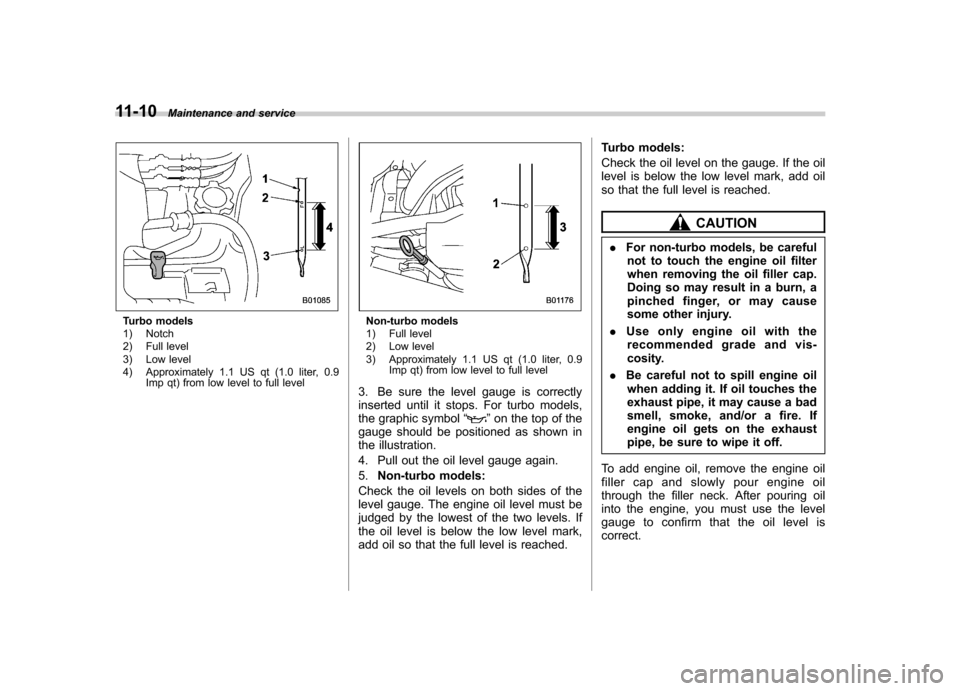
Turbo models
1) Notch
2) Full level
3) Low level
4) Approximately 1.1 US qt (1.0 liter, 0.9
Imp qt) from low level to full levelNon-turbo models
1) Full level
2) Low level
3) Approximately 1.1 US qt (1.0 liter, 0.9
Imp qt) from low level to full level
3. Be sure the level gauge is correctly
inserted until it stops. For turbo models,
the graphic symbol “
”on the top of the
gauge should be positioned as shown in
the illustration.
4. Pull out the oil level gauge again.5. Non-turbo models:
Check the oil levels on both sides of the
level gauge. The engine oil level must be
judged by the lowest of the two levels. If
the oil level is below the low level mark,
add oil so that the full level is reached. Turbo models:
Check the oil level on the gauge. If the oil
level is below the low level mark, add oil
so that the full level is reached.
CAUTION
. For non-turbo models, be careful
not to touch the engine oil filter
when removing the oil filler cap.
Doing so may result in a burn, a
pinched finger, or may cause
some other injury.
. Use only engine oil with the
recommended grade and vis-
cosity.
. Be careful not to spill engine oil
when adding it. If oil touches the
exhaust pipe, it may cause a bad
smell, smoke, and/or a fire. If
engine oil gets on the exhaust
pipe, be sure to wipe it off.
To add engine oil, remove the engine oil
filler cap and slowly pour engine oil
through the filler neck. After pouring oil
into the engine, you must use the level
gauge to confirm that the oil level iscorrect.
Page 351 of 436
11-14Maintenance and service
shortened to that of the mixing coolant.
. Do not splash the engine coolant
over painted parts. The alcohol
contained in the engine coolant
may damage the paint surface.
& Cooling fan, hose and con- nections
Your vehicle employs an electric cooling
fan which is thermostatically controlled to
operate when the engine coolant reaches
a specific temperature.
If the radiator cooling fan does not operate
even when the following conditions occur,
the cooling fan circuit may be defective. . The engine coolant temperature gauge
exceeds the normal operating range (if
equipped). Refer to “Temperature gauge
(models with type A combination meter) ”
F 3-11.
. The coolant temperature high warning
light blinks or illuminates in RED(if
equipped). Refer to “Coolant temperature
low indicator light/Coolant temperature
high warning light ”F 3-16.
Check the fuse and replace it if necessary.
If the fuse is not blown, have the cooling
system checked by your SUBARU dealer. Refer to
“Fuses ”F 11-44 and “Fuse panel
located in the engine compartment ”F 12-
13.
If frequent addition of coolant is neces-
sary, there may be a leak in the engine
cooling system. It is recommended that
the cooling system and connections be
checked for leaks, damage, or looseness.
& Engine coolant
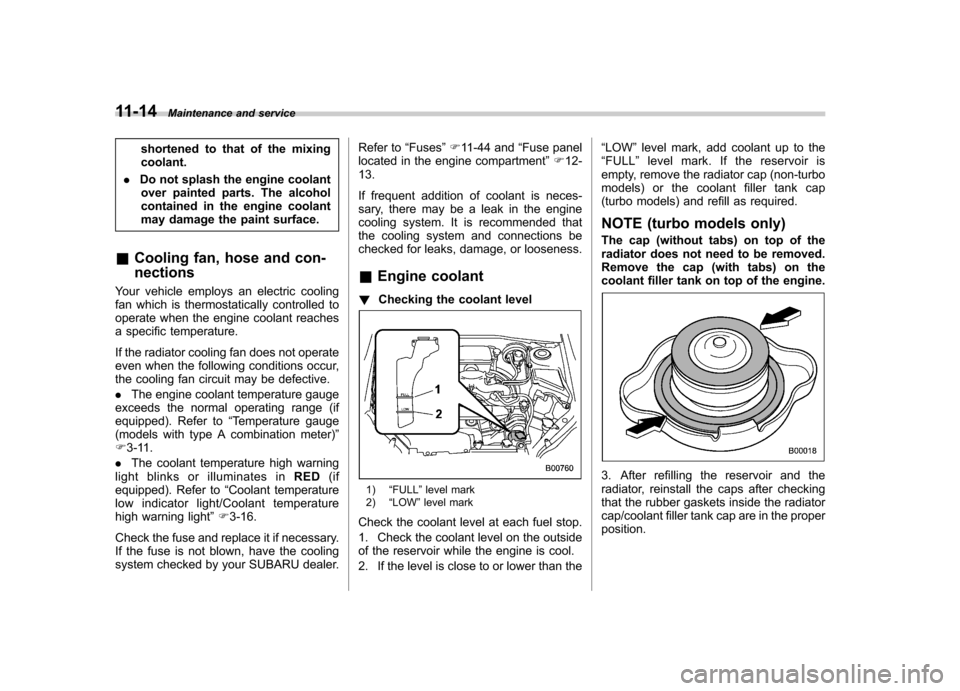
! Checking the coolant level
1) “FULL ”level mark
2) “LOW ”level mark
Check the coolant level at each fuel stop.
1. Check the coolant level on the outside
of the reservoir while the engine is cool.
2. If the level is close to or lower than the “
LOW ”level mark, add coolant up to the
“ FULL ”level mark. If the reservoir is
empty, remove the radiator cap (non-turbo
models) or the coolant filler tank cap
(turbo models) and refill as required.
NOTE (turbo models only)
The cap (without tabs) on top of the
radiator does not need to be removed.
Remove the cap (with tabs) on the
coolant filler tank on top of the engine.
3. After refilling the reservoir and the
radiator, reinstall the caps after checking
that the rubber gaskets inside the radiator
cap/coolant filler tank cap are in the properposition.
Page 352 of 436

WARNING
Never attempt to remove the radia-
tor cap/coolant filler tank cap until
the engine has been shut off and
has cooled down completely. Since
the coolant is under pressure, you
may suffer serious burns from a
spray of boiling hot coolant when
the cap is removed.
CAUTION
. Be careful not to spill engine
coolant when adding it. If coolant
touches the exhaust pipe, it may
cause a bad smell, smoke, and/or
a fire. If engine coolant gets on
the exhaust pipe, be sure to wipe
it off.
. Do not splash the engine coolant
over painted parts. The alcohol
contained in the engine coolant
may damage the paint surface. Air cleaner element
The air cleaner element functions as a
filter screen. When the element is perfo-
rated or removed, engine wear will be
excessive and engine life shortened.
It is not necessary to clean or wash the element.
WARNING
Do not operate the engine with the
air cleaner element removed. The air
cleaner element not only filters
intake air but also stops flames if
the engine backfires. If the air
cleaner element is not installed
when the engine backfires, you
could be burned.
CAUTION
When replacing the air cleaner ele-
ment, use a genuine SUBARU air
cleaner element. If it is not used,
there is the possibility of causing a
negative effect to the engine. &
Replacing the air cleaner element
Replace the air cleaner element according
to the maintenance schedule in the“ Warranty and Maintenance Booklet ”. Un-
der extremely dusty conditions, replace it
more frequently. It is recommended that
you always use genuine SUBARU parts. ! Non-turbo models
1) Connector
2) Clip
3) Clamp
4) Air intake boot
5) Clip
1. Unplug the connector that is attached
to the top of the air cleaner case.
2. Detach the clip on the connector cable
from the right side of the air cleaner case. Maintenance and service
11-15
– CONTINUED –
Page 358 of 436

&Recommended fluid
Refer to “Fluids ”F 12-9.
NOTE
Using any non-specified type of auto-
matic transmission fluid could result in
damage inside the transmission. When
replacing the automatic transmission
fluid, be sure to use the specified type. Front differential gear oil (AT models) &
Checking the oil level
1) Yellow handle
1. Park the vehicle on a level surface and
stop the engine.
2. Pull out the level gauge, wipe it clean,
and insert it again.
1) Full level
2) Low level
3. Pull out the level gauge again and
check the oil level on it. If it is below the
low level, add oil to bring the level up to
the full level.
CAUTION
Be careful not to spill front differ-
ential gear oil when adding it. If oil
touches the exhaust pipe, it may
cause a bad smell, smoke, and/or a
fire. If oil gets on the exhaust pipe,
be sure to wipe it off. Maintenance and service
11-21
– CONTINUED –
Page 361 of 436
11-24Maintenance and service
clean water. For safety, wearing
eye protection is advisable.
. Brake fluid absorbs moisture
from the air. Any absorbed moist-
ure can cause a dangerous loss
of braking performance.
. If the vehicle requires frequent
refilling, there may be a leak. If
you suspect a problem, have the
vehicle checked at your SUBARU
dealer.
CAUTION
. When adding brake fluid, be care-
ful not to allow any dirt into the
reservoir.
. Never splash the brake fluid over
painted surfaces or rubber parts.
Alcohol contained in the brake
fluid may damage them.
. Be careful not to spill brake fluid
when adding it. If brake fluid
touches the exhaust pipe, it may
cause a bad smell, smoke, and/or
a fire. If brake fluid gets on the
exhaust pipe, be sure to wipe itoff. &
Recommended brake fluid
Refer to “Fluids ”F 12-9.
CAUTION
Never use different brands of brake
fluid together. Also, avoid mixing
DOT 3 and DOT 4 brake fluids even if
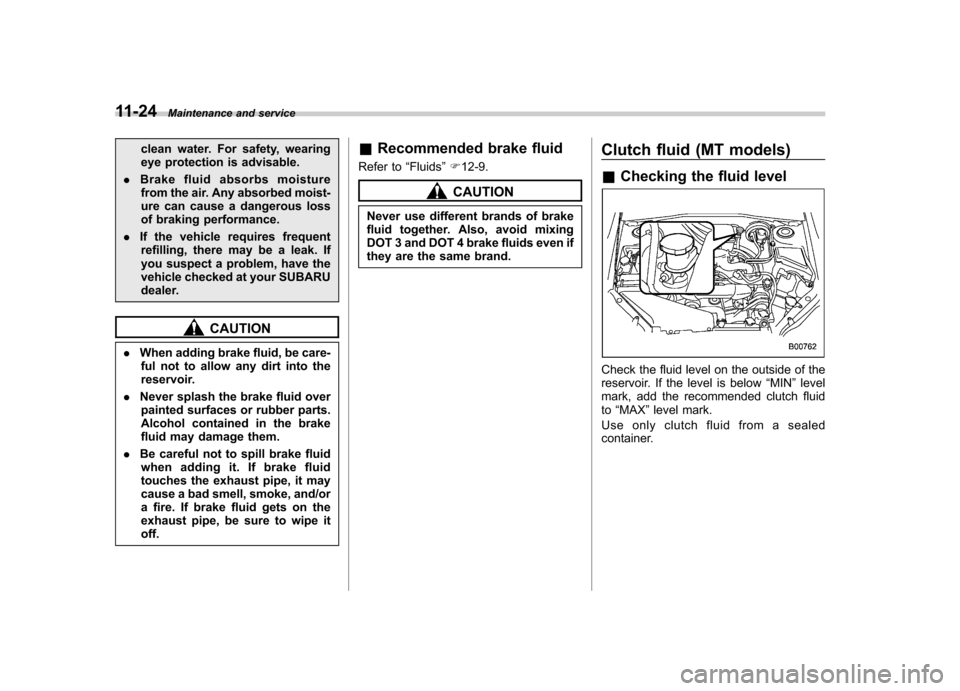
they are the same brand. Clutch fluid (MT models) &
Checking the fluid level
Check the fluid level on the outside of the
reservoir. If the level is below “MIN ”level
mark, add the recommended clutch fluidto “MAX ”level mark.
Use only clutch fluid from a sealed
container.