2013 SUBARU FORESTER window
[x] Cancel search: windowPage 157 of 436

3-46Instruments and controls
tinuously for any longer than
necessary.
. Do not use sharp instruments or
window cleaner containing abra-
sives to clean the inner surface
of the rear window. They may
damage the conductors printed
on the window.
NOTE . Turn on the defogger and deicer
system if the wipers are frozen to the windshield.. If the windshield is covered with
snow, remove the snow so that the
windshield wiper deicer works effec-
tively.. While the defogger and deicer sys-
tem is in the continuous operation
mode, if the vehicle speed remains at
9 mph (15 km/h) or less for 15 minutes,
the windshield wiper deicer automati-
cally stops operating, though the rear
window defogger and outside mirror
defogger maintain continuous opera-
tion in this condition.. While the defogger and deicer sys-
tem is in the continuous operation
mode, if the battery voltage drops
below the permissible level, continu-
ous operation of the defogger and deicer system is canceled and the
system stops operating.
Tilt/telescopic steering wheel
WARNING
. Do not adjust the steering wheel
tilt/telescopic position while driv-
ing. This may cause loss of
vehicle control and result in
personal injury.
. If the lever cannot be raised to
the fixed position, adjust the
steering wheel again. It is dan-
gerous to drive without locking
the steering wheel. This may
cause loss of vehicle control
and result in personal injury.
Page 163 of 436

4-4Climate control
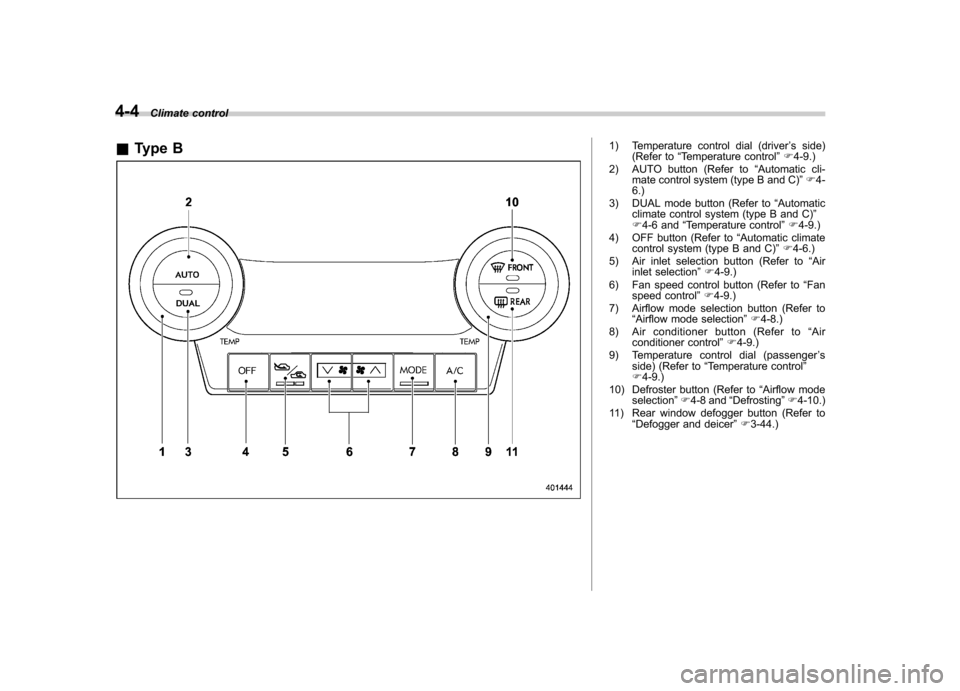
& Type B
1) Temperature control dial (driver ’s side)
(Refer to “Temperature control ”F 4-9.)
2) AUTO button (Refer to “Automatic cli-
mate control system (type B and C) ”F 4-
6.)
3) DUAL mode button (Refer to “Automatic
climate control system (type B and C) ”
F 4-6 and “Temperature control ”F 4-9.)
4) OFF button (Refer to “Automatic climate
control system (type B and C) ”F 4-6.)
5) Air inlet selection button (Refer to “Air
inlet selection ”F 4-9.)
6) Fan speed control button (Refer to “Fan
speed control ”F 4-9.)
7) Airflow mode selection button (Refer to “Airflow mode selection ”F 4-8.)
8) Air conditioner button (Refer to “Air
conditioner control ”F 4-9.)
9) Temperature control dial (passenger ’s
side) (Refer to “Temperature control ”
F 4-9.)
10) Defroster button (Refer to “Airflow mode
selection ”F 4-8 and “Defrosting ”F 4-10.)
11) Rear window defogger button (Refer to “Defogger and deicer ”F 3-44.)
Page 165 of 436

4-6Climate control
Automatic climate control
system (type B and C)
When the automatic climate control mode
is selected, the outlet air temperature, the
fan speed, airflow distribution, air-inlet
control and air conditioner compressor
operation are automatically controlled.
To activate this mode, perform the follow-
ing procedure. NOTE .Operate the automatic climate con-
trol system when the engine is running. . The blower fan rotates at a low
speed when the engine coolant tem-
perature is low.. The air conditioner may not operate
in the following cases:
–When the cabin temperature is
low – When the ambient temperature
decreases to close to 32 8F(0 8C)
. For efficient defogging or dehumidi-
fying in cold weather, press the “A/C ”
button. &
Type B
1) Temperature control dial (driver ’s side)
2) AUTO button
3) Temperature control dial (front passen- ger’s side)
1. Set the preferred temperature using
temperature control dial.
2. Press the “AUTO ”button. The FULL
AUTO mode is selected and the indicator light “FULL AUTO ”on the display illumi-
nates. NOTE . When the “DUAL ”button is pressed,
separate temperature settings for the driver ’s side and passenger ’s side can
be enabled (DUAL mode). To cancel the
DUAL mode, press the “DUAL ”button
again. The temperature setting for the passenger
’s side becomes the same as
the setting for the driver ’s side.
. If you operate any of the buttons on
the control panel other than the “OFF ”
button, rear window defogger button
and temperature control dials during
FULL AUTO mode operation, the indi-
cator light “FULL ”on the control panel
will turn off and the indicator light“ AUTO ”will remain illuminated. You
can then manually control the system
as desired using the button you oper-
ated. To change the system back to the
FULL AUTO mode, press the “AUTO ”
button.
3. To turn off the climate control system,
press the “OFF ”button.
Page 167 of 436

4-8Climate control
Manual climate control &Airflow mode selection
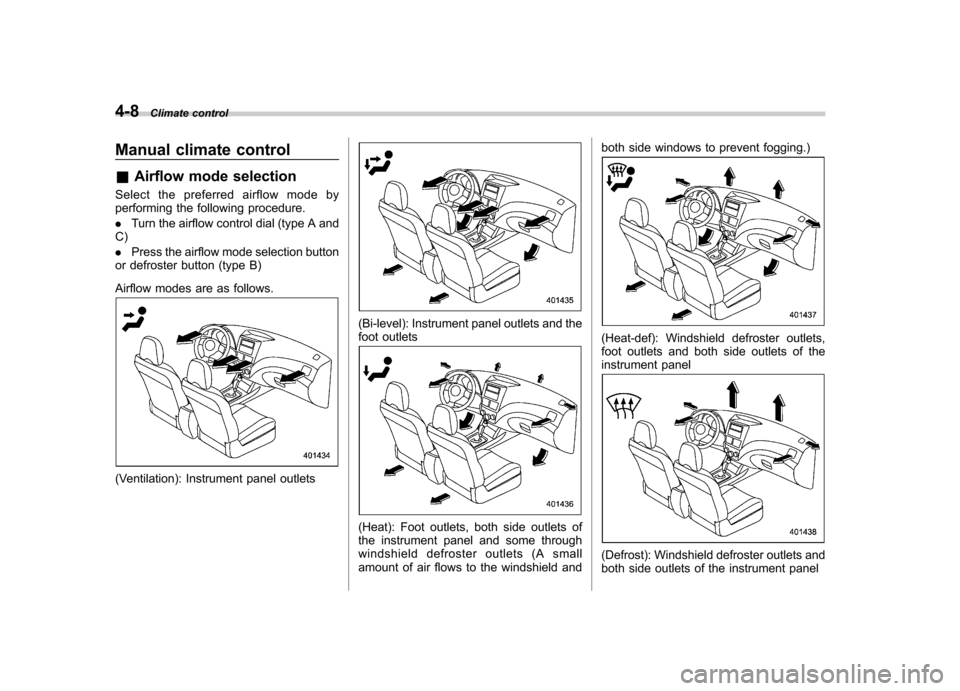
Select the preferred airflow mode by
performing the following procedure. . Turn the airflow control dial (type A and
C) . Press the airflow mode selection button
or defroster button (type B)
Airflow modes are as follows.
(Ventilation): Instrument panel outlets
(Bi-level): Instrument panel outlets and the
foot outlets
(Heat): Foot outlets, both side outlets of
the instrument panel and some through
windshield defroster outlets (A small
amount of air flows to the windshield and both side windows to prevent fogging.)
(Heat-def): Windshield defroster outlets,
foot outlets and both side outlets of the
instrument panel
(Defrost): Windshield defroster outlets and
both side outlets of the instrument panel
Page 169 of 436

4-10Climate control
WARNING
Continued operation in the ON posi-
tion may fog up the windows. Switch
to the OFF position as soon as the
outside dusty condition clears. Defrosting
Select the desired
“
”mode or “”mode
to defrost or dehumidify the windshield
and front door windows by performing the
following procedures.
For types A and C: Turn the airflow control
dial and select the “
”mode or “”
mode.
For type B: Press the airflow mode
selection button to select the “
”mode
or press the defroster button to select the “
” mode.
NOTE . When the “
”mode or “”mode
is selected, the air conditioner com-
pressor automatically operates to more
quickly defog the windshield. (The air
conditioner indicator light does not
illuminate in this case.) At the same
time, the air inlet selection is automa-
tically set to the outside air mode. For
details, refer to “Airflow mode selec-
tion ”F 4-8.
. For type B, if the defroster button is
pressed while the “
”mode is se-
lected, it will return to the previous
mode before selecting the “
”mode. Operating tips for heater and
air conditioner &
Cleaning ventilation grille
Always keep the front ventilation inlet grille
free of snow, leaves, or other obstructions
to ensure efficient heating and defrosting.
Since the condenser is located in front of
the radiator, this area should be kept clean
because cooling performance is impaired
by any accumulation of insects and leaves
on the condenser. &Efficient cooling after parking
in direct sunlight
After parking in direct sunlight, drive with
the windows open for a few minutes to
allow outside air to circulate into the
Page 170 of 436

heated interior. This results in quicker
cooling by the air conditioner. Keep the
windows closed during the operation of
the air conditioner for maximum cooling
efficiency. &Lubrication oil circulation in
the refrigerant circuit
Operate the air conditioner compressor at
a low engine speed (at idle or low driving
speeds) a few minutes each month during
the off-season to circulate its oil. & Checking air conditioning
system before summer sea-son
Check the air conditioner unit for refriger-
ant leaks, hose conditions, and proper
operation each spring. Have the air con-
ditioning system checked by your
SUBARU dealer. & Cooling and dehumidifying in
high humidity and low tem-
perature weather conditions
Under certain weather conditions (high
relative humidity, low temperatures, etc.) a
small amount of water vapor emission
from the air outlets may be noticed. This
condition is normal and does not indicate
any problem with the air conditioning system.
& Air conditioner compressor
shut-off when engine is
heavily loaded
To improve acceleration and gas mileage,
the air conditioner compressor is designed
to temporarily shut off during air condi-
tioner operation whenever the accelerator
pedal is fully depressed such as during
rapid acceleration or when driving on a
steep upgrade. & Refrigerant for your climate
control system
Your air conditioner uses ozone friendly
refrigerant HFC134a. Therefore, the meth-
od of adding, changing or checking the
refrigerant is different from the method for
CFC12 (freon). Consult your SUBARU
dealer for service. Repairs needed as a
result of using the wrong refrigerant are
not covered under warranty. Air filtration system
Replace the filter element according to the
replacement schedule as follows. This
schedule should be followed to maintain
the filter
’s dust collection ability. Under
extremely dusty conditions, the filter
should be replaced more frequently. It is
recommended that you have your filter
checked or replaced by your SUBARU
dealer. For replacement, use only a
genuine SUBARU air filter kit.
Replacement schedule: Every 12 months or 7,500 miles (12,000
km) whichever comes first
CAUTION
Contact your SUBARU dealer if the
following occurs, even if it is not yet
time to change the filter. – Reduction of the airflow through
the vents.
– Windshield gets easily fogged ormisted.
NOTE
The filter can influence the air condi-
tioning, heating and defroster perfor- Climate control
4-11
– CONTINUED –
Page 195 of 436

5-22Audio
!Selecting preset channels
1. Press the “SAT ”button to select SAT1,
SAT2 or SAT3 reception mode.
2. Press the preferred preset button (from
to) briefly.
! Displaying and selecting preset
stations (type D audio)
1. Press and hold the
button for 1.5
seconds or longer during satellite radio
reception to display the radio screen.
2. Operate the “TUNE/TRACK/CH ”dial
to select the stations.
& Display selection (type A, B
and C audio)
Type A and B audio
Type C audio
Press the “TEXT ”button while receiving
the satellite radio to change the display as follows.
CD player operation NOTE . Make sure to always insert a disc
with the label side up. If a disc is
inserted with the label side down, the
player displays “CHECK DISC ”. Refer
to “When the following messages are
displayed ”F 5-29.
. If a disc is inserted during a radio
broadcast, the disc will interrupt thebroadcast.. After the last song finishes, the disc
will automatically return to track 1 (the
first track on the disc) and will auto-
matically play back. . The player is designed to be able to
play music CD-Rs and music CD-RWs,
but it may not be able to play certainones.. Mini CDs (i.e., 8 cm/3 inch CDs) are
not supported, and if inserted, they will
be immediately ejected.. CDs that can be played back are
accompanied by the following restric-tions.
–Maximum number of folders: 255
– Maximum number of tracks in a
folder: 255 –
Maximum number of files on a
CD: 510 (type A, B and C audio)/999
(type D audio)
& Play file
NOTE . Copyright protected MP3/WMA/AAC
files will not be played by the system.
The player will automatically skip to the
next file (track).. WMA9 Lossless, WMA9 Profes-
sional and WMA9 voice cannot beplayed. MP3: . Based on MPEG1, 2 and 2.5 Layer3
. Sampling rate (kHz): 48, 44.1, 32, 24,
22.05, 16, 12, 11.025, 8. Bit rate (kbps): 8 to 320
. Supports variable bit rates
WMA (type A, B and C audio):. Based on Windows Media Audio 9
. Sampling rate (kHz): 48, 44.1, 32
. Bit rate (kbps): 32 to 192
WMA (type D audio):. Based on Windows Media Audio 7, 8
and 9. Sampling rate (kHz): 48, 44.1, 32
. Bit rate (kbps): 32 to 192
Page 216 of 436

that is used, the screen on the cell
phone may remain illuminated while
the ignition switch is in the“ON ”
position. If this occurs, turn the illumi-
nation off by adjusting the cell phonesettings. . Depending on the setting of the cell
phone, the dial lock function may be
activated after making a call. Deacti-
vate the automatic dial lock function of
the cell phone before using the Hands-
free system. . Depending on the type of cell phone
that is used, operation and the sound
volume may be different from those of
cell phones currently used. . When the ignition switch is turned to
the “LOCK ”position during a call, the
call may be disconnected or continued
on the cell phone depending on the
type of cell phone that is used. Note
that operation of the cell phone may be
necessary if the call is continued on the
cell phone. . Do not speak at the same time as the
other party during a call. If you and the
party speak at the same time, it may be
difficult for the other party to hear your
voice and vice versa. This is normal. . The receiver sound volume should
be set as low as possible. Otherwise,
the party you are calling may notice an undesirable echo sound. .
Speak clearly and loudly.
. Your voice may be difficult to be
heard by the party under the following conditions.
–Driving on a rough road.
– Driving at a high speed.
– Driving with a window open.
– When air from the ventilator
blows directly towards the micro-phone. – When the sound coming from the
ventilator is loud.– When the cell phone is too close
to the microphone.
. The sound quality may degrade due
to the influence of the cell phone that is
connected to the system or the circum-
stances of the Bluetooth network. . When another Bluetooth
®device is
simultaneously connected, noise may
be heard in the voice coming from the
hands-free phone. ! Corresponding profiles for the cell phone
. HFP (Hands Free Profile): Ver. 1.0
. OPP (Object Push Profile): Ver. 1.1 &
Certification for the Hands-
free system
CAUTION
FCC WARNING
Changes or modifications not ex-
pressly approved by the party re-
sponsible for compliance could void
the user ’s authority to operate the
equipment.
NOTE
This device complies with Part 15 of
the FCC Rules and RSS-Gen of IC
Rules. Operation is subject to the
following two conditions: (1) this de-
vice may not cause harmful interfer-
ence, and (2) this device must accept
any interference received, including
interference that may cause undesiredoperation. NOTE
This equipment has been tested and
found to comply with the limits for a
Class B digital device, pursuant to Part
15 of the FCC Rules. These limits are
designed to provide reasonable protec-
tion against harmful interference in a
residential installation. This equipment Audio
5-43
– CONTINUED –