2013 SUBARU FORESTER lights
[x] Cancel search: lightsPage 196 of 436
AAC (type C audio): .Based on MPEG4 AAC
. Sampling rate (kHz): 48, 44.1, 32, 24,
22.05, 16, 12, 11.025, 8. Bit rate (kbps): 8 to 320
. Number of channels: 1 to 2ch
AAC (type D audio):. Based on MPEG2 AAC and MPEG4
AAC. Sampling rate (kHz): 48, 44.1, 32, 24,
22.05, 16, 12, 11.025, 8. Bit rate (kbps): 8 to 320
. Number of channels: 1 to 2ch
& How to insert a CD (type A, C
and D)
Hold a disc with a finger in the center hole
while gripping the edge of the disc, then
insert it in to the slot (with the label side
up) and the player will automatically pull
the disc into position. NOTE
DO NOT INSERT TWO DISCS INTO THE
DISC INSERTION SLOT AT THE SAMETIME. &
How to insert a CD(s) (type B)
1. Briefly press the
button. If the
magazine in the player has an empty
position where you can insert a disc, the
disc number indicator associated with the
empty position will blink.
If no indicator blinks, it means that there is
no empty position in the magazine.
2. When the “LOAD ”indicator illumi-
nates, insert the disc. Once you have
inserted the disc, the “LOAD ”indicator will
turn off. The disc will then be automatically
drawn in, and the player will begin to play
back the first track of the disc. . To insert more discs in succession,
repeat steps 1 and 2. The magazine will
be loaded with discs in the ascending
order of position number.
If you do not insert any disc in 15 seconds
after you have pressed the
button,
the player will begin to play back the first
track of the last disc you have inserted. . The disc indicator steadily lights up if a
disc is already inserted in the correspond-
ing position of the magazine. . While the player is in the loading mode,
if you press
orbutton, the
player will enter the standby mode. Press the
button to start playback. !
Inserting a disc in a desired posi- tion
1. Briefly press the
button. If the
magazine in the player has an empty
position where you can insert a disc, the
disc number indicator associated with the
empty position will blink.
The positions in the magazine the indica-
tor of which steadily lights up are already
loaded with discs.
2. Press the disc select button (from
to) at the position where you
want to insert a disc.
3. When the “LOAD ”indicator illumi-
nates, insert the disc. Once you have
inserted the disc, the “LOAD ”indicator will
turn off. The disc will then be automatically
drawn in, and the player will begin to play
the first track on the disc. . If you wish to insert another disc,
repeat the procedure beginning with step 1.
If you do not insert any disc in 15 seconds
after you have pressed the
button,
the player will begin to play back the first
track of the last disc you have inserted. . While the player is in the loading mode,
if you press
orbutton, the
player will enter standby mode. Press the
button to start playback. Audio
5-23
– CONTINUED –
Page 197 of 436
5-24Audio
!Loading all the magazine (full disc
loading mode)
1. If you continue to press the
button for more than 1.5 seconds, the
player will produce beep sound and will
enter the full disc loading mode.
2. When the disc number indicator
flashes and “ALL LOAD ”indicator illumi-
nates, insert a disc within 15 seconds. If a
disc is successfully loaded during this
period, the disc number indicator will stop
blinking and will steadily light.
3. When the loading of a disc is com-
plete, the next disc number indicator will
blink. Then repeat step 2.
4. When the magazine is filled with discs
by repeating steps 2 and 3, the player will
start playback of the discs, beginning with
the one inserted first.
If you fail to insert any disc during each 15
seconds interval, the full disc loading
mode will be canceled, and the player will
start playback of the disc inserted first. & How to play back a CD
! When there is no CD inserted
Properly insert a CD. Refer to “How to
insert a CD (type A, C and D) ”F 5-23 /
“ How to insert a CD(s) (type B) ”F 5-23.
When a CD is loaded, the player will start
playback of the CD, beginning with the first track. !
When CD is in the player (type A)
When thebutton is pressed, the
player will start playback. ! When there are CDs loaded (type B)
Press a desired one of the disc select
buttons (from
to) the disc
number indicator of which steadily lights
up. The player will then start playback of
the selected CD, beginning with the firsttrack.
If a disc that the player cannot read has
been loaded, the player will display themessage “CHECK DISC ”.
! When CD is in the player (type C
and D)
Each brief press of the
button
changes the modes in the following sequence.
*: For type C audio, “BT-A ”is displayed.
When the CD mode is selected, the player
will start playback. &
To select a track from the beginning
Type A and B audio
Type C and D audio
Turn the “TUNE/TRACK/CH ”dial clock-
wise to skip to the beginning of the next
track. Each time the dial is turned, the
indicated track number will increase.
Turn the “TUNE/TRACK/CH ”dial counter-
clockwise to skip to the beginning of the
current track. Each time the dial is turned,
the indicated track number will decrease.
NOTE
With an MP3, WMA or AAC (type C and
D audio): . Skipping past the last track will take
you back to the first track in the folder. . Skipping past the first track will take
you to the last track in the folder.
Page 230 of 436
Interior lights....................................................... 6-2
Dome light .......................................................... 6-2
Cargo area light .................................................. 6-3
Map light ............................................................. 6-3
Sun visors ........................................................... 6-4
Vanity mirror ....................................................... 6-4
Storage compartment ......................................... 6-5
Glove box ........................................................... 6-5
Center console .................................................... 6-5
Overhead console ............................................... 6-6
Rear seat center table (if equipped) ..................... 6-7
Coin tray ............................................................. 6-7
Cup holders ......................................................... 6-8
Front passenger ’s cup holder .............................. 6-8
Rear passenger ’s cup holder (if equipped) ........... 6-8
Bottle holders ...................................................... 6-9
Accessory power outlets .................................... 6-9
Cigarette lighter (dealer option) .......................... 6-10Ashtray (if equipped)
......................................... 6-11
Floor mat ............................................................ 6-12
Shopping bag hook ........................................... 6-13
Coat hook ........................................................... 6-13
Cargo area cover (dealer option) ...................... 6-14
Using the cover ................................................. 6-14
To remove the cover .......................................... 6-14
To install the cover ............................................ 6-15
Cargo tie-down hooks ....................................... 6-15
Under-floor storage compartment (if equipped) ........................................................ 6-16
Rear view camera (if equipped) ........................ 6-17
How to use the rear view camera ....................... 6-18
Viewing range on the screen .............................. 6-18
Help line ............................................................ 6-19 Interior equipment
6
Page 231 of 436
6-2Interior equipment
Interior lights
When leaving your vehicle, make sure the
lights are turned off to avoid batterydischarge. &Dome light
Type A
Type B
1) ON
2) DOOR
3) OFF
The dome light switch has the following
three positions. ON: The light remains on continuously.
OFF: The light remains off.
DOOR: The dome light illuminates auto-
matically in the following cases. . Any of the doors or the rear gate is
opened.. The doors or the rear gate are un-
locked using the remote keyless entry
transmitter. . The ignition switch is turned from the
“ Acc ”position to the “LOCK ”position. The automatically illuminated dome light
remains on for several seconds and then
gradually turns off after all doors and the
rear gate are closed.
While the light is illuminated, if any of the
following operations are performed, the
dome light turns off immediately. .
The ignition switch is turned from the
“ LOCK ”position to the “Acc ”or “ON ”
position.. All doors and the rear gate are locked
using the remote keyless entry transmitter.
The setting of the period for which the light
remains on (OFF delay timer) can be
changed by a SUBARU dealer. Contact
your SUBARU dealer for details.
Page 232 of 436
&Cargo area light
1) DOOR
2) OFF
3) ON
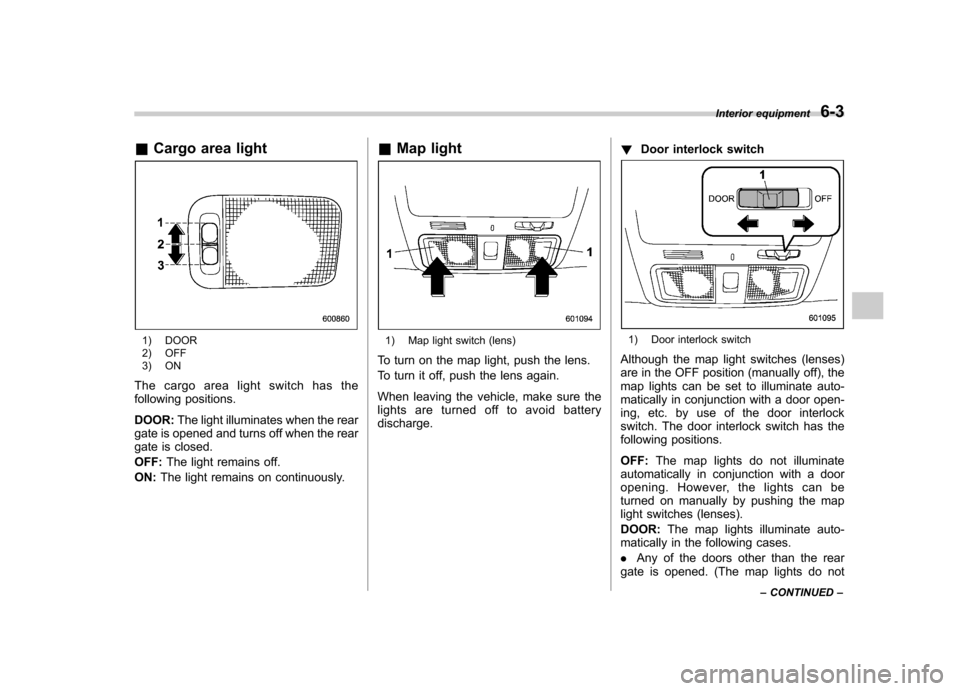
The cargo area light switch has the
following positions. DOOR: The light illuminates when the rear
gate is opened and turns off when the rear
gate is closed. OFF: The light remains off.
ON: The light remains on continuously. &
Map light1) Map light switch (lens)
To turn on the map light, push the lens.
To turn it off, push the lens again.
When leaving the vehicle, make sure the
lights are turned off to avoid batterydischarge. !
Door interlock switch1) Door interlock switch
Although the map light switches (lenses)
are in the OFF position (manually off), the
map lights can be set to illuminate auto-
matically in conjunction with a door open-
ing, etc. by use of the door interlock
switch. The door interlock switch has the
following positions. OFF: The map lights do not illuminate
automatically in conjunction with a door
opening. However, the lights can be
turned on manually by pushing the map
light switches (lenses). DOOR: The map lights illuminate auto-
matically in the following cases.. Any of the doors other than the rear
gate is opened. (The map lights do not Interior equipment
6-3
– CONTINUED –
Page 233 of 436
6-4Interior equipment
illuminate when only the rear gate is opened.) .The doors are unlocked using the
remote keyless entry transmitter.. The ignition switch is turned from the
“ Acc ”position to the “LOCK ”position.
The automatically illuminated map lights
remain on for several seconds and then
gradually turn off after all doors are
closed. While the lights are on, if any of
the following operations are performed,
the map lights turn off immediately. . The ignition switch is turned from the
“ LOCK ”position to the “Acc ”or “ON ”
position.. All doors and the rear gate are locked
using the remote keyless entry transmitter.
The setting of the period for which the
lights remain on (OFF delay timer) can be
changed by a SUBARU dealer. Contact
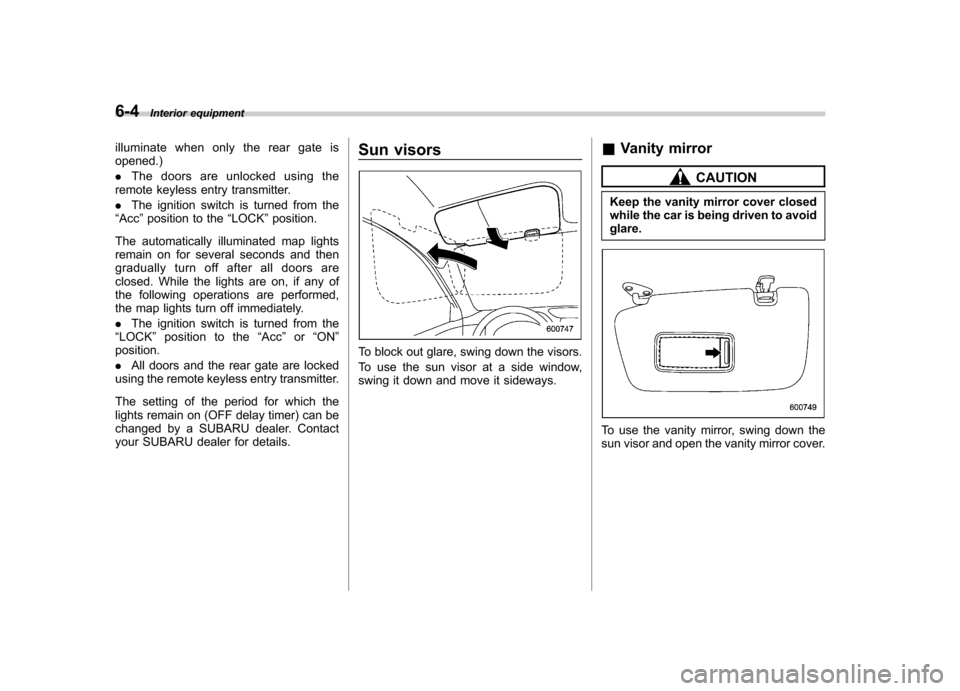
your SUBARU dealer for details. Sun visors
To block out glare, swing down the visors.
To use the sun visor at a side window,
swing it down and move it sideways.
&
Vanity mirror
CAUTION
Keep the vanity mirror cover closed
while the car is being driven to avoidglare.
To use the vanity mirror, swing down the
sun visor and open the vanity mirror cover.
Page 258 of 436

The U.S. Environmental Protection
Agency (EPA) and states using two-wheel
dynamometers in their emission testing
program have EXEMPTED SUBARU
AWD vehicles from the portion of the
testing program that involves a two-wheel
dynamometer. There are some states that
use four-wheel dynamometers in their
testing program. When properly used, this
equipment should not damage a SUBARU
AWD vehicle.
Under no circumstances should the rear
wheels be jacked off the ground, nor
should the driveshaft be disconnected for
state emission testing.Preparing to drive
You should perform the following checks
and adjustments every day before you
start driving.
1. Check that all windows, mirrors, and
lights are clean and unobstructed.
2. Check the appearance and condition
of the tires. Also check tires for properinflation.
3. Look under the vehicle for any sign of leaks.
4. Check that the hood and rear gate are
fully closed.
5. Check the adjustment of the seat.
6. Check the adjustment of the inside
and outside mirrors.
7. Fasten your seatbelt. Check that your
passengers have fastened their seatbelts.
8. Check the operation of the warning
and indicator lights when the ignition
switch is turned to the
“ON ”position.
9. Check the gauges, indicator and warn-
ing lights after starting the engine.
NOTE
Engine oil, engine coolant, brake fluid,
washer fluid and other fluid levels
should be checked daily, weekly or at
fuel stops. Starting the engine
CAUTION
Do not operate the starter motor
continuously for more than 10 sec-
onds. If the engine fails to start after
operating the starter for 5 to 10
seconds, wait for 10 seconds or
more before trying again.
NOTE
It may be difficult to start the engine
when the battery has been discon-
nected and reconnected (for mainte-
nance or other purposes). This diffi-
culty is caused by the electronically
controlled throttle ’s self-diagnosis
function. To overcome it, keep the
ignition switch in the “ON ”position
for approximately 10 seconds before
starting the engine. & MT models
1. Apply the parking brake.
2. Turn off unnecessary lights and ac- cessories.
3. Depress the clutch pedal to the floor
and shift the shift lever into neutral. Hold
the clutch pedal to the floor while starting Starting and operating
7-7
– CONTINUED –
Page 259 of 436
7-8Starting and operating
the engine. The starter motor will only
operate when the clutch pedal is pressed
fully to the floor.
4. Turn the ignition switch to the “ON ”
position and check the operation of the
warning and indicator lights. Refer to“ Warning and indicator lights ”F 3-12.
5. Turn the ignition switch to the “START ”
position without depressing the accelera-
tor pedal. Release the key immediately
after the engine has started.
If the engine does not start, perform the
following procedure.
(1) Turn the ignition switch to the“LOCK ”position and wait for at least
10 seconds. After checking that the
parking brake is firmly applied, turn the
ignition switch to the “START ”position
while depressing the accelerator pedal
slightly (approximately a quarter of the
full stroke). Release the accelerator
pedal as soon as the engine starts.
(2) If this fails to start the engine, turn
the ignition switch back to the “LOCK ”
position and wait for at least 10
seconds. Then fully depress the accel-
erator pedal and turn the ignition
switch to the “START ”position. If the
engine starts, quickly release the
accelerator pedal.
(3) If this does not start the engine,
turn the ignition switch again to the “
LOCK ”position. After waiting for 10
seconds or longer, turn the ignition
switch to the “START ”position without
depressing the accelerator pedal.
(4) If the engine still does not start,
contact your nearest SUBARU dealer
for assistance.
6. Confirm that all warning and indicator
lights have turned off after the engine has
started. The fuel injection system auto-
matically lowers the idle speed as the
engine warms up.
& AT models
1. Apply the parking brake.
2. Turn off unnecessary lights and ac- cessories.
3. Shift the select lever to the “P ” or “N ”
position (preferably “P ”position).
The starter motor will only operate when
the select lever is at the “P ”or “N ”position.
4. Turn the ignition switch to the “ON ”
position and check the operation of the
warning and indicator lights. Refer to “ Warning and indicator lights ”F 3-12.
5. Turn the ignition switch to the “START ”
position without depressing the accelera-
tor pedal. Release the key immediately
after the engine has started.
If the engine does not start, perform the following procedure.
(1) Turn the ignition switch to the “LOCK ”position and wait for at least
10 seconds. After checking that the
parking brake is firmly applied, turn the
ignition switch to the “START ”position
while depressing the accelerator pedal
slightly (approximately a quarter of the
full stroke). Release the accelerator
pedal as soon as the engine starts.
(2) If this fails to start the engine, turn
the ignition switch back to the “LOCK ”
position and wait for at least 10
seconds. Then fully depress the accel-
erator pedal and turn the ignition
switch to the “START ”position. If the
engine starts, quickly release the
accelerator pedal.
(3) If this does not start the engine,
turn the ignition switch again to the“ LOCK ”position. After waiting for 10
seconds or longer, turn the ignition
switch to the “START ”position without
depressing the accelerator pedal.
(4) If the engine still does not start,
contact your nearest SUBARU dealer
for assistance.
6. Confirm that all warning and indicator
lights have turned off after the engine has
started. The fuel injection system auto-
matically lowers the idle speed as the
engine warms up.