2013 SUBARU FORESTER warning lights
[x] Cancel search: warning lightsPage 259 of 436
7-8Starting and operating
the engine. The starter motor will only
operate when the clutch pedal is pressed
fully to the floor.
4. Turn the ignition switch to the “ON ”
position and check the operation of the
warning and indicator lights. Refer to“ Warning and indicator lights ”F 3-12.
5. Turn the ignition switch to the “START ”
position without depressing the accelera-
tor pedal. Release the key immediately
after the engine has started.
If the engine does not start, perform the
following procedure.
(1) Turn the ignition switch to the“LOCK ”position and wait for at least
10 seconds. After checking that the
parking brake is firmly applied, turn the
ignition switch to the “START ”position
while depressing the accelerator pedal
slightly (approximately a quarter of the
full stroke). Release the accelerator
pedal as soon as the engine starts.
(2) If this fails to start the engine, turn
the ignition switch back to the “LOCK ”
position and wait for at least 10
seconds. Then fully depress the accel-
erator pedal and turn the ignition
switch to the “START ”position. If the
engine starts, quickly release the
accelerator pedal.
(3) If this does not start the engine,
turn the ignition switch again to the “
LOCK ”position. After waiting for 10
seconds or longer, turn the ignition
switch to the “START ”position without
depressing the accelerator pedal.
(4) If the engine still does not start,
contact your nearest SUBARU dealer
for assistance.
6. Confirm that all warning and indicator
lights have turned off after the engine has
started. The fuel injection system auto-
matically lowers the idle speed as the
engine warms up.
& AT models
1. Apply the parking brake.
2. Turn off unnecessary lights and ac- cessories.
3. Shift the select lever to the “P ” or “N ”
position (preferably “P ”position).
The starter motor will only operate when
the select lever is at the “P ”or “N ”position.
4. Turn the ignition switch to the “ON ”
position and check the operation of the
warning and indicator lights. Refer to “ Warning and indicator lights ”F 3-12.
5. Turn the ignition switch to the “START ”
position without depressing the accelera-
tor pedal. Release the key immediately
after the engine has started.
If the engine does not start, perform the following procedure.
(1) Turn the ignition switch to the “LOCK ”position and wait for at least
10 seconds. After checking that the
parking brake is firmly applied, turn the
ignition switch to the “START ”position
while depressing the accelerator pedal
slightly (approximately a quarter of the
full stroke). Release the accelerator
pedal as soon as the engine starts.
(2) If this fails to start the engine, turn
the ignition switch back to the “LOCK ”
position and wait for at least 10
seconds. Then fully depress the accel-
erator pedal and turn the ignition
switch to the “START ”position. If the
engine starts, quickly release the
accelerator pedal.
(3) If this does not start the engine,
turn the ignition switch again to the“ LOCK ”position. After waiting for 10
seconds or longer, turn the ignition
switch to the “START ”position without
depressing the accelerator pedal.
(4) If the engine still does not start,
contact your nearest SUBARU dealer
for assistance.
6. Confirm that all warning and indicator
lights have turned off after the engine has
started. The fuel injection system auto-
matically lowers the idle speed as the
engine warms up.
Page 275 of 436
7-24Starting and operating
Electronic Brake Force Dis-
tribution (EBD) system
The EBD system maximizes the effective-
ness of the brakes by allowing the rear
brakes to supply a greater proportion of
the braking force. It functions by adjusting
the distribution of braking force to the rear
wheels in accordance with the vehicle ’s
loading condition and speed.
The EBD system is an integral part of the
ABS system and uses some of the ABS system ’s components to perform its func-
tion of optimizing the distribution of brak-
ing force. If any of the ABS components
used by the EBD system malfunction, the
EBD system also stops working.
When the EBD system is operating, you
may hear a chattering noise or feel a slight
vibration in the brake pedal. This is normal
and does not indicate a malfunction. &
Steps to take if EBD system malfunctions
Type A
Type B
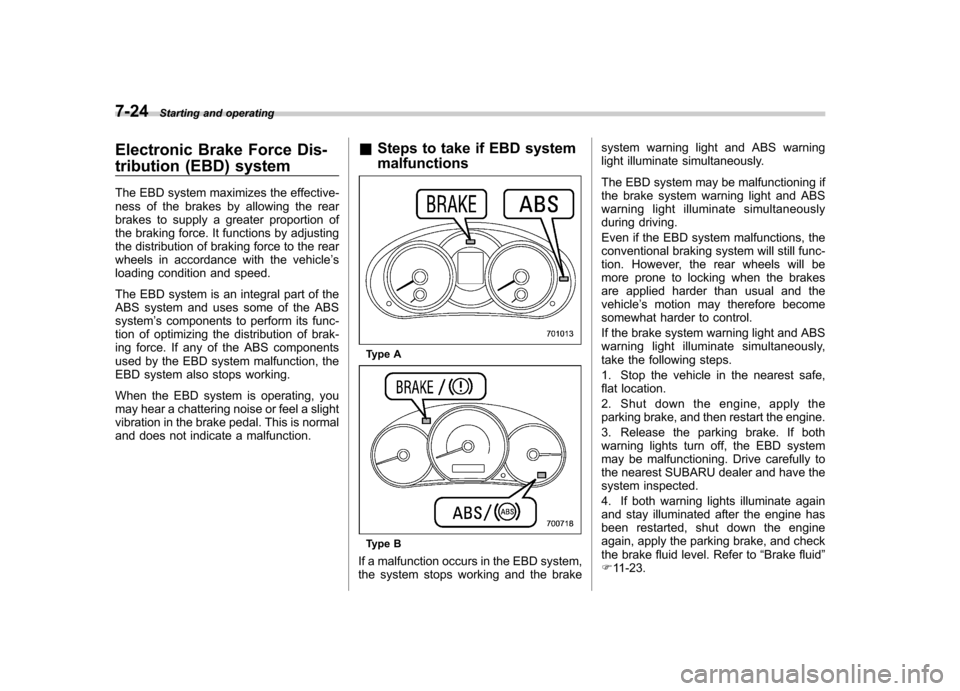
If a malfunction occurs in the EBD system,
the system stops working and the brake system warning light and ABS warning
light illuminate simultaneously.
The EBD system may be malfunctioning if
the brake system warning light and ABS
warning light illuminate simultaneously
during driving.
Even if the EBD system malfunctions, the
conventional braking system will still func-
tion. However, the rear wheels will be
more prone to locking when the brakes
are applied harder than usual and thevehicle
’s motion may therefore become
somewhat harder to control.
If the brake system warning light and ABS
warning light illuminate simultaneously,
take the following steps.
1. Stop the vehicle in the nearest safe,
flat location.
2. Shut down the engine, apply the
parking brake, and then restart the engine.
3. Release the parking brake. If both
warning lights turn off, the EBD system
may be malfunctioning. Drive carefully to
the nearest SUBARU dealer and have the
system inspected.
4. If both warning lights illuminate again
and stay illuminated after the engine has
been restarted, shut down the engine
again, apply the parking brake, and check
the brake fluid level. Refer to “Brake fluid ”
F 11-23.
Page 304 of 436
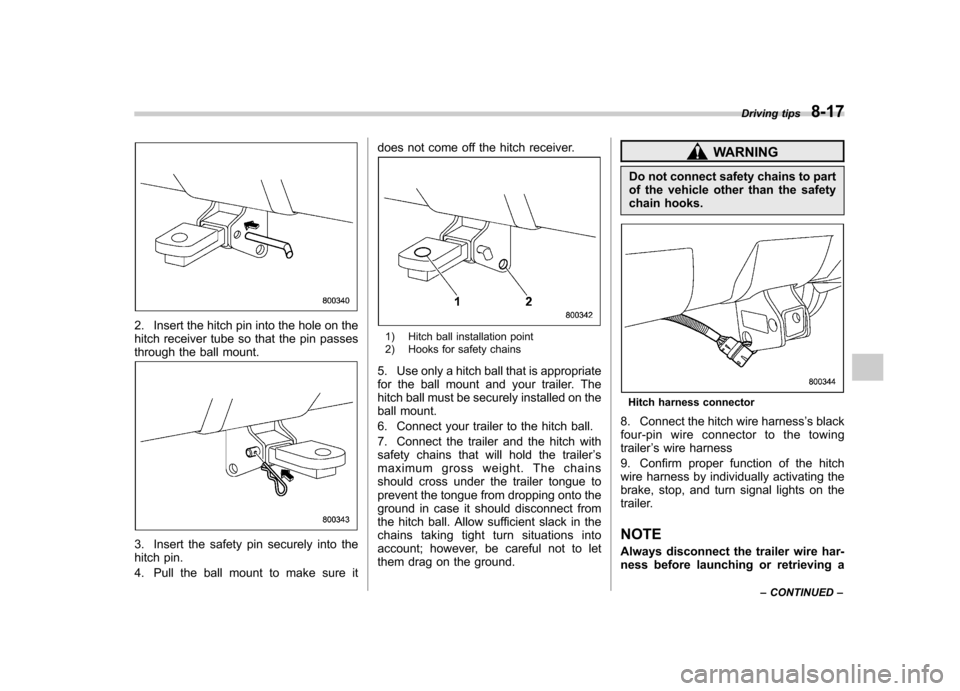
2. Insert the hitch pin into the hole on the
hitch receiver tube so that the pin passes
through the ball mount.
3. Insert the safety pin securely into the
hitch pin.
4. Pull the ball mount to make sure itdoes not come off the hitch receiver.
1) Hitch ball installation point
2) Hooks for safety chains
5. Use only a hitch ball that is appropriate
for the ball mount and your trailer. The
hitch ball must be securely installed on the
ball mount.
6. Connect your trailer to the hitch ball.
7. Connect the trailer and the hitch with
safety chains that will hold the trailer ’s
maximum gross weight. The chains
should cross under the trailer tongue to
prevent the tongue from dropping onto the
ground in case it should disconnect from
the hitch ball. Allow sufficient slack in the
chains taking tight turn situations into
account; however, be careful not to let
them drag on the ground.
WARNING
Do not connect safety chains to part
of the vehicle other than the safety
chain hooks.
Hitch harness connector
8. Connect the hitch wire harness ’s black
four-pin wire connector to the towing trailer ’s wire harness
9. Confirm proper function of the hitch
wire harness by individually activating the
brake, stop, and turn signal lights on the
trailer.
NOTE
Always disconnect the trailer wire har-
ness before launching or retrieving a Driving tips
8-17
– CONTINUED –
Page 310 of 436
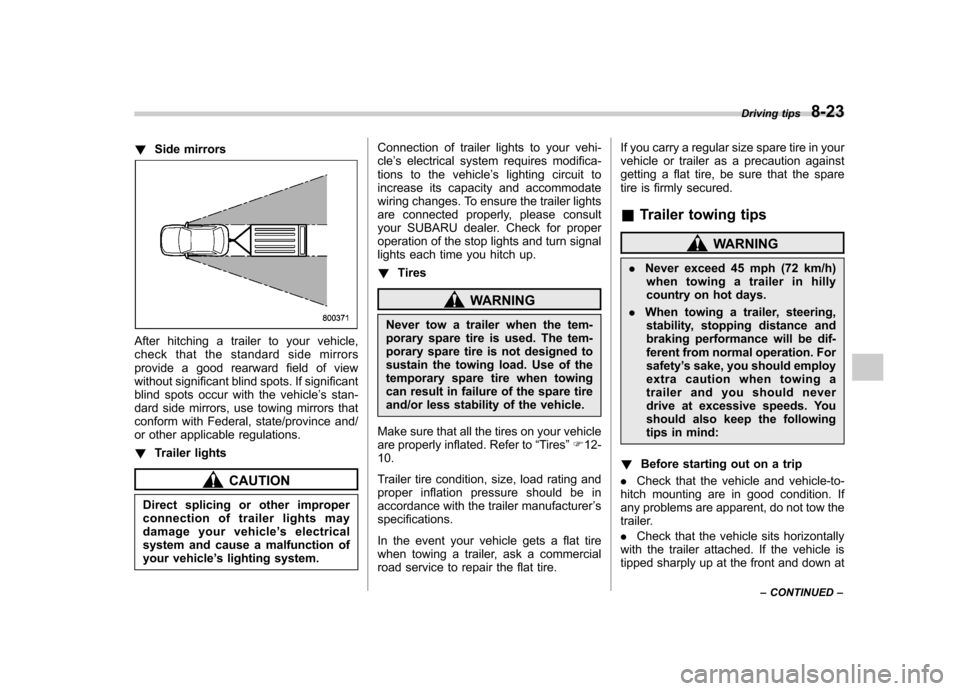
!Side mirrors
After hitching a trailer to your vehicle,
check that the standard side mirrors
provide a good rearward field of view
without significant blind spots. If significant
blind spots occur with the vehicle ’s stan-
dard side mirrors, use towing mirrors that
conform with Federal, state/province and/
or other applicable regulations. ! Trailer lights
CAUTION
Direct splicing or other improper
connection of trailer lights may
damage your vehicle ’s electrical
system and cause a malfunction of
your vehicle ’s lighting system. Connection of trailer lights to your vehi-cle
’s electrical system requires modifica-
tions to the vehicle ’s lighting circuit to
increase its capacity and accommodate
wiring changes. To ensure the trailer lights
are connected properly, please consult
your SUBARU dealer. Check for proper
operation of the stop lights and turn signal
lights each time you hitch up. ! Tires
WARNING
Never tow a trailer when the tem-
porary spare tire is used. The tem-
porary spare tire is not designed to
sustain the towing load. Use of the
temporary spare tire when towing
can result in failure of the spare tire
and/or less stability of the vehicle.
Make sure that all the tires on your vehicle
are properly inflated. Refer to “Tires ”F 12-
10.
Trailer tire condition, size, load rating and
proper inflation pressure should be in
accordance with the trailer manufacturer ’s
specifications.
In the event your vehicle gets a flat tire
when towing a trailer, ask a commercial
road service to repair the flat tire. If you carry a regular size spare tire in your
vehicle or trailer as a precaution against
getting a flat tire, be sure that the spare
tire is firmly secured. &
Trailer towing tips
WARNING
. Never exceed 45 mph (72 km/h)
when towing a trailer in hilly
country on hot days.
. When towing a trailer, steering,
stability, stopping distance and
braking performance will be dif-
ferent from normal operation. Forsafety ’s sake, you should employ
extra caution when towing a
trailer and you should never
drive at excessive speeds. You
should also keep the following
tips in mind:
! Before starting out on a trip
. Check that the vehicle and vehicle-to-
hitch mounting are in good condition. If
any problems are apparent, do not tow the
trailer. . Check that the vehicle sits horizontally
with the trailer attached. If the vehicle is
tipped sharply up at the front and down at Driving tips
8-23
– CONTINUED –
Page 311 of 436
8-24Driving tips
the rear, check the total trailer weight,
GVW, GAWs and tongue load again, then
confirm that the load and its distribution
are acceptable. . Check that the tire pressures are
correct.. Check that the vehicle and trailer are
connected properly. Confirm that:
–The trailer tongue is connected
properly to the hitch ball. – The trailer lights connector is con-
nected properly and trailer ’s stop lights
illuminate when the vehicle ’s brake
pedal is pressed, and that the trailer ’s
turn signal lights flash when the vehicle ’s turn signal lever is operated.
– The safety chains are connected
properly. – All cargo in the trailer is secured
safely in position.– The side mirrors provide a good
rearward field of view without a sig-
nificant blind spot.
. Sufficient time should be taken to learn
the “feel ”of the vehicle/trailer combination
before starting out on a trip. In an area free
of traffic, practice turning, stopping and
backing up. !
Driving with a trailer
. You should allow for considerably more
stopping distance when towing a trailer.
Avoid sudden braking because it may
result in skidding or jackknifing and loss ofcontrol. . Avoid abrupt starts and sudden accel-
erations. If your vehicle has a manual
transmission, always start out in first gear
and release the clutch at moderate enginerevolution. . Avoid uneven steering, sharp turns and
rapid lane changes.. Slow down before turning. Make a
longer than normal turning radius because
the trailer wheels will be closer than the
vehicle wheels to the inside of the turn. In
a tight turn, the trailer could hit yourvehicle. . Crosswinds will adversely affect the
handling of your vehicle and trailer, caus-
ing sway. Crosswinds can be due to
weather conditions or the passing of large
trucks or buses. If swaying occurs, firmly
grip the steering wheel and slow down
immediately but gradually. . When passing other vehicles, consid-
erable distance is required because of the
added weight and length caused by
attaching the trailer to your vehicle.
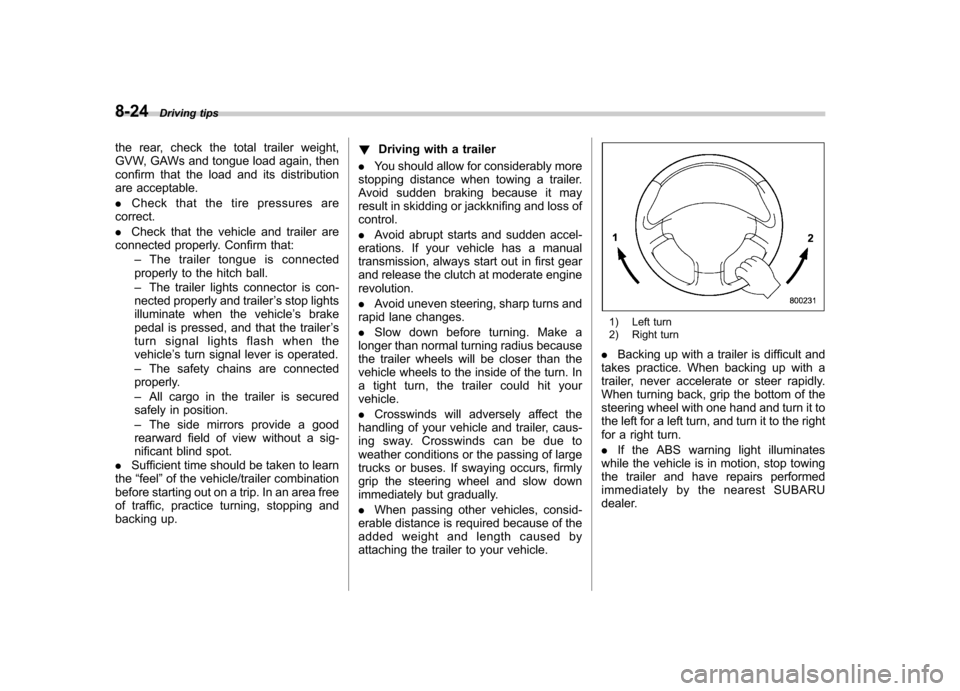
1) Left turn
2) Right turn
. Backing up with a trailer is difficult and
takes practice. When backing up with a
trailer, never accelerate or steer rapidly.
When turning back, grip the bottom of the
steering wheel with one hand and turn it to
the left for a left turn, and turn it to the right
for a right turn. . If the ABS warning light illuminates
while the vehicle is in motion, stop towing
the trailer and have repairs performed
immediately by the nearest SUBARU
dealer.
Page 382 of 436

corresponding fuse. If a fuse has blown,
replace it.
1. Turn the ignition switch to the“LOCK ”
position and turn off all electrical acces- sories.
2. Remove the cover.
3. Determine which fuse may be blown.
Look at the back side of each fuse box
cover and refer to “Fuses and circuits ”
F 12-11.
4. Pull out the fuse with the fuse puller.
5. Inspect the fuse. If it has blown,
replace it with a spare fuse of the samerating.
6. If the same fuse blows again, this
indicates that its system has a problem.
Contact your SUBARU dealer for repairs. Installation of accessories
Always consult your SUBARU dealer
before installing fog lights or any other
electrical equipment in your vehicle. Such
accessories may cause the electronic
system to malfunction if they are incor-
rectly installed or if they are not suited for
the vehicle.
Replacing bulbs
WARNING
Bulbs may become very hot while
illuminated. Before replacing bulbs,
turn off the lights and wait until the
bulbs cool down. Otherwise, there is
a risk of burn injury.
CAUTION
Replace any bulb only with a new
bulb of the specified wattage. Using
a bulb of different wattage could
result in a fire. For the specified
wattage of each bulb, refer to “Bulb
chart ”F 12-15.
& Headlights (models with HID headlights)
WARNING
High-intensity-discharge (HID) bulbs
are used for the low beams of the
headlights. These HID bulbs use an
extremely high voltage. To avoid the
risk of an electric shock that could
result in serious injury, observe the Maintenance and service
11-45
– CONTINUED –
Page 405 of 436
12-16Specifications
Wattage Bulb No.
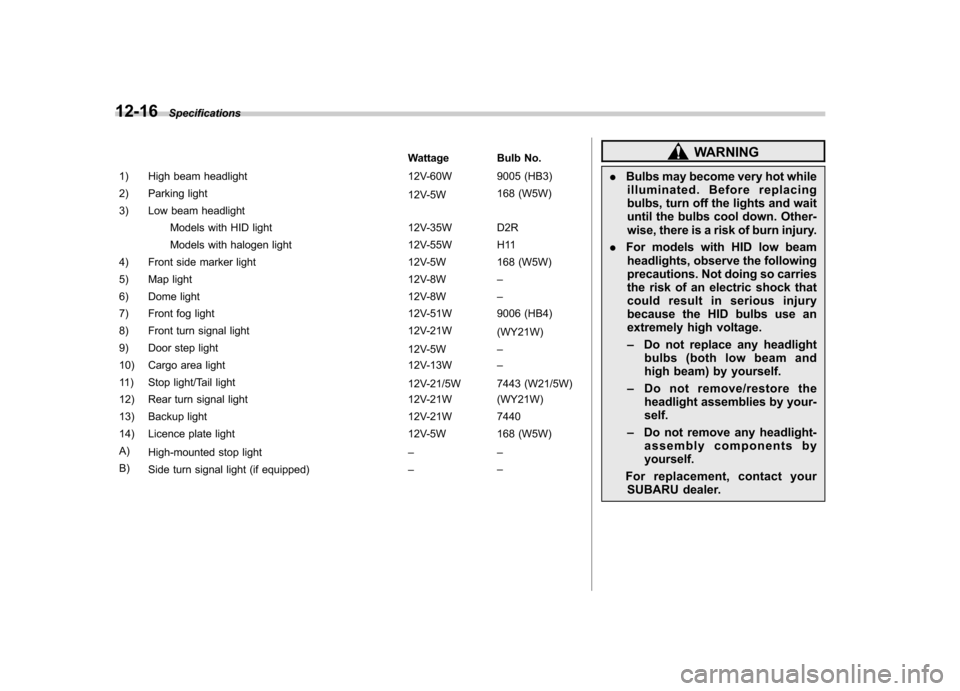
1) High beam headlight 12V-60W 9005 (HB3)
2) Parking light 12V-5W168 (W5W)
3) Low beam headlight
Models with HID light 12V-35W D2R
Models with halogen light 12V-55W H11
4) Front side marker light 12V-5W 168 (W5W)
5) Map light 12V-8W–
6) Dome light 12V-8W–
7) Front fog light 12V-51W 9006 (HB4)
8) Front turn signal light 12V-21W (WY21W)
9) Door step light 12V-5W–
10) Cargo area light 12V-13W–
11) Stop light/Tail light 12V-21/5W 7443 (W21/5W)
12) Rear turn signal light 12V-21W (WY21W)
13) Backup light 12V-21W 7440
14) Licence plate light 12V-5W 168 (W5W)A) High-mounted stop light ––
B) Side turn signal light (if equipped) ––WARNING
. Bulbs may become very hot while
illuminated. Before replacing
bulbs, turn off the lights and wait
until the bulbs cool down. Other-
wise, there is a risk of burn injury.
. For models with HID low beam
headlights, observe the following
precautions. Not doing so carries
the risk of an electric shock that
could result in serious injury
because the HID bulbs use an
extremely high voltage. – Do not replace any headlight
bulbs (both low beam and
high beam) by yourself.
– Do not remove/restore the
headlight assemblies by your-self.
– Do not remove any headlight-
assembly components by yourself.
For replacement, contact your SUBARU dealer.
Page 429 of 436
14-6Index
Indicator light ......................................................... 3-25
HID headlights ...................................................... 1, 11-45
High beam indicator light ............................................ 3-24
High/low beam change (dimmer) .................................. 3-30
Hill start assist (MT models) ............................... 7-31, 11-27
Warning light ......................................................... 3-21
HomeLink
®................................................................ 3-38
Hook Cargo tie-down ...................................................... 6-15
Coat ..................................................................... 6-13
Shopping bag ........................................................ 6-13
Towing and tie-down ............................................... 9-14
Horn ......................................................................... 3-47
Hose and connections ............................................... 11-14
I
Ignition switch .............................................................. 3-3
Light ....................................................................... 3-5
Illuminated entry .......................................................... 2-9
Illumination brightness control ...................................... 3-31
Immobilizer. ................................................................. 2-3
Indicator light (security indicator light) ....................... 3-23
Indicator light
Coolant temperature low ......................................... 3-16
Cruise control ........................................................ 3-24
Cruise control set ................................................... 3-25
Front fog light ........................................................ 3-25
Headlight .............................................................. 3-25
High beam ............................................................ 3-24
Immobilizer. ........................................................... 3-23
Security ................................................................ 3-23 Select lever/Gear position
........................................ 3-24
SPORT mode ........................................................ 3-24
Turn signal ............................................................ 3-24
Vehicle Dynamics Control OFF ................................. 3-23
Vehicle Dynamics Control operation .. ........................ 3-22
Information display ...................................................... 3-26
Inside mirror .............................................................. 3-36
Interior lights ............................................................... 6-2
iPod
®operations ........................................................ 5-32
J
Jack and jack handle ................................................... 9-5
Jack-up point .............................................................. 9-6
Jump starting ............................................................. 9-10
K
Key............................................................................ 2-2 Number .................................................................. 2-2
Reminder chime ...................................................... 3-5
Replacement. .......................................................... 2-3
Keyless entry system ................................................... 2-7
L
Leather seat materials ................................................. 10-5
License plate light ..................................................... 11-49
Light Backup ............................................................... 11-48
Cargo area .................................................... 6-3, 11-50
Control switch ........................................................ 3-29
Daytime running ..................................................... 3-30
Dome ............................................................ 6-2, 11-50