2013 SUBARU FORESTER reset
[x] Cancel search: resetPage 224 of 436

forming either of the following procedures.–Press the talk switch
.
– Operate the “TUNE/TRACK/CH ”
dial.
3. After “SELECTED ”is displayed, you
can choose the following menus. . “DIAL ”to make a phone call
. “CHANGE NAME ”to change the name
(voice tag) . “SET SPD DIAL ”/“ SET SPEED DIAL ”
to set the speed dial. “DELETE ENTRY ”to delete the name
(voice tag) from the phonebook. “GO BACK ”to go back to the menu
mode
NOTE . After “LIST NAMES ”is selected, if
the OFF hook switch
is pushed, the
selected number is called. . After “LIST NAMES ”is selected, if
no operation is performed, the mem-
ories are displayed and voice tags are
spoken. After all memories/voice tags
are displayed/spoken, “END OF LIST ”
is displayed and the mode changes tothe “PHONE BOOK ”menu mode.
! Changing voice tag
1. Select the “CHANGE NAME ”menu.
2. Select the phone number by perform- ing either of the following procedures.
–Operate the “TUNE/TRACK/CH ”
dial. – Press the talk switch
and say
the voice tag.
3. Select the “CONFIRM ”menu (only
after saying the voice tag). Then the
selected phone number/name is dis-played.
4. Press the talk switch
.
5. Say the new voice tag.
6. Select the “CONFIRM ”menu. Then
“ CHANGED ”is displayed.
! Set speed dial
1. Select the “SET SPD DIAL ”/“ SET
SPEED DIAL ”menu.
2. Select the phone number by perform-
ing either of the following procedures. –Operate the “TUNE/TRACK/CH ”
dial. – Press the talk switch
and say
the voice tag.
3. Select the “CONFIRM ”menu (only
after saying the voice tag).
4. Press the preset button (from
to) in which you want to register the
phone number. !
Deleting the phonebook data
1. Select the “DELETE ENTRY ”menu.
2. Select the phone number by perform-
ing either of the following procedures. –Operate the “TUNE/TRACK/CH ”
dial. – Press the talk switch
and say
the voice tag.
3. Select the “CONFIRM ”menu. Then
“ DELETED ”is displayed and the selected
phonebook data is deleted. ! Deleting the speed dial
1. Select the “DEL SPD DIAL ”/“ DELETE
SPEED DIAL ”menu.
2. Press the preset button (from
to) in which you want to delete the
speed dial.
3. Select the “CONFIRM ”menu. Then
“ DELETED ”is displayed and the selected
speed dial is deleted. ! Deleting the redial data
1. Select the “REDIAL ”menu.
2. Select the phone number by operating the “TUNE/TRACK/CH ”dial.
3. Select the “DELETE ”menu.
4. Select the “CONFIRM ”menu. Then
“ DELETED ”is displayed and the selected
redial data is deleted. Audio
5-51
– CONTINUED –
Page 225 of 436

5-52Audio
! Deleting the callback data
1. Select the “CALLBACK ”menu.
2. Select the phone number by operating the “TUNE/TRACK/CH ”dial.
3. Select the “DELETE ”menu.
4. Select the “CONFIRM ”menu. Then
“ DELETED ”is displayed and the selected
callback data is deleted. ! Making a phone call
! Making a phone call by saying name
1. Select the top menu (phone menu).
2. Press the talk switch
.
3. Say “DIAL BY NAME ”.
4. Press the talk switch
again.
5. Say the desired name (voice tag) to be called.
6. Select the “DIAL ”menu.
! Making a phone call by saying number
1. Select the top menu (phone menu).
2. Press the talk switch
.
3. Say “DIAL BY NUMBER ”.
4. Press the talk switch
again.
5. Say the desired phone number to be called.
6. Select the “DIAL ”menu. !
Making a phone call from speed dial
It is possible to select a phone number
from speed dial registered with the in-
vehicle equipment to make a phone call.
1. Select the top menu (phone menu).
2. Press the preset button (from
to) in which the desired number is
registered.
3. Press the OFF hook switch
.
NOTE
When a preset button for which num-
bers are not registered is pressed, an
error message is indicated on the audioscreen. ! Redial
1. Select the “REDIAL ”menu.
2. Press the OFF hook switch
.
3. Select the desired number by turning the “TUNE/TRACK/CH ”dial.
4. Perform either of the following proce-dures. –Press the OFF hook switch
.
– Press the “TUNE/TRACK/CH ”dial,
then select the “DIAL ”menu.
! Callback
1. Select the “CALL BACK ”menu.
2. Press the OFF hook switch
. 3. Select the desired number by turning the
“TUNE/TRACK/CH ”dial.
4. Perform either of the following proce-dures. –Press the OFF hook switch
.
– Press the “TUNE/TRACK/CH ”dial,
then select the “DIAL ”menu.
! Making a phone call from list name
It is possible to select a phone number
from the list name registered with the in-
vehicle equipment to make a phone call.
For details, refer to “List names function ”
F 5-50.
! Top redial
1. Select the top menu (phone menu).
2. Press the OFF hook switch
and
load the outgoing call history.
3. Select the “DIAL ”menu.
! Taking a phone call and declining
an incoming call
To take a phone call: Press the OFF
hook switch
.
To put an incoming call on hold: Press
the ON hook switch
briefly.
To decline an incoming call: Press and
hold the ON hook switch
for more
than 1.5 seconds.
Page 257 of 436

7-6Starting and operating
State emission testing (U.S. only)
WARNING
Testing of an All-Wheel Drive model
must NEVER be performed on a
single two-wheel dynamometer. At-
tempting to do so will result in
uncontrolled vehicle movement and
may cause an accident or injuries to
persons nearby.
CAUTION
. At state inspection time, remem-
ber to tell your inspection or
service station in advance not to
place your SUBARU AWD vehicle
on a two-wheel dynamometer.
Otherwise, serious transmission
damage will result.
. Resultant vehicle damage due to
improper testing is not covered
under the SUBARU Limited War-
ranty and is the responsibility of
the state inspection program or
its contractors or licensees.
California and a number of federal states
have Inspection/Maintenance programs to inspect your vehicle
’s emission control
system. If your vehicle does not pass this
test, some states may deny renewal of
your vehicle ’s registration.
Your vehicle is equipped with a computer
that monitors the performance of the engine ’s emission control system. Certi-
fied emission inspectors will inspect the
On-Board Diagnostic (OBDII) system as
part of the state emission inspection
process. The OBDII system is designed
to detect engine and transmission pro-
blems that might cause the vehicle emis-
sions to exceed allowable limits. OBDII
inspections apply to all 1996 model year
and newer passenger cars and trucks.
Over 30 states plus the District of Colum-
bia have implemented emission inspec-
tion of the OBDII system. . The inspection of the OBDII system
consists of a visual operational check of the “CHECK ENGINE ”warning light/mal-
function indicator light (MIL) and an
examination of the OBDII system with an
electronic scan tool. . A vehicle
passes the OBDII system
inspection if proper operation of the “ CHECK ENGINE ”warning light is ob-
served, there are no stored diagnostic
trouble codes, and the OBDII readiness
monitors are all complete. .
A vehicle
fails the OBDII inspection if
the “CHECK ENGINE ”warning light is not
properly operating (light is illuminated or is
not working due to a burned out bulb) or
there is one or more diagnostic trouble
codes stored in the vehicle ’s computer.
. A state emission inspection may reject
(not pass or fail) a vehicle if the number of
OBDII system readiness monitors “NOT
READY ”is greater than one. If the
vehicle ’s battery has been recently re-
placed or disconnected, the OBDII system
inspection may indicate that the vehicle is
not ready for the emission test. Under this
condition, the vehicle driver should be
instructed to drive his/her vehicle for a few
days to reset the readiness monitors and
return for an emission re-inspection. . Owners of rejected or failing vehicles
should contact their SUBARU Dealer for service.
Some states still use dynamometers in
their emission inspection program. A
dynamometer is a treadmill or roller-like
testing device that allows your vehicle ’s
wheels to turn while the vehicle remains in
one place. Prior to your vehicle being put
on a dynamometer, tell your emission
inspector
not to place your SUBARU
AWD vehicle on a two-wheel dynam-
ometer. Otherwise, serious transmis-
sion damage will result.
Page 279 of 436

7-28Starting and operating
The tire pressure monitoring system pro-
vides the driver with a warning message
by sending a signal from a sensor that is
installed in each wheel when tire pressure
is severely low.
The tire pressure monitoring system will
activate only when the vehicle is driven at
speeds above 20 mph (32 km/h). Also,
this system may not react immediately to a
sudden drop in tire pressure (for example,
a blow-out caused by running over a
sharp object).
WARNING
If the low tire pressure warning light
illuminates while driving, never
brake suddenly and keep driving
straight ahead while gradually redu-
cing speed. Then slowly pull off the
road to a safe place. Otherwise an
accident involving serious vehicle
damage and serious personal injury
could occur.
Check the pressure for all four tires
and adjust the pressure to the COLD
tire pressure shown on the tire
placard on the door pillar on thedriver ’s side.
Even when the vehicle is driven a
very short distance, the tires get
warm and their pressures increase accordingly. Be sure to let the tires
cool thoroughly before adjusting
their pressures to the standard
values shown on the tire placard.
Refer to
“Tires and wheels ”F 11-29.
The tire pressure monitoring system
does not function when the vehicle
is stationary. After adjusting the tire
pressures, increase the vehicle
speed to at least 20 mph (32 km/h)
to start the TPMS re-checking of the
tire inflation pressures. If the tire
pressures are now above the severe
low pressure threshold, the low tire
pressure warning light should turn
off a few minutes later.
If this light still illuminates while
driving after adjusting the tire pres-
sure, a tire may have significant
damage and a fast leak that causes
the tire to lose air rapidly. If you have
a flat tire, replace it with a spare tire
as soon as possible.
When a spare tire is mounted or a
wheel rim is replaced without the
original pressure sensor/transmitter
being transferred, the low tire pres-
sure warning light will illuminate
steadily after blinking for approxi-
mately 1 minute. This indicates the
TPMS is unable to monitor all four
road wheels. Contact your SUBARU dealer as soon as possible for tire
and sensor replacement and/or sys-
tem resetting.
Do not inject any tire liquid or
aerosol tire sealant into the tires,
as this may cause a malfunction of
the tire pressure sensors. If the light
illuminates steadily after blinking for
approximately 1 minute, promptly
contact a SUBARU dealer to have
the system inspected.CAUTION
. Do not place metal film or any
metal parts in the cargo room.
This may cause poor reception of
the signals from the tire pressure
sensors, and the tire pressure
monitoring system will not func-
tion properly.
. FCC WARNING
Changes or modifications not
expressly approved by the party
responsible for compliance
could void the user ’s authority
to operate the equipment.
Page 285 of 436

7-34Starting and operating
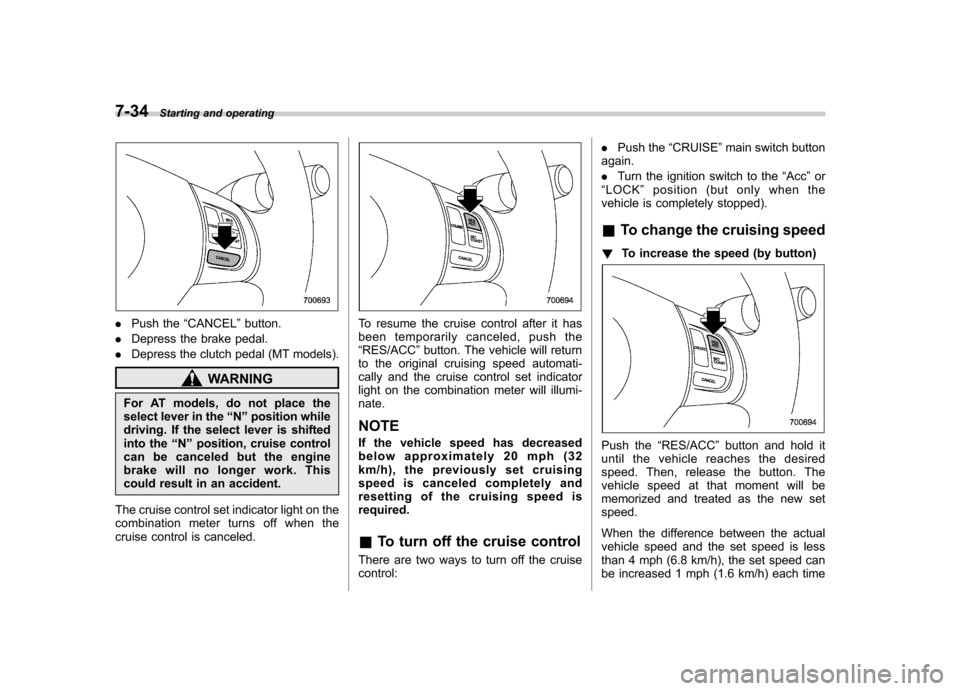
.Push the “CANCEL ”button.
. Depress the brake pedal.
. Depress the clutch pedal (MT models).
WARNING
For AT models, do not place the
select lever in the “N ” position while
driving. If the select lever is shifted
into the “N ” position, cruise control
can be canceled but the engine
brake will no longer work. This
could result in an accident.
The cruise control set indicator light on the
combination meter turns off when the
cruise control is canceled.
To resume the cruise control after it has
been temporarily canceled, push the“ RES/ACC ”button. The vehicle will return
to the original cruising speed automati-
cally and the cruise control set indicator
light on the combination meter will illumi-nate. NOTE
If the vehicle speed has decreased
below approximately 20 mph (32
km/h), the previously set cruising
speed is canceled completely and
resetting of the cruising speed isrequired. & To turn off the cruise control
There are two ways to turn off the cruise control: .
Push the “CRUISE ”main switch button
again. . Turn the ignition switch to the “Acc ”or
“ LOCK ”position (but only when the
vehicle is completely stopped). & To change the cruising speed
! To increase the speed (by button)
Push the “RES/ACC ”button and hold it
until the vehicle reaches the desired
speed. Then, release the button. The
vehicle speed at that moment will be
memorized and treated as the new setspeed.
When the difference between the actual
vehicle speed and the set speed is less
than 4 mph (6.8 km/h), the set speed can
be increased 1 mph (1.6 km/h) each time
Page 315 of 436

9-2In case of emergency
If you park your vehicle in
case of an emergency
The hazard warning flasher should be
used during the daytime and nighttime to
warn other drivers when you have to park
your vehicle under emergency conditions.
Avoid stopping on the road. It is best to
safely pull off the road if a problem occurs.
The hazard warning flasher can be acti-
vated regardless of the ignition switchposition.
Turn on the hazard warning flasher by
pushing the hazard warning flasher
switch. Turn it off by pushing the switch again. NOTE
When the hazard warning flasher is on,
the turn signals do not work.
Temporary spare tire (if
equipped)
WARNING
When a spare tire is mounted or a
wheel rim is replaced without the
original pressure sensor/transmitter
being transferred, the low tire pres-
sure warning light will illuminate
steadily after blinking for approxi-
mately one minute. This indicates
the tire pressure monitoring system
(TPMS) is unable to monitor all four
road wheels. Contact your SUBARU
dealer as soon as possible for tire
and sensor replacement and/or sys-
tem resetting.
CAUTION
Never use any temporary spare tire
other than the original. Using other
sizes may result in severe mechan-
ical damage to the drive train of yourvehicle.
The temporary spare tire is smaller and
lighter than a conventional tire and is
designed for emergency use only. Re-
move the temporary spare tire and re-
Page 323 of 436

9-10In case of emergency
it with a spare tire as soon as possible.
When a spare tire is mounted or a
wheel rim is replaced without the
original pressure sensor/transmitter
being transferred, the low tire pres-
sure warning light will illuminate
steadily after blinking for approxi-
mately one minute. This indicates
the TPMS is unable to monitor all
four road wheels. Contact your
SUBARU dealer as soon as possible
for tire and sensor replacement and/
or system resetting.
Do not inject any tire liquid or
aerosol tire sealant into the tires,
as this may cause a malfunction of
the tire pressure sensors.
If the light illuminates steadily after
blinking for approximately one min-
ute, promptly contact a SUBARU
dealer to have the system inspected. Jump starting
WARNING
. Battery fluid is SULFURIC ACID.
Do not let it come in contact with
the eyes, skin, clothing or thevehicle.
If battery fluid gets on you,
thoroughly flush the exposed
area with water immediately. Get
medical help if the fluid has
entered your eyes.
If battery fluid is accidentally
swallowed, immediately drink a
large amount of milk or water,
and obtain immediate medicalhelp.
Keep everyone including chil-
dren away from the battery.
. The gas generated by a battery
explodes if a flame or spark is
brought near it. Do not smoke or
light a match while jump starting.
. Never attempt jump starting if the
discharged battery is frozen. It
could cause the battery to burst
or explode.
. Whenever working on or around
a battery, always wear suitable eye protectors, and remove metal
objects such as rings, bands or
other metal jewelry.
. Be sure the jumper cables and
clamps on them do not have
loose or missing insulation.
Do not jump start unless cables
in suitable condition are avail-able.
. A running engine can be danger-
ous. Keep your fingers, hands,
clothing, hair and tools away
from the cooling fan, belts and
any other moving engine parts.
Removing rings, watches and
ties is advisable.
. Jump starting is dangerous if it
done incorrectly. If you are un-
sure about the proper procedure
for jump starting, consult a com-
petent mechanic.
When your vehicle does not start due to a
run down (discharged) battery, the vehicle
may be jump started by connecting your
battery to another battery (called the
booster battery) with jumper cables.
Page 367 of 436

11-30Maintenance and service
the temperature in the garage and the
temperature outside. By way of example,
the following table shows the required tire
pressures that correspond to various out-
side temperatures when the temperature
in the garage is 60 8F (15.6 8C).
Example:
Tire size: P215/65R16 96H
Standard tire pressures:
Front: 30 psi (210 kPa, 2.1 kgf/cm
2)
Rear: 29 psi (200 kPa, 2.0 kgf/cm2)
Garage temperature: 60 8F (15.6 8C)
Outside
temperature Adjusted pressure
[psi (kPa, kgf/cm
2)]
Front Rear
30 8F( �18C) 33
(230, 2.3) 32
(220, 2.2)
10 8F( �12 8C) 35
(240, 2.4) 34
(235, 2.35)
� 10 8F( �23 8C) 37
(255, 2.55) 36
(250, 2.5)
Example:
Tire size: P225/55R17 95H
Standard tire pressures:
Front: 32 psi (220 kPa, 2.2 kgf/cm
2)
Rear: 30 psi (210 kPa, 2.1 kgf/cm2)
Garage temperature: 60 8F (15.6 8C) Outside
temperature Adjusted pressure
[psi (kPa, kgf/cm
2)]
Front Rear
30 8F( �18C) 35
(240, 2.4) 33
(230, 2.3)
10 8F( �12 8C) 37
(255, 2.55) 35
(240, 2.4)
� 10 8F( �23 8C) 39
(270, 2.7) 37
(255, 2.55)
If the low tire pressure warning light
illuminates when you drive the vehicle in
cold outside air after adjusting the tire
pressures in a warm garage, re-adjust the
tire pressures using the method described
above. Then, increase the vehicle speed
to at least 20 mph (32 km/h) and check to
see that the low tire pressure warning light
turns off a few minutes later. If the low tire
pressure warning light does not turn off,
the tire pressure monitoring system may
not be functioning normally. In this event,
go to a SUBARU dealer to have the
system inspected as soon as possible.
While the vehicle is driven, friction be-
tween tires and the road surface causes
the tires to warm up. After illumination of
the low tire pressure warning light, any
increase in the tire pressures caused by
an increase in the outside air temperature
or by an increase in the temperature in the tires can cause the low tire pressure
warning light to turn off.
System resetting is necessary when the
wheels are changed (for example, a
switch to snow tires) and new TPMS
valves are installed on the newly fitted
wheels. Have this work performed by a
SUBARU dealer following wheel replace-ment.
It may not be possible to install TPMS
valves on certain wheels that are on the
market. Therefore, if you change the
wheels (for example, a switch to snow
tires), use wheels that have the same part
number as the standard-equipment
wheels. Without four operational TPMS
valve/sensors on the wheels, the TPMS
will not fully function and the warning light
in the instrument panel will illuminate
steadily after blinking for approximately
one minute.
When a tire is replaced, adjustments are
necessary to ensure continued normal
operation of the tire pressure monitoring
system. As with wheel replacement, there-
fore, you should have the work performed
by a SUBARU dealer.