Page 395 of 751
04-12
2) Speedometer Gauge
The speedometer indicates the vehicle speed by calculating the signals from the rear left and rear right
wheel speed sensors through ABS or ESP unit. (For the vehicle without ABS or ESP, the signals are
received from the EMS)
If the speedometer gauge vibrates, stops at a certain range or makes an abnormal noise, there could be
defectives in speedometer. However, these symptoms also could be occured when the tire has
uneven wear, different tire inflation pressures or different tire specifications.
Perform the speedometer test regarding the tolerance as described. However, it is not similar simple
work in field due to lack of measuring conditions such as test equipment and preciseness.
Check the allowable tolerance of the speedometer and operations of the trip odometer by using
a tester.
Check if the speedometer pointer is shaking and the abnormal noise sounds.
Eliminate the hysteresis by tapping the speedometer. 1.
2.
3.
Page 545 of 751
08-8
5. TROUBLESHOOTING
Problem Cause Action
Vehicle rollingBroken stabilizer bar Replace
Faulty shock absorber Replace
Abnormal noise.Loosening mounting Retighten
Damaged or worn wheel bearing Replace
Damaged shock absorber Replace
Damaged tire Replace
Poor ridingOver inflated tire Adjust pressure
Faulty shock absorber Replace
Loosened wheel nut Tighten as specified torque
Bent or broken coil spring Replace
Damaged tire Replace
Worn bushing Replace
Vehicle pulls to one sideDeformed arm assembly Replace
Worn bushing Replace
Bent or broken coil spring Replace
Hard steeringExcessive resistance of lower arm ball
jointReplace
Insufficient tire pressure Replace
Faulty power steering Replace
Unstable steering
Worn or loosened lower arm bushing Retighten or replace
Vehicle bottoming
Worn or broken coil spring Replace
Vehicle height loweredOver loaded on the vehicle -
Defective shock absorber Replace
Defective coil spring Replace
Page 645 of 751

12-16
The difference between both sides should be
within 0.6 kg.Park the vehicle on a paved and flat ground
and place the front wheels at straight ahead
direction.
Start the engine and let it run around 1,000
rpm.
Install the spring scale on the circumference o
f
the steering wheel and measure the steering
effort in both directions. 1.
2.
3. Steering Effort Check ▶
Steering Angle Check ▶
Place the front wheel on a turning radius
measuring tool.
Turn the steering wheel to the its both ends
and measure the maximum steering angle. 1.
2.
If the steering angle is out of the specified
value, check and adjust the toe-in.
Steering angleInner36.2˚
Outer32.4˚
Free Play Check ▶
Start the engine and place the wheels at
straight ahead direction.
Turn the steering wheel until the tires starts to
move and measure the distance on the
circumference of the steering wheel. 1.
2.
If the free play is out of the specified value,
check the free play in steering column shaft
connection and steering linkage. Replace or
repair if necessary.
Free play30 mm
Steering effort in
standstill2.2 kgf
Page 664 of 751
14-34170-09
1. SPECIFICATIONS
2. MAJOR CHANGES
Wheel assembly
16-inches silver 18-inches silver 18-inches hyper silver
PN: 41730-32000 PN: 41730-32200 PN: 41730-32300
- Added 18-inches hyper silver to wheel assembly
- Wheel offset and tire size are identical with existing specifications
Existing specifications New specifications
Description Specification
Tire 16 inch 225/75R 16
18 inch 255/60R 18
Tire inflation pressure Front: 32 psi
Rear: 32 psi (44 psi: when the vehicle is fully laden
with luggage)
Wheel 16 inch 6.5J x 16
18 inch 7.5J x 18
Balance weight 16 inch Inner: Attachment type
Outer: Clip type
18 inch Inner: Attachment type
Outer: Attachment type
Tightening torquse of wheel bolt 127.4 ~ 156.8 Nm
Page 666 of 751
14-54170-09
Symptom Possible Cause
Wear at tread edge
Insufficient tire inflation pressure
or overload
Wear at tread center
Excessive tire inflation pressure
Excessive wear in the outer side of the
tread than in the inner side
Excessive camber or deflection of
knuckle arm
Excessive wear in the inner side of the
tread than in the outer side
Insufficient camber or deflection o
f
knuckle arm
1) Appearance Check
4. INSPECTION
InsideOutside
Inside
Outside
InsideOutside
Inside
Outside
Page 669 of 751
14-8
Measure the dial runout and lateral runout
on both the inboard and outboard rim
flanges. - Tire inflation pressure -
Check the tire inflation pressure by
inspecting the tread width. -
Specified value 2.66 mm
Wheel runout
If wheel runout or tire runout is excessive, it
could result in abnormal wear of the tire.
Measure the runout with a dial gauge. 4.
Measure free radial runout on the tire tread. -
Specified value 2.03 mm
If any measurement exceeds the above
specifications, replace the applicable tires
or wheels -Tire inflation pressure 3.
Specified value 32 psi
Maintaining the specified tire ressure is
essential for comfortable riding, driving
safety, and long tire life. Incorrect inflation
pressures will increase tire wear and will
impair safety, vehicle handling, comfortable
driving and fuel economy. Always make sure
that the tire inflation pressure is correct.
Proper
inflationProper
inflationOver
inflation
Tread width Tread width Tread width
Page 672 of 751

14-114170-09
1. OVERVIEW
A radial tire uses a cord angle of 90 degrees. That is, the cord material runs in a radial or direct line from
one bead to the other across the tread. In addition, a radial tire has a belt overwrap under the tread
surface to provide greater structural stability. The belt overwrap of a radial tire distortion while the radial
structure enables high speed driving.
Tire supports the weight of the vehicle, reduces the impact from the road and at the same time, transmits
<009b008f008c004700970096009e008c00990047009b009600470097009900960097008c0093005300470089009900880092008c004700880095008b0047009a009b008c008c00990047009600950047009b008f008c0047009900960088008b0055004700
70009b004700880093009a00960047008d009c0095008a009b>ions to maintain a vehicle’s
movement. In order to complete such tasks, a tire must be structured to be a resilient vessel of air.
There is wear limit mark on the tire, which protrudes as a strip shape located approximately 1.6 mm from
the groove bottom. This wear limit mark is not seen from the outside so there is additional "▲"
mark on the shoulder to let the driver find the wear mark easily. To measure the tire groove depth,
measure at any point other than the point which has a wear limit mark.
The tire is worn unevenly according to the driver's driving habit, improper servicing, low tire inflation
pressure, changed tire location, etc.
Page 674 of 751

14-134170-09
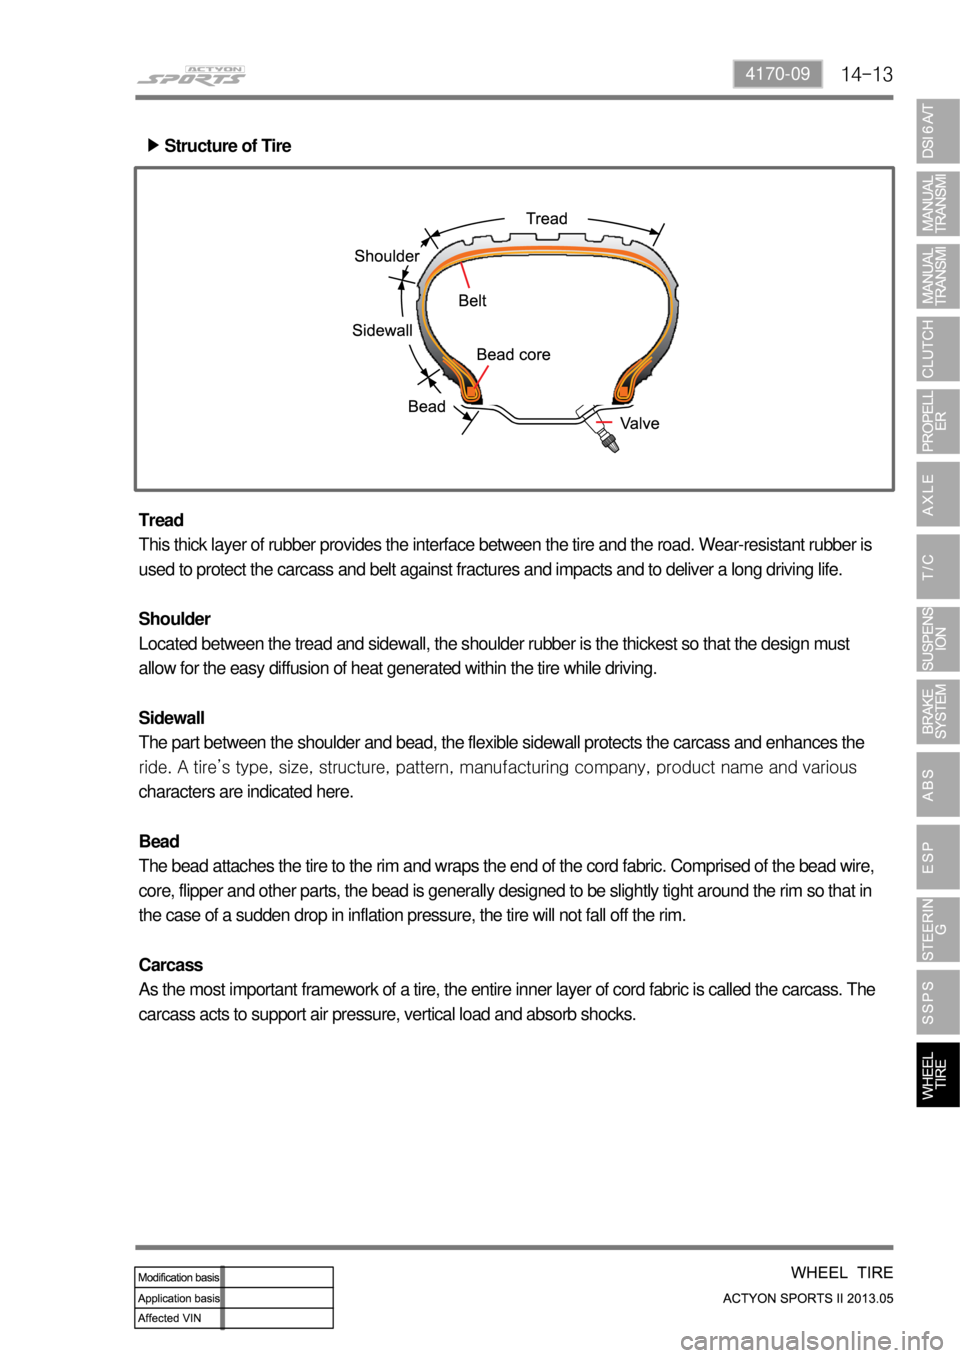
Structure of Tire ▶
Tread
This thick layer of rubber provides the interface between the tire and the road. Wear-resistant rubber is
used to protect the carcass and belt against fractures and impacts and to deliver a long driving life.
Shoulder
Located between the tread and sidewall, the shoulder rubber is the thickest so that the design must
allow for the easy diffusion of heat generated within the tire while driving.
Sidewall
The part between the shoulder and bead, the flexible sidewall protects the carcass and enhances the
<00990090008b008c0055004700680047009b00900099008c02c5009a0047009b00a00097008c00530047009a009000a1008c00530047009a009b0099009c008a009b009c0099008c0053004700970088009b009b008c009900950053004700940088009500
9c008d0088008a009b009c009900900095008e0047008a0096>mpany, product name and various
characters are indicated here.
Bead
The bead attaches the tire to the rim and wraps the end of the cord fabric. Comprised of the bead wire,
core, flipper and other parts, the bead is generally designed to be slightly tight around the rim so that in
the case of a sudden drop in inflation pressure, the tire will not fall off the rim.
Carcass
As the most important framework of a tire, the entire inner layer of cord fabric is called the carcass. The
carcass acts to support air pressure, vertical load and absorb shocks.